SideKing ST8LPRO-7.4VDXD-GN
SideKing 2 Gallon Battery Powered Sprayer User Manual
Model: ST8LPRO-7.4VDXD-GN
Introduction
This manual provides essential information for the safe and efficient operation, maintenance, and troubleshooting of your SideKing 2 Gallon Battery Powered Sprayer. Please read this manual thoroughly before initial use to ensure proper handling and to maximize the lifespan of your product.

Figure 1: SideKing 2 Gallon Battery Powered Sprayer, showcasing its main components and included nozzles.
Key Features
- 3-Level Adjustable Spray Intensity: Easily switch between low, medium, and high pressure settings for diverse applications, from gentle misting to powerful jet streams.
- Integrated Water-Resistant Design: Features a seamless one-piece handle and a self-sealing, coverless USB-C port for enhanced durability and protection against moisture and rust.
- Effortless Battery-Powered Operation: Eliminates manual pumping, offering 2-3 hours of continuous spraying on a full charge. Includes a real-time battery indicator for convenient monitoring.
- Versatile Spray Modes: Comes with 4 adjustable nozzles (fine mist, direct spray, fan mist) and a telescopic wand extendable from 8.66" to 23.6" for optimal reach.
- User-Friendly Design: Equipped with two wide openings for easy filling and mixing, a translucent tank for quick liquid level checks, and simple disassembly for cleaning.
- Durable Construction: Manufactured from high-density polyethylene (HDPE) and ABS materials, ensuring long-lasting performance for both indoor and outdoor use.
Package Contents
Verify that all items are present and in good condition upon opening the package:
- SideKing 2 Gallon Battery Powered Sprayer Unit
- Rechargeable Handle with Integrated Battery
- Telescopic Wand (23.6" extended)
- 4 Interchangeable Nozzles (Fan, F-Type Dual, Cone, 6-Hole Pattern)
- Adjustable Shoulder Strap
- USB Charging Cable
- User Manual (this document)
Setup Instructions
- Charge the Battery: Before first use, fully charge the integrated battery in the handle using the provided USB charging cable. The battery indicator lights will show charging progress.
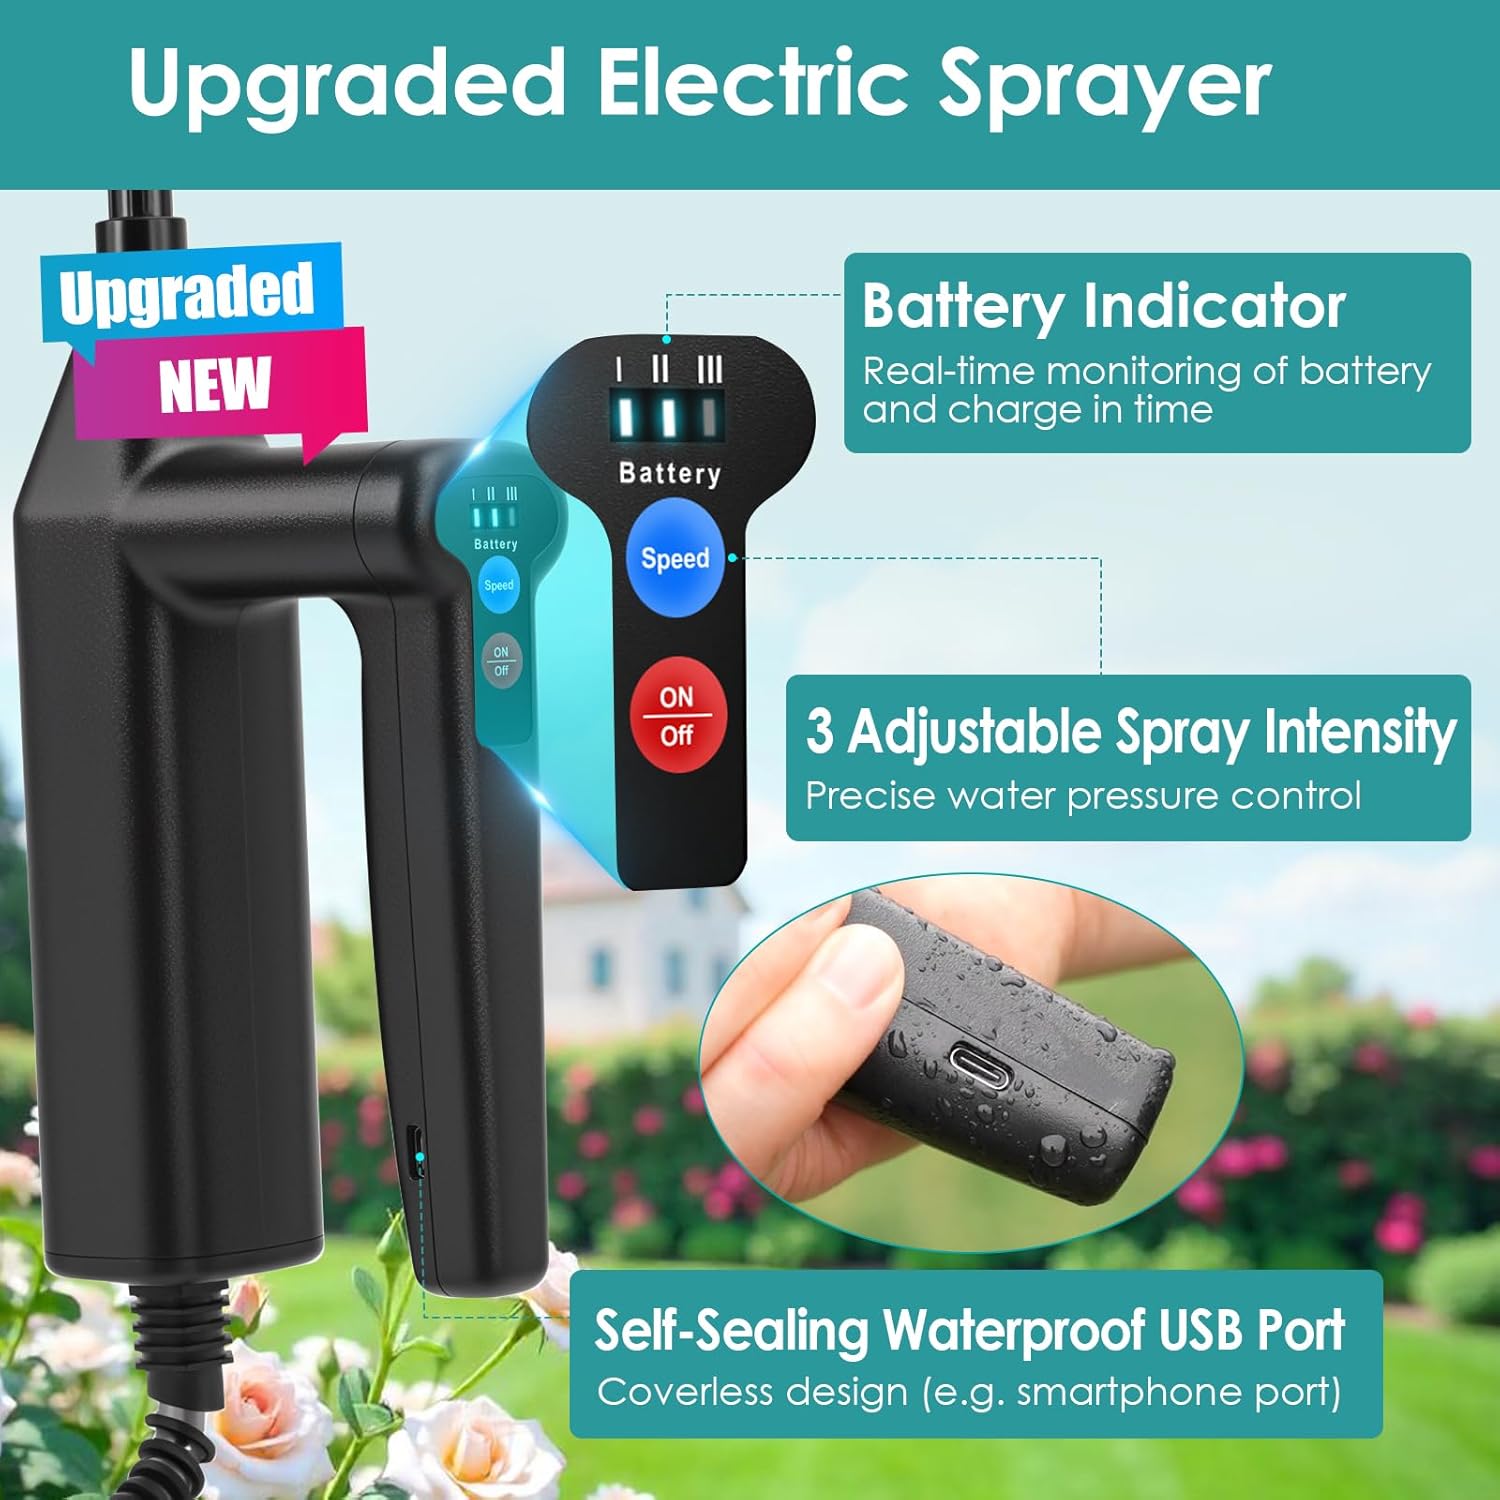
Figure 2: The sprayer handle features a battery indicator and a self-sealing waterproof USB port for charging.
- Attach the Hose: Connect the hose from the sprayer tank to the handle. Ensure a secure connection to prevent leaks. The coil spring near the handle connection helps prevent kinking.

Figure 3: The anti-kinking coil spring ensures durability and prevents hose damage during use.
- Assemble the Wand: Screw your desired nozzle onto the end of the telescopic wand. Then, attach the wand to the sprayer handle. The wand can be extended or retracted as needed for different spraying tasks.

Figure 4: Visual guide for assembling the nozzle, extension rod, and hose to the handle and tank.
- Attach Shoulder Strap: Securely attach the adjustable shoulder strap to the designated loops on the sprayer tank for comfortable carrying during use.

Figure 5: The adjustable shoulder strap provides comfort and ease of transport.
- Fill the Tank: Unscrew the main cap and the smaller cap to access the two wide mouth openings. Pour your desired liquid (water, weed killer, fertilizer, etc.) into the tank. The translucent tank allows for easy monitoring of liquid levels.

Figure 6: The two wide mouth openings simplify filling and mixing liquids without spills.
Operating Instructions
- Power On: Press the "ON" button on the handle to activate the sprayer. The battery indicator lights will illuminate.

Figure 7: The control panel on the handle allows for easy power and speed adjustments.
- Adjust Spray Intensity: Press the "Speed" button on the handle to cycle through the three spray intensity levels: Low, Medium, and High. Select the appropriate intensity for your task.

Figure 8: Choose from three adjustable spray forces to suit various applications.
- Select Nozzle Type: Twist the installed nozzle to adjust the spray pattern, or replace it with one of the other 4 included nozzles to achieve different spray types (e.g., fine mist, direct stream, fan spray).

Figure 9: The sprayer includes four distinct nozzles for versatile spraying options.
- Begin Spraying: Aim the wand at the target area and press the trigger on the handle to begin spraying. Release the trigger to stop.

Figure 10: The electric sprayer is ideal for various lawn and garden tasks, including weed and pest control.
- Extend/Retract Wand: To adjust the length of the telescopic wand, twist the locking mechanism, extend or retract to the desired length, and then twist to lock it in place.
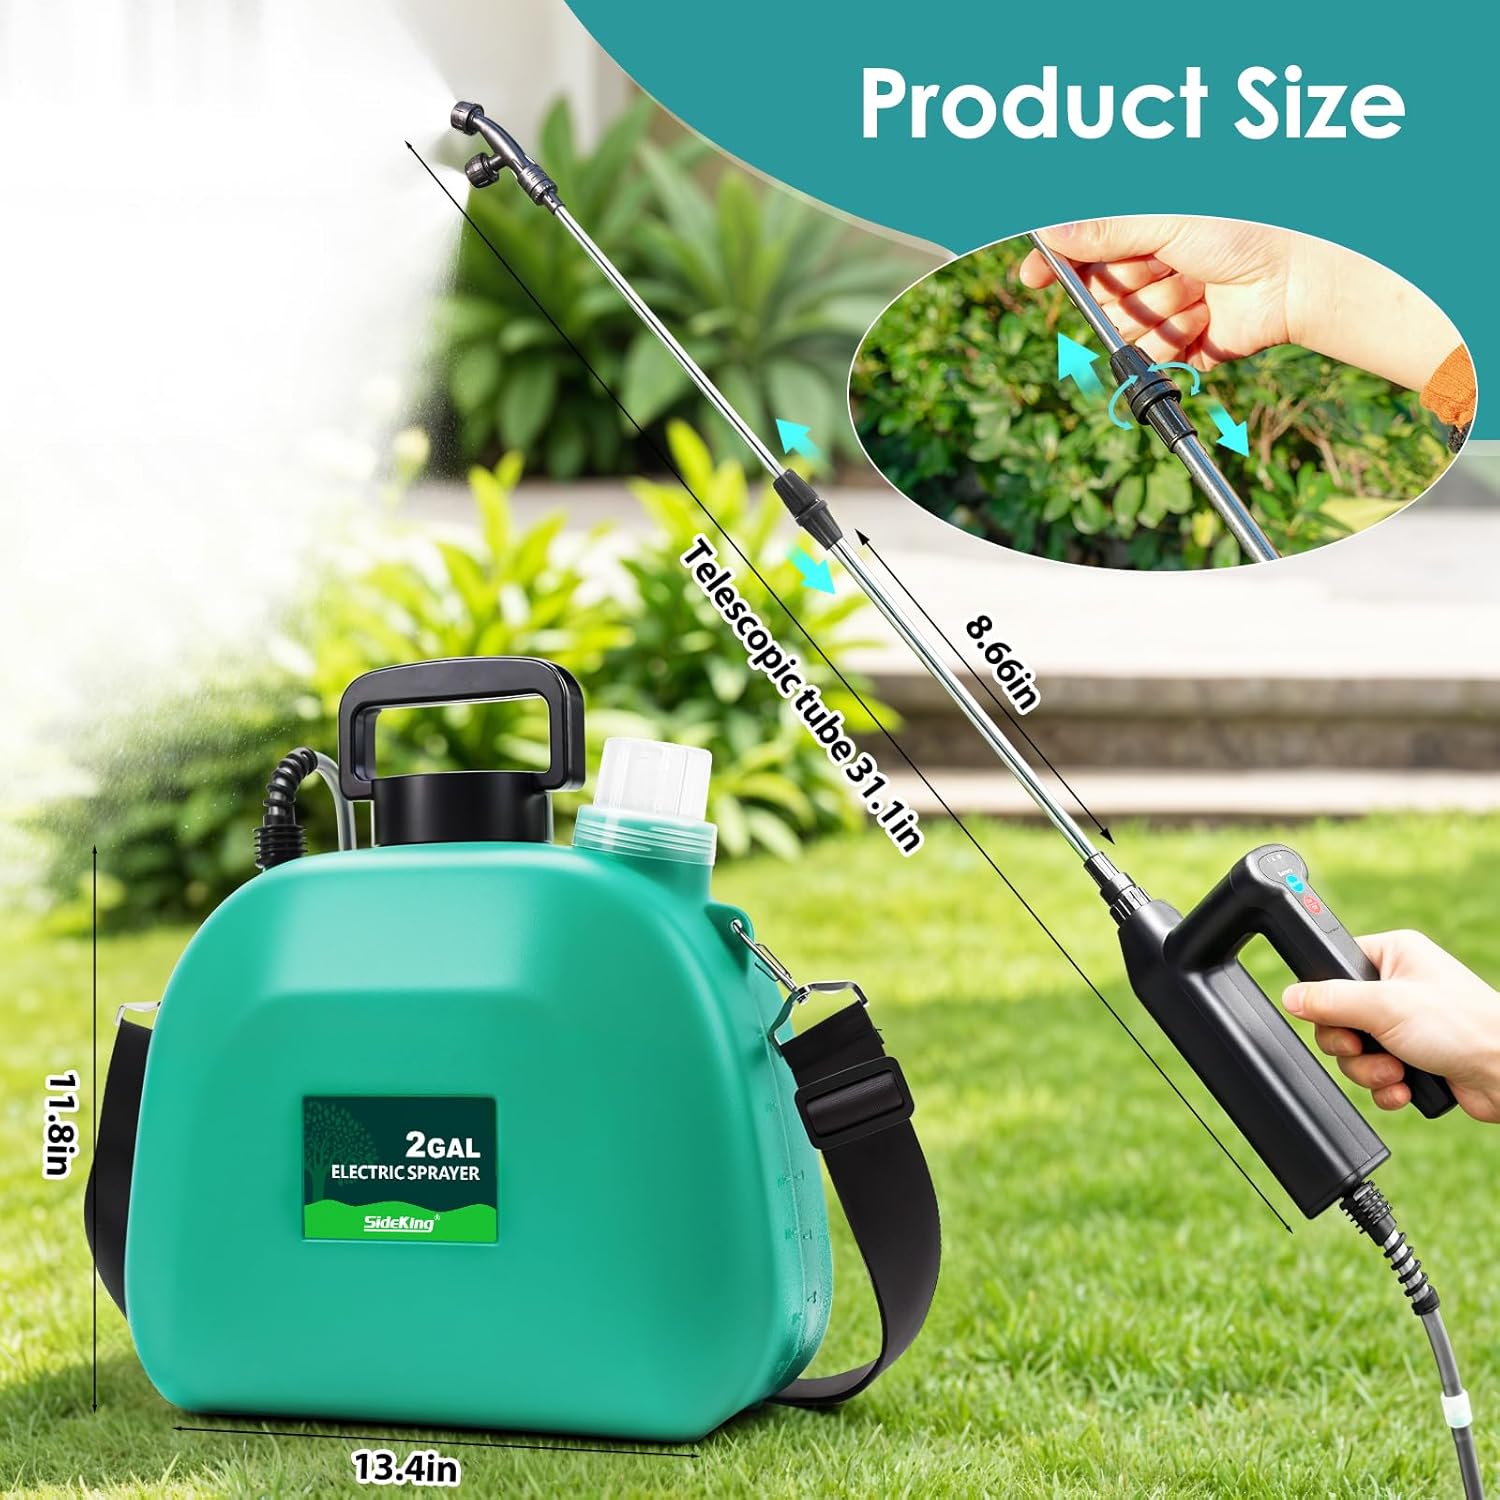
Figure 11: The telescopic wand extends for improved reach in various applications.
- Power Off: After use, press the "OFF" button on the handle.
Official Product Video
Video 1: SideKing Battery Powered Sprayer 2 Gallon - This video demonstrates the key features and ease of use of the sprayer, including filling, operation, and nozzle adjustments.
Maintenance
- Cleaning: After each use, especially when switching between different solutions (e.g., weed killer to fertilizer), rinse the tank thoroughly with clean water. Spray clean water through the wand and nozzle for a few seconds to clear any residue.
- Storage: Store the sprayer in a cool, dry place away from direct sunlight and freezing temperatures. Ensure the tank is empty and clean before storage.
- Battery Care: To prolong battery life, avoid completely draining the battery. Recharge it regularly, even if not in frequent use. Do not expose the battery or charging port to excessive moisture or extreme temperatures.
- Nozzle Maintenance: If nozzles become clogged, remove them and rinse under strong water pressure. A small brush or needle can be used to clear stubborn blockages.
Troubleshooting
| Problem | Possible Cause | Solution |
|---|---|---|
| Sprayer not turning on. | Battery is drained. | Charge the battery fully. |
| No spray or weak spray. |
|
|
| Leaking from connections. | Loose connections or damaged seals. | Tighten all connections. Inspect seals for damage and replace if necessary. |
| Inconsistent spray pattern. | Partially clogged nozzle or incorrect nozzle selection. | Clean the nozzle thoroughly. Ensure the correct nozzle is selected and properly adjusted. |
Specifications
- Brand: SideKing
- Model Name: ST8LPRO-7.4VDXD-GN
- Tank Volume: 2 Gallons (8 Liters)
- Power Source: Battery Powered (1 Lithium Ion battery included)
- Battery Voltage: 7.4V (Upgraded Motor)
- Working Time: Up to 2-3 hours continuous spraying
- Charging Time: Approximately 3 hours for full charge
- Material: High Density Polyethylene (HDPE), Plastic, Acrylonitrile Butadiene Styrene (ABS)
- Product Dimensions: 9.7"W x 11"H (Tank)
- Item Weight: 3.09 pounds
- Wand Length: Extends from 8.66" to 23.6"
- Included Components: 4 Nozzles, Shoulder Strap, USB Charging Cable
Warranty and Support
SideKing offers a 12-month warranty for this product, covering manufacturing defects and malfunctions under normal use. For any questions, technical assistance, or warranty claims, please contact our customer support team.
Customer Support: Available 24/7 to assist you with any inquiries or issues.
Please retain your proof of purchase for warranty validation.