Organizedlife Curved Design
Mirror Shoe Storage Cabinet with 5 Flip Drawers
Instruction Manual
Introduction
Thank you for choosing the Organizedlife Mirror Shoe Storage Cabinet. This manual provides detailed instructions for assembly, operation, maintenance, and troubleshooting to ensure safe and efficient use of your new cabinet. Please read all instructions carefully before beginning assembly and retain this manual for future reference.
Important Safety Information
WARNING: Failure to follow these safety instructions may result in injury or damage to the product.
- Always use the provided double anti-tipping device to securely mount the cabinet to the wall. This prevents the cabinet from tipping over, especially in households with children or pets.
- Exercise extreme caution when handling the glass mirror components during assembly. The mirror is made of real glass and can break, causing injury.
- Ensure all screws and fasteners are tightened securely before using the cabinet. Periodically check and re-tighten as necessary.
- Do not overload the drawers. Adhere to the recommended capacity to maintain stability and functionality.
- Keep small parts and packaging materials away from children.
- Assemble the cabinet on a soft, clean surface to prevent scratches and damage.

Image: Overview of cabinet features including safety elements like arc corners and the mirror drawer.
Parts List
Before assembly, verify that all components listed below are present and undamaged. If any parts are missing or damaged, please contact Organizedlife customer support.
- Cabinet Panels (Top, Bottom, Side, Back)
- Mirror Panels (for flip drawers)
- Flip Drawer Mechanisms and Dividers
- Supporting Legs
- Anti-Tipping Device Kit (brackets, screws, wall anchors)
- Assembly Hardware (screws, dowels, cam locks, etc.)
- Assembly Tools (Hex key/Allen wrench, screwdriver - typically included)

Image: Detail of a flip drawer, illustrating the internal structure and space for shoes.
Assembly Instructions
Tools Required (Not Included):
- Phillips Head Screwdriver
- Hammer (for dowels)
- Drill (for wall mounting anti-tipping device)
- Level
- Measuring Tape
Step-by-Step Assembly:
- Unpack and Identify Parts: Carefully remove all components from the packaging. Lay them out on a soft, clean surface to prevent scratches. Identify each part using the provided parts list and diagrams.
- Assemble the Main Cabinet Frame: Connect the side panels to the top and bottom panels using the designated hardware (e.g., cam locks and dowels). Ensure all connections are secure and the frame is square.
- Install Flip Drawer Mechanisms: Attach the flip drawer mechanisms to the interior of the cabinet frame according to the diagrams. Ensure they are aligned correctly for smooth operation.
- Attach Mirror Panels to Drawers: With extreme care, attach the mirror panels to the front of each flip drawer. Use the specified screws and ensure the mirrors are firmly secured. Refer to the safety warnings regarding glass handling.
- Insert Drawer Dividers: Place the internal dividers within each flip drawer to create compartments for shoes.
- Install Supporting Legs: Attach the supporting legs to the bottom of the cabinet. These provide additional stability.
- Mount Anti-Tipping Device: This step is critical for safety.
- Position the cabinet in its desired location against a solid wall.
- Mark the wall through the holes in the anti-tipping brackets located at the top rear of the cabinet.
- Drill pilot holes into the wall at the marked locations. Use appropriate wall anchors for your wall type (e.g., drywall, concrete).
- Securely fasten the anti-tipping brackets to the wall and to the cabinet using the provided screws. Ensure the cabinet is firmly anchored and cannot tip forward.

Image: The shoe cabinet in both closed (mirrored) and open (showing flip drawers) configurations.

Image: Detailed dimensions of the shoe cabinet for planning placement.

Image: Visual comparison of the cabinet in its closed, mirrored state versus its open, functional state.
Assembly Video Guide:
Video: A demonstration of the Organizedlife 5-Tier Mirror Shoe Cabinet, showcasing its design, features like rounded corners, ultra-thin profile, flip drawers for shoe storage, and the anti-tipping device for safety.
Operating Instructions
Using the Flip Drawers:
Each of the five drawers operates with a flip-down mechanism. Gently pull the top edge of a drawer outwards to open it. The drawer will pivot downwards, revealing the shoe compartments. To close, push the drawer upwards until it clicks securely into place, ensuring it is flush with the cabinet front.
- The cabinet is designed to store 15 to 20 pairs of shoes, accommodating men's shoes up to size 15 and all sizes for women's shoes.
- Place shoes with the toes pointing inwards for optimal space utilization and easy access.
Mirror Functionality:
The full-length mirrored front allows you to check your outfit and shoes before leaving. Ensure the cabinet is placed in a well-lit area for best mirror utility.
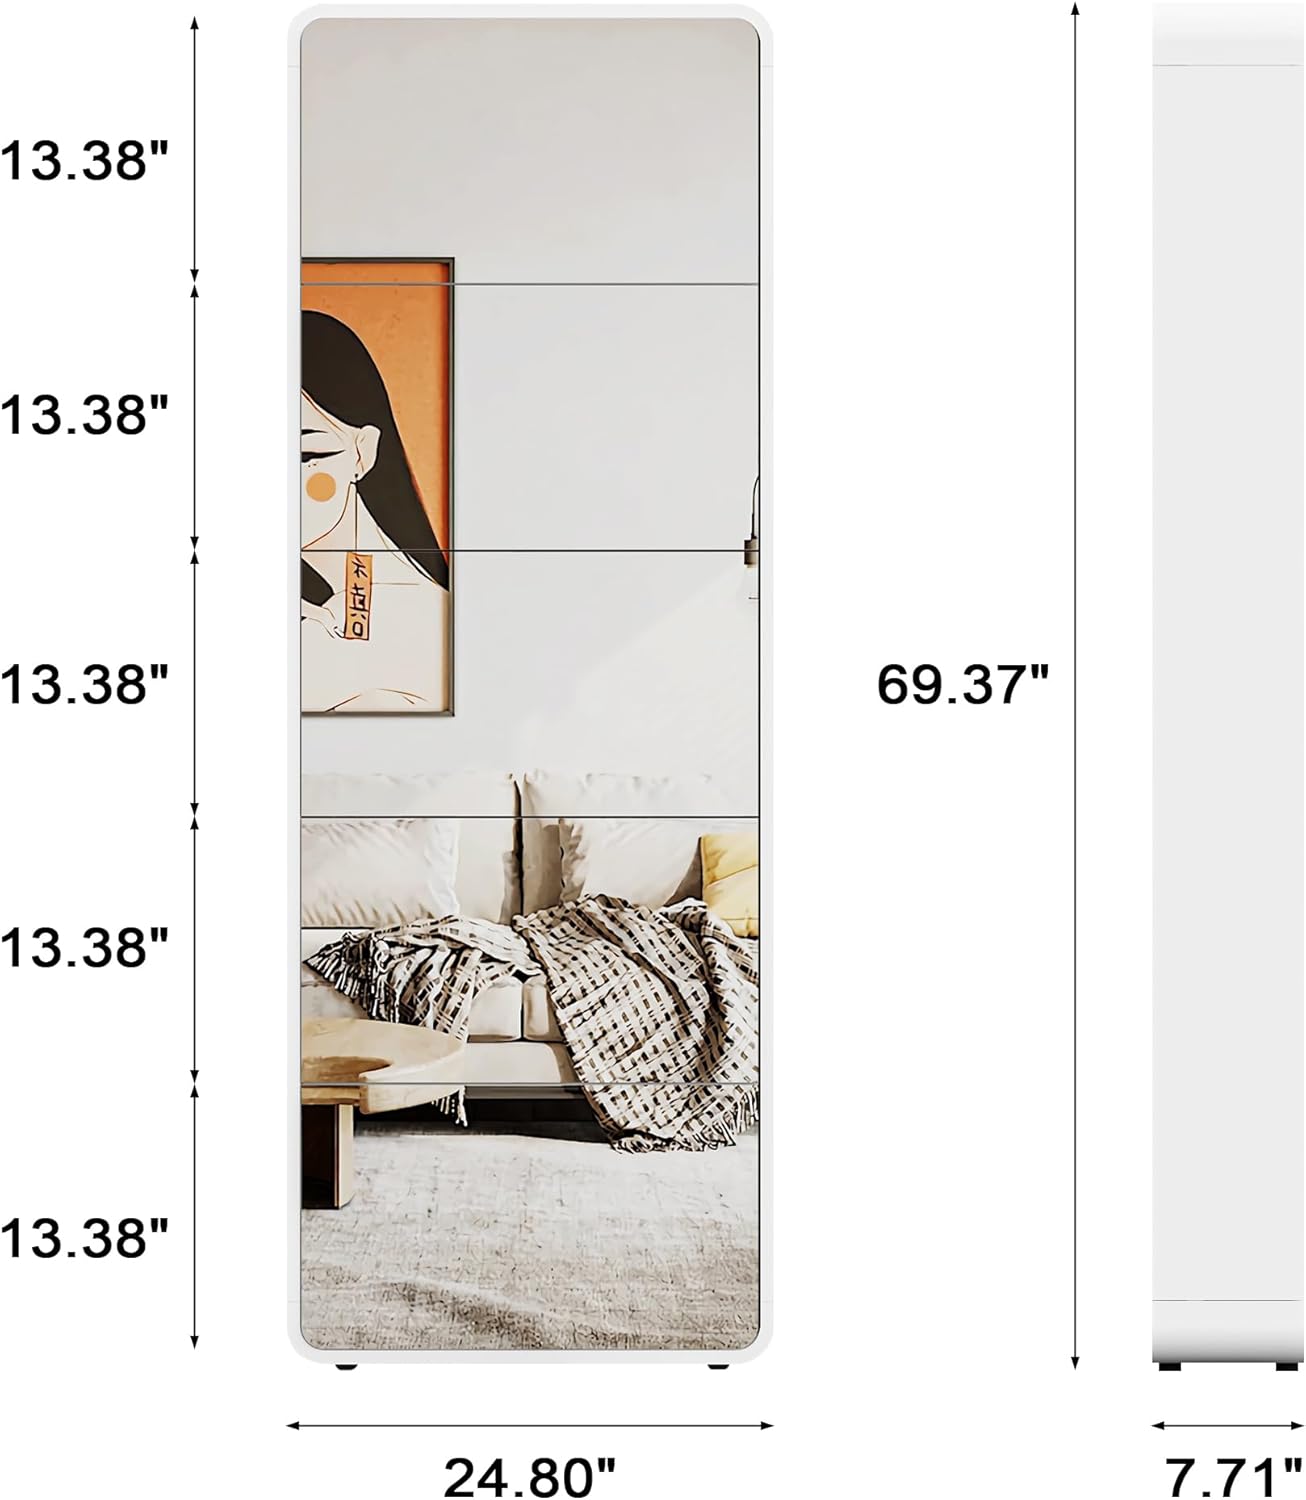
Image: The mirrored cabinet serving as a full-length mirror in an entryway.
Maintenance and Care
- Cleaning the Cabinet: Wipe the engineered wood surfaces with a soft, damp cloth. Avoid abrasive cleaners or harsh chemicals that could damage the finish.
- Cleaning the Mirror: Use a standard glass cleaner and a lint-free cloth to clean the mirror panels. Spray cleaner onto the cloth, not directly onto the mirror, to prevent liquid from seeping into edges.
- Regular Checks: Periodically inspect all screws and connections to ensure they remain tight. Re-tighten if necessary to maintain the cabinet's stability.
- Avoid Overloading: Do not exceed the recommended shoe capacity to prevent strain on the flip mechanisms and cabinet structure.
- Placement: Avoid placing the cabinet in direct sunlight or near heat sources, as this can cause material degradation over time.
Troubleshooting
This section addresses common issues you might encounter. If you experience problems not covered here, please contact customer support.
| Problem | Possible Cause | Solution |
|---|---|---|
| Drawers are difficult to open/close or do not close flush. |
|
|
| Cabinet feels unstable or wobbly. |
|
|
| Mirror appears distorted or has minor imperfections. |
|
|
Product Specifications
| Feature | Detail |
|---|---|
| Brand | Organizedlife |
| Model Number | Curved Design |
| Dimensions (H x W x D) | 69.37" x 24.8" x 7.71" |
| Weight | 95 Pounds |
| Material | Engineered Wood, Glass (Mirror) |
| Number of Drawers | 5 Flip Drawers |
| Shoe Capacity | 15-20 pairs (Men's up to size 15, Women's all sizes) |
| Mounting Type | Wall Mount (with anti-tipping device) |
| Assembly Required | Yes |
Warranty and Customer Support
Organizedlife is committed to providing high-quality products and customer satisfaction. For any questions, missing parts, or issues encountered during assembly or use, please contact our customer support team. If the mirror is accidentally damaged during installation, our customer service will assist with sending new mirrors.
Please refer to your purchase documentation or the Organizedlife website for specific warranty details and contact information.
Ask a question about this manual
Ask about setup, troubleshooting, compatibility, parts, safety, or missing instructions. Manuals+ will review the question and use this page’s manual context to help answer it.