1. Introduction
This manual provides essential information for the safe and efficient operation, maintenance, and troubleshooting of your AHM Mini Excavator, Model EXC-1501. Please read this manual thoroughly before operating the machine to ensure proper usage and to prevent injury or damage. Keep this manual in a safe place for future reference.
2. Safety Information
Operating heavy machinery requires strict adherence to safety protocols. Failure to follow these guidelines can result in serious injury or death.
- Read the Manual: Always read and understand the entire user manual before operating the excavator.
- Personal Protective Equipment (PPE): Wear appropriate PPE, including hard hat, safety glasses, hearing protection, safety boots, and gloves.
- Operator Training: Ensure all operators are properly trained and qualified to operate mini excavators.
- Site Inspection: Before starting work, inspect the work area for hazards such as uneven terrain, underground utilities, overhead power lines, and unstable ground.
- Machine Inspection: Perform a pre-operation inspection of the excavator, checking fluid levels, controls, tracks, and attachments for damage or malfunction.
- Maintain Clearances: Be aware of the machine's swing radius and maintain safe distances from bystanders, structures, and other equipment.
- Stable Operation: Operate on stable, level ground whenever possible. Avoid steep slopes or unstable surfaces.
- Engine Shutdown: Always shut down the engine, engage the parking brake, and relieve hydraulic pressure before leaving the operator's seat or performing maintenance.
- No Passengers: Never allow passengers on the excavator.
- Emergency Procedures: Know the location of emergency stops and understand emergency shutdown procedures.
3. Product Overview
The AHM Mini Excavator EXC-1501 is a compact and powerful machine designed for various tasks including excavation, lifting, landscaping, demolition, and material handling. It features a robust Kubota D722 engine and a compact design suitable for tight workspaces.
Key Features:
- Engine: 13.8 hp Kubota D722 engine for reliable power.
- Digging Force: 2698 lbf digging force with a 5.9 ft. digging depth.
- Compact Design: Maximum width of 3 feet for access to confined areas.
- Controls: Intuitive front joysticks for precise operation.
- Comfort: Adjustable seat and shielding canopy for operator comfort.
- Tracks: 48.5 inch all-terrain tracks for traction on diverse surfaces.
- Versatility: Compatible with a wide range of excavator attachments (hammer, log grapple, quick hitch, rake, bucket, auger).
Included Components:
The following items are included with your AHM Mini Excavator EXC-1501:
- 1x Mini Excavator
- 1x Canopy
- 1x Filter
- 4x Pipe Clamps
- 4x Grease Fittings
- 1x Hose Nozzle
- 1x Socket
- 1x Grease Gun
- 1x Hex Wrench
- 1x Socket Lever
- 1x Adjustable Wrench
- 4x Wrenches
- 1x Lubricating Grease
- 1x Tool Box
- 4x Adapters
- 1x User Manual (this document)
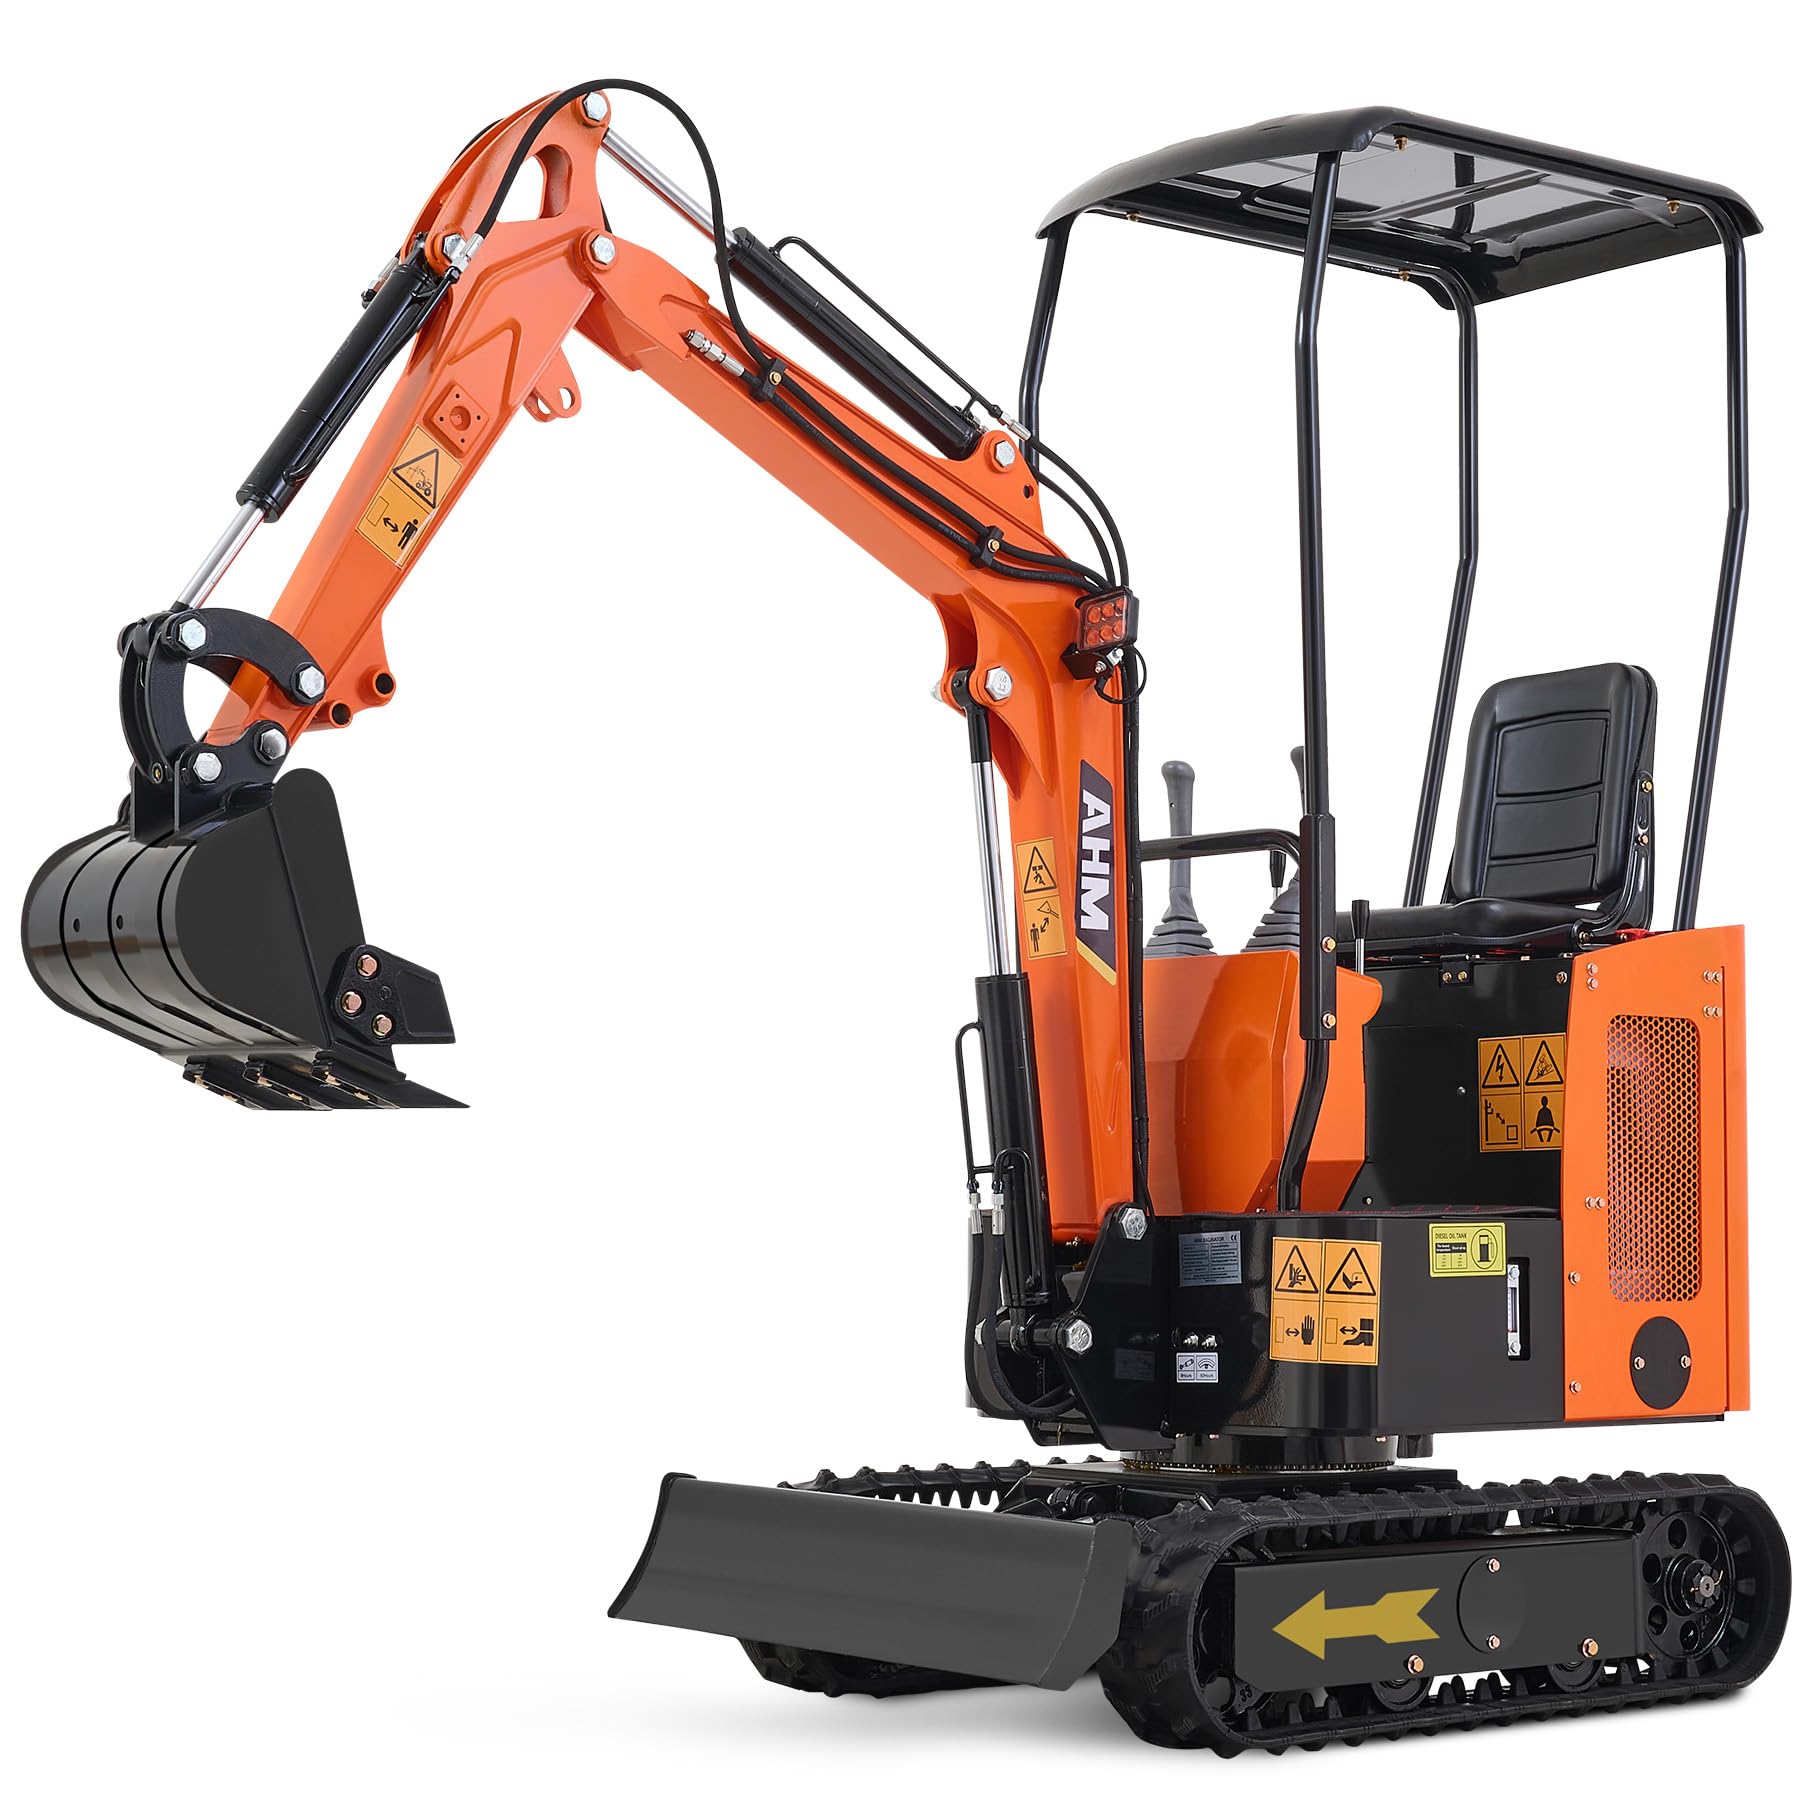
Figure 3.1: View of the AHM Mini Excavator's engine compartment, highlighting the Kubota D722 engine. This engine provides the necessary power for digging and other operations.

Figure 3.2: The excavator's upgraded boom, designed for deeper digging, and visible external hydraulic lines for improved cooling and easier maintenance.

Figure 3.3: The compact design of the AHM Mini Excavator, demonstrating its narrow 3-foot width, ideal for navigating tight spaces.
4. Setup
Upon delivery, your AHM Mini Excavator will require some initial setup before operation. Ensure the machine is on a stable, level surface during assembly and preparation.
- Unloading: Carefully unload the excavator from its transport vehicle using appropriate lifting equipment.
- Unpacking: Remove all packaging materials and inspect the machine for any signs of damage during transit. Report any damage immediately.
- Canopy Installation: Attach the rain canopy to the designated mounting points on the excavator frame. Secure all fasteners tightly.
- Battery Connection: Connect the battery terminals. Ensure the battery is fully charged before the first use. If the battery is not fully charged, charge it according to the battery manufacturer's instructions.
- Fluid Level Checks: Verify all fluid levels, including engine oil, hydraulic fluid, and coolant, are at the recommended marks. Refer to the maintenance section for specific fluid types and capacities.
- Greasing: Apply lubricating grease to all grease fittings using the provided grease gun.
- Control Familiarization: Sit in the operator's seat and familiarize yourself with the location and function of all controls, including joysticks, pedals, and switches.

Figure 4.1: The adjustable operator seat, designed for comfort during extended operation. Ensure the seat is adjusted to a comfortable and safe position before starting.

Figure 4.2: The protective rain canopy, providing shelter for the operator. Ensure it is securely fastened.
5. Operating Instructions
This section outlines the basic procedures for operating your AHM Mini Excavator. Always operate the machine with caution and attention to your surroundings.
5.1 Starting the Engine
- Ensure the parking brake is engaged and all controls are in the neutral position.
- Turn the ignition key to the "ON" position.
- If operating in cold weather, allow the glow plugs to warm up as indicated by the dashboard light.
- Turn the ignition key to the "START" position. Release the key once the engine starts. Do not crank for more than 10 seconds at a time.
- Allow the engine to warm up for a few minutes before beginning operation.
5.2 Control Operation
The excavator is controlled using intuitive front joysticks and foot pedals. Operate controls slowly and deliberately until you are familiar with their response.

Figure 5.1: The front joystick controls, providing precise and reliable operation for the boom, arm, bucket, and swing functions. Familiarize yourself with the control pattern before operating.
- Left Joystick: Typically controls the swing of the boom and the movement of the arm.
- Right Joystick: Typically controls the boom lift/lower and bucket curl/dump.
- Foot Pedals: Control track movement (forward/reverse) and auxiliary hydraulic functions (if equipped).
- Throttle: Adjust engine RPM for desired power and speed.
5.3 Moving the Excavator
Use the foot pedals to control the movement of the tracks. The excavator moves slowly, which enhances stability, especially on uneven ground.

Figure 5.2: The all-terrain tracks provide excellent traction across various challenging surfaces, including loose soil, rocky paths, and muddy areas.
- Ensure the area is clear of obstacles and personnel.
- Gradually engage the track pedals to move forward or backward.
- To turn, apply pressure to one pedal while releasing the other, or apply differential pressure.
- Always keep the boom and bucket low to the ground when moving to maintain stability.
5.4 Using Attachments
The AHM Mini Excavator is compatible with various attachments. Refer to the attachment's specific manual for installation and operation instructions.
- Ensure the excavator is turned off and hydraulic pressure is relieved before changing attachments.
- Use appropriate pins and safety clips to secure attachments.
- Always test the attachment's function at a low speed in a clear area before beginning work.
6. Maintenance
Regular maintenance is crucial for the longevity and safe operation of your AHM Mini Excavator. Always perform maintenance with the engine off and the machine on a stable surface.
6.1 Daily Checks (Before Operation)
- Check engine oil level.
- Check hydraulic fluid level.
- Check coolant level.
- Inspect tracks for damage or excessive wear.
- Check for any fluid leaks.
- Ensure all lights and safety devices are functional.
- Clean debris from the engine compartment and radiator.
6.2 Weekly / 50-Hour Maintenance
- Grease all pivot points and fittings (refer to machine diagram for locations).
- Check battery terminals for corrosion and ensure they are tight.
- Inspect hydraulic hoses and lines for wear or damage.
- Check track tension and adjust if necessary.
6.3 Monthly / 250-Hour Maintenance
- Change engine oil and oil filter.
- Inspect air filter and clean or replace if necessary.
- Check fuel filter and drain any water or sediment.
- Inspect fan belt tension and condition.
6.4 Annual / 500-Hour Maintenance
- Replace hydraulic fluid and filter.
- Replace fuel filter.
- Inspect and adjust valve clearances (refer to Kubota D722 engine manual).
- Flush and replace engine coolant.
7. Troubleshooting
This section provides solutions to common operational issues. For problems not listed here, or if solutions do not resolve the issue, contact AHM customer support.
| Problem | Possible Cause | Solution |
|---|---|---|
| Engine Fails to Start |
|
|
| Loss of Hydraulic Power |
|
|
| Tracks Not Moving / Slow Movement |
|
|
| Excessive Smoke from Exhaust |
|
|
8. Specifications
Detailed technical specifications for the AHM Mini Excavator EXC-1501.
| Specification | Value |
|---|---|
| Manufacturer | AHM |
| Model Number | EXC-1501 |
| Engine | Kubota D722, 13.8 hp |
| Product Dimensions (L x W x H) | 114.16 x 40.16 x 64.96 inches |
| Max. Digging Depth | 5.9 ft. (68.9 in. / 1750 mm) |
| Digging Force | 2698 lbf |
| Max. Dumping Height | 62.6 in. (1590 mm) |
| Max. Dozer Height | 12.6 in. (320 mm) |
| Max. Dozer Depth | 7.8 in. (200 mm) |
| Bucket Width | 15.7 in. (400 mm) |
| Bucket Volume | 0.9 ft³ (0.025 m³) |
| Max. Slope Grade | 30° |
| Max. Passenger Capacity | 264.5 lb. (120 kg) |
| Color | Orange |

Figure 8.1: Dimensional diagram illustrating the key measurements and operational capacities of the AHM Mini Excavator EXC-1501.
9. Warranty and Support
For warranty information, technical support, or service inquiries, please contact AHM customer service. Keep your purchase receipt and model number (EXC-1501) readily available when contacting support.
Manufacturer: AHM
Contact Information: Refer to the contact details provided on the AHM official website or your purchase documentation.
The product comes with a standard return policy of 30 days for refund or replacement, as per the purchase terms.