1. Introduction
This manual provides detailed instructions for the safe and efficient operation, maintenance, and troubleshooting of your VEVOR Meat Grinder and Slicer, Model JQ-90A-12. This versatile appliance is designed for commercial and home use, capable of grinding, slicing, shredding, dicing meat, and stuffing sausages.
Please read this manual thoroughly before operating the machine to ensure proper usage and to prevent injury or damage.

Figure 1.1: VEVOR Meat Grinder and Slicer, showcasing its multi-functionality with raw meat, ground meat, sliced meat, and sausage patties.
2. Safety Instructions
Always adhere to the following safety precautions to prevent electric shock, injury, or damage to the appliance.
- Ensure the power supply matches the voltage specified on the machine's rating label.
- Do not operate the machine with wet hands or in wet conditions.
- Keep hands, hair, loose clothing, and utensils away from moving parts during operation.
- Always use the provided meat pounding stick to push meat into the feeder. Never use fingers or other objects.
- Unplug the machine from the power outlet before cleaning, assembling, or disassembling parts.
- Do not immerse the motor unit in water or any other liquid.
- Keep the machine out of reach of children.
- Do not attempt to repair or modify the machine yourself. Contact qualified service personnel for assistance.
- Ensure the machine is placed on a stable, level surface during operation.
- Avoid processing bones, large tendons, or other hard, non-meat items, as this can damage the blades and motor.
3. Product Components
Familiarize yourself with the main components of your VEVOR Meat Grinder and Slicer:
- Main Unit: Houses the motor and control panel.
- Feeding Tray: Stainless steel tray for holding meat before processing.
- Grinder/Slicer Head: Detachable assembly containing the auger, blade, and cutting plate.
- Cross Blade (SUS420): Sharp blade for cutting meat.
- Cutting Plate (SUS430): Perforated plate for grinding or slicing.
- Sausage Stuffer Tube: Attachment for making sausages.
- Meat Pounding Stick: Tool for safely pushing meat into the feeder.

Figure 3.1: Key components including the SUS430 Cutting Plate and Sausage Stuffer Tube, demonstrating the machine's ability to grind, slice, shred, dice, and make sausages.

Figure 3.2: Detachable components of the meat grinder, including the feeding tray, auger, blade, and cutting plate, shown in water to illustrate ease of cleaning.
4. Setup
- Unpacking: Carefully remove all components from the packaging. Retain packaging for future storage or transport.
- Initial Cleaning: Before first use, wash all detachable parts (feeding tray, grinder head, auger, blade, cutting plate, sausage stuffer tube) with warm, soapy water. Rinse thoroughly and dry completely.
- Assembly:
- Attach the grinder/slicer head to the main unit, ensuring it is securely locked in place.
- Insert the auger into the grinder head.
- Place the cross blade onto the auger shaft, ensuring the sharp edges face outwards.
- Position the desired cutting plate over the blade.
- Secure the assembly with the locking ring, tightening it firmly but not excessively.
- Place the feeding tray onto the top of the grinder head.
- Placement: Position the assembled machine on a stable, flat, and dry surface, ensuring adequate ventilation around the motor.
- Power Connection: Plug the power cord into a grounded electrical outlet.
5. Operating Instructions
5.1 General Operation
- Prepare meat by cutting it into pieces that fit easily into the feeding tray opening. Remove any large bones or excessively tough connective tissue.
- Place a suitable collection bowl or container under the output of the grinder head.
- Turn on the machine using the power switch.
- Feed the meat into the opening using the meat pounding stick. Never use your hands.
- Allow the machine to process the meat. The powerful 700W copper motor operates at 180 RPM, capable of grinding up to 11 lbs per minute.
- For optimal performance and motor longevity, operate the machine for a maximum of 30 minutes, then allow it to rest for 10 minutes before resuming.
- Once processing is complete, turn off the machine and unplug it from the power outlet.

Figure 5.1: Illustration of the powerful 700W copper motor, highlighting its capability to process various types of meat including pork, chicken, frozen beef, and chicken cartilage.

Figure 5.2: Demonstration of the thickened sharp blade, capable of processing 11 lbs of meat in one minute, with a meat slice thickness of 3.5mm. Examples of output include minced meat, onion bits, chili, pet food, and chicken frames.
5.2 Sausage Stuffing
- After grinding your meat mixture for sausages, disassemble the cutting plate and cross blade from the grinder head.
- Attach the sausage stuffer tube to the grinder head.
- Carefully slide the sausage casing onto the stuffer tube, gathering it at the end.
- Feed the prepared sausage mixture into the feeding tray.
- Turn on the machine. The mixture will be pushed through the stuffer tube into the casing.
- Guide the casing as it fills, ensuring even distribution and avoiding air pockets.
- Once the casing is filled, turn off the machine and tie off the ends of the sausage.

Figure 5.3: The VEVOR Meat Grinder in action, demonstrating the sausage stuffing function with a long sausage being formed into coils on a plate.
6. Maintenance and Cleaning
Regular cleaning and maintenance are crucial for the longevity and hygienic operation of your meat grinder.
- Immediate Cleaning: Clean the machine immediately after each use to prevent meat residue from drying and hardening.
- Disassembly: Unplug the machine. Disassemble the feeding tray, grinder head, auger, blade, and cutting plate.
- Washing: Wash all detachable parts with warm, soapy water. Use a brush to remove any stubborn meat particles from the cutting plate holes and blade. The detachable design allows for efficient cleaning of meat scraps, grease, dust, and hair.
- Rinsing: Rinse all parts thoroughly with clean water to remove all soap residue.
- Drying: Dry all parts completely before reassembly or storage. Moisture can lead to rust, especially on metal components.
- Main Unit Cleaning: Wipe the main unit (motor housing) with a damp cloth. Never immerse the main unit in water.
- Storage: Store the clean and dry machine in a cool, dry place, away from direct sunlight and moisture.
7. Troubleshooting
Refer to the table below for common issues and their potential solutions.
| Problem | Possible Cause | Solution |
|---|---|---|
| Machine does not turn on. | Not plugged in; power switch off; power outage; motor overheating. | Check power cord connection; ensure switch is ON; check circuit breaker; allow motor to cool down for 10-15 minutes. |
| Meat is not grinding/slicing properly or machine jams. | Meat pieces too large; too much meat fed at once; dull blade; incorrect assembly of parts; presence of bones/hard objects. | Cut meat into smaller pieces; feed meat gradually; check blade sharpness and replace if necessary; reassemble parts correctly; ensure no bones or hard objects are present. |
| Unusual noise during operation. | Loose parts; foreign object inside; motor issue. | Turn off and unplug; check all assembled parts are tight; inspect for foreign objects and remove; if noise persists, contact customer support. |
| Difficulty cleaning. | Meat residue dried on parts. | Clean immediately after use; soak parts in warm, soapy water before scrubbing. |
If the problem persists after attempting these solutions, please contact VEVOR customer support.
8. Specifications
| Feature | Detail |
|---|---|
| Model Number | JQ-90A-12 |
| Rated Power | 700W |
| Grinding Speed | 180 RPM |
| Meat Grinding Capacity | Up to 11 lbs/min |
| Blade Thickness | 3.5 mm (for slicing) |
| Material | Thick Stainless Steel (body, auger, tray), SUS420 (cross blade), SUS430 (cutting plate) |
| Net Weight | 73.4 lbs (33.3 kg) |
| Product Dimensions (L x W x H) | 15.55 x 16.93 x 15.35 inches (395 x 430 x 390 mm) |
| Accessories Included | Instruction Manual, 1x SUS420 Cross Blade, 1x Sausage Stuffer Tube, 1x SUS430 Cutting Plate, 1x Meat Pounding Stick |
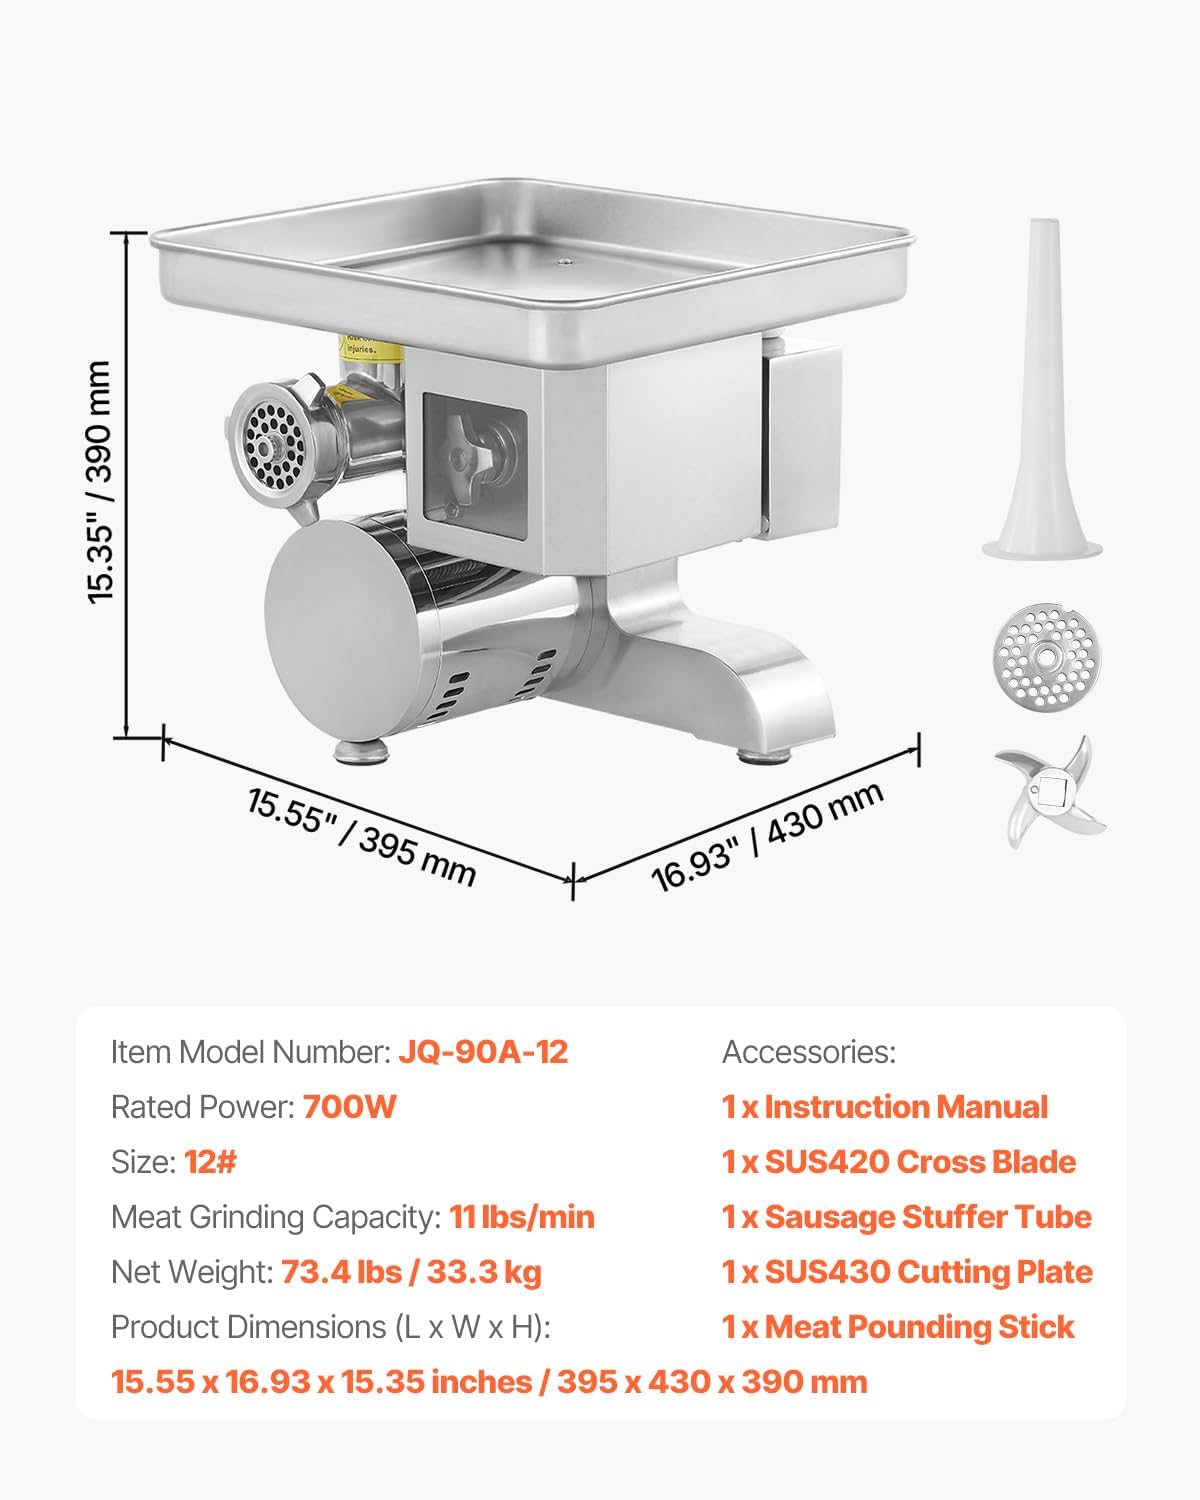
Figure 8.1: Detailed dimensions of the VEVOR Meat Grinder and a list of included accessories.
9. Warranty and Support
VEVOR products are designed for durability and performance. For any warranty claims, technical support, or service inquiries, please contact VEVOR customer support through their official website or the retailer where the product was purchased.
Please have your model number (JQ-90A-12) and purchase information ready when contacting support.