Introduction
This manual provides essential instructions for the proper use, care, and maintenance of your Ameda 19mm Breast Pump Flange Inserts. These inserts are designed to optimize your pumping experience by ensuring a comfortable and effective fit, which is crucial for maximizing milk expression. Please read this manual thoroughly before first use.
The Ameda 19mm Flange Inserts are compatible with Ameda's standard 25mm breast flanges and all Ameda GLO breast flanges, including those found with the MYA Joy, MYA Joy Plus, and Pearl Breast Pumps.
Important Safety Information
Always prioritize safety and hygiene when using breast pump accessories. Failure to follow these guidelines may result in contamination or injury.
- Inspect inserts before each use for any signs of damage, tears, or discoloration. Discard and replace if damaged.
- Wash and sanitize all parts that come into contact with breast milk before first use and after each subsequent use.
- Keep out of reach of children when not in use. Small parts can be a choking hazard.
- These flange inserts are made from soft, BPA and DEHP-free silicone, ensuring safety for you and your baby.

Image: A mother and baby, emphasizing the safety and quality features of Ameda products, including being BPA & DEHP free, made of soft silicone, and easy to clean.
Package Contents
Your Ameda 19mm Breast Pump Flange Insert package includes:
- Two (2) Ameda 19mm Silicone Flange Inserts
Flange Sizing Guide
Proper flange sizing is critical for comfort and effective milk expression. An incorrect size can lead to discomfort, nipple damage, and reduced milk output. The 19mm insert is designed for mothers whose nipple diameter requires this specific size.
How to Determine Your Nipple Size:
- Step 1: Measure Your Nipple Base: After a pumping session, use a ruler or measuring tape to measure the diameter of your nipple at its base (where it meets the areola) in millimeters. Do not include the areola in this measurement.
- Step 2: Select Flange Size: Choose a flange or insert size that is 1-3mm larger than your measured nipple diameter. For example, if your nipple measures 17mm, a 19mm insert would be appropriate.

Image: A diagram demonstrating how to accurately measure nipple diameter for proper flange sizing.

Image: A visual guide for nipple measurement and a coin comparison chart to assist in selecting the correct flange size.
Ameda offers a range of flange insert sizes to ensure a custom fit. The 19mm insert is one of several options available to help you find your perfect fit.
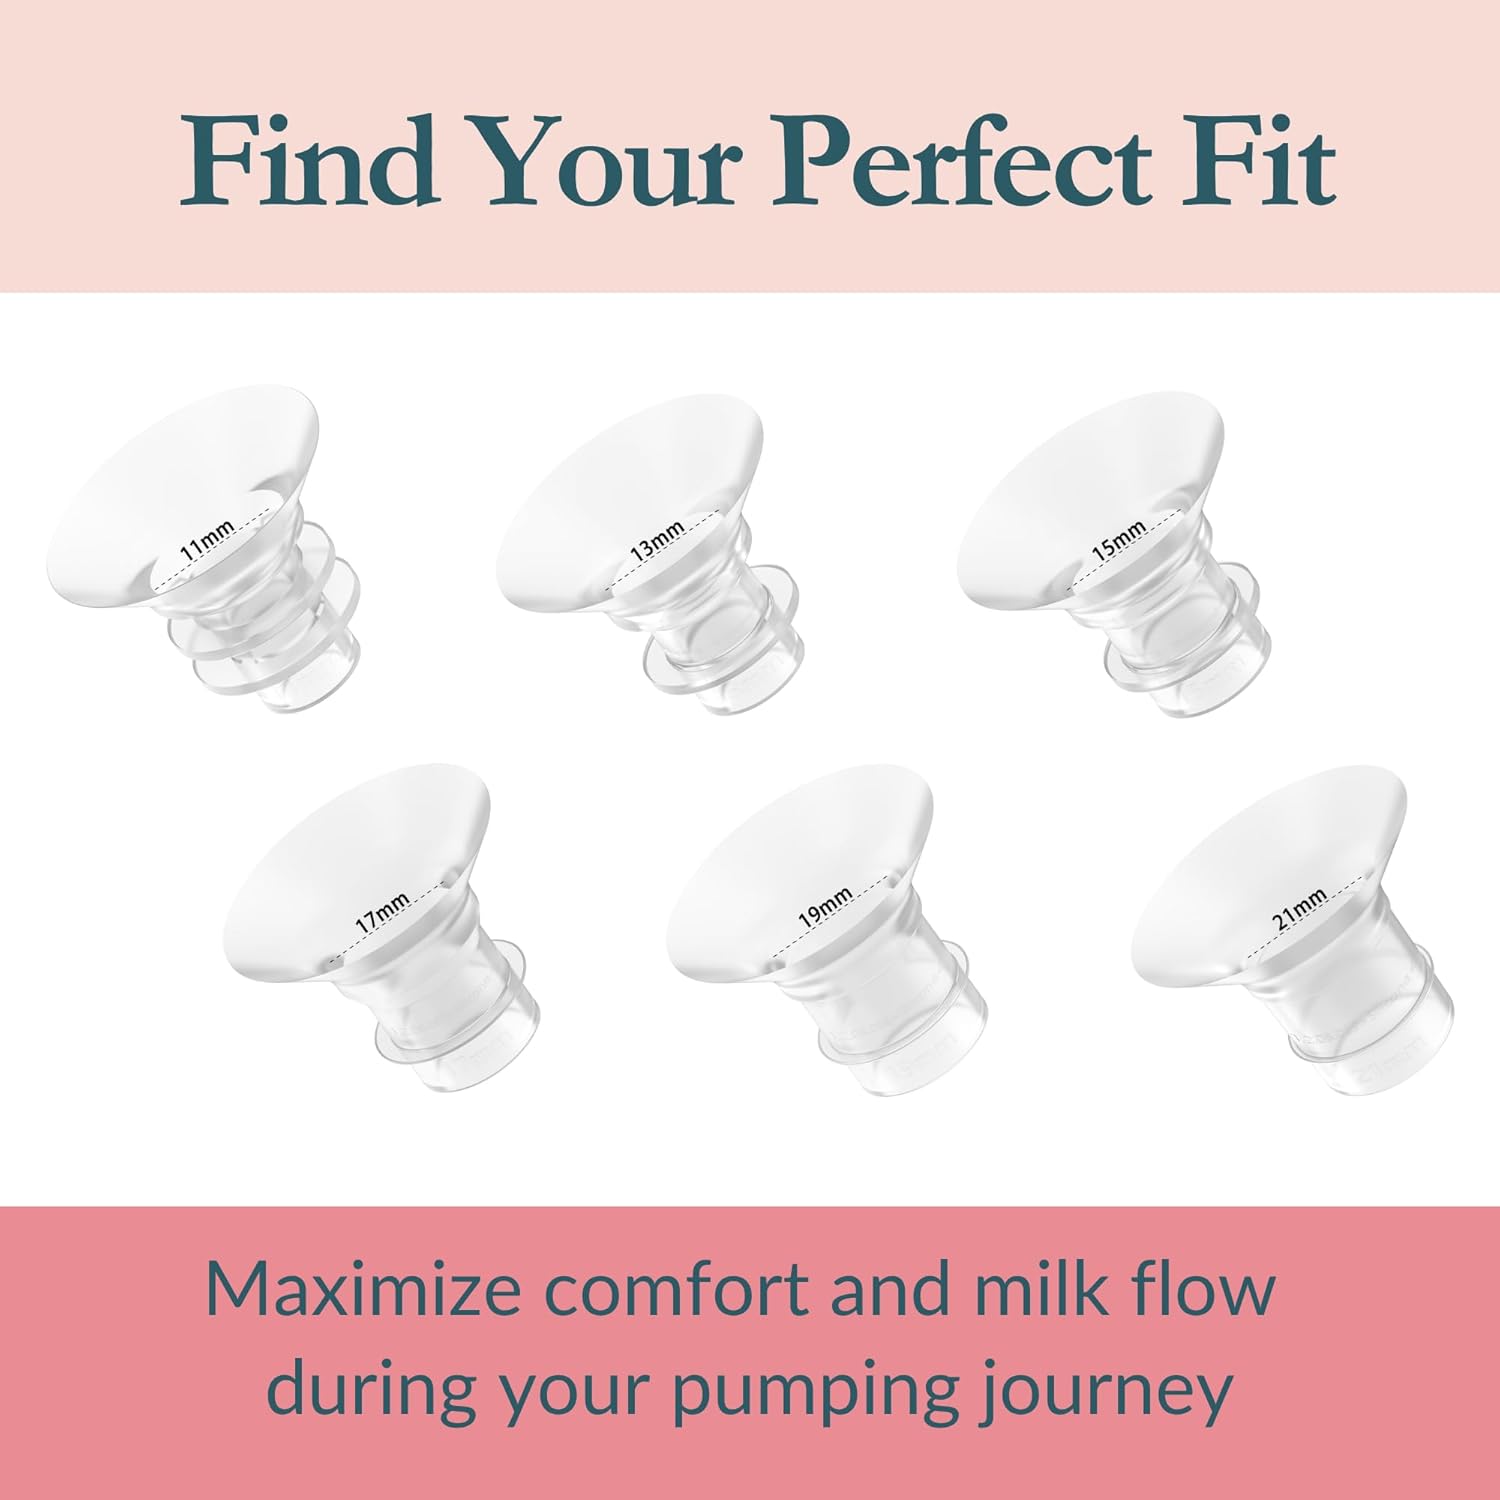
Image: A visual representation of various Ameda flange insert sizes, including 19mm, to help users find their ideal fit.
Setup and Assembly
The Ameda 19mm flange inserts are designed for easy integration with your existing Ameda breast pump system.
- Clean and Sanitize: Before first use and after each subsequent use, ensure the flange inserts are thoroughly cleaned and sanitized according to the "Cleaning and Maintenance" section.
- Insert into Flange: Gently push the 19mm silicone insert into the neck of your Ameda 25mm breast flange or Ameda GLO flange. Ensure it is seated snugly and evenly, creating a smooth tunnel for your nipple.
- Assemble Pump Kit: Attach the assembled flange with the insert to your breast pump collection bottle and connect to the pump tubing as per your specific Ameda breast pump's instructions.

Image: Hands demonstrating the insertion of a flange insert into a breast pump flange, highlighting its compatibility with Ameda 25mm and GLO flanges.

Image: A mother using an Ameda breast pump while holding her baby, demonstrating the product's compatibility and ease of use in a real-world setting.
Operating Instructions
Once the 19mm flange inserts are correctly assembled with your Ameda breast pump, you can begin your pumping session.
- Positioning: Center your nipple within the opening of the 19mm insert. Ensure that your nipple moves freely within the tunnel without excessive friction or rubbing against the sides.
- Comfort and Suction: Begin pumping at a low suction level and gradually increase it to a comfortable setting that allows for effective milk flow. You should feel a gentle tugging sensation, not pain.
- Observe Milk Flow: A proper fit helps maximize milk production. If you experience discomfort, reduced milk output, or notice your nipple rubbing, re-evaluate your flange size.

Image: Hands holding a breast pump flange with an insert, emphasizing the importance of a custom fit for maximizing milk production.
Cleaning and Maintenance
Proper cleaning and maintenance are essential for hygiene and extending the life of your flange inserts.
After Each Use:
- Disassemble: Carefully remove the silicone inserts from the breast flanges.
- Rinse: Rinse all parts that came into contact with breast milk under cool running water to remove milk residue.
- Wash: Wash parts in warm, soapy water using a mild dish soap. Use a soft brush if necessary to clean crevices.
- Rinse Thoroughly: Rinse all parts thoroughly under running water to remove all soap residue.
- Air Dry: Place parts on a clean paper towel or drying rack and allow them to air dry completely. Do not use a cloth towel, as it may transfer germs.
Sanitizing (Once Daily or as Recommended):
Sanitize parts by boiling them in water for 5-10 minutes or using a steam sterilizer designed for breast pump parts. Refer to your breast pump's manual for specific sanitization recommendations.

Image: Two clean Ameda flange inserts, highlighting their ease of cleaning, BPA/DEHP-free material, soft silicone, and hospital-grade quality.
Troubleshooting
If you encounter issues while using your Ameda 19mm flange inserts, consider the following:
- Discomfort or Pain During Pumping:
- Re-evaluate your nipple size using the "Flange Sizing Guide." The 19mm insert might be too small or too large.
- Ensure your nipple is centered in the tunnel and moves freely.
- Check for proper assembly of all pump parts.
- Reduce suction level if it's too high.
- Low Milk Output:
- Verify flange size. An ill-fitting flange can restrict milk flow.
- Ensure all pump parts are correctly assembled and sealed.
- Check pump suction strength and tubing for damage or kinks.
- Consider hydration and overall well-being.
- Inserts Not Staying in Place:
- Ensure the insert is fully seated and pushed firmly into the larger flange.
- Check for any damage or wear on the insert or flange that might prevent a secure fit.
If problems persist, contact Ameda Customer Support for further assistance.
Specifications
| Product Name: | Ameda Breast Pump Flange Insert |
| Model Number: | 120G13 |
| Size: | 19mm |
| Material: | Silicone (BPA & DEHP Free) |
| Quantity: | 2 Count |
| Compatibility: | Ameda 25mm Flanges, Ameda GLO, MYA Joy, MYA Joy Plus, Pearl Breast Pumps |

Image: A detailed view of the 19mm Ameda flange insert, highlighting its size.
Warranty and Support
Ameda products are designed with quality and durability in mind. For specific warranty information regarding your flange inserts or other Ameda products, please refer to the documentation included with your original breast pump or visit the official Ameda website.
For customer support, product inquiries, or assistance with troubleshooting, please contact Ameda's dedicated Parent Care team. Contact information can typically be found on the Ameda website or on your product packaging.
 Trusted by Hospitals, Loved by Moms.