ASOBRIS Model x6-b2
ASOBRIS Laser Level with Tripod Instruction Manual
Model: x6-b2
1. Product Overview
The ASOBRIS Model x6-b2 is an 82ft green cross line laser level designed for various indoor and outdoor construction and home renovation projects. It features advanced chip technology for enhanced brightness and offers both self-leveling and manual modes for versatile application. This tool is lightweight, portable, and built to withstand typical job site conditions.

Image 1.1: The ASOBRIS Laser Level, showing the main unit, included tripod, and two AA batteries.
2. Package Contents
Please verify that all items listed below are included in your package:
- 1 x Green Cross Line Laser Level
- 1 x Aluminum Compact Tripod (expandable up to 25.6 inches)
- 2 x AA Alkaline Batteries
- 2 x Instruction Manuals
3. Safety Information
WARNING: This is a Class II laser product with a maximum laser output of less than 1mW. Do not stare directly into the laser beam. Avoid direct eye exposure. Use caution when operating around others.
- Always operate the laser level in a safe environment, away from children and pets.
- Do not attempt to disassemble or modify the device. This may cause damage and void the warranty.
- Ensure the tripod is placed on a stable, level surface to prevent tipping.
- Store the device in a dry, cool place when not in use.
4. Setup and Installation
4.1 Battery Installation
The ASOBRIS Laser Level requires 2 AA batteries (included). To install:
- Locate the battery compartment on the bottom of the laser level unit.
- Open the battery compartment cover.
- Insert the two AA batteries, ensuring correct polarity (+/-).
- Close the battery compartment cover securely.

Image 4.1: Detailed view of the laser level, highlighting the battery compartment and control buttons.
4.2 Tripod Assembly and Placement
The included compact tripod can be used to elevate and stabilize the laser level.
- Unfold the tripod legs and extend them to the desired height (up to 25.6 inches).
- Secure the leg extensions using the adjustment buckles.
- Mount the laser level onto the tripod's 1/4"-20 mounting thread.
- Place the tripod on a firm, level surface. Note: The tripod's leveling bubble is for general guidance and not for precision measurement.

Image 4.2: The compact tripod, illustrating its extendable height and features like durable aluminum alloy material, extended neck locker, adjustment buckle, and non-skid rubber feet.
5. Operating Modes
The ASOBRIS Laser Level offers two primary operating modes: Self-Leveling Mode and Manual Mode.
5.1 Self-Leveling Mode
This mode is ideal for applications requiring perfectly horizontal and vertical lines, such as aligning shelves or hanging pictures.
- Slide the pendulum switch on the side of the unit to the "ON" position.
- The laser will automatically self-level within a ±4° range.
- If the device is placed on a surface that is beyond the ±4° self-leveling range, the laser lines will flash continuously to indicate it is out of range. Adjust the device's position until the lines stop flashing and become steady.

Image 5.1: Top panel shows the laser level in self-leveling mode on a kitchen counter, projecting a cross line. Bottom panel shows the laser level in manual mode on a staircase, projecting angled lines.
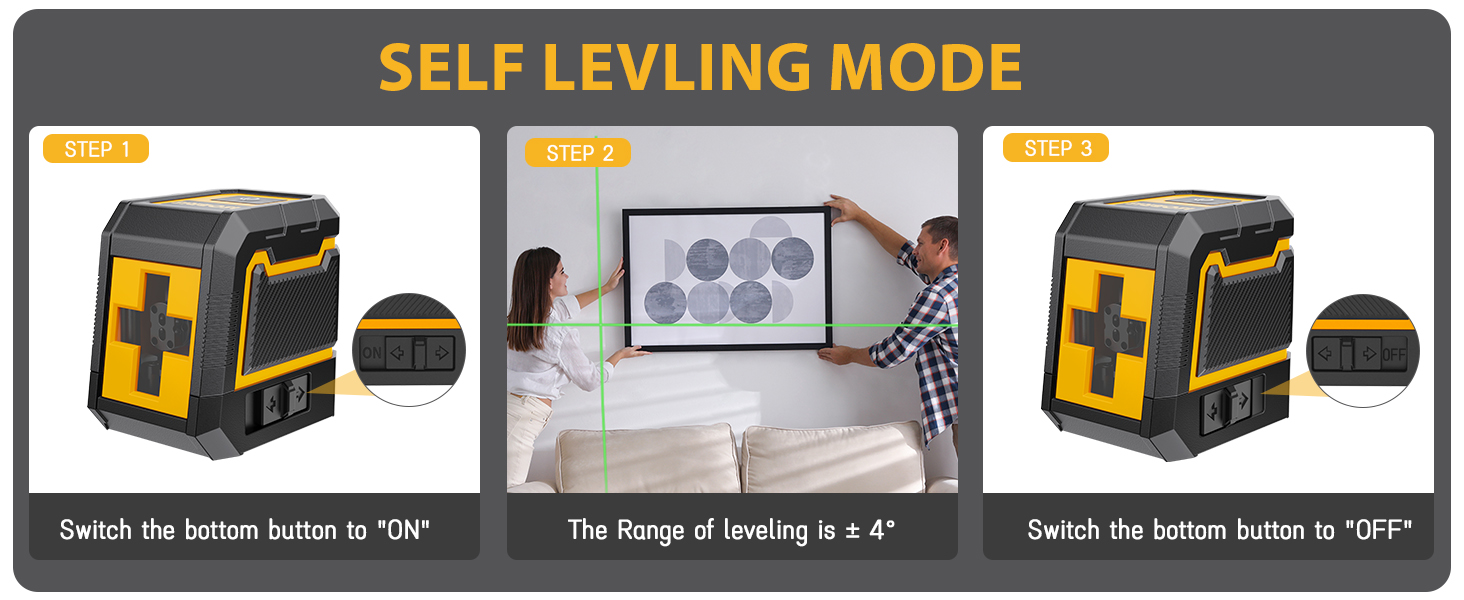
Image 5.2: Visual guide for activating and using the self-leveling mode, showing the switch position and the ±4° leveling range.
5.2 Manual Mode
Manual mode allows the laser lines to be locked at any angle, suitable for angled or sloped installations like stair railings.
- Slide the pendulum switch to the "OFF" position.
- Press and hold the top button for 3 seconds to activate Manual Mode.
- In this mode, the automatic leveling feature is disabled, and the laser lines will not flash regardless of the angle.
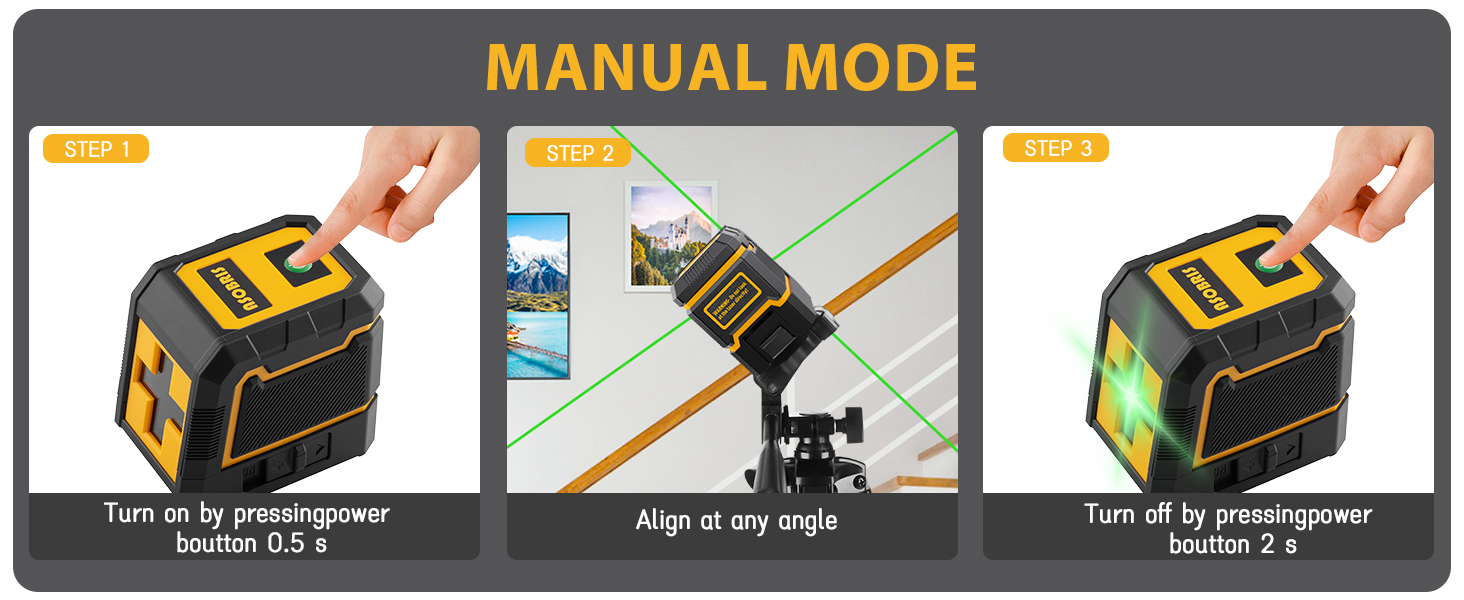
Image 5.3: Visual guide for activating and using the manual mode, demonstrating how to turn it on and align at any angle.
5.3 Brightness Adjustment
The laser level features 3 adjustable brightness levels to suit different lighting conditions.
- After turning on the laser level, press the brightness adjustment button (typically the top button, or a dedicated button if present) to cycle through High, Medium, and Low brightness settings.
- Adjust the brightness to ensure optimal visibility of the laser lines in your working environment.

Image 5.4: Illustration of the three adjustable brightness levels (High, Medium, Low) of the green laser lines, demonstrated by a worker using the tool.
6. Applications
The ASOBRIS Laser Level is a versatile tool suitable for a wide range of indoor and outdoor projects, including but not limited to:
- Picture hanging and gallery wall alignment
- Installing shelves and cabinets
- Floor and wall tile installation
- Door and window frame alignment
- Furniture woodworking
- Wallpaper installation
- Drilling holes for fixtures

Image 6.1: Examples of the laser level in use for various home improvement tasks, including tiling, installing shelves, and drilling screw holes.

Image 6.2: The laser level projecting a cross line to assist in accurately hanging a picture frame on a wall.
7. Maintenance
Proper maintenance ensures the longevity and accuracy of your ASOBRIS Laser Level.
- Cleaning: Wipe the device with a soft, dry cloth after each use. Do not use abrasive cleaners or solvents.
- Storage: Store the laser level and tripod in a clean, dry place, away from direct sunlight and extreme temperatures. Remove batteries if the device will not be used for an extended period.
- Durability: The device is IP54 water and dust resistant, providing protection against splashes and dust ingress. However, it is not designed for submersion.

Image 7.1: Visual representation of the laser level's dustproof and waterproof capabilities, showing it in dusty and rainy environments.
8. Troubleshooting
If you encounter issues with your ASOBRIS Laser Level, refer to the following common problems and solutions:
| Problem | Possible Cause | Solution |
|---|---|---|
| Laser lines are flashing continuously in Self-Leveling Mode. | Device is out of its ±4° self-leveling range. | Adjust the position of the laser level or the tripod until it is within the self-leveling range. The lines will become steady. |
| No laser lines are projected. | Batteries are low or incorrectly installed; device is off. | Check battery polarity and ensure they are fresh. Confirm the pendulum switch is in the "ON" position for self-leveling or that Manual Mode is activated. |
| Laser lines are dim. | Brightness setting is too low; ambient light is too bright. | Adjust the brightness level to High. Reduce ambient light if possible. |
| Tripod does not provide precise leveling. | The included tripod's bubble level is for general guidance only. | For precision, ensure the surface the tripod is on is truly level, or use a separate, more accurate leveling tool for initial setup. |
If the problem persists after attempting these solutions, please contact ASOBRIS customer support.
9. Specifications
Key technical specifications for the ASOBRIS Laser Level (Model x6-b2):
| Feature | Specification |
|---|---|
| Model Number | x6-b2 |
| Laser Type | Green Cross Line Laser |
| Laser Class | Class II (< 1mW) |
| Operating Range | 82 ft (25 m) |
| Self-Leveling Range | ±4° |
| Operation Modes | Automatic Self-Leveling Mode / Manual Mode |
| Brightness Levels | 3 Adjustable Levels |
| Power Source | 2 x AA Alkaline Batteries (included) |
| Material | Acrylonitrile Butadiene Styrene, Metal |
| Product Dimensions | 3.15"L x 2.76"W |
| Item Weight | 1.57 Pounds |
| Ingress Protection | IP54 (Dust and Water Resistant) |
| Tripod Max Height | 25.6 inches |
| Tripod Mounting Thread | 1/4"-20 |
10. Warranty and Support
ASOBRIS is committed to providing high-quality products and excellent customer service.
- Warranty: This laser level tool is covered by a ONE-YEAR exchange warranty and a LIFETIME guarantee.
- Customer Support: For any product questions, technical assistance, or warranty claims, please do not hesitate to contact ASOBRIS customer support. We aim to respond to your needs within 24 hours.

Image 10.1: ASOBRIS commitment to customer satisfaction, including warranty and support details.
Thank you for choosing ASOBRIS. We hope our laser level enhances your projects with precision and ease.
Ask a question about this manual
Ask about setup, troubleshooting, compatibility, parts, safety, or missing instructions. Manuals+ will review the question and use this page’s manual context to help answer it.