1. Introduction
Thank you for choosing the NovorikX 60V Lithium Ion Cordless String Trimmer. This manual provides essential information for the safe and efficient operation, assembly, and maintenance of your new tool. Please read this manual thoroughly before first use and keep it for future reference.

Figure 1: NovorikX 60V Lithium Ion Cordless String Trimmer
2. Important Safety Information
Always prioritize safety when operating power tools. Failure to follow safety instructions can result in serious injury.
- Wear safety glasses, long pants, and closed-toe shoes.
- Keep a safe distance from others and objects while operating the trimmer.
- Ensure the battery is fully charged before use.
- Do not operate the trimmer in wet conditions.
- Keep hands and feet away from the cutting line.
- Always remove the battery before performing any maintenance or adjustments.
3. Product Components & What's in the Box
Your NovorikX 60V Lithium Ion Cordless String Trimmer kit includes the following components:

Figure 2: Included Accessories and Components
- String Trimmer Unit
- 5.0Ah Battery Pack
- Battery Charger
- Auxiliary Handle
- Cutting Guard
- Shoulder Strap
- Trimmer Lines (x3)
- User Manual (this document)
4. Setup and Assembly
Assembly is required for this product. Follow these steps to prepare your string trimmer for use:
4.1 Attaching the Cutting Guard
Align the cutting guard with the mounting points on the trimmer head. Secure it using the provided screws and tools. Ensure it is firmly attached to protect against debris during operation.
4.2 Attaching the Auxiliary Handle
Slide the auxiliary handle onto the shaft. Adjust its position for comfortable operation, then tighten the clamp securely. The handle is designed to be adjustable for user comfort.

Figure 3: Adjustable Auxiliary Handle and Controls
4.3 Inserting the Battery
Align the 5.0Ah battery pack with the battery slot on the trimmer's power head. Slide the battery firmly into place until it clicks, indicating it is securely locked. Ensure the battery is fully charged before use.
Video 1: NovorikX 60V String Trimmer Overview. This video provides a general overview of the product and its features.
5. Operating Instructions
5.1 Charging the Battery
The 5.0Ah battery fully charges in approximately 1 hour using the dedicated fast charger. The charger features built-in overcharge, overheat, and overload protection to extend battery life (≥1000 charge-discharge cycles).

Figure 4: 5.0Ah Battery and Charger
5.2 Starting and Stopping the Trimmer
To start the trimmer, ensure the battery is inserted and securely locked. Press the safety lock button and then squeeze the variable speed trigger. To stop, release the trigger.
5.3 Speed Adjustment
The trimmer features a 2-speed adjustment for versatile use:
- Low Gear (4600 RPM): Ideal for precise weeding and lighter tasks, offering extended runtime.
- High Gear (6100 RPM): Provides maximum power for cutting thick vines, roots, and dense vegetation.
Use the speed adjustment button located on the handle to switch between low and high gear.

Figure 5: 2-Speed Adjustment Button
5.4 Line Feeding Mechanism
The trimmer utilizes a bump-feed line system. To advance the cutting line, gently tap the trimmer head on the ground while the trimmer is running. The integrated line cutter on the guard will automatically trim the line to the optimal 17-inch cutting swath.
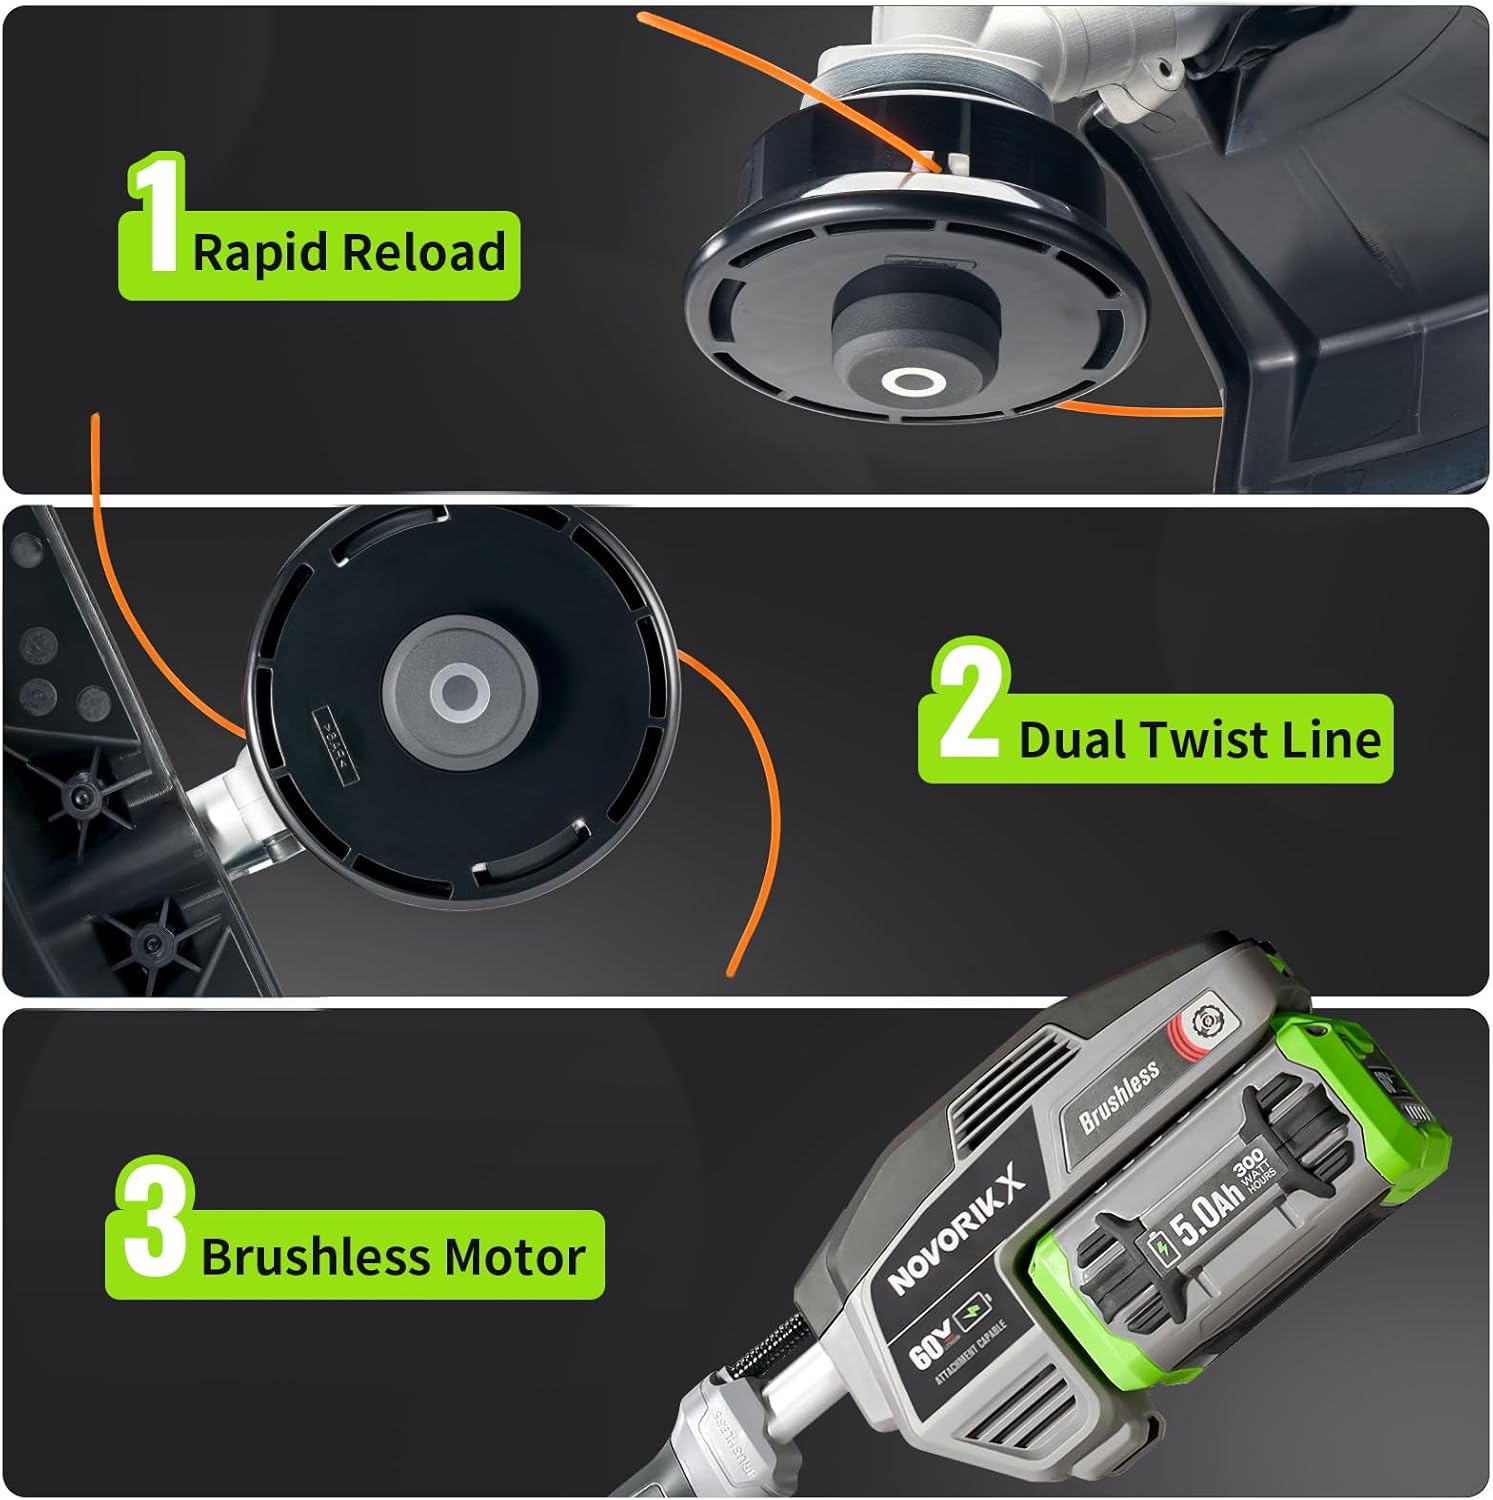
Figure 6: Line Feeding and Motor Features
6. Maintenance
Regular maintenance ensures optimal performance and extends the life of your string trimmer.
6.1 Cleaning
After each use, remove the battery and clean the trimmer head and guard of any grass clippings or debris. Use a damp cloth; do not use harsh chemicals or abrasive cleaners.
6.2 Replacing the Trimmer Line
When the trimmer line runs out, replace it with 0.095-inch diameter line. The rapid reload feature allows for quick and easy line replacement without disassembling the head. Refer to the visual guides for proper loading.
6.3 Storage
Store the trimmer in a dry, secure location away from children and pets. Remove the battery before storing for extended periods.
7. Troubleshooting
If you encounter issues with your string trimmer, consult the following common troubleshooting tips:
- Trimmer not starting: Ensure the battery is fully charged and properly inserted. Check that the safety lock and trigger are engaged correctly.
- Line not advancing: Ensure the trimmer head is tapped firmly on a hard surface while running. Check for tangled or broken line inside the spool.
- Reduced power: The battery may be low on charge. Recharge the battery. Also, ensure the trimmer is set to the appropriate speed for the task.
- Excessive vibration: Check the trimmer line for uneven length or damage. Replace the line if necessary.
For further assistance, please contact NovorikX customer support.
8. Specifications
| Feature | Specification |
|---|---|
| Brand | NovorikX |
| Model Number | NST3004DCJ00202 |
| Power Source | Battery Powered |
| Battery Type | 60V Lithium Ion (5.0Ah) |
| Motor Type | Brushless |
| Speed Settings | 2-Speed (4600 RPM Low / 6100 RPM High) |
| Cutting Width | 17 Inches |
| Trimmer Line Diameter | 0.095 Inches |
| Charging Time | 1 Hour (for 5.0Ah battery) |
| Approximate Runtime (5.0Ah) | 54 mins (High Gear) / 116 mins (Low Gear) |
| Item Weight | 15 Pounds |
| Product Dimensions | 72"L x 12"W |
9. Warranty and Support
For specific warranty details and to register your product, please refer to the documentation included with your purchase or visit the official NovorikX website. For technical support or service inquiries, please contact NovorikX customer service.