1. Introduction
This manual provides comprehensive instructions for the installation, operation, and maintenance of your Generic Wi-Fi Smart Thermostat with RF Receiver. This device is designed to provide uniform and comfortable temperature control for gas boiler heating systems, offering both local and remote control capabilities. Please read this manual thoroughly before installation and use to ensure proper function and safety.

An overview of the Generic Wi-Fi Smart Thermostat system, showing the main thermostat unit, the RF receiver, and a smartphone displaying the control application.
2. Package Contents
Verify that all items listed below are present in your package:
- 1 x Smart Thermostat Unit
- 1 x RF Receiver Unit
- 1 x Set of Installation Screws
- 1 x USB Cable (for thermostat power option)
- 1 x User Manual (this document)

This image displays the items included in the product package: the smart thermostat, the RF receiver, a user manual, installation screws, and the product packaging box.
3. Product Overview
3.1. Thermostat Unit
The thermostat unit features a large LCD screen for displaying temperature, time, and program settings. It includes control buttons for manual adjustments and programming.
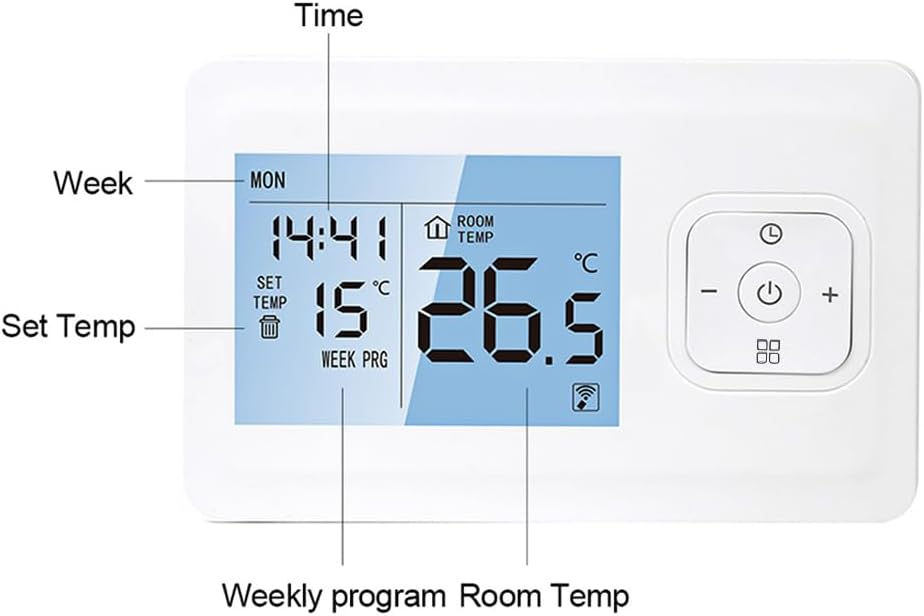
A close-up view of the thermostat's LCD screen, indicating the display areas for current time, day of the week, set temperature, room temperature, and weekly program status.

This image highlights the large, clear LCD display of the thermostat, emphasizing the readability of the set and room temperatures.
3.2. RF Receiver Unit
The RF receiver unit communicates wirelessly with the thermostat and is responsible for controlling the heating system. It includes indicators for power and heating status.

This image presents four different perspectives of the thermostat and receiver units, showcasing their design and physical features from various angles, including the back panel of the thermostat.
4. Specifications
| Feature | Specification |
|---|---|
| Brand | Generic |
| Model Number | 3b541a83-df84-4c49-aaee-8b3ab6922f7c |
| Voltage | 230V (AC) |
| Load Current | 3A |
| Temperature Sensor | NTC |
| Temperature Accuracy | ±1℃ |
| Temperature Setting Range | 5~90℃ |
| Protection Level | IP20 |
| Wireless Transmission Distance | 100-200m |
| Wireless Frequency | 868MHz/433MHz (Two-way FSK) |
| APP Compatibility | Tuya |
| Power Supply (Thermostat) | 2 * AAA Batteries (NOT INCLUDED), DC 5V USB Charging |
| Power Supply (Receiver) | AC230V Wiring |
| Thermostat Dimensions | 135 x 87.5 x 23.2mm (5.3 x 3.4 x 0.9in) |
| Receiver Dimensions | 86 x 86 x 26mm (3.4 x 3.4 x 1.0in) |
| Item Weight | 13.6 ounces |

This composite image provides detailed dimensions for both the thermostat and the receiver units, along with a clear wiring diagram for connecting the receiver to a gas boiler heating system (AC230V input).
5. Setup
5.1. Installation Style
The thermostat unit offers flexible installation options: it can be wall-mounted or placed on a tabletop. Choose the style that best suits your needs and room layout.
- Wall-Mounted: Use the provided screws to secure the thermostat to a wall at an appropriate height, away from direct sunlight, drafts, or heat sources.
- Tabletop: The thermostat can be placed on any flat surface, such as a desk or shelf, allowing for easy repositioning.

An example of the thermostat unit placed on a desk, illustrating its tabletop installation option and flexibility in room placement.
5.2. Receiver Wiring
The RF receiver must be wired to your gas boiler heating system. It requires an AC230V power input. Consult a qualified electrician if you are unsure about wiring procedures.
- Ensure the main power supply to your heating system is turned OFF before beginning any wiring.
- Connect the AC230V power input to the designated terminals on the receiver (L and N).
- Connect the heating system control wires to the appropriate terminals (NO, NC, COM) on the receiver, according to your boiler's specifications. The receiver acts as a switch for the boiler.
- Secure all connections and ensure no bare wires are exposed.
5.3. Power Supply for Thermostat
The thermostat unit can be powered by two methods:
- AAA Batteries: Insert 2 AAA batteries (not included) into the battery compartment on the back of the thermostat.
- USB Charging: Connect the provided USB cable to the thermostat and a DC 5V USB power source.
5.4. Pairing the Thermostat with Receiver
The thermostat and receiver are typically pre-paired. If pairing is required or lost:
- Ensure both the thermostat and receiver are powered on.
- On the receiver, press and hold the 'Pair Code' button until the pairing indicator light flashes.
- On the thermostat, access the pairing menu (refer to the on-screen instructions or specific button combination in the quick start guide).
- Confirm pairing on the thermostat. The indicator light on the receiver should become solid, indicating a successful connection.
5.5. App Pairing (Wi-Fi Connection)
To enable remote control via your smartphone, connect the thermostat to your home Wi-Fi network using the Tuya app.
- Download the 'Tuya' app from your smartphone's app store (iOS or Android).
- Register or log in to your Tuya account.
- Add a new device in the app, selecting 'Thermostat' or 'Heating Device'.
- Follow the in-app instructions to put the thermostat into Wi-Fi pairing mode (usually involves holding a specific button combination on the thermostat until a Wi-Fi icon flashes).
- Enter your Wi-Fi network credentials in the app to complete the connection.
6. Operation
6.1. Basic Controls
- Power Button: Press to turn the thermostat ON or OFF.
- Temperature Adjustment: Use the '+' and '-' buttons to increase or decrease the set temperature.
- Mode Selection: Cycle through different operating modes (e.g., Manual, Auto/Program) using the mode button (if available).
6.2. Programming
The thermostat supports weekly programming, allowing you to set different temperatures for various times of the day across a 7-day cycle. This feature includes power-off memory to retain settings.

The thermostat display indicating its programming capabilities and the power-off memory function, which retains settings during power interruptions.
- Access the programming menu on the thermostat (refer to the quick start guide for specific button presses).
- Set desired temperatures and times for each period (e.g., morning, day, evening, night) for each day of the week.
- Save your program settings. The thermostat will then operate according to this schedule.
6.3. Mobile App Control
Once connected to Wi-Fi, you can control your thermostat remotely using the Tuya app.
- Adjust temperature settings from anywhere.
- View current room temperature.
- Set or modify heating schedules.
- Create thermostat groups for centralized control of multiple devices.
- Share device control with family members.

The thermostat unit is shown alongside a hand holding a smartphone, demonstrating the mobile application interface used for remote control and monitoring.
6.4. Voice Control
The thermostat is compatible with voice assistants like Amazon Alexa. After linking your Tuya account to your voice assistant, you can control the thermostat using voice commands.
- Example commands: "Alexa, set the thermostat to 22 degrees." or "Alexa, what is the temperature in the living room?"
7. Maintenance
- Cleaning: Wipe the thermostat and receiver surfaces with a soft, dry cloth. Do not use abrasive cleaners or solvents.
- Battery Replacement: If using AAA batteries, replace them when the low battery indicator appears on the thermostat display. Ensure correct polarity.
- Firmware Updates: Periodically check the Tuya app for any available firmware updates for your thermostat to ensure optimal performance and new features.
8. Troubleshooting
| Problem | Possible Cause | Solution |
|---|---|---|
| Thermostat display is blank. | No power or low batteries. | Replace AAA batteries or connect USB power cable. Ensure power outlet is functional. |
| Heating system not responding. | Receiver not powered, not paired with thermostat, or wiring issue. | Check receiver power indicator. Re-pair thermostat and receiver. Verify wiring connections to the boiler. |
| Cannot connect to Wi-Fi or app. | Incorrect Wi-Fi password, weak signal, or thermostat not in pairing mode. | Ensure correct Wi-Fi password. Move thermostat closer to router. Put thermostat into Wi-Fi pairing mode as per app instructions. Check router settings (2.4GHz network required). |
| Temperature reading seems inaccurate. | Thermostat placed in an unsuitable location. | Relocate the thermostat away from direct sunlight, drafts, or heat-emitting appliances. |
9. Warranty and Support
For warranty information and technical support, please refer to the documentation provided at the point of purchase or contact the retailer directly. Keep your purchase receipt as proof of purchase.