1. Introduction
This manual provides instructions for the proper use and maintenance of your Relaxweex Adjustable Schumann Sine Wave Resonance Generator. This device is designed to generate ultra-low frequency sine waves, square waves, and inverted square waves within an adjustable range of 0.01Hz to 100,000Hz. It is intended for various applications, including creating relaxing environments, supporting meditation, yoga practice, or for use in laboratories and scientific experiments.
Please read this manual thoroughly before operating the device to ensure safe and effective use.
2. Package Contents
Upon opening your package, please verify that all the following items are included:
- 1 x Schumann Sine Wave Resonance Generator
- 1 x Acrylic Case (with small magnets for assembly)
- 1 x USB Power Cable
- 1 x English User Manual (this document)
Note: The acrylic case may have a slight odor upon unpacking. This can be dissipated by placing it in a well-ventilated area for 2-3 days. It is recommended to remove any protective film from the acrylic panels before assembly.
3. Product Overview
The Schumann Sine Wave Resonance Generator consists of a main circuit board with an integrated display, control buttons, and a PCB antenna, housed within a protective acrylic case.
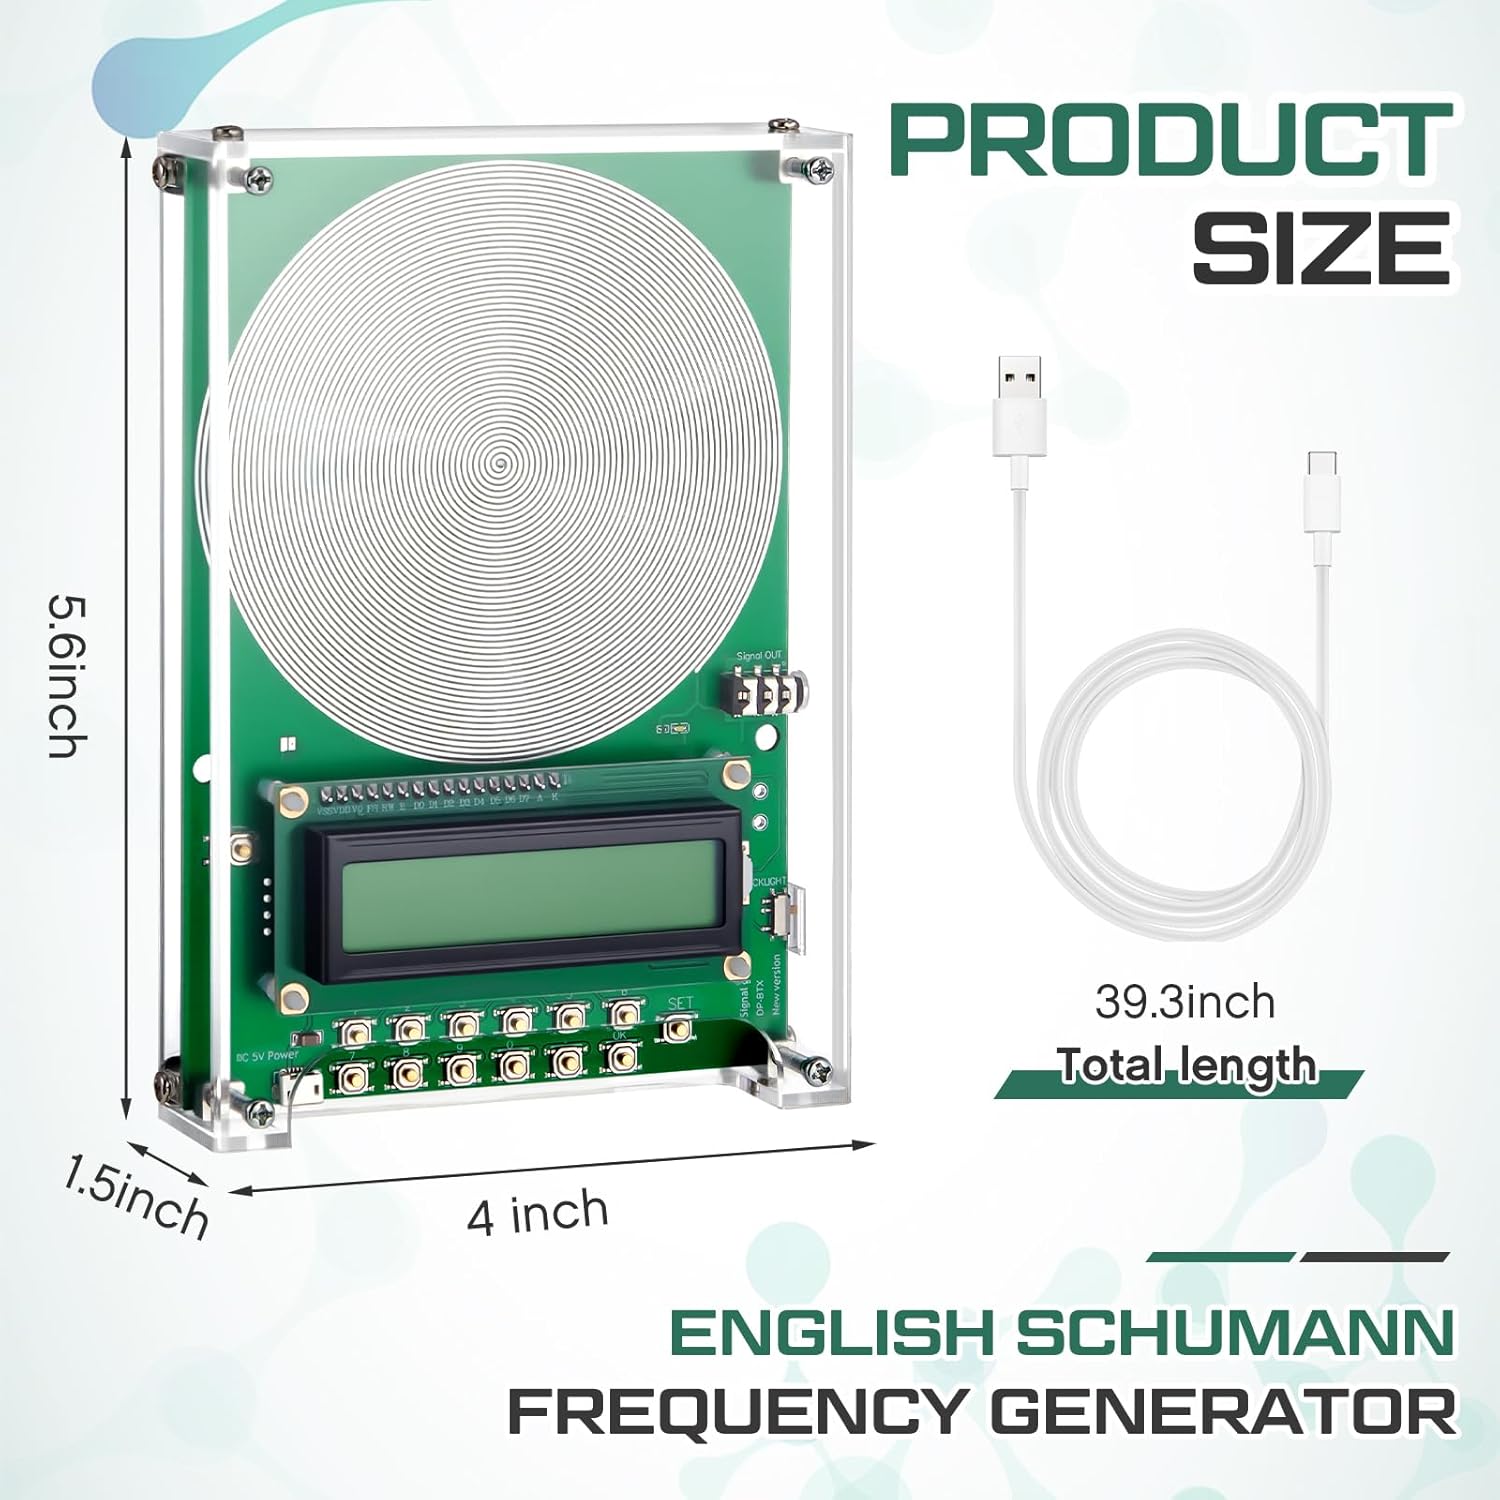
Figure 3.1: Schumann Resonance Generator with approximate dimensions and included USB cable.

Figure 3.2: Detailed view of the generator's components, including the acrylic case, PCB antenna, and display.
Key Components:
- PCB Antenna: The large spiral pattern on the circuit board is the transmitting antenna for the Schumann waves.
- LCD Display: Shows the current frequency, waveform, and input prompts.
- Control Buttons: A keypad for entering frequency values and selecting modes.
- USB Power Input: For connecting the device to a 5V power source.
- Audio Output Jack: For connecting headphones to hear the generated frequencies.
4. Setup
4.1 Assembling the Acrylic Case
- Carefully remove the protective film from both sides of all acrylic panels.
- Place the main circuit board onto the bottom acrylic panel, aligning the screw holes.
- Position the top acrylic panel over the circuit board, ensuring all components are properly aligned.
- Secure the case using the provided screws and nuts. The small magnets help hold the panels in place during assembly.
4.2 Power Connection
- Connect the provided USB cable to the USB power input port on the generator.
- Connect the other end of the USB cable to a 5V USB power adapter (not included) or a USB port on a computer/power bank.
- The device will power on, and the LCD display will illuminate.
Caution: Ensure the power supply is 5V. Voltages above 5V can damage the instrument.
5. Operation
5.1 Adjusting Frequency
- Upon powering on, the device typically defaults to 7.83Hz (Schumann Resonance).
- To change the frequency, press the 'MODE' button on the keypad. The display will show 'Input(Hz):'.
- Use the numeric keypad (0-9) to enter your desired frequency. The adjustable range is 0.01Hz to 100,000Hz.
- After entering the frequency, press the 'OK' button to confirm. The device will then generate the specified frequency.
Examples of frequencies you can set include 174Hz, 285Hz, 396Hz, 417Hz, 528Hz, 639Hz, 741Hz, 852Hz, 963Hz, and many more within the operational range.
5.2 Waveform Selection
The generator supports multiple waveforms: sinusoidal, square wave, and inverted square wave. Refer to the device's specific buttons or menu options (if available) to cycle through and select the desired waveform. The display will indicate the currently active waveform.
5.3 Audio Output
The generated frequencies are low-frequency electromagnetic waves. To hear the output, you must plug headphones into the audio output jack on the device.
Video 5.1: Demonstrates the setup, power connection, and frequency input process for the Adjustable Schumann Sine Wave Resonance Generator. It shows how to connect the USB power, plug in headphones, and use the keypad to set a desired frequency.
6. Maintenance
6.1 Cleaning
To clean the device, gently wipe the acrylic case and circuit board with a soft, dry cloth. Avoid using abrasive cleaners or solvents, as these can damage the acrylic and electronic components.
6.2 Storage
Store the generator in a cool, dry place away from direct sunlight and extreme temperatures. Keep it away from dust and moisture to prolong its lifespan.
7. Troubleshooting
- Device does not power on: Ensure the USB cable is securely connected to both the generator and a functional 5V power source. Check if the power source is active.
- Power jack feels loose or device loses power: If the power jack connection is unstable, try using a different USB cable or power source. If the issue persists, the internal power jack may be faulty.
- Frequency input is not exact: The device may display a slightly different frequency (e.g., input 444 Hz, displays 444.04 Hz). This minor deviation is often within acceptable operational tolerances for this type of device.
- LED display not working or flickering: Try unplugging and re-plugging the USB power cable. If the issue persists, there may be an internal connection problem.
- No sound from headphones: Ensure headphones are properly plugged into the audio output jack. Verify that the volume on your headphones or connected audio device is turned up. Remember that these are low-frequency waves, and the audible range may vary for individuals.
8. Specifications
| Feature | Specification |
|---|---|
| Product Dimensions | 5.91 x 5.51 x 1.57 inches |
| Item Weight | 10.1 ounces |
| Manufacturer | Relaxweex |
| Item Model Number | HAT-Relaxweex-0743 |
| Frequency Range | 0.01Hz - 100,000Hz |
| Waveforms | Sinusoidal, Square Wave, Inverted Square Wave |
| Power Input | USB 5V |
9. Warranty and Support
For warranty information and technical support, please refer to the retailer or manufacturer's official website where you purchased the product. Keep your purchase receipt as proof of purchase.


