1. Introduction
This manual provides detailed instructions for the safe and efficient operation of your Parsagi T12 PLUS Soldering Station, designed for use with Milwaukee 18V batteries. Please read this manual thoroughly before using the device.

Figure 1: Parsagi T12 PLUS Soldering Station connected to a Milwaukee 18V battery, with soldering iron and solder wire.
2. Safety Information
- Always wear appropriate personal protective equipment, including safety glasses, when operating the soldering station.
- Ensure adequate ventilation in your workspace to avoid inhaling solder fumes.
- The soldering iron tip reaches high temperatures. Avoid direct contact with skin or flammable materials.
- Place the soldering iron in its holder when not in use.
- Do not operate the soldering station near liquids or in damp conditions.
- Keep out of reach of children.
- Utilize the low-voltage protection feature to prevent battery damage.
3. Product Components
Familiarize yourself with the main components of your soldering station:
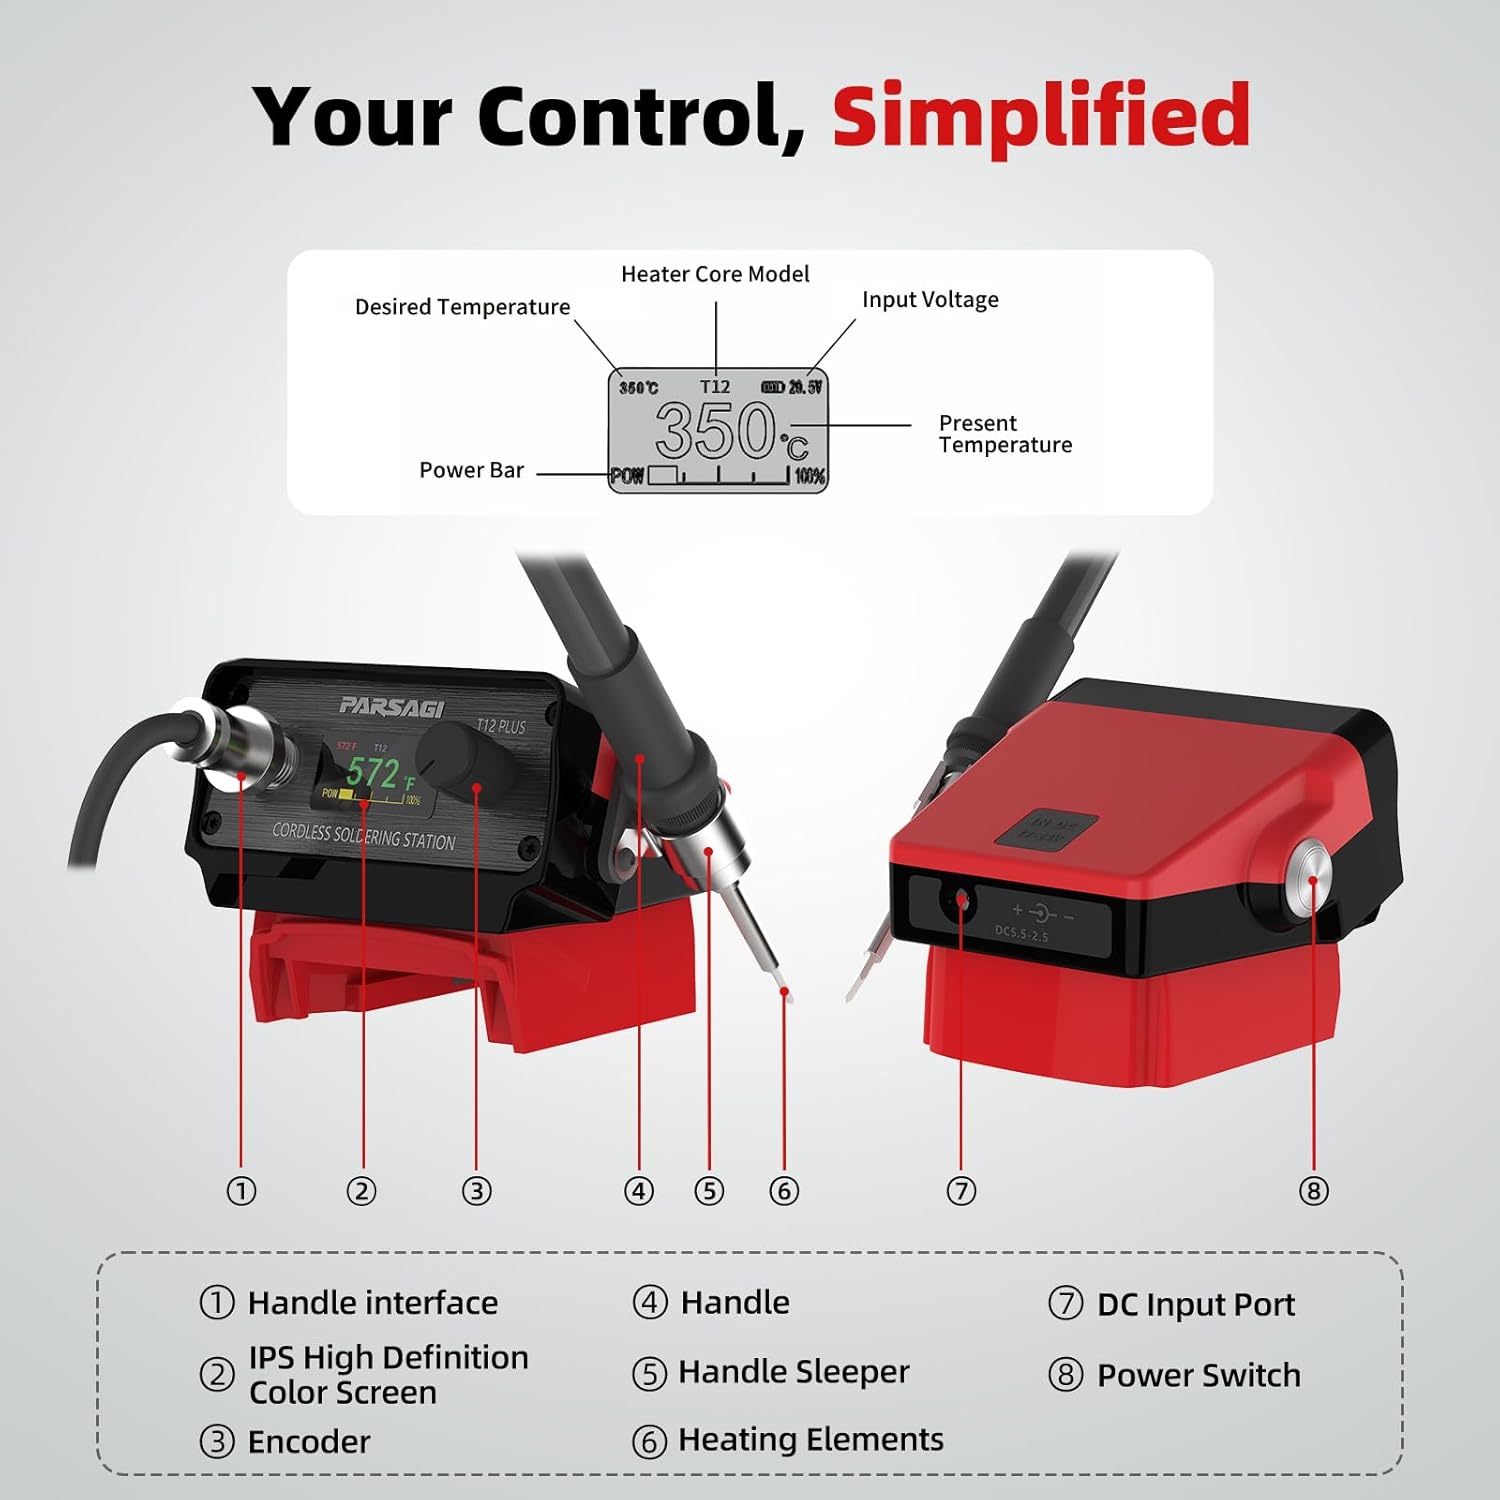
Figure 2: Labeled diagram of the Parsagi T12 PLUS Soldering Station, highlighting key parts such as the handle interface, IPS display, encoder, handle, handle sleeper, heating elements, DC input port, and power switch.
- Handle Interface: Connection point for the soldering iron handle.
- IPS High Definition Color Screen: Displays temperature, battery status, and menu options.
- Encoder: Rotary knob for adjusting settings and navigating menus. Press to confirm.
- Handle: Ergonomic grip for the soldering iron.
- Handle Sleeper: Integrated holder for the soldering iron, activating sleep mode when in place.
- Heating Elements: The T12 soldering tips, responsible for heating.
- DC Input Port: Alternative power input (17-24V DC) if not using a battery.
- Power Switch: Turns the soldering station on or off.
4. Setup
4.1. Installing the Soldering Iron and Tips
Proper installation of the soldering gun and tips is crucial for correct operation and heating. This soldering station is compatible with any T12 soldering tips.
- Install Heating Element: Securely install the T12 heating element (soldering tip) into the soldering iron handle. Ensure it is fully seated and the fixing screws are tightened.
- Connect Handle: Align the soldering iron handle with the handle interface on the station. Insert it firmly until it clicks into place.
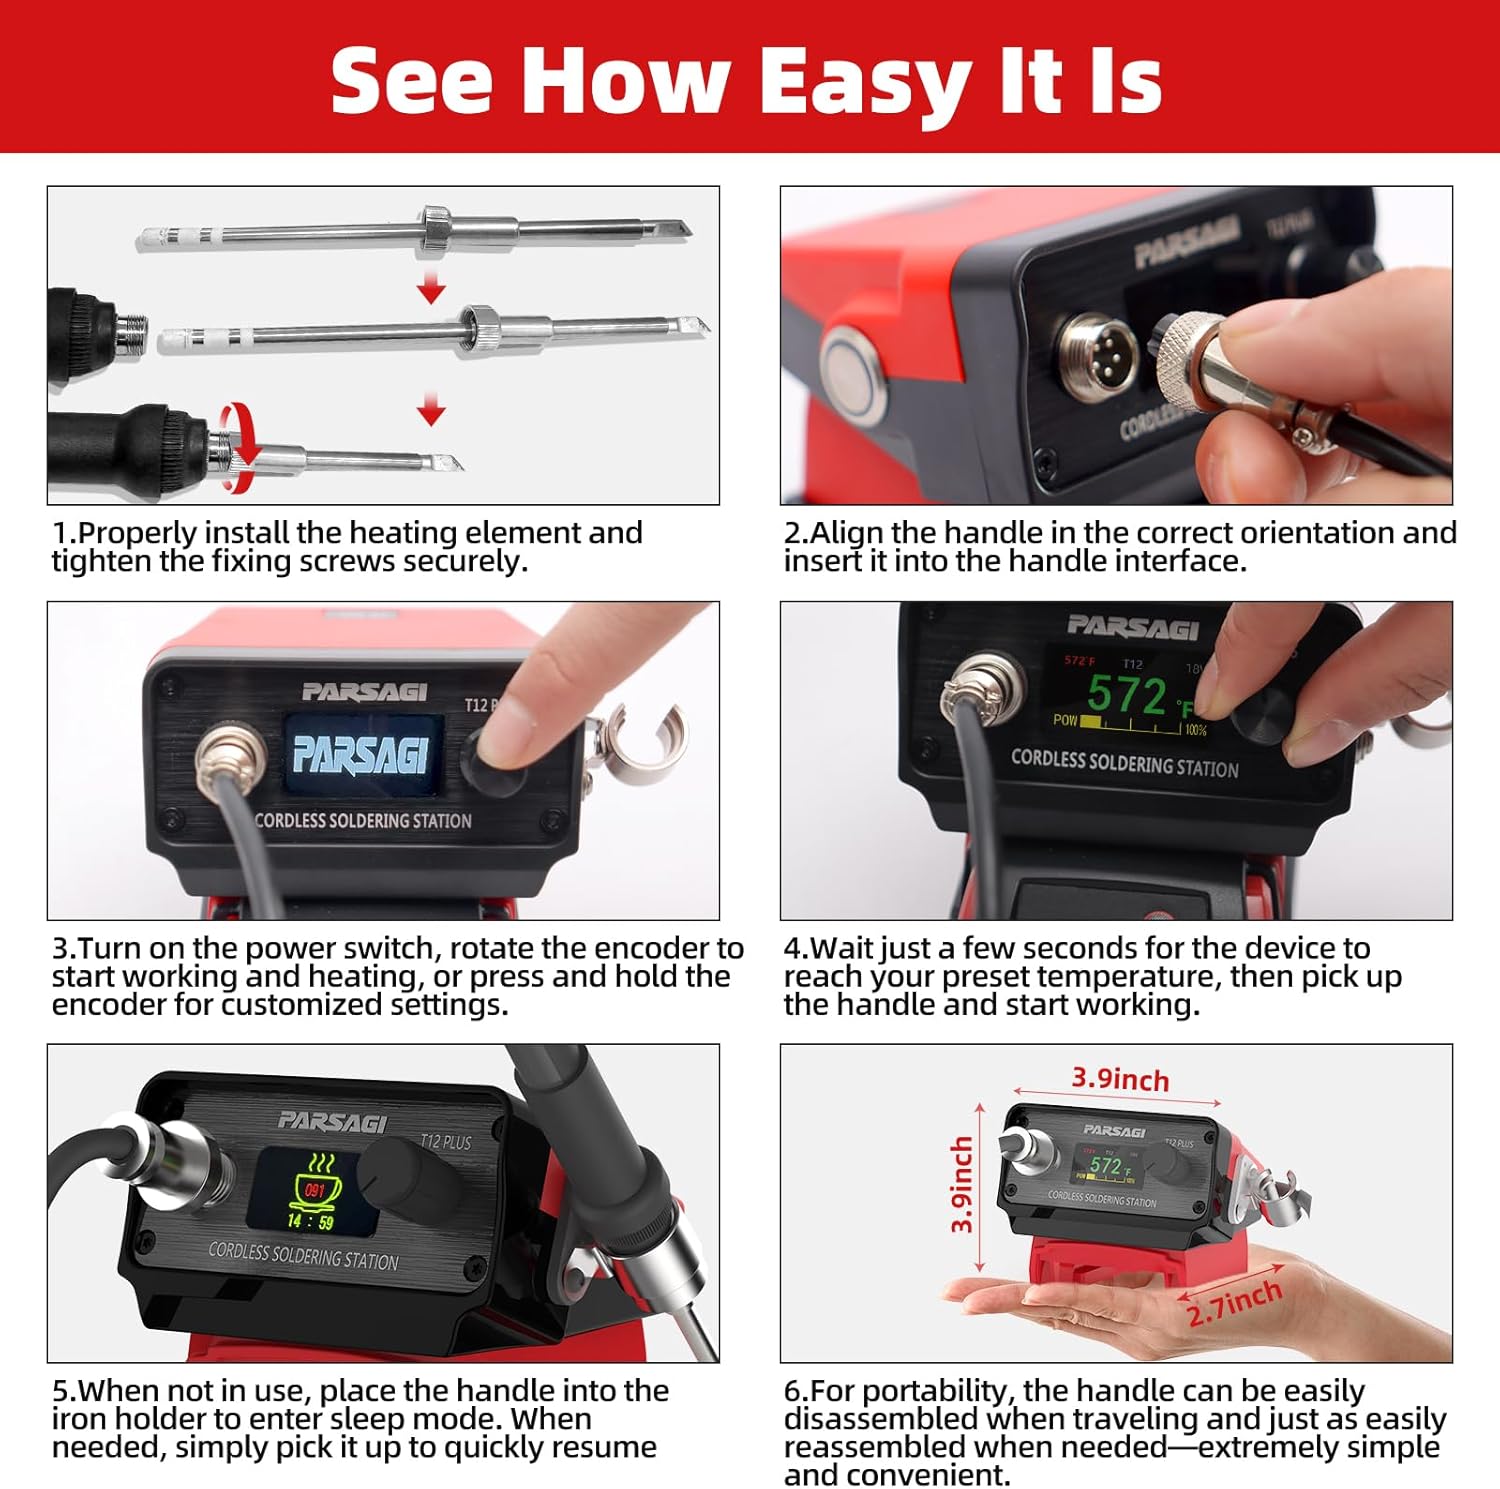
Figure 3: Visual guide demonstrating the installation of the heating element and connection of the soldering iron handle to the station.
4.2. Power Source Connection
The Parsagi T12 PLUS Soldering Station is designed for use with Milwaukee 18V batteries. Alternatively, it can be powered via the DC Input Port (17-24V DC).
- Battery Connection: Slide a charged Milwaukee 18V battery onto the base of the soldering station until it locks securely.
- DC Power (Optional): If using an external DC power supply, connect it to the DC Input Port (7) as shown in Figure 2.
5. Operating Instructions
5.1. Powering On and Initial Heating
- Turn On: Flip the power switch (8) to the "ON" position. The IPS display will illuminate.
- Temperature Display: The display will show the current temperature, target temperature, and battery status.
- Rapid Heating: The station heats up quickly, typically reaching working temperature in approximately 10 seconds. Wait for the desired temperature to be reached before use.
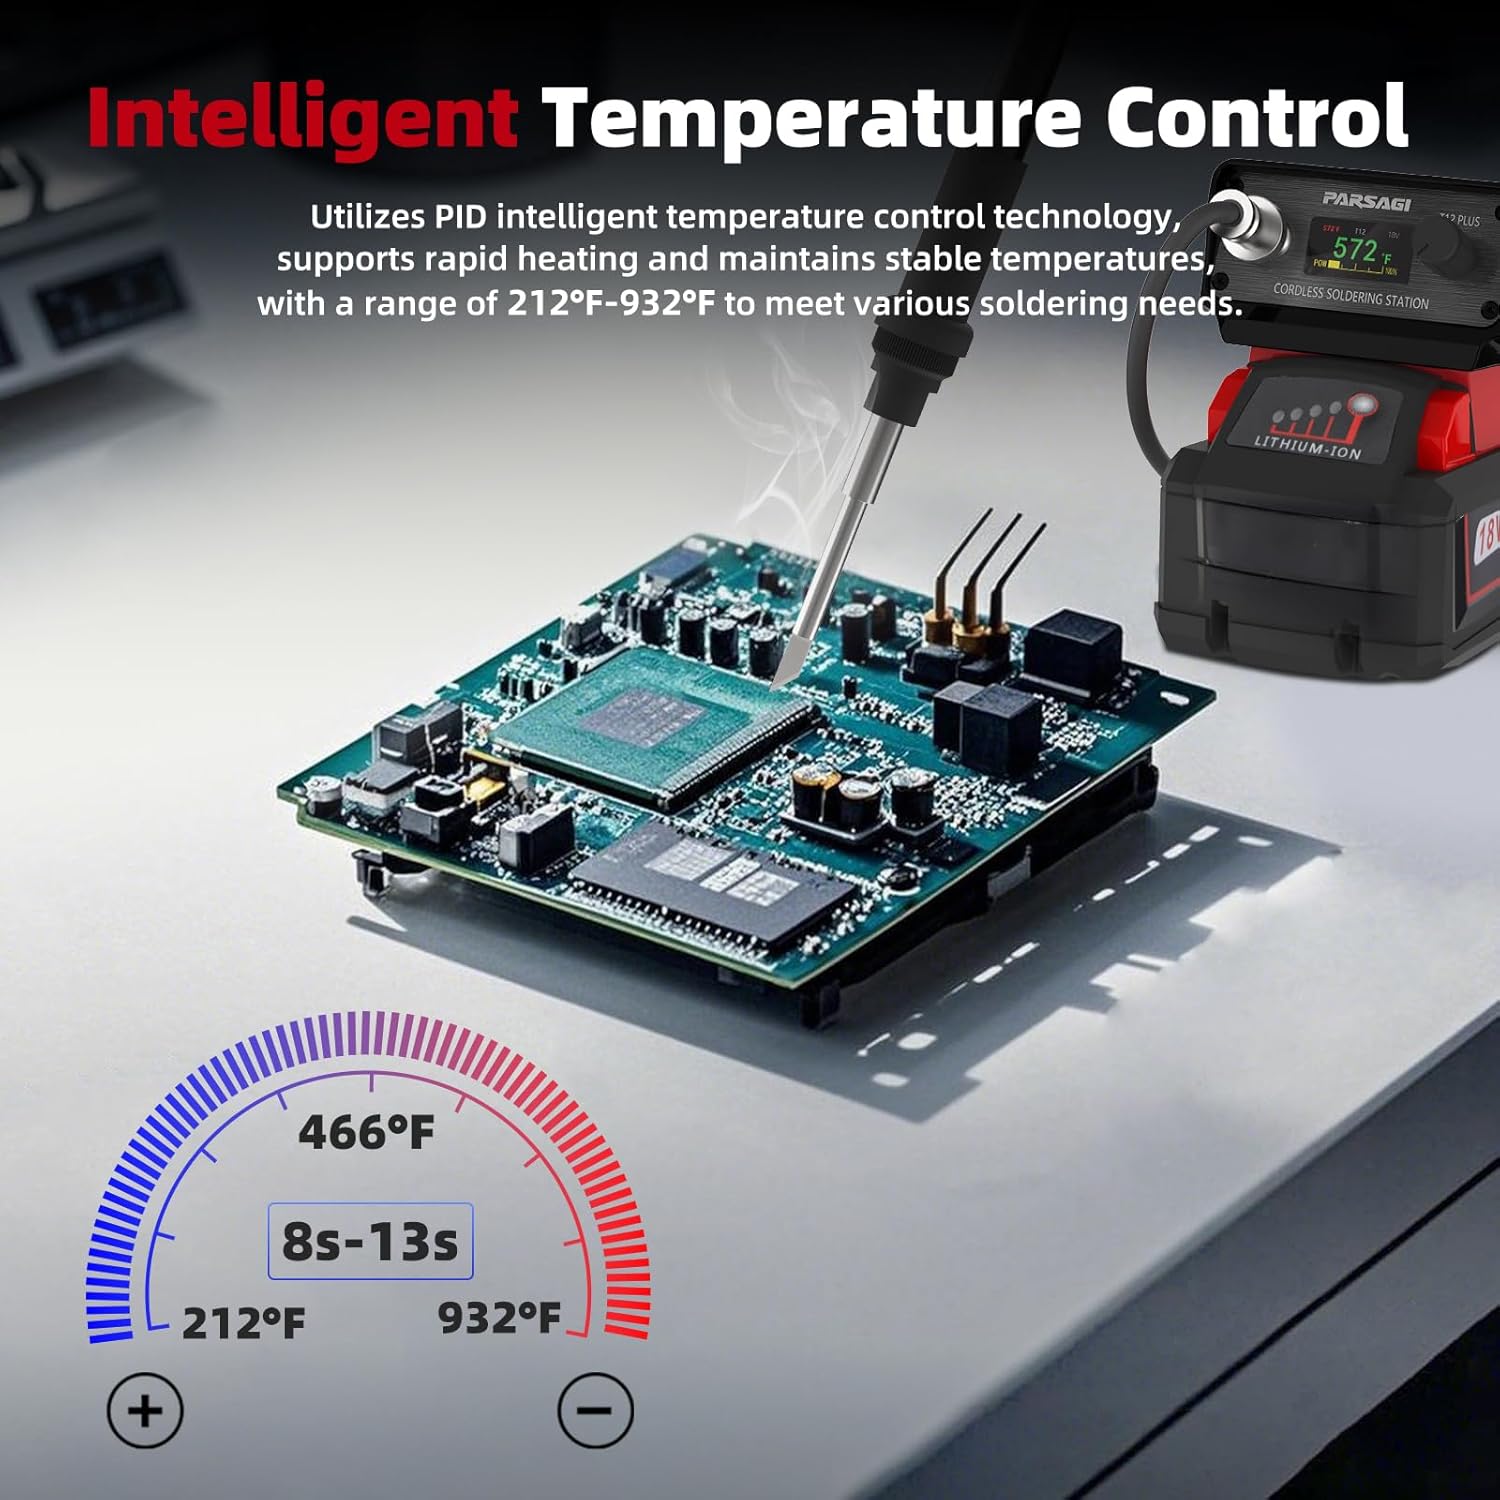
Figure 4: Illustration of the soldering station's rapid heating, reaching temperatures between 212°F and 932°F in 8-13 seconds.
5.2. Adjusting Temperature and Menu Navigation
The encoder knob (3) is the primary control for adjusting settings.
- Adjust Temperature: Rotate the encoder knob clockwise to increase the temperature and counter-clockwise to decrease it. The temperature range is 200°F to 896°F (100°C to 480°C).
- Access Menu: Press and hold the encoder knob to enter the main menu.
- Navigate Menu: Rotate the encoder knob to scroll through menu options.
- Select/Confirm: Press the encoder knob to select an option or confirm a setting.
5.3. Customizable Settings
The IPS display and encoder allow customization of various features:
- Temperature Calibration: Fine-tune temperature accuracy.
- Auto Sleep Mode: Configures the automatic sleep function when the iron is in its holder.
- Boost Duration & Boost Degree Settings: Adjust temporary temperature boosts.
- Wake-Up Methods: Define how the station exits sleep mode (e.g., picking up the iron, pressing the encoder).
- Buzzer On/Off Switch: Enable or disable audible alerts.
- Battery Guard for Low Voltage Protection: Activates to protect the battery from over-discharge.
- °C/°F Unit Conversion: Switch between Celsius and Fahrenheit temperature units.
5.4. Auto Sleep Mode
When the soldering iron is placed in its integrated holder (Handle Sleeper), the station will automatically enter sleep mode after a configurable period. This conserves energy and prolongs tip life. Simply pick up the iron to resume operation.
6. Maintenance
6.1. Soldering Tip Care
- Tinning: Always tin the tip with a small amount of solder before and after use to prevent oxidation.
- Cleaning: Use a damp sponge or brass wool to clean the tip regularly during soldering.
- Replacement: Replace T12 soldering tips when they become excessively worn or corroded. Ensure the station is off and cooled before replacing tips.
6.2. General Cleaning and Storage
- Cleaning: Wipe the station and handle with a soft, dry cloth. Do not use abrasive cleaners or solvents.
- Storage: Store the soldering station in a dry, dust-free environment. For portability, the handle can be easily disassembled for compact storage.
7. Troubleshooting
| Problem | Possible Cause | Solution |
|---|---|---|
| Soldering station displays an error code or is not heating. | Soldering gun (handle and tip) improperly installed. | Ensure the heating element (tip) is correctly seated and secured in the handle, and the handle is firmly connected to the station. Refer to Section 4.1. |
| Station powers off unexpectedly. | Low battery voltage detected by the Battery Guard protection. | Replace or recharge the Milwaukee 18V battery. |
| Difficulty navigating menu settings. | Unfamiliarity with encoder operation or menu structure. | Refer to Section 5.2 for encoder operation. Experiment with rotating and pressing the knob to understand menu flow. |
| Soldering tip not melting solder effectively. | Incorrect temperature setting, oxidized tip, or worn tip. | Increase temperature, clean the tip, or replace the tip if worn. Ensure the tip is properly tinned. |
8. Specifications
| Feature | Detail |
|---|---|
| Model Number | T12 PLUS for Milwaukee 18V |
| Brand | Parsagi |
| Power Source | Milwaukee 18V Battery (not included) or 17-24V DC Input |
| Voltage | 18 Volts (DC) |
| Temperature Range | 200°F to 896°F (100°C to 480°C) |
| Display Type | IPS Color Display |
| Item Weight | 14.9 ounces (approx. 422 grams) |
| Package Dimensions | 8.5 x 4.72 x 3.62 inches |
| Included Components | 1 Soldering Station (Tool Only) |
9. Warranty and Support
Specific warranty details for the Parsagi T12 PLUS Soldering Station are not provided in this manual. Please refer to the product packaging or the manufacturer's official website for warranty information.
For technical support or further assistance, please contact Parsagi customer service through the retailer where the product was purchased or visit the official Parsagi website.


