1. Introduction
The ARCTIC Liquid Freezer III Pro 420 is an all-in-one (AIO) liquid CPU cooler designed for high-performance computing systems. It features a large 420mm radiator with three 140mm fans, a PWM-controlled pump, and an integrated VRM fan to ensure efficient heat dissipation and stable operation for your CPU and surrounding components. This manual provides essential information for the proper installation, operation, and maintenance of your cooler.

Figure 1.1: The ARCTIC Liquid Freezer III Pro 420 AIO CPU Cooler, showcasing its large radiator with three fans and the CPU block with integrated pump and VRM fan.
2. Key Features
- CONTACT FRAME FOR INTEL LGA1851 | LGA1700: Optimized contact pressure distribution for longer CPU life and better heat dissipation.
- ARCTIC's P14 PRO FAN: More power at any speed - more powerful and quieter than the P14, especially at low speeds. Higher maximum speed for optimal cooling performance under high load.
- NATIVE OFFSET MOUNTING FOR INTEL AND AMD: Shifting the cold plate center towards the CPU hotspot ensures more efficient heat transfer.
- INTEGRATED VRM FAN: PWM-controlled fan that lowers the temperature of the voltage converters and thus ensures reliable performance.
- INTEGRATED CABLE MANAGEMENT: The PWM cables of the radiator fans are integrated in the sheathing of the hoses so that only a single visible cable is connected to the motherboard.
3. Setup and Installation
Proper installation is crucial for the performance and longevity of your ARCTIC Liquid Freezer III Pro 420. Please follow these general steps. For a detailed visual guide, refer to the unofficial installation video provided below.
3.1. Pre-Installation Checks
- Case Compatibility: Ensure your PC case supports a 420mm radiator. This cooler has a radiator thickness of 38mm and a total height of 65mm with fans. Verify clearance in your case, especially for the front or top mounting positions. Some full-size towers may still require modifications due to internal structures.
- CPU Socket Compatibility: The cooler supports AMD AM5/AM4 and Intel LGA1851/1700 sockets.
- Unpack Components: Carefully unpack all components and verify against the packing list.
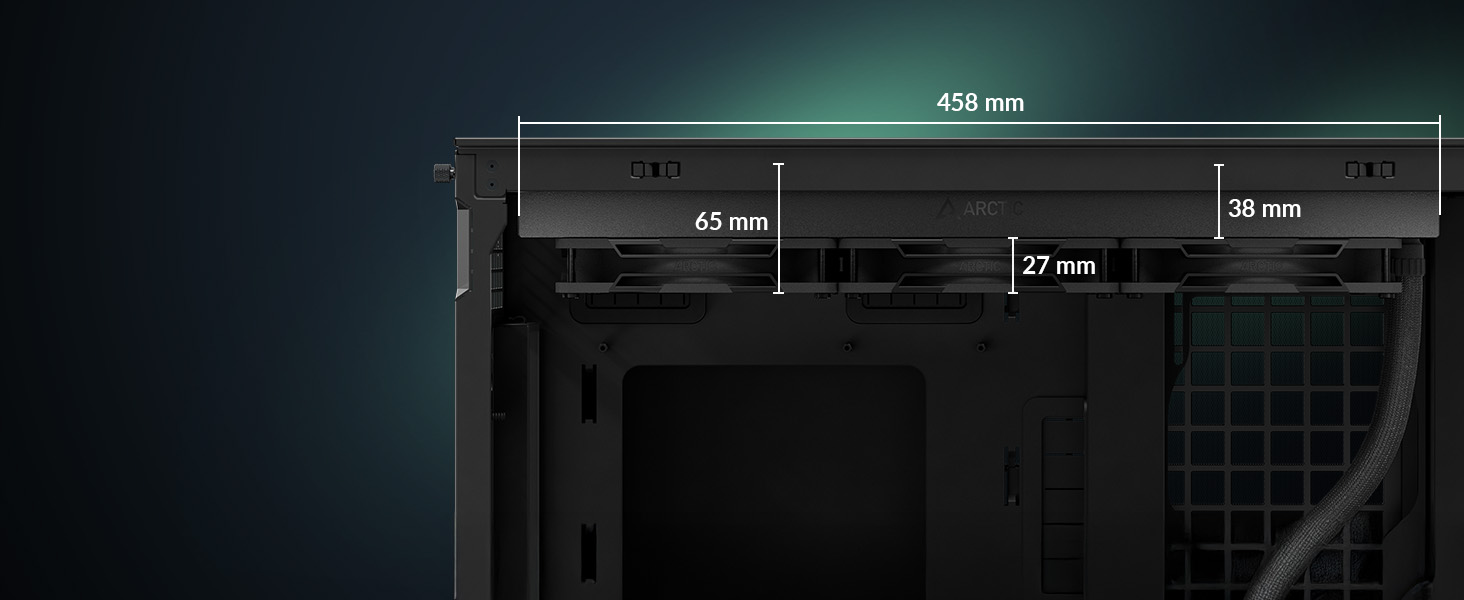
Figure 3.1: Radiator dimensions (458mm length, 38mm thickness, 65mm total height with fans) for checking case compatibility.
3.2. General Installation Steps
- Prepare CPU Socket: For Intel LGA1851/1700, install the included contact frame for optimal pressure distribution. For AMD, ensure the stock backplate is in place.
- Apply Thermal Paste: Apply a small amount of the included ARCTIC MX-6 thermal paste to the center of your CPU's Integrated Heat Spreader (IHS).
- Mount CPU Block: Secure the CPU block onto the CPU using the appropriate mounting hardware for your socket. The native offset mounting design helps align the cold plate with the CPU hotspot for improved heat transfer.
- Install Radiator: Mount the radiator to your chosen location in the PC case (e.g., front, top). The fans are pre-installed on the radiator for convenience.
- Connect Cables: Connect the single PWM cable from the cooler to your motherboard's CPU_FAN header. The integrated cable management simplifies wiring.

Figure 3.2: Diagram illustrating the offset mounting for AMD AM5 and Intel LGA1851, optimizing contact with the CPU hotspot.

Figure 3.3: The cooler features pre-installed fans and integrated cable management, simplifying the installation process by routing fan cables through the hose sleeving.
3.3. Installation Video Guide (Unofficial)
This video provides a user's perspective on installing the ARCTIC Liquid Freezer III, including considerations for case compatibility and the installation process. While not an official ARCTIC video, it offers practical insights.
Video 3.1: An influencer's review and installation overview of the ARCTIC Liquid Freezer III, highlighting potential challenges with case compatibility.
4. Operating the Cooler
The ARCTIC Liquid Freezer III Pro 420 is designed for efficient and quiet operation, with intelligent control over its components.
4.1. PWM Control
The pump, radiator fans, and VRM fan are all PWM (Pulse Width Modulation) controlled. This allows your motherboard or dedicated fan controller to precisely adjust their speeds based on CPU temperature, optimizing cooling performance and noise levels.

Figure 4.1: The cooler offers flexible connection options, allowing for individual PWM control of the VRM fan, radiator fans, and pump, or a single 'All-in-One' connection for simplified control.
4.2. Integrated VRM Fan
The CPU block includes a dedicated PWM-controlled fan that actively cools the Voltage Regulator Modules (VRMs) on your motherboard. This helps maintain lower VRM temperatures, which is especially beneficial during heavy loads or overclocking, ensuring system stability and longevity.

Figure 4.2: A chart demonstrating the effectiveness of active VRM cooling via the PWM-controlled fan, showing significantly lower VRM temperatures compared to passive cooling.
5. Maintenance
While AIO liquid coolers require less maintenance than custom loops, periodic checks can ensure optimal performance.
- Dust Cleaning: Regularly clean dust from the radiator fins and fans using compressed air. Accumulated dust can impede airflow and reduce cooling efficiency.
- Check Tubing: Periodically inspect the tubing for any signs of kinks, leaks, or damage.
- Thermal Paste: The included ARCTIC MX-6 thermal paste is designed for long-term stability. Reapplication is generally not needed unless the cooler is removed from the CPU.
6. Troubleshooting
If you encounter issues with your ARCTIC Liquid Freezer III Pro 420, consider the following common problems and solutions:
- High CPU Temperatures:
- Ensure the CPU block is securely mounted and making good contact with the CPU.
- Verify that the thermal paste application was sufficient and even.
- Check that all fans (radiator and VRM) are spinning and connected correctly to their headers.
- Confirm that the pump is operating (you might hear a faint hum or feel vibrations in the tubing).
- Clean any dust buildup on the radiator fins.
- Unusual Noise:
- Identify the source of the noise (fans, pump).
- If it's a fan, check for obstructions or loose mounting screws.
- A gurgling sound might indicate air bubbles in the loop; this often resolves itself over time. If persistent, try gently tilting your PC case to help move air bubbles to the highest point of the radiator.
- Installation Difficulties:
- As noted in user reviews, some cases, despite being full-size, may not have sufficient clearance for the 420mm radiator without modification. Double-check your case's specifications and internal dimensions before attempting installation.
- Ensure all mounting screws align and engage properly. Do not force components.
7. Specifications
| Attribute | Value |
|---|---|
| Brand | ARCTIC |
| Model Name | Liquid Freezer III Pro 420 |
| Item Model Number | ACFRE00181A |
| Color | Black |
| Product Dimensions | 18.03 x 5.51 x 2.66 inches (458 x 140 x 67.5 mm) |
| Item Weight | 5.22 pounds (2370 Grams) |
| Voltage | 12 Volts |
| Wattage | 4.2 watts |
| Air Flow Capacity | 110 Cubic Feet Per Minute (CFM) |
| Included Components | Liquid Freezer III 420 |
| CPU Socket Support | AMD AM5/AM4, Intel LGA1851/1700 |
8. Warranty and Support
The ARCTIC Liquid Freezer III Pro 420 comes with a 6-year warranty, ensuring long-term reliability and peace of mind. For technical support, warranty claims, or further assistance, please visit the official ARCTIC website or contact their customer service directly. You can also refer to the ARCTIC Store on Amazon for product information and support resources.
Manufacturer: ARCTIC
Seller: ARCTIC Inc (Fulfilled by Amazon)
For the latest support information and contact details, please visit the ARCTIC Store on Amazon.