
1. Introduction and Overview
The Enventor 10L Portable Mini Fridge/Warmer is a versatile appliance designed for both cooling and warming items. Its compact size and dual power options (AC/DC) make it suitable for various environments, including home, office, car, camping, and outdoor activities. This manual provides essential information for safe and efficient operation of your device.

Image: Front view of the Enventor 10L Portable Mini Fridge/Warmer, showcasing its compact design and LCD display.
2. Safety Instructions
Please read and understand all safety instructions before using this appliance to prevent injury or damage.
- Ensure the power supply matches the voltage requirements of the unit (AC 100-240V or DC 12V).
- Do not block the ventilation openings on the unit. Maintain at least 10 cm of space around the appliance for proper airflow.
- Keep the appliance away from water or other liquids. Do not immerse the unit in water.
- Unplug the unit from the power source before cleaning or when not in use.
- Do not attempt to disassemble or repair the unit yourself. Contact qualified service personnel for assistance.
- Avoid placing hot items directly into the cooling mode or cold items directly into the warming mode without allowing the unit to adjust to the new temperature setting.
- This appliance is not intended for use by persons (including children) with reduced physical, sensory, or mental capabilities, or lack of experience and knowledge, unless they have been given supervision or instruction concerning use of the appliance by a person responsible for their safety.
3. Package Contents
Verify that all items are present in the package:
- Enventor 10L Mini Fridge/Warmer Unit (Model KB-10L)
- AC Power Cord (for household use)
- DC 12V Car Power Cord (for vehicle use)
- Removable Shelves (2 pieces)
4. Product Features
The Enventor 10L Mini Fridge/Warmer offers a range of features for optimal performance and convenience:
- Quiet Operation: Utilizes Peltier cooling technology for minimal noise, making it suitable for bedrooms, offices, and other quiet environments.
- Efficient Insulation: Features high-density foam insulation for effective temperature retention, contributing to energy efficiency.
- Dual Cooling and Warming Modes: Capable of cooling down to -2°C (approximately 20°C below ambient temperature) and warming up to 60°C.
- Precise Temperature Control: LCD display shows the internal temperature in real-time, allowing for one-touch adjustment in 1°C increments.
- 10-Liter Capacity: Offers ample storage for beverages, snacks, cosmetics, and other small items. Includes removable shelves for flexible organization.
- AC/DC Power Options: Compatible with standard household AC power (100-240V) and 12V DC car power outlets, providing portability.
- Compact and Portable: Lightweight design (approx. 3.5 kg) with a built-in handle for easy transport.
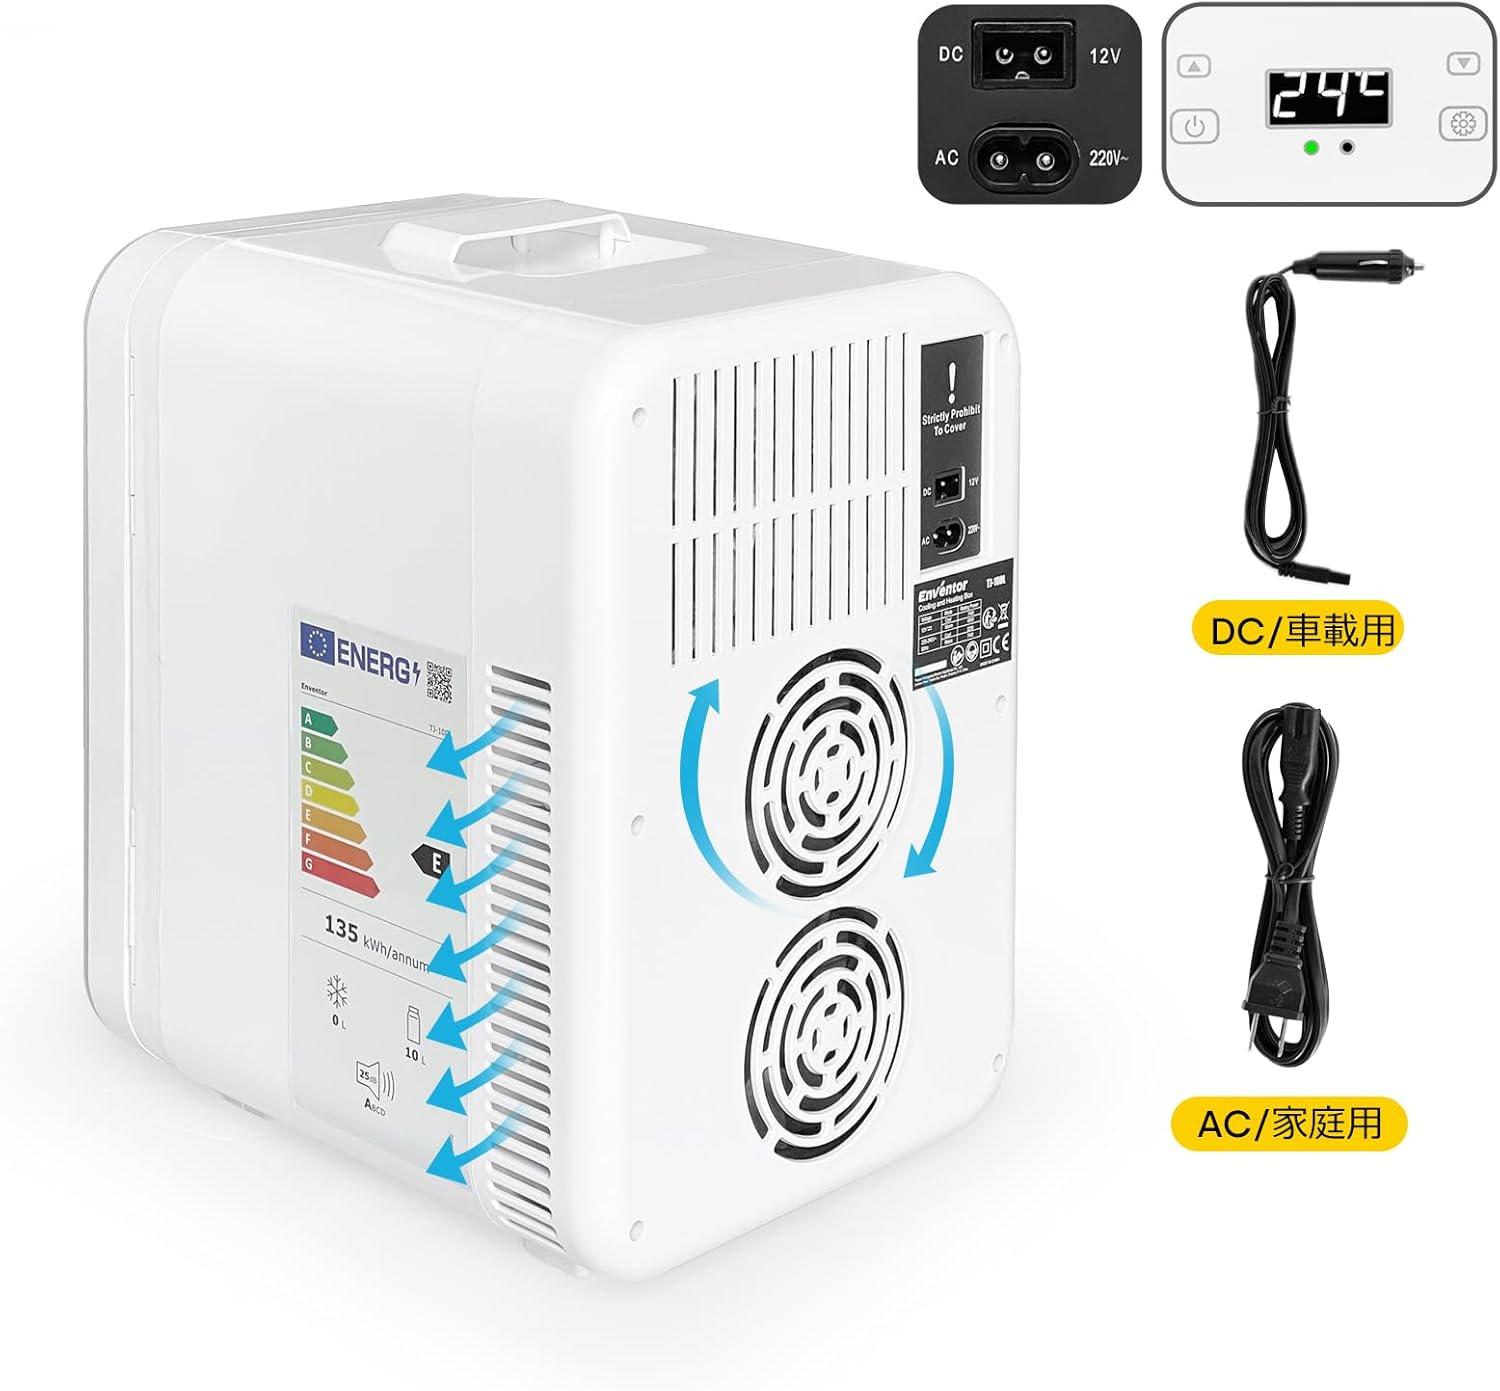
Image: Rear view of the unit, highlighting the dual cooling fans and AC/DC power input ports.

Image: Illustration of the removable and adjustable shelves for customized storage.
5. Setup
Follow these steps to set up your Enventor Mini Fridge/Warmer:
- Placement: Place the unit on a flat, stable surface. Ensure there is adequate ventilation (at least 10 cm) around all sides, especially the rear, to allow heat dissipation. Avoid direct sunlight or heat sources.
- Power Connection:
- For Household Use (AC): Connect the AC power cord to the AC input port on the back of the unit, then plug the other end into a standard wall outlet.
- For Vehicle Use (DC): Connect the DC 12V car power cord to the DC input port on the back of the unit, then plug the other end into your vehicle's 12V cigarette lighter socket.
- Initial Operation: After connecting power, press the power button to turn on the unit. The LCD display will illuminate, showing the current internal temperature.

Image: Visual guide for connecting the AC (household) and DC (car) power cords.
6. Operating Instructions
Operating your Enventor Mini Fridge/Warmer is straightforward:
- Power On/Off: Press the Power Button () once to turn the unit on or off.
- Select Mode (Cooling/Warming):
- To activate Cooling Mode, press the Cooling Button (often indicated by a snowflake or blue icon). The indicator light will turn blue.
- To activate Warming Mode, press the Warming Button (often indicated by a sun or red icon). The indicator light will turn red.
- Set Temperature: Use the Up and Down arrow buttons to adjust the desired temperature. The LCD display will show the set temperature, then revert to the current internal temperature. The unit will work to reach and maintain the set temperature.
- Cooling range: Approximately -2°C (28°F) to 20°C (68°F). Note: Minimum temperature is dependent on ambient temperature (approx. 20°C below ambient).
- Warming range: Up to 60°C (140°F).
- Loading Items: Place items inside the unit. For best results, pre-chill or pre-warm items before placing them in the unit, especially if a rapid temperature change is desired. The time required to reach the target temperature depends on the quantity and initial temperature of the contents.

Image: Interior view showing various fruits and vegetables stored in cooling mode.

Image: Interior view demonstrating storage of cosmetics and skincare products.
7. Maintenance
Regular maintenance ensures the longevity and optimal performance of your appliance:
- Cleaning the Interior: Wipe the interior with a soft, damp cloth and mild detergent. Do not use abrasive cleaners or solvents. Ensure the unit is unplugged before cleaning.
- Cleaning the Exterior: Wipe the exterior with a soft, dry or slightly damp cloth.
- Cleaning Fan Vents: Periodically check and clean the fan vents on the back of the unit to prevent dust buildup, which can affect cooling efficiency. Use a soft brush or vacuum cleaner.
- Defrosting: If ice accumulates inside the unit during cooling, unplug the unit and allow the ice to melt naturally. Wipe away any excess water with a cloth.
- Storage: When not in use for extended periods, unplug the unit, clean it thoroughly, and leave the door slightly ajar to prevent odors. Store in a dry, well-ventilated area.
8. Troubleshooting
If you encounter issues with your Enventor Mini Fridge/Warmer, refer to the following common problems and solutions:
| Problem | Possible Cause | Solution |
|---|---|---|
| Unit does not power on. | No power supply; faulty power cord; power outlet issue. | Check if the power cord is securely plugged into both the unit and the power outlet. Test the outlet with another device. Ensure the power button is pressed. |
| Unit is not cooling/warming effectively. | Blocked ventilation; ambient temperature too high/low; door not sealed properly; too many items inside. | Ensure ventilation vents are clear. Check door seal. Reduce the number of items. Allow more time for temperature stabilization, especially if ambient temperature is extreme. |
| Excessive noise from the unit. | Fan obstruction; unit not on a level surface. | Check fan vents for obstructions and clean if necessary. Ensure the unit is placed on a stable, level surface. Some fan noise is normal during operation. |
| Water accumulation inside. | Condensation; ice melting. | This is normal. Wipe away water with a cloth. Defrost the unit if ice buildup is significant. |
If the problem persists after attempting these solutions, please contact customer support.
9. Specifications
Detailed specifications for the Enventor 10L Portable Mini Fridge/Warmer:
- Brand: Enventor
- Model: KB-10L
- Capacity: 10 Liters
- Cooling Temperature: Down to -2°C (approx. 20°C below ambient)
- Warming Temperature: Up to 60°C
- Power Supply: AC 100-240V, DC 12V
- Product Dimensions (D x W x H): 32 cm x 23 cm x 34 cm (12.6 in x 9.1 in x 13.4 in)
- Product Weight: Approximately 4.96 kg (10.9 lbs)

Image: External dimensions of the Enventor 10L Mini Fridge/Warmer.
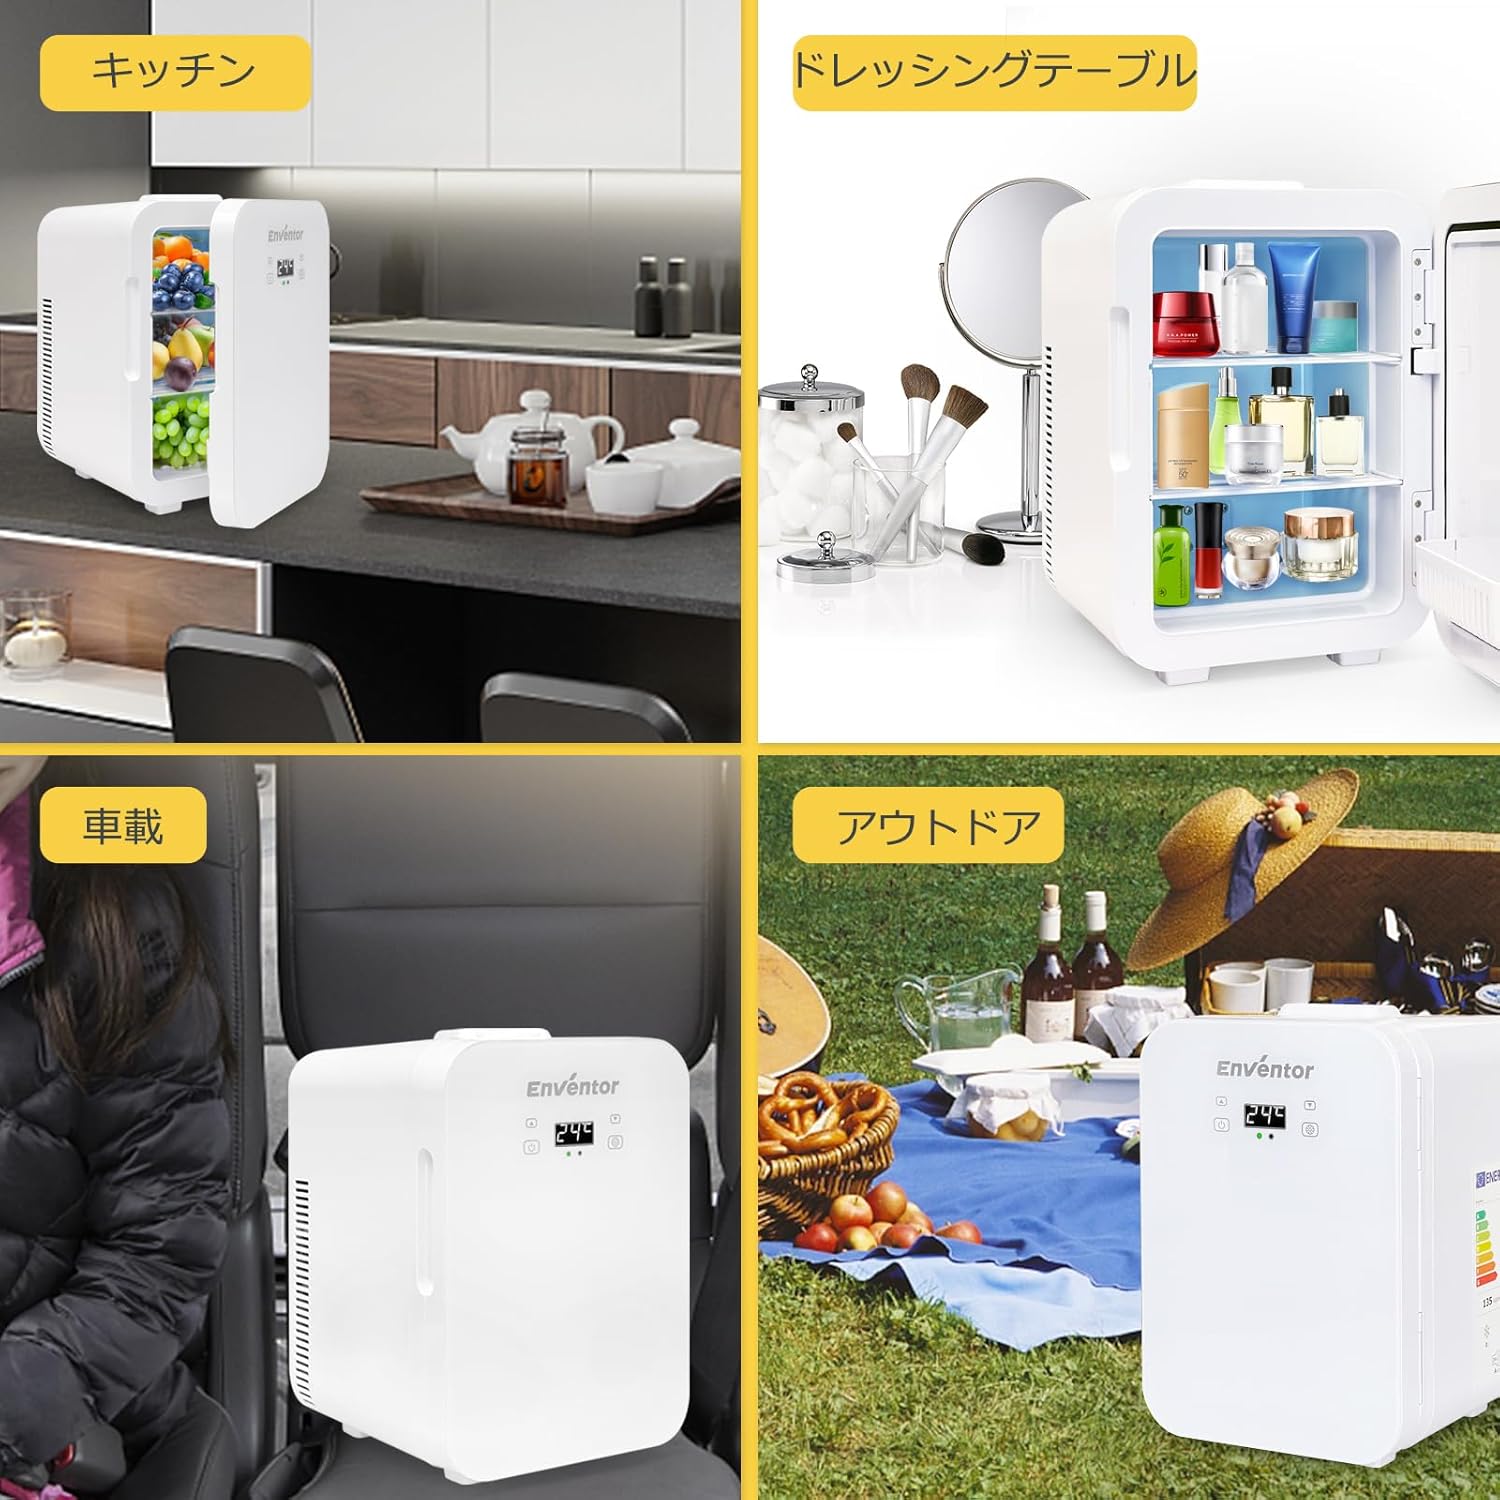
Image: Examples of the mini fridge in different settings: kitchen, car, and outdoor camping.
10. Warranty and Support
Enventor provides a 1-year quality warranty for this product. In case of initial defects or issues under normal use, we offer product exchange or refund. For warranty claims or any questions, please contact our customer support team. We are committed to ensuring your satisfaction.
For support, please refer to the contact information provided with your purchase or visit the official Enventor website.