Introduction
The Waterdrop G5P500 Reverse Osmosis Water Filter is an advanced 7-stage filtration system designed to provide pure, safe, and great-tasting drinking water. Certified by NSF/ANSI 372 for lead-free materials, its innovative tankless design saves significant under-sink space while delivering a high 500 gallons per day (GPD) capacity with an efficient 2:1 pure to drain ratio. This manual provides essential information for the proper setup, operation, and maintenance of your new water filtration system.
Setup and Installation
Proper installation is crucial for the optimal performance of your Waterdrop G5P500 system. Please follow these steps carefully.
1. Unboxing and Component Check
Verify all components are present before beginning installation. Refer to the parts list provided in your packaging.

The Waterdrop G5P500 system includes the main unit, faucet assembly, various tubing (red for drain, blue for pure, white for inlet), power adapter, drain saddle, and Teflon tape.
2. Pre-Installation Considerations
Ensure sufficient space under your sink. The system dimensions are approximately 5.69"L x 16.69"W x 13.9"H. Allow at least 2 inches of space around the unit for proper ventilation and access.

The tankless design of the G5P500 significantly reduces the space required under your sink, making it ideal for modern kitchens.
3. Water Supply Connection
The RO system must be connected to the COLD water supply ONLY. Shut off the main water supply before proceeding. Disconnect the cold water pipe from the cold water supply valve and install the provided feed water adapter (3/8" or 1/2").
4. Faucet Installation
If your sink or countertop does not have an existing hole for the faucet, you will need to drill a 1-inch hole. Assemble the faucet spout to the faucet body and insert the faucet stem into the hole. Secure it from underneath the sink using the mounting washer and tighten.

The sleek, stainless steel faucet provides convenient access to purified water and is designed for easy rotation.
5. Drain Saddle Installation
Choose a suitable spot on the vertical drainpipe for the drain saddle. Drill a 1/4-inch hole and attach the drain saddle, ensuring the foam seal is aligned. Insert the red drain tubing into the saddle.
6. Tubing and Power Connections
Connect the white 'INLET' tubing, blue 'PURE' tubing, and red 'DRAIN' tubing to their respective ports on the system unit. Ensure all connections are fully inserted and secured with lock clips to prevent leaks. Connect the power adapter to the 'POWER' port on the system. Do NOT plug the power adapter into the wall socket yet.
Watch this official video for a step-by-step guide on installing your Waterdrop G5P500 Tankless RO System.
Operating Your System
1. Initial Startup and Flushing
After all connections are secure, plug the power adapter into a grounded electrical outlet. The system will begin a 30-minute auto-flush cycle. The blue indicator lights for CF and RO will blink during this process. Once the lights become steady blue, the auto-cleaning is complete, and the system is ready for use.
2. Water Dispensing
Turn on the RO faucet to dispense purified water. The G5P500 provides a fast and stable flow, filling a 6-oz cup in just 8 seconds.

Experience instant access to purified water with the G5P500's high flow rate, eliminating waiting times.
3. Water Quality
The 7-stage filtration system, including a 0.0001μm RO membrane, effectively reduces over 1000 impurities such as PFOA, PFOS, chlorine, lead, fluoride, heavy metals, and more. This ensures unparalleled water purity and a refreshing taste.
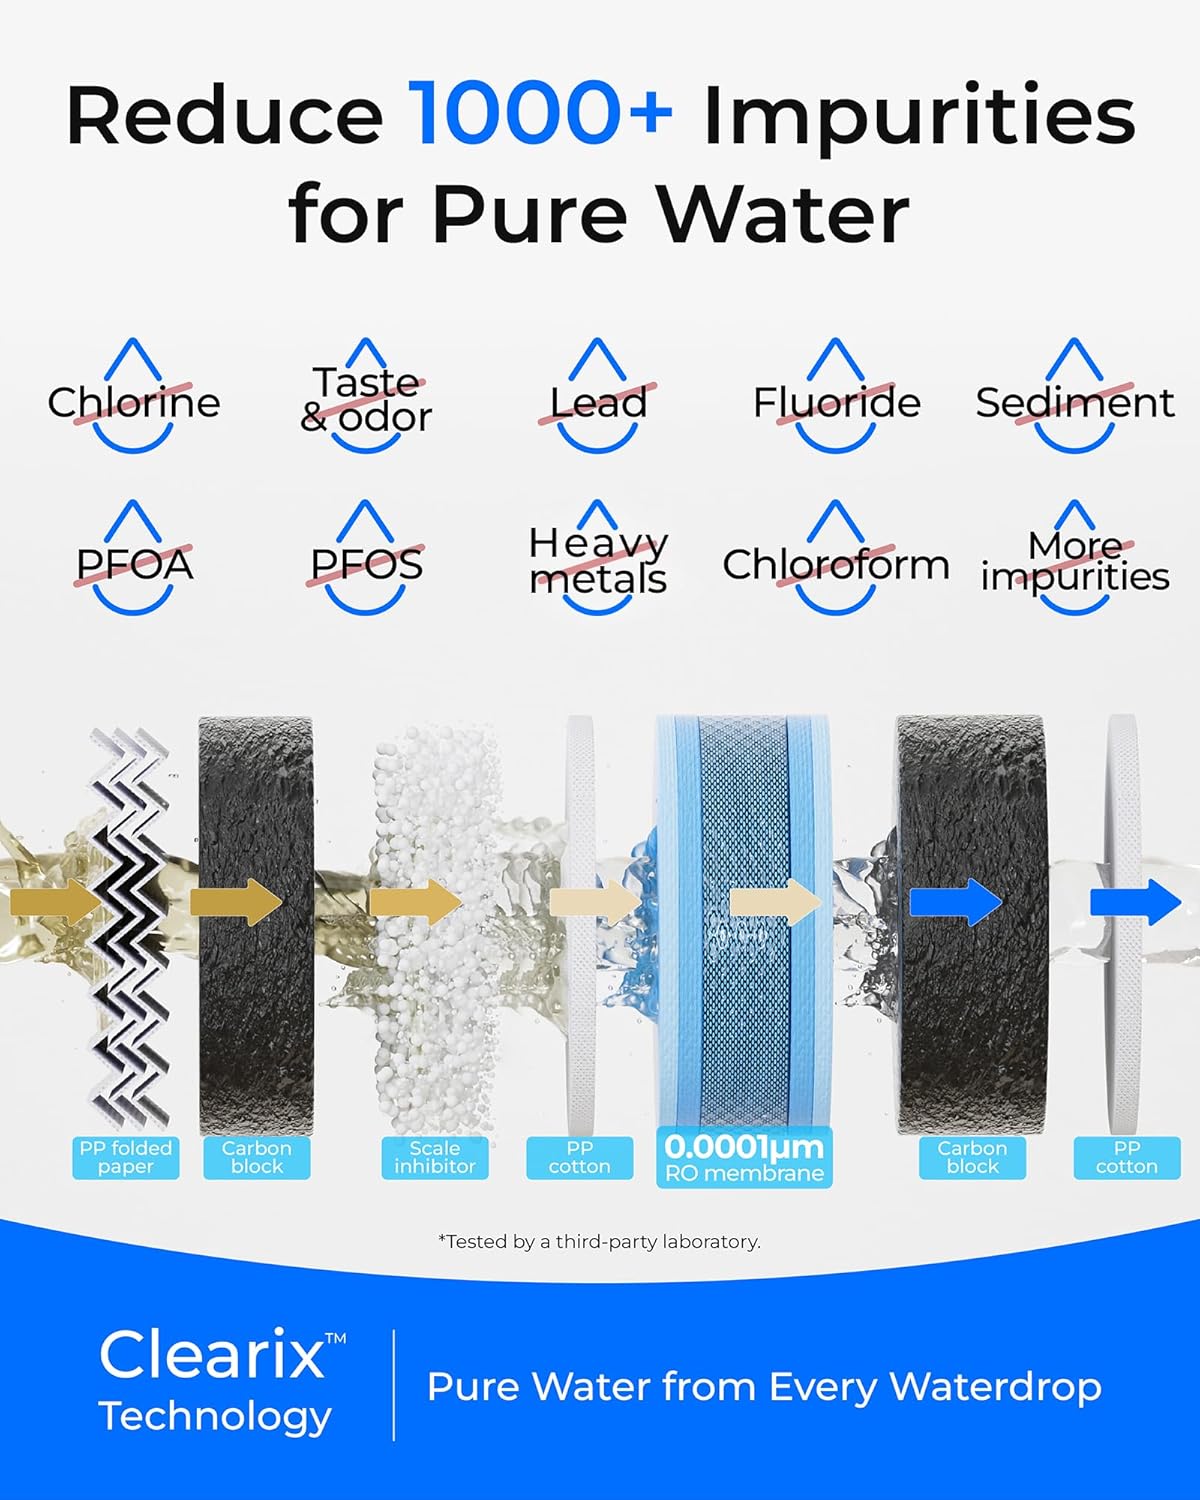
The advanced filtration technology ensures your water is free from harmful contaminants, delivering pure and safe drinking water.
Maintenance and Filter Replacement
Regular maintenance, especially filter replacement, is essential to ensure the continued performance and longevity of your Waterdrop G5P500 system.
1. Filter Life Indicators
The system features intelligent filter life indicators (CF and RO) on the front panel. These lights will change color (blue for normal, yellow for pre-warning, red for warning) and may beep to notify you when it's time to replace a filter based on usage time or processed capacity.
2. Replacing Filters
Before replacing any filter, turn off the RO faucet and wait 5 minutes to release internal pressure. Twist the old filter counterclockwise to remove it. After removing, press the center knob on the old filter over a bucket to release any remaining water. Insert the new filter into the housing, aligning the marks, and twist clockwise until it clicks securely.

The long-lasting filters provide cost-effective filtration, with the RO filter lasting up to 24 months and the CF filter up to 6 months.
This video demonstrates the simple process of replacing the filters in your Waterdrop G5P500 system.
3. Resetting Filter Life Indicator
After replacing a filter, hold down the corresponding filter icon (CF or RO) on the system panel for 7 seconds until the system beeps to reset the filter life indicator.
4. Flushing After Replacement
After replacing a filter and resetting the indicator, turn on the RO faucet to flush the system. Flush the CF filter for 15 minutes and the RO filter for 30 minutes. Flashing lights on the front panel indicate flushing is in progress. Steady lights mean flushing is complete.
Troubleshooting
If you encounter any issues with your Waterdrop G5P500 system, refer to the common problems and solutions below:
- No Water Flow or Slow Flow: Check if the water supply valve is fully open. Ensure the power adapter is securely plugged in. Verify that the filter life indicators are not red, indicating a need for filter replacement. Check for any kinks or blockages in the tubing.
- System Beeping Continuously: A continuous beep usually indicates a filter needs replacement (red indicator light). Replace the indicated filter and reset the filter life indicator.
- Water Leakage: Immediately shut off the water supply. Check all quick-connect fittings and ensure they are fully inserted and secured with lock clips. Inspect tubing for any damage or cracks.
- Unusual Taste or Odor: This may indicate that filters need replacement, especially the CF filter. Ensure proper flushing after new filter installation.
Product Specifications
| Feature | Detail |
|---|---|
| Product Dimensions | 5.69"L x 16.69"W x 13.9"H |
| Weight | 21.4 Pounds |
| Brand | Waterdrop |
| Special Feature | 7-stage Filtration, 500GPD High Capacity, 2:1 Pure to Drain |
| Feed Water Pressure | 14.5-87 psi (0.1-0.6 MPa) |
| Feed Water Temperature | 41-100°F (5-38°C) |
Warranty and Support
Waterdrop offers various protection plans for your peace of mind. For detailed warranty information, please refer to the official product documentation or contact Waterdrop customer service.
Customer Support
Waterdrop provides 7/24 customer service to assist with any water issues, installation queries, accessories, or replacement filters. You can find contact information on the official Waterdrop website or through your purchase platform.
Official User Manual (PDF)
For a complete and detailed user manual, you can download the PDF version:


