1. Introduction
Thank you for choosing the HWB Farmhouse 3-in-1 Vanity Desk. This versatile furniture piece is designed to function as a makeup vanity, an office desk, or a storage cabinet, adapting to your needs. It features a flip-top mirror with adjustable 3-color LED lighting, a convenient charging station, multiple drawers, and adjustable shelves for organized storage. This manual provides essential information for safe assembly, operation, and maintenance of your new vanity desk.

Figure 1: An overview of the HWB Farmhouse 3-in-1 Vanity Desk, showcasing its primary configuration as a makeup vanity with the mirror flipped up and the accompanying stool.

Figure 2: This image illustrates the versatility of the HWB vanity, showcasing its use as a makeup vanity, a storage cabinet, and an office desk, suitable for various rooms like bedrooms, cloakrooms, living rooms, and study rooms.
2. Safety Instructions
Please read and understand all safety instructions before assembly and use. Failure to follow these instructions may result in injury or damage to the product.
- Keep all small parts and packaging materials away from children and pets to prevent choking hazards.
- Assemble the unit on a soft, clean surface to prevent scratches.
- Ensure all screws and fasteners are securely tightened before use. Periodically check and re-tighten as necessary.
- Do not overload drawers or shelves. Refer to specifications for weight capacity.
- For electrical components (lights, charging station), ensure the power source matches the product's requirements. Do not use damaged cords or plugs.
- Avoid placing hot items directly on the surface to prevent damage.
- Do not stand or sit on the desk surface, except for the designated stool.
3. Package Contents
Before beginning assembly, verify that all components listed in your product's assembly guide are present and undamaged. If any parts are missing or damaged, please contact customer support.
- Main Desk Components (panels, top, base)
- Drawer Components
- Stool Components
- Flip-Top Mirror with LED Lights
- Charging Station Unit
- Hardware Pack (screws, dowels, cam locks, handles, etc.)
- Assembly Instructions Manual

Figure 3: This image highlights key features of the vanity desk, including the lighted flip-top mirror, 6-compartment storage, lighting control and charging panel, 5 sliding drawers, 2 adjustable storage shelves, and the stool with hidden storage.
4. Setup and Assembly
Follow the step-by-step instructions provided in the separate assembly guide included with your product. The general assembly process involves:
- Unpacking: Carefully remove all components from the packaging. Lay them out on a clean, soft surface to prevent damage.
- Identify Parts: Match each part to the diagrams in the assembly guide.
- Assemble Main Desk Frame: Connect the side panels, back panel, and base using the provided hardware.
- Install Drawers: Assemble the drawer boxes and install the drawer slides. Insert the drawers into their designated slots.
- Attach Shelves: Insert adjustable shelves into the side cabinets as desired.
- Install Flip-Top Mirror: Secure the mirror assembly to the desk top according to the instructions.
- Connect Charging Station: Integrate the charging station unit into its designated slot on the desk top and connect its power cable.
- Assemble Stool: Follow the separate instructions for assembling the padded stool, including its hidden storage compartment.
- Final Checks: Ensure all connections are tight and the desk is stable before use.

Figure 4: A close-up of the internal storage solutions, highlighting the 9-compartment organizer within the flip-top section, the adjustable shelves in the side cabinets, and the hidden storage space with drawers within the accompanying stool.
5. Operating Instructions
5.1 Flip-Top Mirror Operation
- To use as a makeup vanity, gently lift the top panel to reveal the mirror and internal storage compartments.
- To use as a regular desk or storage cabinet, gently lower the top panel until it is flush with the desk surface.
5.2 LED Lighting Control
The mirror features integrated LED lights with adjustable color modes and brightness.

Figure 5: This image provides a closer look at the HD flip-top mirror mechanism and the integrated charging station, detailing the light and brightness buttons, USB, Type-C ports, and AC outlets.
- Power On/Off: Press the 'Light Button' (often depicted as a light bulb icon) once to turn the lights on. Press again to cycle through color modes or turn off.
- Adjust Lighting Mode: With the lights on, repeatedly press the 'Light Button' to switch between Warm Light, Cool Light, and Blue Light modes.
- Adjust Brightness: Use the 'Brightness Button' (often depicted as a sun icon) to increase or decrease the light intensity. Hold the button down to smoothly adjust brightness, or press repeatedly for stepped adjustments.
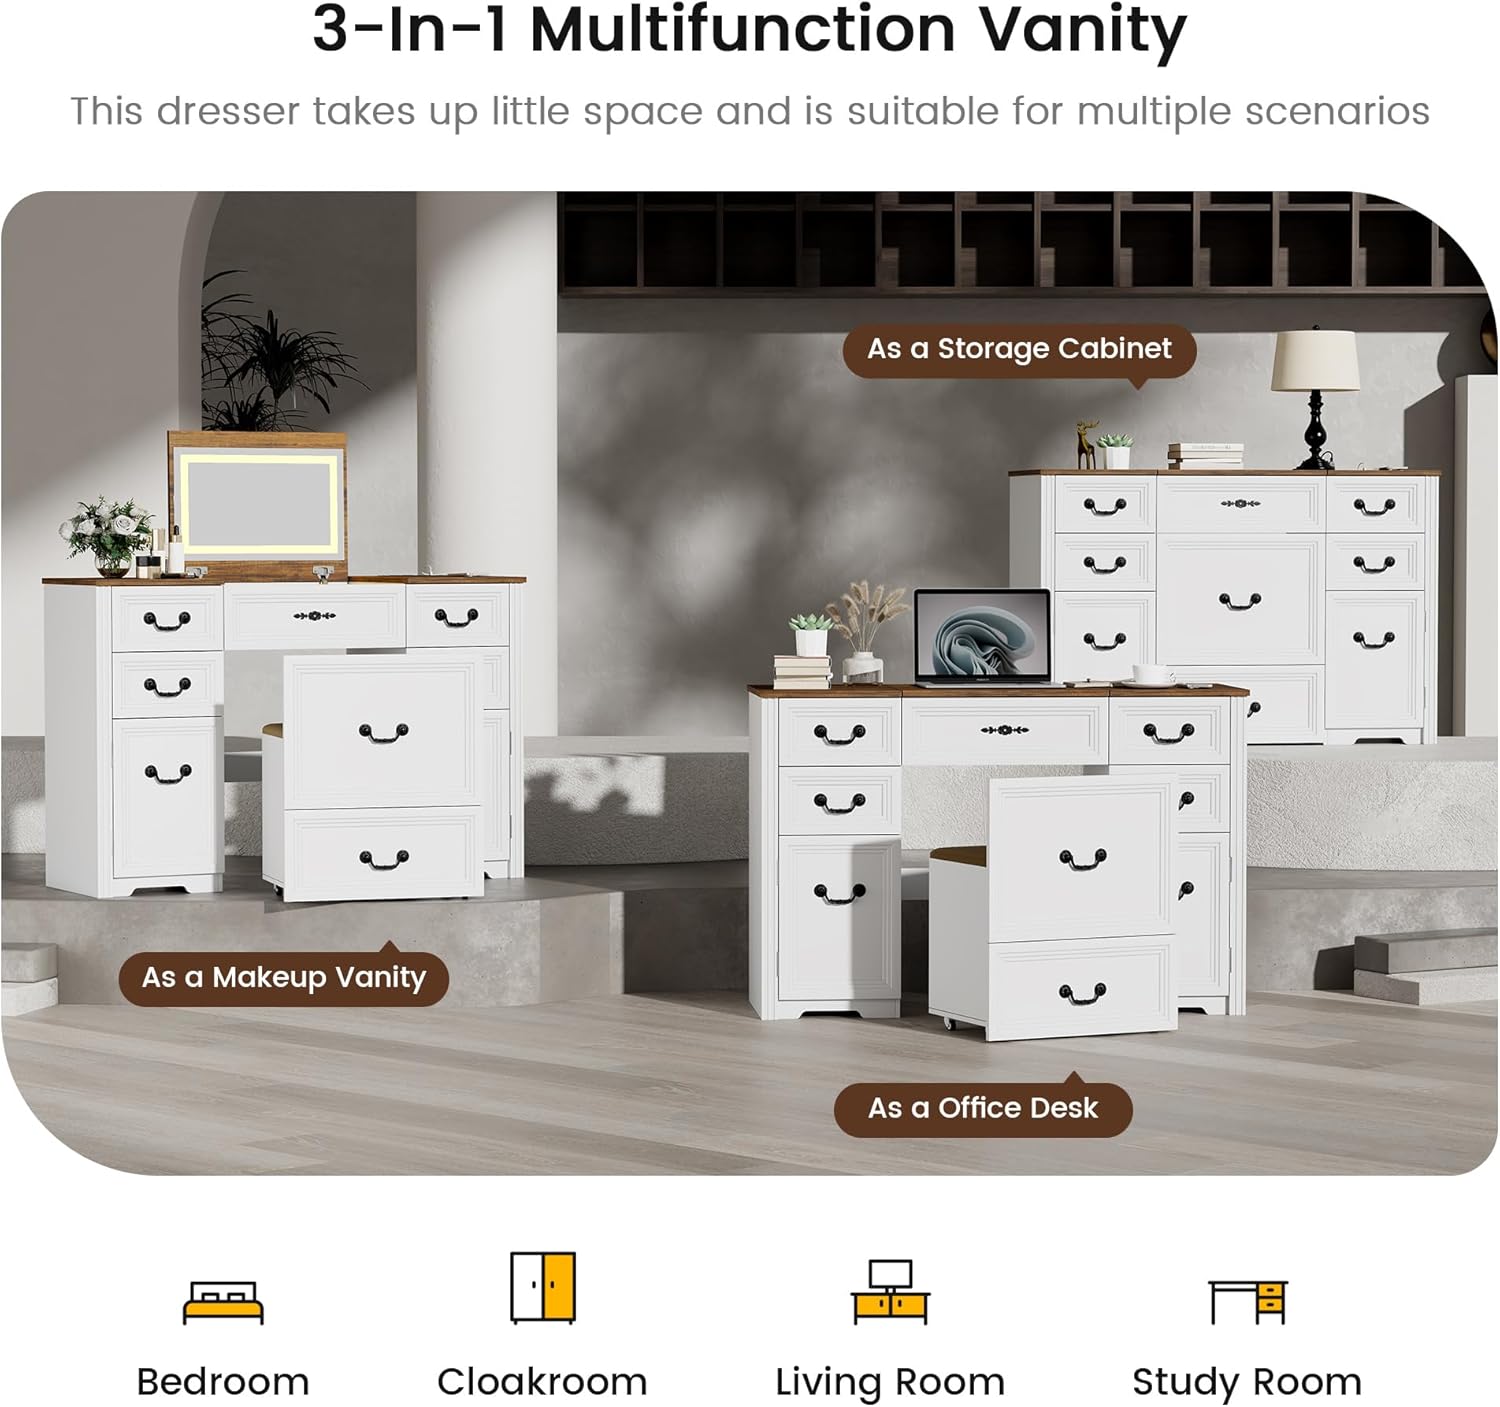
Figure 6: An illustration demonstrating the three distinct lighting modes (Warm, Cool, Blue) and the adjustable brightness feature of the vanity mirror lights, controlled by dedicated buttons.
5.3 Charging Station Usage
The integrated charging station provides convenient power access for your devices.

Figure 7: A detailed view of the desk's thick table top, emphasizing the integrated charging station with a phone connected, and the overall sturdy construction.
- Plug the charging station's power cord into a standard wall outlet.
- Use the USB and Type-C ports to charge compatible electronic devices.
- The two AC outlets can be used for small appliances or chargers. Ensure the total wattage does not exceed the charging station's maximum capacity.
6. Maintenance
Proper care and maintenance will extend the life of your vanity desk.
- Cleaning: Wipe surfaces with a soft, damp cloth. Avoid abrasive cleaners, harsh chemicals, or excessive moisture, which can damage the finish.
- Mirror Care: Clean the mirror with a glass cleaner and a lint-free cloth.
- Electrical Components: Keep the charging station and LED lights dry. Do not attempt to repair electrical components yourself; contact qualified personnel if issues arise.
- Hardware: Periodically check all screws and fasteners to ensure they remain tight. Re-tighten as needed to maintain stability.
- Avoid Direct Sunlight: Prolonged exposure to direct sunlight can cause fading or damage to the finish.
7. Troubleshooting
If you encounter any issues with your HWB Vanity Desk, refer to the following common problems and solutions:
- Problem: LED lights are not turning on.
Solution: Ensure the charging station's power cord is securely plugged into a working wall outlet. Check if the light button has been pressed. - Problem: Charging station ports are not working.
Solution: Verify the charging station is powered on and connected to a live outlet. Test with a different device or cable to rule out device-specific issues. - Problem: Drawers are sticking or difficult to open/close.
Solution: Check if the drawers are properly aligned on their slides. Ensure no items are obstructing the drawer's movement. Lightly lubricate drawer slides if necessary. - Problem: Desk feels unstable or wobbly.
Solution: Re-check all assembly hardware and tighten any loose screws or fasteners. Ensure the desk is placed on a level surface.
8. Specifications
| Brand | HWB |
| Model Number | CY-85096 |
| Product Dimensions | 15.7"D x 31.5"W x 19.7"H (15.7 x 31.5 x 19.7 inches) |
| Item Weight | 116.8 pounds |
| Material | Engineered Wood |
| Color | White |
| Furniture Finish | Wood |
9. Warranty and Support
For warranty information, technical support, or to order replacement parts, please refer to the contact information provided with your purchase or visit the official HWB website. Please have your model number (CY-85096) and purchase date available when contacting support.


