Plyisty Plyisty4hbaiv70ys
Smart Video Call Camera with Screen User Manual
Model: Plyisty4hbaiv70ys | Brand: Plyisty
1. Introduction
The Plyisty Smart Video Call Camera with Screen is an advanced indoor security and communication device designed to keep you connected with your loved ones and monitor your home. Featuring a 2K HD camera, AI learning capabilities, two-way audio, and a convenient one-touch video call function, this device offers both security and ease of communication. It also includes a daily clock reminder feature for improved organization.
2. Safety Information
- Ensure the device is placed on a stable, flat surface to prevent falling.
- Use only the provided power adapter to avoid damage or fire.
- Keep the device away from water, moisture, and extreme temperatures.
- Do not attempt to disassemble or repair the device yourself. Contact qualified personnel for service.
- Keep out of reach of small children to prevent accidental ingestion of small parts.
3. Package Contents
Please check the package for the following items:
- 1 x Smart Video Call Camera
- 1 x Power Cord (Type-C)
- 1 x User Manual
4. Product Overview
Familiarize yourself with the components of your Smart Video Call Camera.

Figure 4.1: Front View and Key Features
This image highlights the main components visible from the front, including the pan-tilt-zoom (PTZ) camera, HD lens, infrared night vision, dual microphones, and the 4.3-inch IPS HD screen. It also shows the two call keys for quick communication.
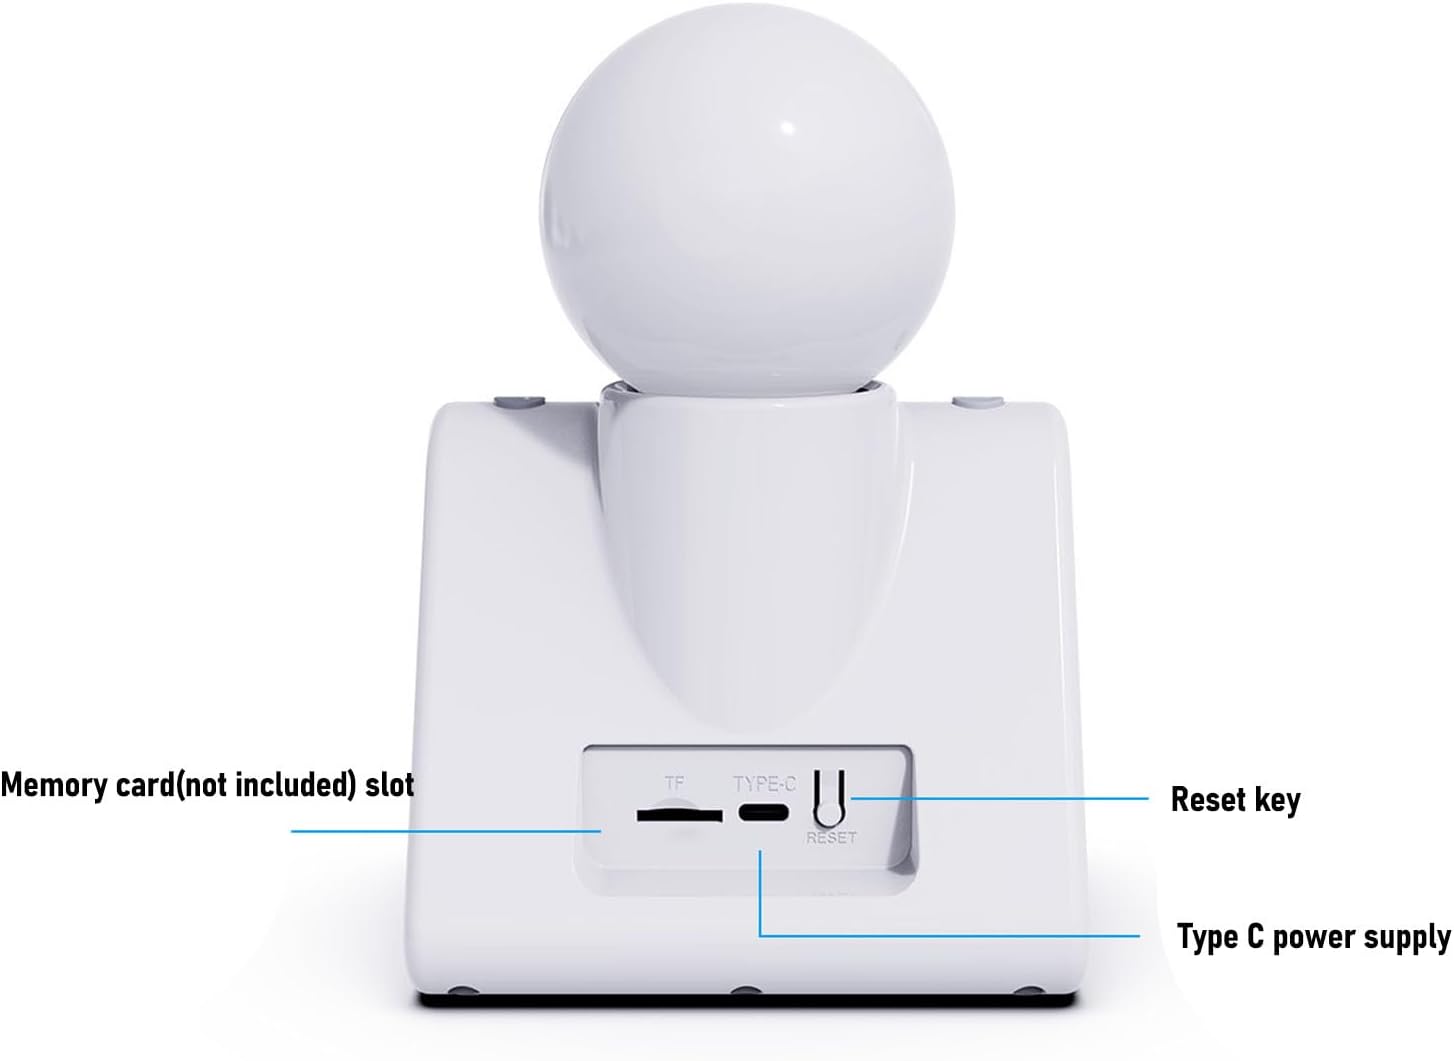
Figure 4.2: Rear View and Ports
This image displays the back of the device, indicating the slot for a small memory card (TF card, not included), the Type-C port for power supply, and the reset key for system reinitialization.

Figure 4.3: Device Front View
A clear view of the camera from the front, showcasing its integrated screen displaying time and date, indicating its readiness for use.
Key Components:
- 2K HD Camera: Provides clear and smooth real-time video with 1080P 2MP resolution.
- IPS 4.3-inch HD Screen: For displaying video calls, time, and other information.
- Dual MIC Array: Ensures clear two-way audio communication.
- Call Keys (1 & 2): Dedicated buttons for one-touch video calls.
- PTZ350°: Pan-Tilt-Zoom functionality for wider coverage.
- Infrared Night Viewing: Allows monitoring up to 8 meters in low-light conditions.
- TF Card Slot: Supports local storage up to 128GB (memory card not included).
- Type-C Power Supply: For connecting the power adapter.
- Reset Key: For factory reset or troubleshooting.
5. Features
5.1 AI Voice Function
The camera supports AI learning, allowing it to answer multidisciplinary questions. You can interact with it at any time, asking questions, telling jokes, or stories, providing a warm and interactive experience.
5.2 Smart Voice Call
The video call camera supports calling specific roles or family names, making communication more convenient. If the device does not answer a call, a voice reminder will be sent to your phone, ensuring you don't miss family calls.

Figure 5.1: Missed Call Notification
This image demonstrates how the device notifies your phone if a call is missed, ensuring important communications are not overlooked.
5.3 Daily Clock Reminder
The two-way video call camera supports precise clock reminders, promoting a more organized life and offering great convenience for daily routines.

Figure 5.2: Daily Clock Reminder Function
This image illustrates the device's ability to display reminders on its screen, synchronized with a mobile application for setting and managing schedules.
5.4 One-Touch Video Call
Simply press a key to connect without any complex setup. The 2K indoor security camera facilitates easy conversation with your mobile phone.

Figure 5.3: Video Call Between Devices
This image shows the seamless video calling capability between two Smart Video Call Cameras, highlighting the ease of communication.
5.5 Applicable Scenario
The camera provides clear and smooth real-time video, suitable for monitoring your family, children, babysitter, pets, or elderly individuals at any time. Video can be stored locally (on a memory card) or in the cloud (cloud storage service may require subscription).
6. Setup Guide
6.1 Initial Power-On
- Unpack the Smart Video Call Camera and its accessories.
- Connect the provided Type-C power cord to the camera's Type-C port (refer to Figure 4.2).
- Plug the other end of the power cord into a standard power outlet.
- The device will power on automatically and display the boot screen.
6.2 Network Connection and App Pairing
To utilize all smart features, the camera needs to be connected to your home Wi-Fi network and paired with its dedicated mobile application.
- Download the App: Scan the QR code provided in the quick start guide (if available) or search for the official app (e.g., 'Smart Home Camera' or similar, check packaging for exact name) on your smartphone's app store (iOS App Store or Google Play Store).
- Create an Account: Open the app and follow the on-screen instructions to create a new user account or log in if you already have one.
- Add Device: In the app, select 'Add Device' or the '+' icon. Choose 'Smart Camera' or 'Video Call Device' from the list.
- Connect to Wi-Fi: Follow the app's instructions to connect the camera to your Wi-Fi network. This usually involves entering your Wi-Fi password and scanning a QR code displayed on your phone with the camera's lens.
- Pairing Confirmation: Once connected, the camera will indicate successful pairing (e.g., a voice prompt or a change in indicator light). The device will then appear in your app's device list.

Figure 6.1: App Interface Overview
This image shows the camera alongside a smartphone, illustrating how the mobile application provides access to multiple camera feeds and settings.
6.3 Inserting a Memory Card (Optional)
For local video storage, insert a small memory card (TF card) into the designated slot on the back of the device (supports up to 128GB).
- Ensure the device is powered off before inserting or removing the memory card.
- Locate the TF card slot (refer to Figure 4.2).
- Gently insert the memory card with the gold contacts facing down until it clicks into place.
- Power on the device. The app may prompt you to format the card for optimal performance.
7. Operating Instructions
7.1 Making a Video Call
- One-Touch Call: Press either Call Key 1 or Call Key 2 (refer to Figure 4.1) to initiate a video call to a pre-configured contact.
- Via Mobile App: Open the app, select the camera, and use the video call function within the app to call the camera or other paired devices/contacts.
7.2 Receiving a Video Call
- When an incoming call is detected, the screen will display the caller's information.
- Press any call key on the device to answer the call.
- If the call is not answered, a notification will be sent to the paired mobile phone.
7.3 Using AI Voice Function
- Activate the AI voice assistant by saying the designated wake word (e.g., "Hey Camera" or as configured in the app).
- Once activated, you can ask questions, request information, or engage in conversation.
7.4 Setting Daily Clock Reminders
- Open the mobile application and navigate to the 'Reminders' or 'Clock' settings for the device.
- Set specific times and messages for daily reminders.
- The camera's screen will display the reminder at the scheduled time, and an audible alert may sound.
7.5 Monitoring and Recording
- Live View: Access the live video feed through the mobile app at any time.
- Pan-Tilt-Zoom (PTZ): Use the controls in the app to remotely adjust the camera's viewing angle (350° rotation).
- Recording: Video footage can be automatically recorded to the inserted memory card or uploaded to cloud storage (if subscribed). Review recordings via the app.
8. Maintenance
- Cleaning: Use a soft, dry cloth to clean the camera lens and screen. Do not use liquid cleaners or abrasive materials.
- Storage: If storing the device for an extended period, power it off and keep it in a cool, dry place.
- Software Updates: Regularly check the mobile app for firmware updates to ensure optimal performance and security.
9. Troubleshooting
| Problem | Possible Cause | Solution |
|---|---|---|
| Device does not power on. | No power connection; faulty adapter. | Ensure power cord is securely connected to both the device and the outlet. Try a different outlet. |
| Cannot connect to Wi-Fi. | Incorrect Wi-Fi password; weak signal; router issues. | Double-check Wi-Fi password. Move device closer to router. Restart router. Ensure Wi-Fi is 2.4GHz (if applicable). |
| Video feed is blurry or black. | Protective film on lens; poor lighting; camera malfunction. | Remove any protective film from the lens. Ensure adequate lighting. Clean the lens. Restart the device. |
| Two-way audio is unclear. | Microphone/speaker obstruction; network latency. | Ensure microphones and speakers are not blocked. Check network connection stability. Reduce background noise. |
| Cannot make/receive calls. | No network connection; app not running; incorrect contact configuration. | Verify network connection. Ensure app is open and device is online. Check call settings in the app. |
10. Specifications
| Feature | Detail |
|---|---|
| Brand | Plyisty |
| Model | Plyisty4hbaiv70ys |
| Video Resolution | 1920 x 1080 (2K HD) |
| Screen Type | IPS 4.3 inch HD screen |
| Storage | Supports small memory card (TF card), up to 128GB (not included) |
| Night Vision | Infrared, up to 8 meters |
| PTZ | 350° Pan-Tilt-Zoom |
| Dimensions (Package) | 20 x 14 x 14 cm |
| Weight (Package) | 587 Grams |
| Power Supply | Type-C |
11. Warranty and Support
11.1 Manufacturer's Warranty
This product comes with a manufacturer's warranty of 90 days from the date of purchase. This warranty covers defects in materials and workmanship under normal use. It does not cover damage caused by misuse, accidents, unauthorized modifications, or natural disasters.
11.2 Customer Support
For technical support, troubleshooting assistance, or warranty claims, please contact Plyisty customer service. Refer to the product packaging or the official brand website for the most up-to-date contact information.
Online Support: Visit the Plyisty official website for FAQs, support articles, and contact forms.
Email Support: [Insert Manufacturer's Support Email Here, if available]
Phone Support: [Insert Manufacturer's Support Phone Number Here, if available]
Ask a question about this manual
Ask about setup, troubleshooting, compatibility, parts, safety, or missing instructions. Manuals+ will review the question and use this page’s manual context to help answer it.