1. Product Overview
The Wood Ranger Mini Chainsaw is a compact and powerful cordless electric chain saw designed for light carpentry, yard work, and garden maintenance. Its 4-inch chain and efficient motor allow for easy cutting of branches and small logs. The ergonomic design ensures comfortable handling and maneuverability.
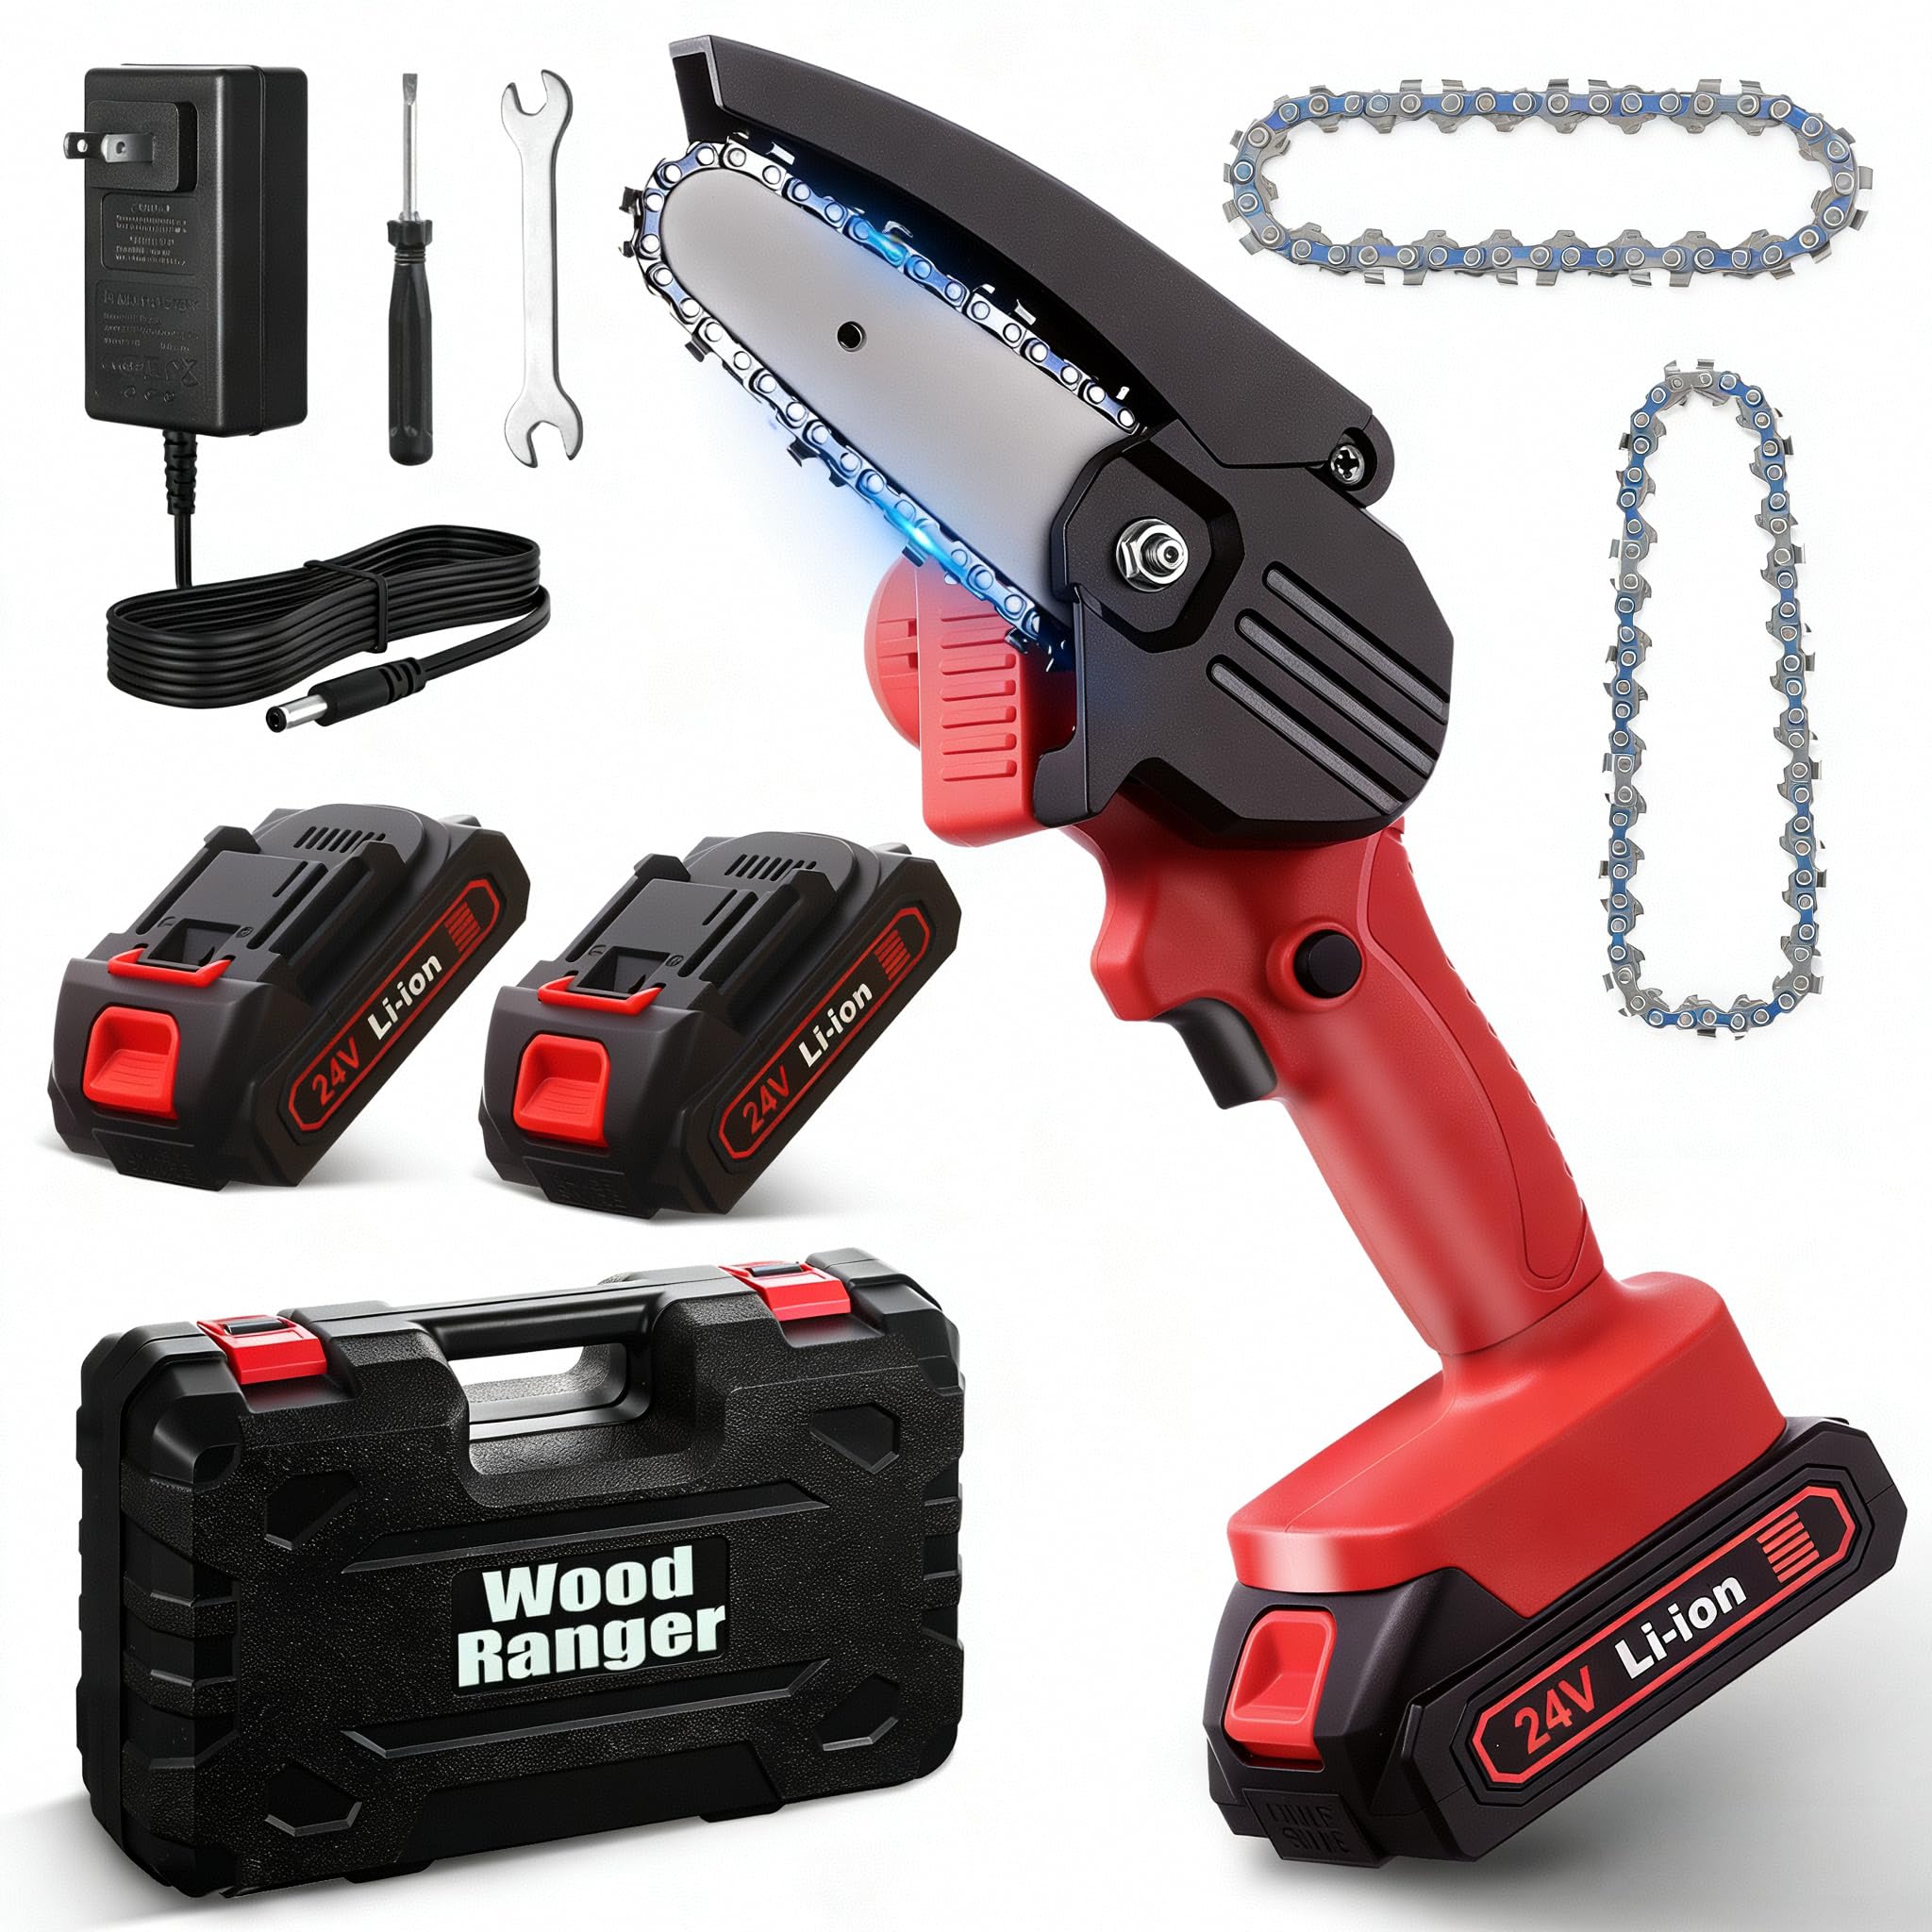
Image 1.1: The Wood Ranger Mini Chainsaw, a compact and portable tool for various cutting tasks.
Key Features:
- Compact and Powerful: Equipped with a highly efficient motor for reliable cutting performance on branches and small logs.
- Portable Design: Weighs only 2.42 pounds, featuring an ergonomic handle for comfortable use and easy maneuverability.
- Safety Features: Includes a safety switch, chain brake, and a protective cover to prevent debris from flying during operation.
- Easy to Use: Simple design with an easy-to-start mechanism and tool-less chain tension adjustment.
- Durable Construction: Made with high-quality materials, including a deep quenched steel chain, for long-lasting service.

Image 1.2: Illustration of the chainsaw's premium pure copper motor, highlighting quicker cutting, more torque, longer running time, and overheat protection.
2. Safety Information
Always prioritize safety when operating power tools. Read and understand all safety warnings and instructions before using the Wood Ranger Mini Chainsaw. Failure to follow these instructions may result in electric shock, fire, and/or serious injury.
General Safety Guidelines:
- Wear appropriate personal protective equipment (PPE), including safety glasses, gloves, and hearing protection.
- Ensure the work area is clear of bystanders, especially children and pets.
- Do not operate the chainsaw in wet conditions or in the presence of flammable liquids or gases.
- Keep a firm grip on the chainsaw with both hands during operation.
- Never overreach. Maintain proper footing and balance at all times.
- Disconnect the battery pack before making any adjustments, changing accessories, or storing the tool.
Chainsaw Specific Safety Features:
- Safety Baffle/Guard: The protective cover helps prevent debris from flying towards the user.
- Safety Lock: Requires two buttons to be pressed simultaneously to activate the saw, preventing accidental starts.
- Non-Slip Handle: Provides a secure grip for better control.

Image 2.1: Overview of the chainsaw's multiple safety protections, including the safety baffle, safety lock, non-slip handle, and an integrated LED light.
3. Package Contents
Upon opening your Wood Ranger Mini Chainsaw package, verify that all components are present and undamaged. The standard package includes:
- 1 x Mini Chainsaw Unit
- 2 x 24V Lithium-Ion Batteries
- 1 x Battery Charger
- 3 x Saw Chains (Note: Product title indicates 3 chains, specifications indicate 1 chain. Please verify actual contents upon receipt.)
- 1 x Screwdriver
- 1 x Wrench
- 1 x Storage Box/Carrying Case
- 1 x User Manual

Image 3.1: A visual representation of all items included in the Wood Ranger Mini Chainsaw package.
4. Setup
4.1 Battery Charging
- Connect the charger to a power outlet.
- Slide the battery pack onto the charger. Ensure it clicks into place.
- Allow 1.5-2 hours for a full charge. The indicator light on the charger will change to show charging status.
- Once fully charged, disconnect the battery from the charger.

Image 4.1: The 24V Lithium-Ion battery, showing approximately 40 minutes of working time and 1.5-2 hours of charging time.
4.2 Battery Installation
- Align the charged battery pack with the battery slot on the bottom of the chainsaw handle.
- Slide the battery into the slot until it locks securely into place.
- To remove, press the release button(s) on the battery pack and slide it out.
4.3 Chain Installation and Tension Adjustment
Refer to the video below for a visual guide on installing and adjusting the chain.
Video 4.1: This video demonstrates the unboxing, battery installation, chain setup, and initial operation of the mini chainsaw. It also highlights the safety guard and trigger mechanism.
- Ensure the battery is removed before handling the chain.
- Carefully place the chain around the guide bar, ensuring the cutting teeth are facing the correct direction.
- Mount the guide bar and chain onto the chainsaw body.
- Use the provided wrench to tighten the retaining nut, adjusting the chain tension as needed. The chain should be snug but still able to move freely around the guide bar.
- Important: If the chainsaw does not cut effectively, the chain may be installed backward. Remove the chain and reinstall it with the cutting teeth facing the opposite direction.
5. Operation
5.1 Starting the Chainsaw
- Ensure the battery is securely installed.
- With one hand, press and hold the safety lock button (usually located on the side of the handle).
- With the other hand, press the trigger switch to start the chainsaw. Release the safety lock button once the saw is running.
5.2 Cutting Techniques
Always maintain a stable stance and a firm grip on the chainsaw. Allow the chainsaw to reach full speed before engaging the material. Apply light pressure and let the saw do the work. Avoid forcing the saw, as this can lead to kickback or damage to the tool.
Video 5.1: This video provides a detailed overview of the 4-inch cordless electric handheld chainsaw, including its components, assembly, and practical demonstrations of cutting various bushes and branches.

Image 5.1: Examples of various scenarios where the mini chainsaw can be used, including forestry tasks, cutting with the chainsaw bar, and wood-making.
5.3 Stopping the Chainsaw
Release the trigger switch to stop the chainsaw. The chain brake will engage automatically to quickly stop the chain's movement.
6. Maintenance
Regular maintenance ensures the longevity and safe operation of your chainsaw.
6.1 Chain Sharpening/Replacement
- A dull chain will reduce cutting efficiency and increase strain on the motor. Sharpen the chain regularly or replace it with a new one when necessary.
- Use the provided extra chain as a replacement when the original becomes too dull or damaged.

Image 6.1: Close-up of the deep quenched steel chain, designed for durability and tackling tough tasks.
6.2 Cleaning
- After each use, remove the battery and clean the chainsaw.
- Use a brush or compressed air to remove sawdust, wood chips, and debris from the chain, guide bar, and motor vents.
- The safety guard can be pulled up to easily remove any trapped leaves or debris.
6.3 Storage
- Store the chainsaw in its carrying case in a dry, secure location, out of reach of children.
- Ensure the battery is removed from the chainsaw before long-term storage.
7. Troubleshooting
| Problem | Possible Cause | Solution |
|---|---|---|
| Chainsaw does not start | Battery not charged or improperly installed. Safety lock not engaged correctly. | Ensure battery is fully charged and correctly inserted. Press the safety lock button and trigger simultaneously. |
| Chainsaw cuts poorly or not at all | Chain installed backward. Chain is dull. Chain tension is incorrect. | Check chain direction and reinstall if necessary. Sharpen or replace the chain. Adjust chain tension. |
| Excessive vibration or noise | Loose chain. Damaged chain or guide bar. | Adjust chain tension. Inspect chain and guide bar for damage and replace if needed. |
| Motor overheats | Overloading the saw. Blocked ventilation. | Reduce cutting pressure. Clear debris from motor vents. Allow the saw to cool down. |
8. Specifications
| Feature | Detail |
|---|---|
| Brand | Generic |
| Model Number | WD-001 |
| Power Source | Battery Powered |
| Horsepower | 350 Watts |
| Item Weight | 2.42 Pounds |
| Product Dimensions (L x W x H) | 4.72" x 2.95" x 13.38" |
| Chain Length | 4 Inches |
| Manufacturer | WD |
9. Warranty and Support
For warranty information, returns, or technical support, please refer to the documentation included with your purchase or contact the seller directly. Specific warranty terms and conditions may vary.