1. Introduction
This manual provides essential instructions for the assembly, operation, and maintenance of your KCCLVER Anthracite Aluminum Greenhouse. Designed for hobby gardening, this spacious greenhouse offers a protected environment for your plants, shielding them from adverse weather conditions. Please read this manual thoroughly before assembly and use to ensure safe and efficient operation.
The greenhouse features a sturdy aluminum frame, UV-resistant polycarbonate panels, a robust base frame for stability, an efficient gutter system for water drainage, and a roof vent for optimal ventilation.
2. Safety Information
- Snow Load Warning: The roof of this greenhouse is not designed to withstand heavy snowfall. In areas prone to heavy snow, it is recommended to clear snow accumulation promptly or consider temporary disassembly during winter months.
- Intended Use: This greenhouse is an impermanent standalone agricultural installation intended for hobby gardening only. It is not a construction building or conservatory for leisure purposes.
- Assembly Safety: Wear appropriate personal protective equipment, such as gloves, during assembly to prevent cuts from sharp edges of aluminum profiles or panels.
- Anchoring: Ensure the greenhouse is securely anchored to the ground to prevent wind damage. The base frame provides stability, but additional anchoring may be necessary depending on local weather conditions.
- Ventilation: Ensure proper ventilation, especially on hot days, to prevent overheating inside the greenhouse.
- Children and Pets: Keep children and pets away from the assembly area. Do not allow them to play unsupervised inside or around the greenhouse.
3. Package Contents
Before beginning assembly, verify that all components are present and undamaged. While a detailed list is not provided, the package typically includes:
- Aluminum frame profiles
- Polycarbonate panels
- Base frame components (4 strong profiles)
- Door assembly components
- Roof vent assembly components
- Metal clips for panel fixation
- Fasteners and hardware (screws, nuts, bolts, washers)
- Instruction manual
If any parts are missing or damaged, please contact your retailer for assistance.
4. Setup and Assembly
Assembly is required for this greenhouse. It is recommended to have at least two people for assembly. Choose a level, stable site for installation, clear of obstructions and with good sun exposure.
- Prepare the Base: Assemble the base frame (consisting of 4 strong profiles) on a level surface. Ensure it is square and securely fastened. This base provides crucial stability.
- Construct the Frame: Begin assembling the aluminum frame profiles according to the provided diagrams. Start with the vertical supports and connect them with horizontal beams.
- Install Panels: Carefully slide the polycarbonate panels into the designated channels of the aluminum frame. Secure them using the provided metal clips. Ensure panels are oriented correctly for UV protection.
- Assemble Door: Construct the sliding door assembly and install it into the designated opening. Ensure it slides smoothly.
- Install Roof Vent: Assemble and install the roof vent mechanism. This allows for adjustable ventilation.
- Final Checks: Verify all screws and fasteners are tightened. Ensure the structure is stable and all panels are securely in place.
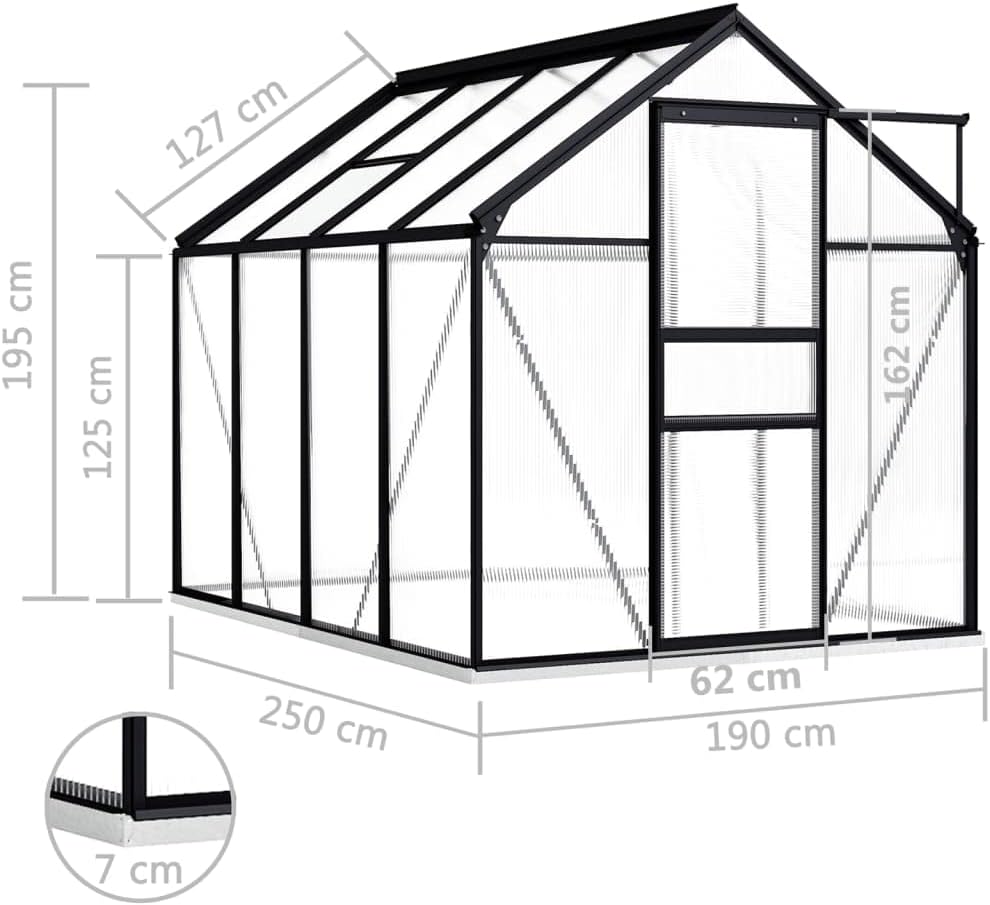
Image 1: Diagram illustrating the overall dimensions of the greenhouse, including width, depth, and height measurements in centimeters, along with the base frame height.
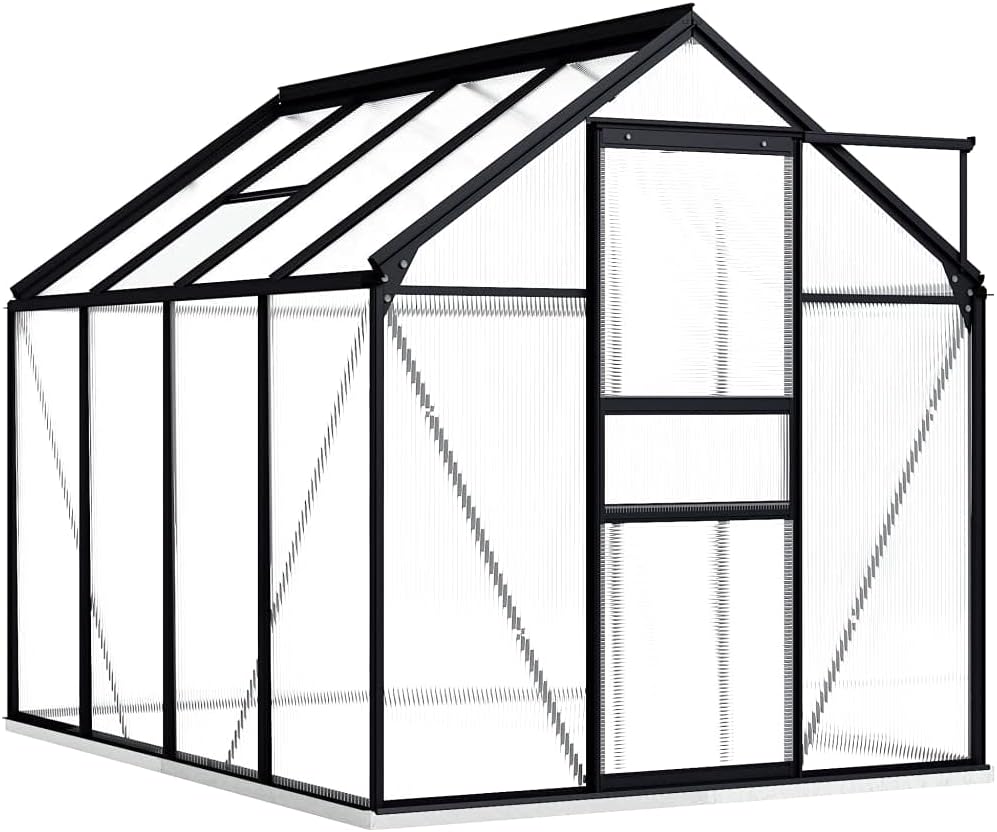
Image 2: An angled view of the fully assembled KCCLVER greenhouse, showcasing its anthracite aluminum frame, transparent polycarbonate panels, and integrated base frame.
5. Operating Instructions
- Ventilation: Utilize the roof vent to regulate temperature and humidity inside the greenhouse. Open it on warm days to allow hot air to escape and fresh air to circulate. Close it during cooler periods or at night to retain heat.
- Door Operation: The sliding door provides access to the greenhouse. Ensure it operates smoothly and can be securely closed to protect plants.
- Water Management: The integrated gutter system is designed to collect and drain rainwater. Consider directing the runoff to a collection barrel for irrigation purposes.
- Plant Placement: Arrange plants inside the greenhouse to optimize light exposure and air circulation. Consider the specific needs of each plant species.

Image 3: Close-up view of the roof vent mechanism, showing the metal arm and hinge that allow the vent panel to be opened for ventilation.

Image 4: Side view of the greenhouse with the sliding door partially open, illustrating the access point and the structure of the polycarbonate panels.
6. Maintenance
- Cleaning Panels: Regularly clean the polycarbonate panels with mild soap and water to remove dirt, dust, and algae buildup. Avoid abrasive cleaners or tools that could scratch the panels.
- Frame Inspection: Periodically inspect the aluminum frame for any signs of corrosion, loose fasteners, or damage. Tighten any loose screws and replace damaged components as necessary.
- Gutter System: Ensure the gutter system remains clear of debris (leaves, dirt) to allow for effective water drainage.
- Door and Vent: Lubricate the sliding door tracks and roof vent hinges annually to ensure smooth operation.
- Snow Removal: As noted in the safety section, promptly remove any snow accumulation from the roof to prevent structural damage.
7. Troubleshooting
- Problem: Poor Ventilation.
Solution: Ensure the roof vent is open during warm periods. Check for any obstructions around the vent or door opening. - Problem: Water Leakage.
Solution: Inspect panel seals and metal clips for proper seating. Ensure all panels are correctly installed and secured. Check the gutter system for blockages. - Problem: Unstable Structure.
Solution: Verify that the base frame is level and securely anchored to the ground. Check all frame connections and tighten any loose fasteners. - Problem: Door Sticking.
Solution: Clean the door tracks of any dirt or debris. Apply a silicone-based lubricant to the tracks to improve sliding.
8. Specifications
| Feature | Specification |
|---|---|
| Model | KCCLVER |
| Color | Anthracite and transparent |
| Material | Aluminum, Polycarbonate |
| Dimensions (W x D x H) | 74.8" x 98.4" x 52"/79.5" (190 cm x 250 cm x 132 cm/202 cm) |
| Ground Surface Area | 51.1 ft² (4.75 m²) |
| Capacity | 280.2 ft³ (7.94 m³) |
| Panel Thickness | 0.16" (4 mm) |
| Features | UV resistant panels, Base frame (4 strong profiles), Gutter system, Roof vent |
| Assembly Required | Yes |

Image 5: Front view of the KCCLVER greenhouse, highlighting the sliding door and the overall structure from the entrance perspective.

Image 6: Top-down view of the greenhouse roof, showing the arrangement of the polycarbonate panels and the roof vent.
9. Warranty and Support
For warranty information, please refer to the documentation provided at the time of purchase or contact your retailer directly. Warranty terms typically cover manufacturing defects.
For technical support, missing parts, or further assistance, please contact the manufacturer, KCCLVER, or your authorized retailer. Ensure you have your product model number (KCCLVER) and proof of purchase available when contacting support.