1. Introduction
This manual provides essential instructions for the safe and efficient operation of your BOSYTRO SJK-24V-480W-WX 24V 20A 480W DC Switching Power Supply. This unit is designed to convert AC mains power to a stable DC 24V output, suitable for a wide range of applications including LED strips, 3D printers, and CCTV camera security systems. Please read this manual thoroughly before installation and use, and retain it for future reference.

Image 1.1: The BOSYTRO 24V switching power supply is suitable for various applications such as LED advertising displays, security monitoring systems, automation equipment, car audio, LED light strips, and medical equipment.
2. Safety Instructions
To ensure safe operation and prevent damage, observe the following safety precautions:
- Input Voltage Selection: Before connecting the power supply, verify that the input voltage switch (115V/230V) is set to match your local mains voltage. Incorrect voltage selection can damage the unit.
- Proper Wiring: Ensure all wiring connections are secure and correct. Pay close attention to positive (V+) and negative (V-) DC output terminals and AC input connections (Live, Neutral, Ground).
- Grounding: Always connect the ground terminal to a proper earth ground to prevent electrical shock.
- Overload Protection: Do not exceed the maximum output current of 20A or power of 480W. Overloading can trigger protection mechanisms or damage the unit. For equipment with high peak variations (e.g., motors), select a power supply with at least 2 times the rated power.
- Ventilation: Ensure adequate ventilation around the power supply. Do not block the cooling fan or ventilation holes. Maintain the operating temperature range of 14℉-140℉ (-10℃-60℃).
- Environmental Conditions: Avoid exposing the unit to moisture, dust, or extreme temperatures.
- Professional Installation: Installation and wiring should be performed by qualified personnel to prevent electrical hazards.
- No User Serviceable Parts: Do not open the power supply casing. There are no user-serviceable parts inside, and opening it voids the warranty.
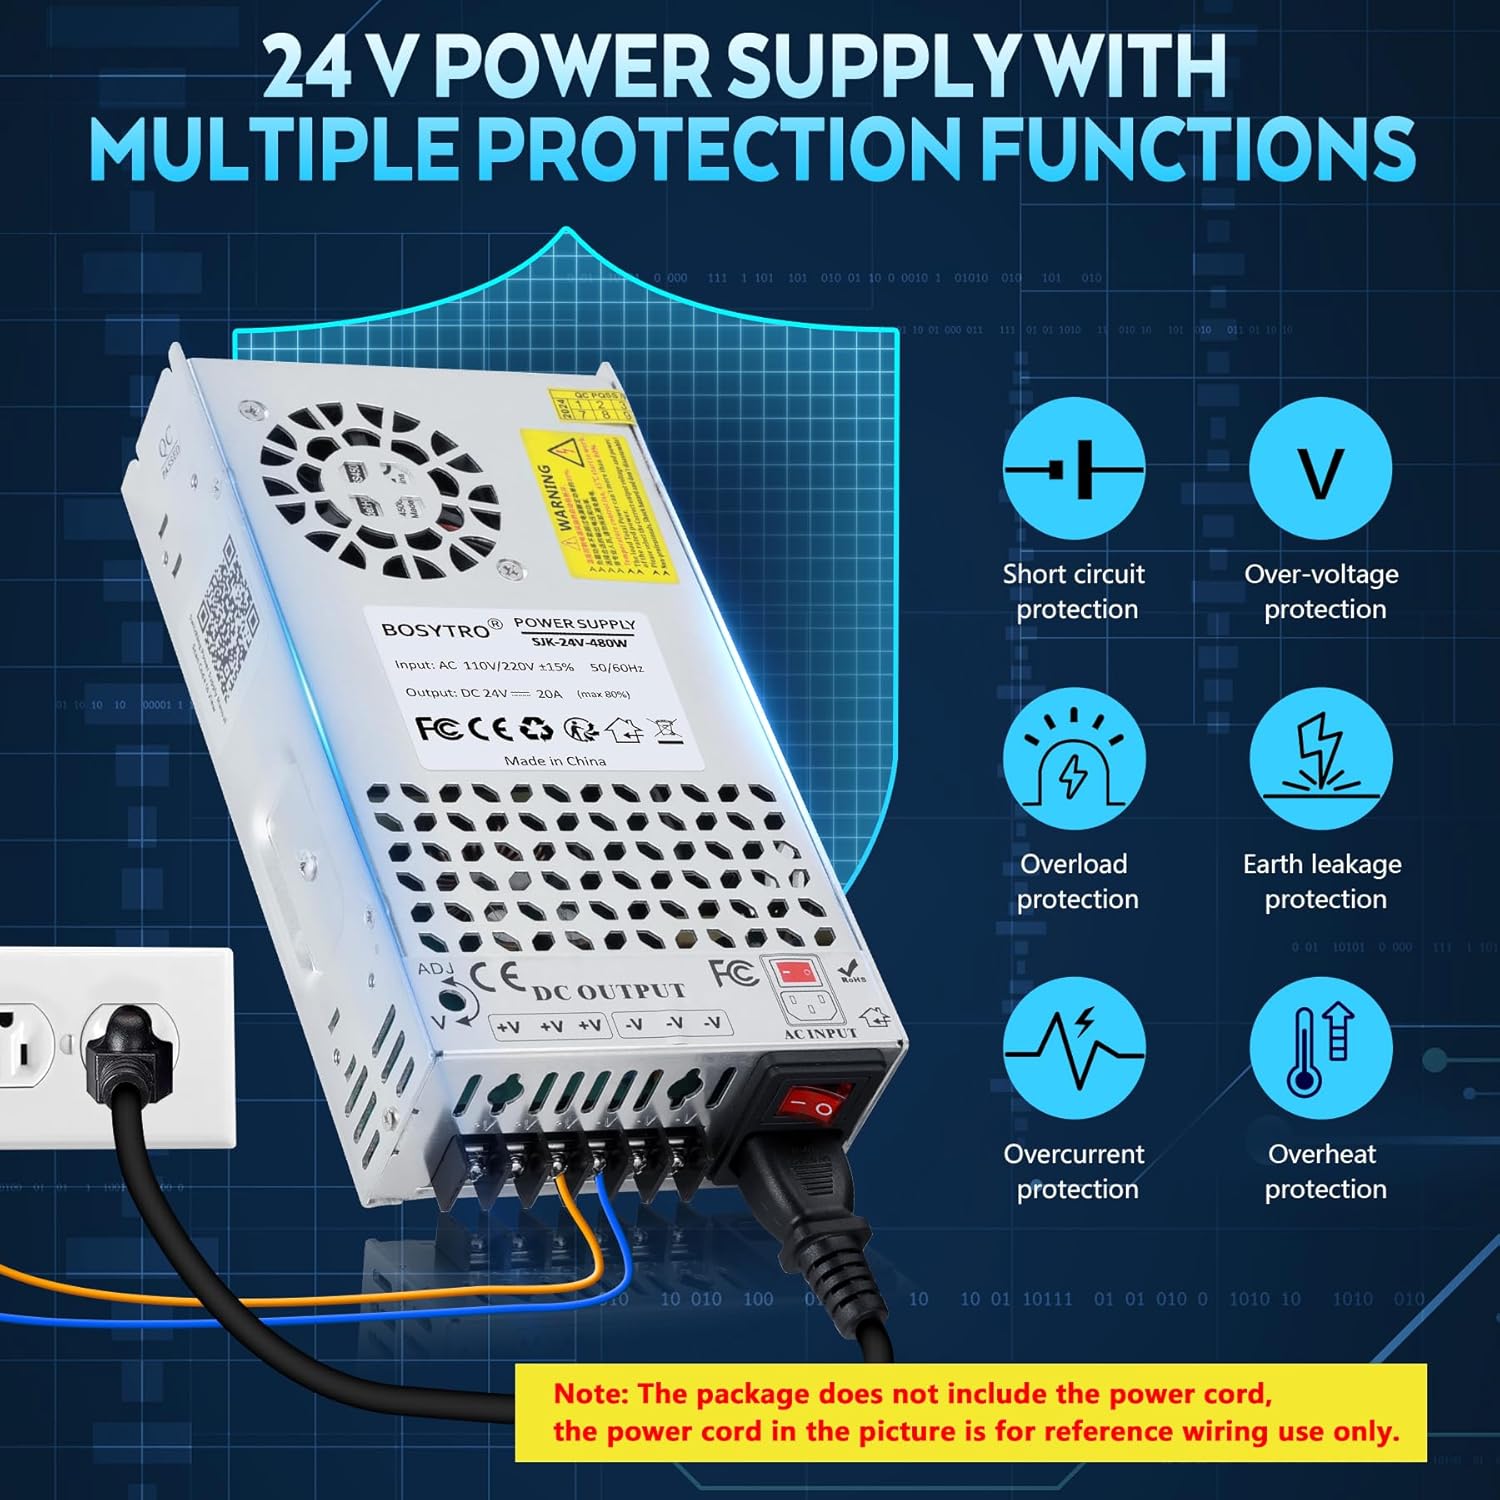
Image 2.1: The power supply features multiple protections including short circuit, over-voltage, overload, earth leakage, overcurrent, and overheat protection. Note: The power cord is for reference wiring use only and is not included.
3. Product Overview
3.1 Key Features
- AC/DC 24V Power Supply: Provides a default DC 24V output with an adjustable range of ±10% (21.6V-26.4V).
- High Power Output: Delivers up to 20A and 480W of maximum power with an efficiency of up to 80%.
- Upgraded Output Ports: Features three output channels and an added power port for easier and faster connections, eliminating the need for separate Fire, Ground, and Zero cables.
- Efficient Heat Dissipation: Constructed with a porous metal aluminum shell and equipped with a built-in cooling fan for stable and low-noise heat management.
- Multiple Protections: Incorporates smart chip technology for overload, over-voltage, overheat, and short circuit protection. Certified with RoHS/CE/LVD/EMC standards.
- Input Voltage Switch: Selectable input voltage between 115V and 230V to accommodate different regional power standards.
3.2 Components
The BOSYTRO SJK-24V-480W-WX power supply is composed of high-quality electronic components housed within a durable aluminum casing.
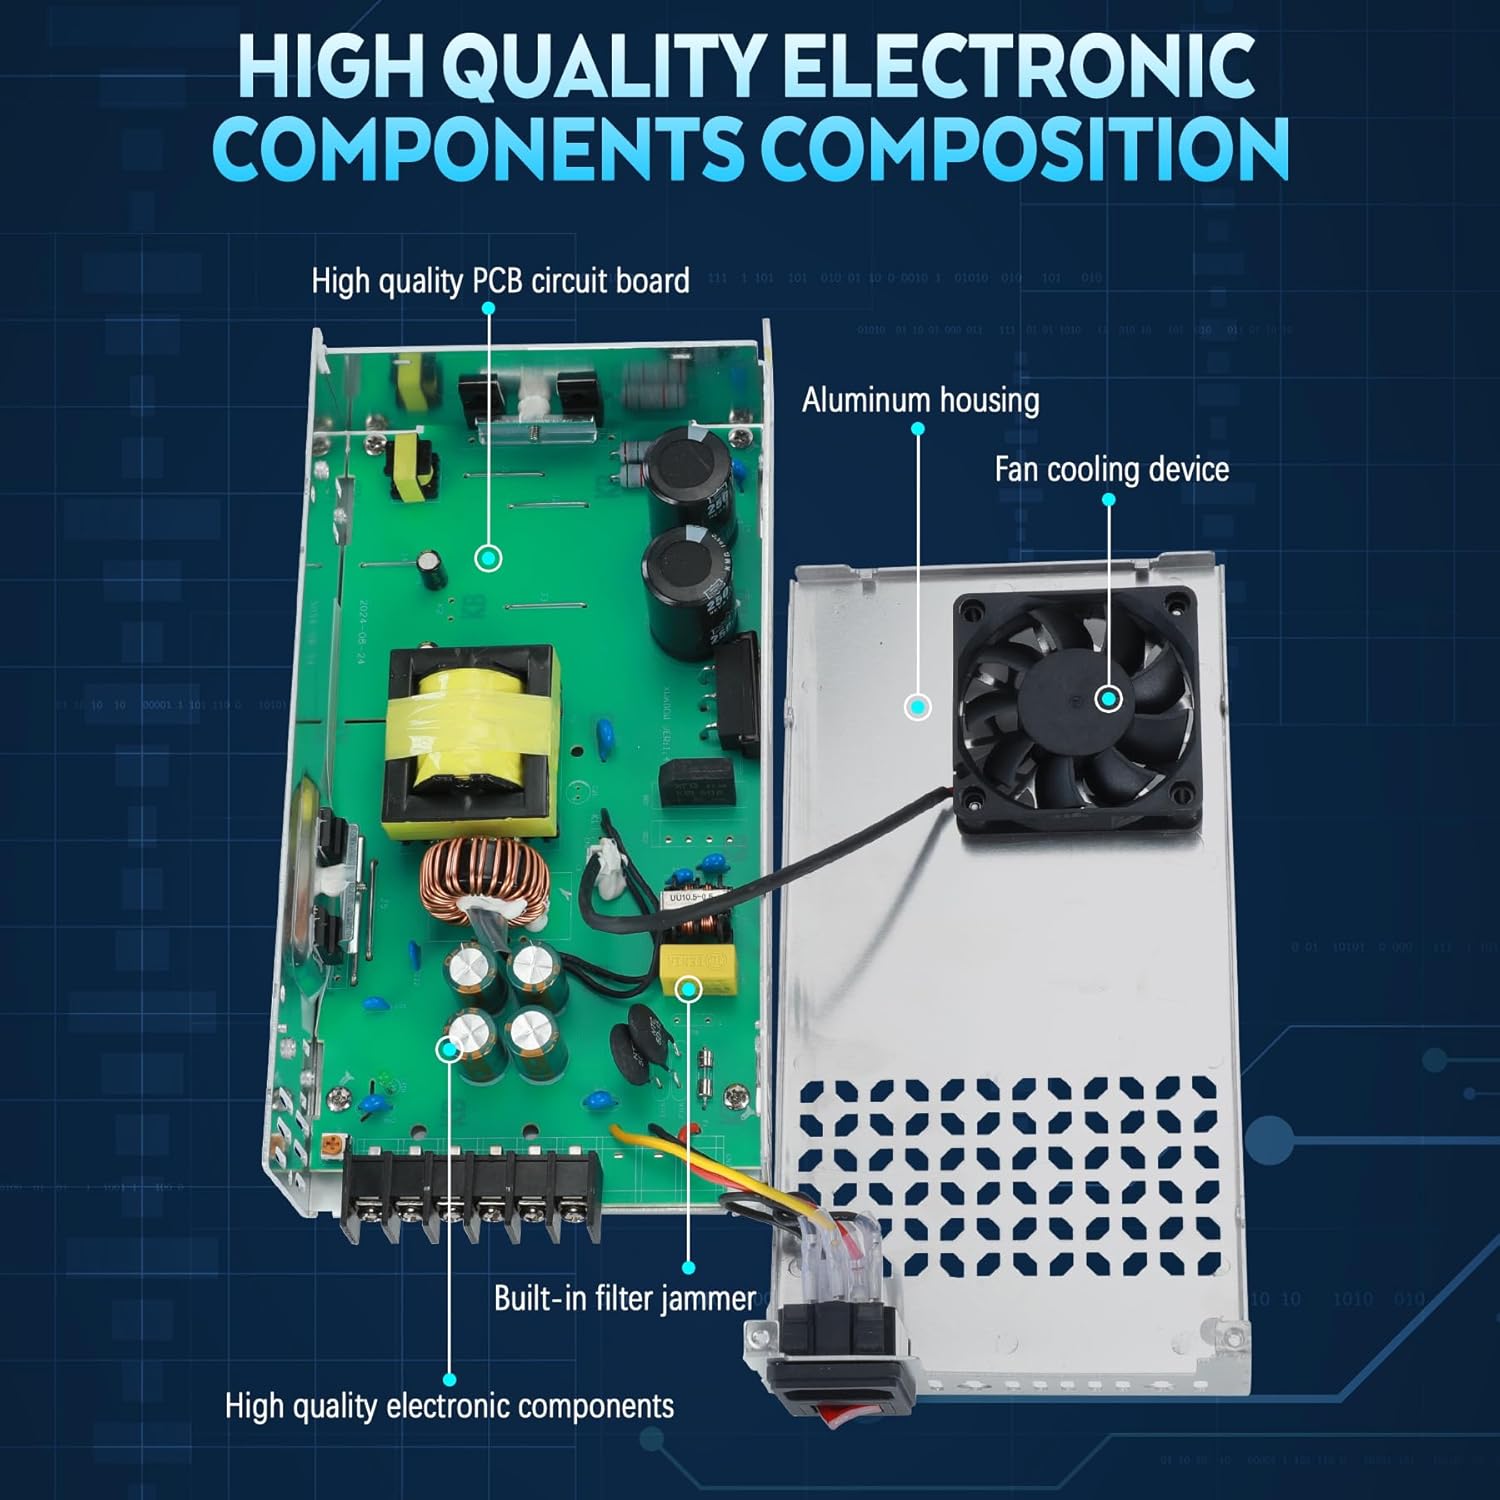
Image 3.1: A detailed view of the power supply's internal structure, showing the high-quality PCB circuit board, aluminum housing, fan cooling device, built-in filter jammer, and other electronic components.

Image 3.2: An overhead view of the BOSYTRO SJK-24V-480W-WX power supply, highlighting its physical dimensions (21.5cm x 11.5cm x 5cm) and a table of key specifications.
4. Setup Instructions
4.1 Select Input Voltage
Before connecting the power supply to an AC source, it is critical to set the input voltage switch to match your local power grid. The switch is located on the side of the unit. For American and Canadian customers, set it to 115V. For European customers, set it to 230V. Failure to select the correct voltage can result in damage to the power supply and connected equipment.

Image 4.1: The input voltage selector switch, showing options for 115V (USA/CA) and 230V (EU). Ensure this is correctly set before powering on.
4.2 Power Supply Check (Initial Test)
After setting the input voltage, perform a quick check:
- Ensure the power supply is not connected to any load devices.
- Plug a power cord (not included) into the AC input port of the power supply.
- Turn on the power switch. Observe the indicator lights. If both the red and green lights are on, the power supply is functioning normally.
- Turn off the switch and unplug the power cord before proceeding to connect your devices.
4.3 Connecting Your Device
Connect your load device(s) to the DC output terminals. The power supply features three positive (V+) terminals and three negative (V-) terminals for connecting multiple devices. Ensure correct polarity to prevent damage to your devices.
- Connect the positive wire from your device to any V+ terminal.
- Connect the negative wire from your device to any V- terminal.
- Ensure all connections are tight and secure.

Image 4.2: A diagram illustrating the wiring terminals of the 24V power supply, including the AC input, power switch, and DC output terminals (V+ for positive, V- for negative). It also shows the adjustable voltage screw (ADJ) for fine-tuning the output voltage.
5. Operating Instructions
5.1 Powering On
Once all connections are secure and the input voltage is correctly set, plug the power cord into the AC input and turn on the power switch. The power supply will begin providing 24V DC power to your connected devices.
5.2 Adjusting Output Voltage
The output voltage can be fine-tuned within a ±10% range (21.6V-26.4V) using the adjustable voltage screw (labeled 'ADJ') located near the DC output terminals. Use a small screwdriver to carefully turn the screw clockwise to increase voltage or counter-clockwise to decrease voltage. Monitor the output voltage with a multimeter during adjustment to ensure it meets your device's requirements.
6. Maintenance
Regular maintenance helps ensure the longevity and reliable operation of your power supply:
- Cleaning: Keep the unit clean and free from dust. Use a soft, dry cloth to wipe the exterior. Do not use liquid cleaners or solvents.
- Ventilation: Periodically check that the ventilation holes and cooling fan are not obstructed. Ensure proper airflow to prevent overheating.
- Connections: Regularly inspect all wiring connections for tightness and signs of wear or corrosion. Loose connections can lead to poor performance or safety hazards.
- Storage: If storing the unit for an extended period, disconnect it from power, clean it, and store it in a cool, dry place away from direct sunlight and moisture.
7. Troubleshooting
If you encounter issues with your power supply, refer to the following common troubleshooting steps:
| Problem | Possible Cause | Solution |
|---|---|---|
| No output voltage / Unit not powering on |
|
|
| Output voltage unstable or incorrect |
|
|
| Unit overheating |
|
|
| Connectors breaking or loose |
|
|
If the problem persists after attempting these solutions, please contact BOSYTRO customer support.
8. Specifications
| Feature | Detail |
|---|---|
| Brand | BOSYTRO |
| Model Number | SJK-24V-480W-WX |
| Input Voltage | AC 110V/220V (Switchable) |
| Output Voltage | DC 24V (Adjustable range: 21.6V-26.4V) |
| Output Current | 20A (Max) |
| Output Wattage | 480W (Max) |
| Frequency | 50/60 Hz |
| Material | Aluminum |
| Item Dimensions (L x W x H) | 8.46 x 4.52 x 1.97 inches (21.5 x 11.5 x 5 cm) |
| Operating Temperature | 14℉-140℉ (-10℃-60℃) |
| Working Efficiency | ≥80% |
| Safety Certifications | CE, RoHS, LVD, EMC |
9. Warranty and Support
9.1 Warranty Information
BOSYTRO provides a warranty for this product. Quality issues can be returned or exchanged. Please retain your proof of purchase for warranty claims.
9.2 Customer Support
For technical assistance, troubleshooting beyond this manual, or warranty inquiries, please contact BOSYTRO customer support through the retailer where the product was purchased or visit the official BOSYTRO website for contact information.


