1. Introduction
This manual provides detailed instructions for the setup, operation, and maintenance of your LN LENQIN R027 Digital Watch. Please read this manual thoroughly to ensure proper use and to maximize the lifespan of your watch.

Image 1.1: Front view of the LN LENQIN R027 Digital Watch. The watch features a black square case, a digital display, and a black silicone strap.
2. Product Features
- Digital Time Display (Hour, Minute, Second)
- Date and Day of Week Display
- LED Backlight for low-light conditions
- Stopwatch Function
- Alarm Function
- Water Resistance up to 50 meters (5 ATM)
- Durable Silicone Strap
- Japanese Quartz Movement
3. Watch Components and Button Functions
Familiarize yourself with the watch's buttons and display indicators as shown in the diagram below.
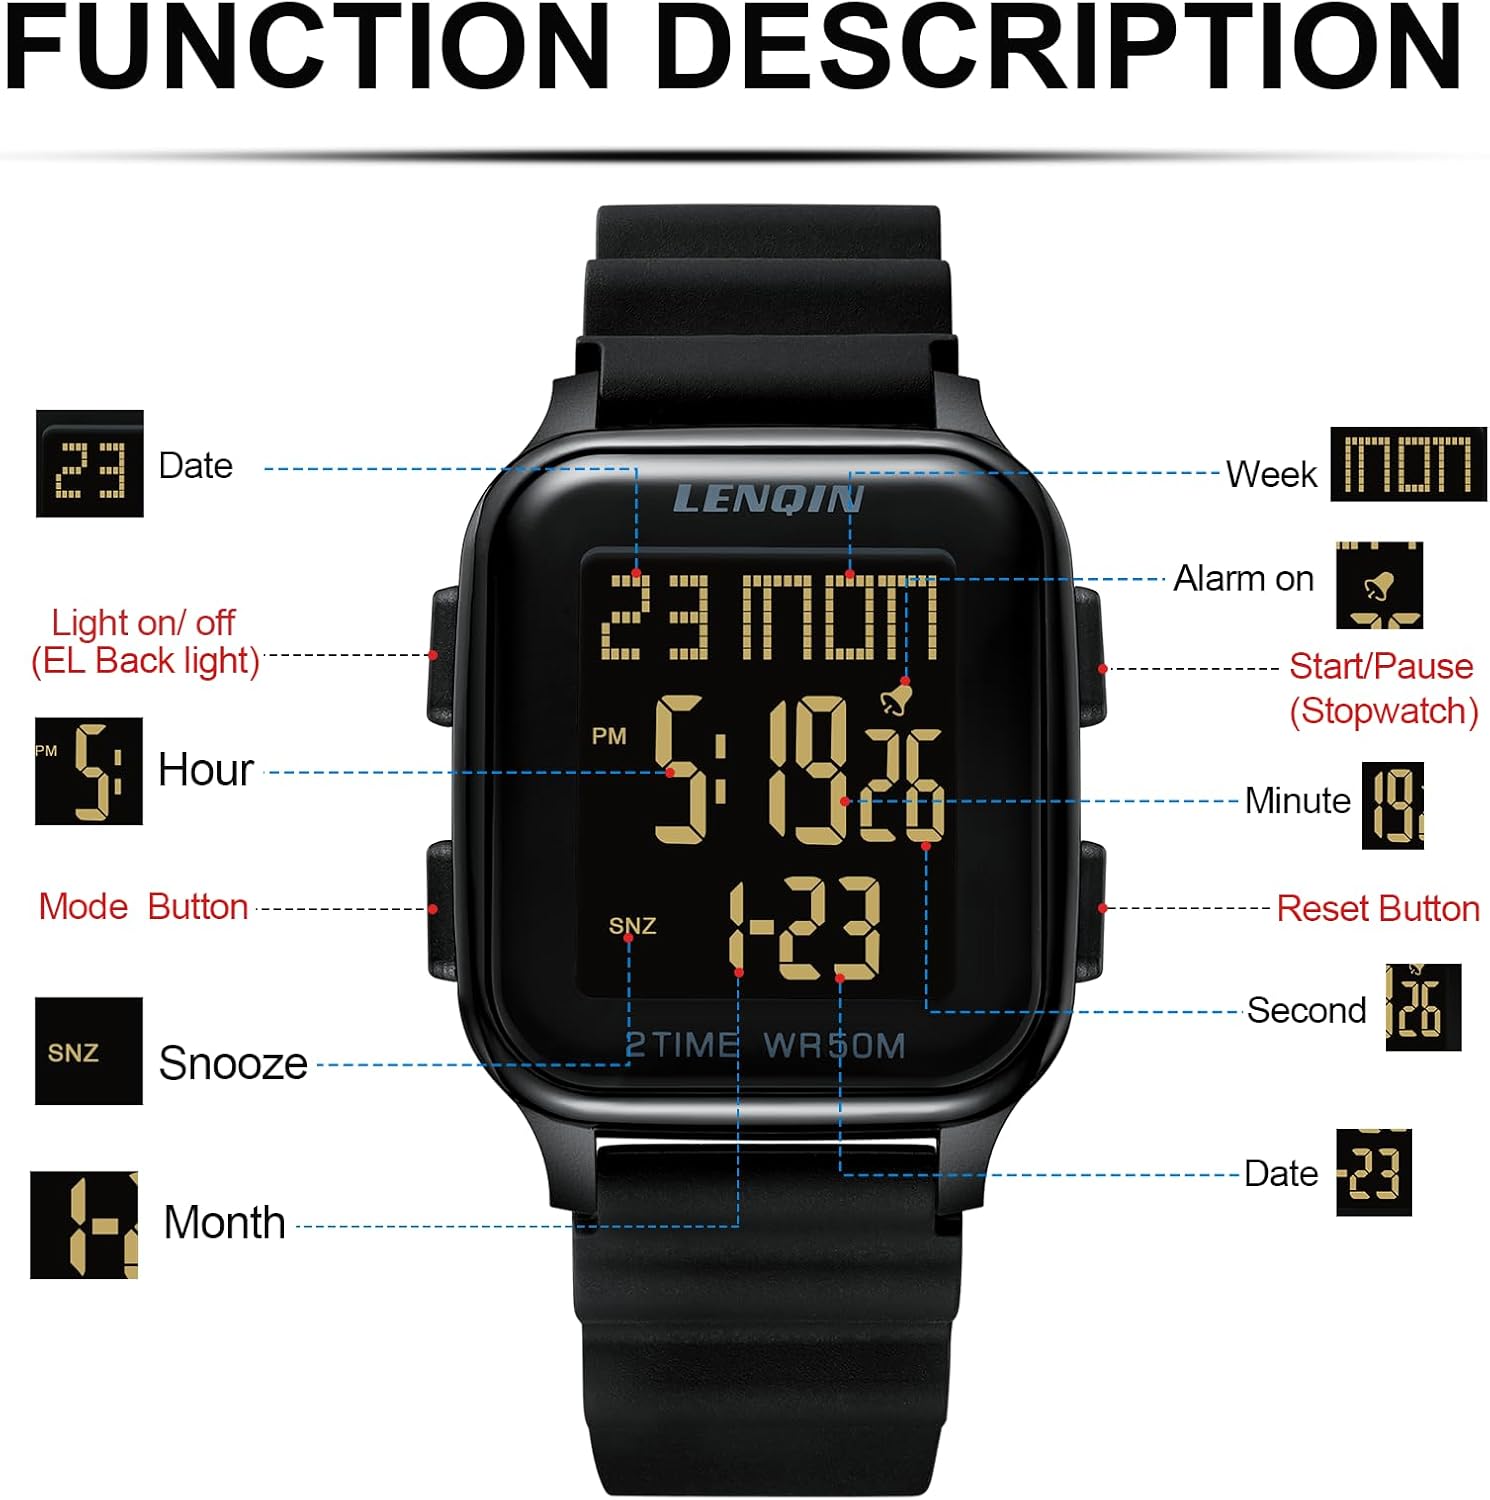
Image 3.1: Diagram illustrating the LN LENQIN R027 watch's display elements and button assignments. The display shows Date, Week, Alarm on indicator, Hour, PM indicator, Minute, SNZ (Snooze) indicator, Month, and Date. Buttons are labeled for Light on/off (EL Backlight), Mode Button, Start/Pause (Stopwatch), and Reset Button.
- Light Button (Top Left): Activates the LED backlight.
- Mode Button (Bottom Left): Cycles through different modes (Time, Stopwatch, Alarm).
- Start/Pause Button (Top Right): Used to start/pause the stopwatch or adjust settings.
- Reset Button (Bottom Right): Used to reset the stopwatch or adjust settings.
4. Setup Instructions
4.1 Setting Time and Date
- From the normal time display, press the Mode Button (bottom left) three times to enter Time Setting mode. The seconds will begin to flash.
- Press the Reset Button (bottom right) to cycle through the settings: Seconds → Hour → Minute → Month → Date → Day of Week.
- While a setting is flashing, use the Start/Pause Button (top right) to adjust the value.
- Once all settings are adjusted, press the Mode Button (bottom left) once to exit Time Setting mode and return to the normal time display.
4.2 Setting the Alarm
- From the normal time display, press the Mode Button (bottom left) twice to enter Alarm Setting mode. The hour digits will begin to flash.
- Press the Start/Pause Button (top right) to adjust the alarm hour.
- Press the Reset Button (bottom right) to switch to minute setting. The minute digits will flash.
- Press the Start/Pause Button (top right) to adjust the alarm minute.
- Press the Mode Button (bottom left) once to exit Alarm Setting mode.
- To turn the alarm ON/OFF, in normal time display, press and hold the Reset Button (bottom right) and then press the Start/Pause Button (top right). An alarm icon will appear/disappear on the display.
5. Operating Instructions
5.1 Using the Stopwatch
- From the normal time display, press the Mode Button (bottom left) once to enter Stopwatch mode. The display will show "0:00:00".
- Press the Start/Pause Button (top right) to start the stopwatch.
- Press the Start/Pause Button (top right) again to pause the stopwatch.
- To resume, press the Start/Pause Button (top right).
- To reset the stopwatch to "0:00:00", ensure it is paused, then press the Reset Button (bottom right).
- Press the Mode Button (bottom left) to return to normal time display.
5.2 Using the Backlight
Press the Light Button (top left) at any time to illuminate the display for a few seconds. This is useful in low-light conditions.
6. Maintenance
6.1 Battery Replacement
The watch uses one A-type battery (CR2025 is a common type for similar watches, though the JSON states "1 A batteries required"). When the display dims or functions become erratic, it's time to replace the battery. Battery replacement should ideally be performed by a qualified watch technician to ensure water resistance is maintained. If replacing yourself, carefully open the back case, replace the battery with the correct type, and ensure the gasket is properly seated before closing the case.

Image 6.1: Back view of the LN LENQIN R027 Digital Watch, showing the stainless steel case back secured by four screws. The back is engraved with "LENQIN", "5 ATM WATCH RESISTANT", "STAINLESS STEEL", and "NO: R027".
6.2 Water Resistance
This watch is water resistant up to 50 meters (5 ATM). This means it is suitable for daily use, showering, and swimming in shallow water. It is not suitable for diving, snorkeling, or high-pressure water activities. Avoid pressing buttons underwater to prevent water ingress.
Note: Forbidden to soak in sea water or expose to corrosive liquids.
7. Troubleshooting
| Problem | Possible Cause | Solution |
|---|---|---|
| Display is dim or blank. | Low or dead battery. | Replace the battery (see Section 6.1). |
| Time is incorrect. | Time not set correctly or accidental adjustment. | Re-set the time and date (see Section 4.1). |
| Alarm does not sound. | Alarm is turned off or set incorrectly. | Ensure alarm is ON and set to the correct time (see Section 4.2). |
| Water inside the watch. | Water resistance compromised or exposed to unsuitable conditions. | Immediately take the watch to a professional for inspection and repair. Avoid further water exposure. |
8. Specifications
Detailed specifications for the LN LENQIN R027 Digital Watch:

Image 8.1: Diagram detailing the product parameters for the LN LENQIN R027 Digital Watch, including dimensions, materials, and water resistance level.
- Model: R027
- Case Diameter: 42 mm (1.57 inches)
- Case Thickness: 12 mm (0.47 inches)
- Strap Width: 20 mm (0.78 inches)
- Strap Length: 175 mm (6.88 inches)
- Max Perimeter: 245 mm (9.64 inches)
- Item Weight: 46.8 g (1.65 oz)
- Band Material: Silicone
- Dial Window Material: High Transparency Mineral Glass
- Waterproof Level: 5 ATM (50 Meters)
- Movement Type: Japanese Quartz
- Power Source: 1 A Battery (included)
9. Warranty and Support
Your LN LENQIN R027 Digital Watch comes with a limited warranty against manufacturing defects. For specific warranty terms and conditions, please refer to the documentation included with your purchase or contact LN LENQIN customer support.
For further assistance, troubleshooting, or inquiries, please visit the official LN LENQIN website or contact their customer service department.


