1. Introduction
This manual provides comprehensive instructions for the proper use and maintenance of the Sper Scientific 860031 Benchtop pH Meter. This instrument is designed for accurate pH and temperature measurements in laboratory and field settings. Key features include a large HD display, automatic/manual ranging, N.I.S.T. buffer recognition for precise calibration, and both digital and analog output capabilities.
2. Product Overview
The Sper Scientific 860031 is a robust benchtop pH meter engineered for reliability and ease of use. It features a large LCD for clear data visualization and an intuitive button layout for operation.

Figure 2.1: Sper Scientific 860031 Benchtop pH Meter in typical operational setup. The meter displays a pH reading of 9.84 and a temperature of 19.4°C, with the electrode submerged in a solution.
2.1. Package Contents
Upon unpacking, verify that all components listed below are present and undamaged:
- Sper Scientific 860031 Benchtop pH Meter Unit
- pH Electrode (meter probe)
- Temperature Probe (ATC)
- Adjustable Electrode Stand
- Power Adapter
- Instruction Manual
- Software CD (for RS232 data transfer, if applicable)

Figure 2.2: All components included in the Sper Scientific 860031 Benchtop pH Meter package.
2.2. Meter Components
Familiarize yourself with the various ports and controls on the meter unit.

Figure 2.3: Rear panel connections of the Sper Scientific 860031. From left to right: DC power input, RS232 port, Analog output (GND and Signal), BNC connector for pH electrode, and ATC probe input.
- DC Power Input: For connecting the provided power adapter.
- RS232 Port: For digital data communication with a computer.
- Analog Output: Provides an analog signal proportional to the measured value.
- BNC Connector: Standard connection for the pH electrode.
- ATC Input: For connecting the Automatic Temperature Compensation probe.
3. Setup
- Positioning the Meter: Place the meter on a stable, level surface away from direct sunlight, heat sources, and strong electromagnetic fields.
- Assembling the Electrode Stand: Securely attach the electrode stand to the meter unit or a stable base as per the stand's design. Ensure it can hold the electrode steadily.
- Connecting the pH Electrode:
- Remove the protective cap from the pH electrode.
- Connect the BNC connector of the pH electrode to the BNC input port on the rear of the meter.
- Rinse the electrode with distilled water before first use and after storage.
- Connecting the ATC Probe: Insert the temperature probe connector into the ATC input port on the rear of the meter. This probe is essential for accurate temperature compensation during pH measurements.
- Power Connection: Connect the provided power adapter to the DC power input on the rear of the meter, then plug the adapter into a suitable electrical outlet.
- Initial Power On: Press the POWER button to turn on the meter. The display should illuminate and show initial readings.
4. Operation
4.1. Calibration
Regular calibration is crucial for accurate pH measurements. The Sper Scientific 860031 supports 5-point calibration with N.I.S.T. buffer recognition.
- Prepare Buffers: Use fresh, uncontaminated pH buffer solutions (e.g., pH 4.00, 7.00, 10.00). Ensure buffer temperatures are stable and known.
- Rinse Electrode: Rinse the pH electrode and ATC probe thoroughly with distilled water and gently blot dry with a lint-free tissue.
- Initiate Calibration: Press the CAL button. The meter will typically prompt for the first buffer solution.
- First Buffer Calibration: Immerse the electrode and ATC probe into the first buffer solution (e.g., pH 7.00). Stir gently and wait for the reading to stabilize. The meter will automatically recognize the buffer and confirm calibration.
- Subsequent Buffers: Rinse the probes with distilled water. Immerse them into the next buffer solution (e.g., pH 4.00 or pH 10.00) and repeat the stabilization process. Continue for all desired calibration points (up to 5).
- Complete Calibration: Once all buffers are calibrated, the meter will store the calibration data.
Note: Always calibrate with buffers that bracket your expected sample pH range for optimal accuracy.
4.2. pH Measurement
- Prepare Sample: Ensure your sample is well-mixed and at a stable temperature.
- Rinse Electrode: Rinse the calibrated pH electrode and ATC probe with distilled water.
- Immerse Probes: Carefully immerse the pH electrode and ATC probe into the sample solution. Ensure the sensing part of the electrode is fully submerged.
- Read Measurement: Stir gently and wait for the reading on the large HD display to stabilize. The meter will show the pH value and the temperature.
- Record Data: Record the stable pH and temperature readings.
- After Measurement: Rinse the probes thoroughly with distilled water and return the electrode to its storage solution or protective cap.
4.3. Automatic/Manual Ranging
The meter offers both automatic and manual ranging options. Refer to the specific button on the meter (e.g., RANGE or MODE) to switch between these modes if manual adjustment of measurement range is desired for specific applications.
4.4. Data Output (Digital and Analog)
The 860031 meter provides options for data output:
- Digital Output (RS232): Connect the meter to a computer using an RS232 cable (not always included) and the provided software (if applicable) for data logging and analysis.
- Analog Output: The analog output ports on the rear panel can be used to connect the meter to external recording devices or data acquisition systems that accept analog signals. Consult the meter's detailed specifications for analog output voltage ranges.
5. Maintenance
5.1. pH Electrode Care
- Cleaning: After each use, rinse the electrode thoroughly with distilled water. For stubborn deposits, a mild detergent solution or a specialized electrode cleaning solution may be used, followed by a thorough rinse.
- Storage: Always store the pH electrode in its protective cap filled with electrode storage solution (or pH 4 buffer if storage solution is unavailable). Never store in distilled water, as this can deplete the electrolyte and shorten electrode life.
- Rejuvenation: If the electrode response becomes sluggish, refer to the electrode manufacturer's instructions for rejuvenation procedures, which may involve soaking in specific solutions.
5.2. Meter Unit Cleaning
Wipe the meter's exterior with a soft, damp cloth. Do not use abrasive cleaners or solvents, as these can damage the casing or display. Ensure no liquid enters the meter's ports or internal components.
5.3. General Storage
When not in use for extended periods, disconnect the power adapter and store the meter and its accessories in a clean, dry environment, preferably in its original packaging or a protective case.
6. Troubleshooting
| Problem | Possible Cause | Solution |
|---|---|---|
| No display/Meter won't turn on | No power, faulty adapter, loose connection. | Check power adapter connection and outlet. Ensure adapter is functional. |
| Unstable or drifting readings | Dirty electrode, air bubbles on electrode, expired buffer, temperature fluctuations, faulty electrode. | Clean electrode, remove air bubbles, use fresh buffer, ensure stable sample temperature, replace electrode if necessary. |
| Calibration errors | Contaminated buffers, incorrect buffer selection, dirty electrode, faulty electrode. | Use fresh, correct buffers. Clean electrode. Replace electrode if damaged. |
| Slow response time | Dry electrode, old electrode, low electrolyte in electrode. | Soak electrode in storage solution. Rejuvenate or replace electrode. |
| Incorrect temperature reading | Faulty ATC probe, loose ATC connection. | Check ATC probe connection. Replace ATC probe if damaged. |
If troubleshooting steps do not resolve the issue, contact Sper Scientific customer support for further assistance.
7. Specifications
The following table outlines the technical specifications for the Sper Scientific 860031 Benchtop pH Meter:
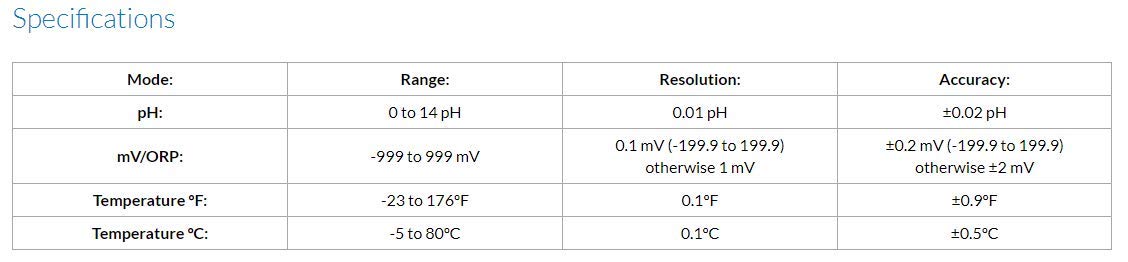
Figure 7.1: Detailed technical specifications for the 860031 pH Meter.
| Mode | Range | Resolution | Accuracy |
|---|---|---|---|
| pH | 0 to 14 pH | 0.01 pH | ±0.02 pH |
| mV/ORP | -999 to 999 mV | 0.1 mV (-199.9 to 199.9) otherwise 1 mV | ±0.2 mV (-199.9 to 199.9) otherwise ±2 mV |
| Temperature °F | -23 to 176°F | 0.1°F | ±0.9°F |
| Temperature °C | -5 to 80°C | 0.1°C | ±0.5°C |
Product Dimensions: 7 x 2.25 x 8.5 inches; 0.71 ounces
Item Model Number: 860031
Manufacturer: Sper Scientific
8. Warranty and Support
Specific warranty details for the Sper Scientific 860031 Benchtop pH Meter are not provided in this document. For information regarding warranty coverage, technical support, or service, please contact Sper Scientific directly through their official website or customer service channels.
Sper Scientific Contact Information: Refer to the manufacturer's official website or the product packaging for the most current contact details.