1. Introduction
The LUOTWO W500 is a state-of-the-art 4G PoC (Push-to-Talk Over Cellular) global walkie talkie designed for unlimited communication range and reliable performance. Utilizing advanced 4G LTE technology, it ensures stable and clear communication across vast distances, making it ideal for various professional and personal applications. This manual provides essential information for setting up, operating, and maintaining your W500 device.
2. Product Overview
The W500 features a durable design with a shock-resistant plastic casing and antenna. It is equipped with a high-capacity lithium-ion battery and supports Type-C fast charging. Key features include clear audio with advanced noise-canceling microphones, GPS tracking, and intelligent weather forecasting.
2.1. Key Features and Components
- Global Communication: Unlimited range via 4G PoC technology.
- Durable Construction: Shock-resistant casing for demanding environments.
- High-Capacity Battery: Extended battery life with Type-C fast charging.
- Clear Audio: Noise-canceling microphones and powerful speakers.
- GPS Tracking: Enhance team security with location tracking.
- Weather Intelligence: Stay informed of weather conditions.
2.2. Visual Guide

Figure 1: LUOTWO W500 Walkie Talkies with SIM cards.
This image displays two LUOTWO W500 walkie talkies, highlighting their compact design and the inclusion of SIM cards for global connectivity.
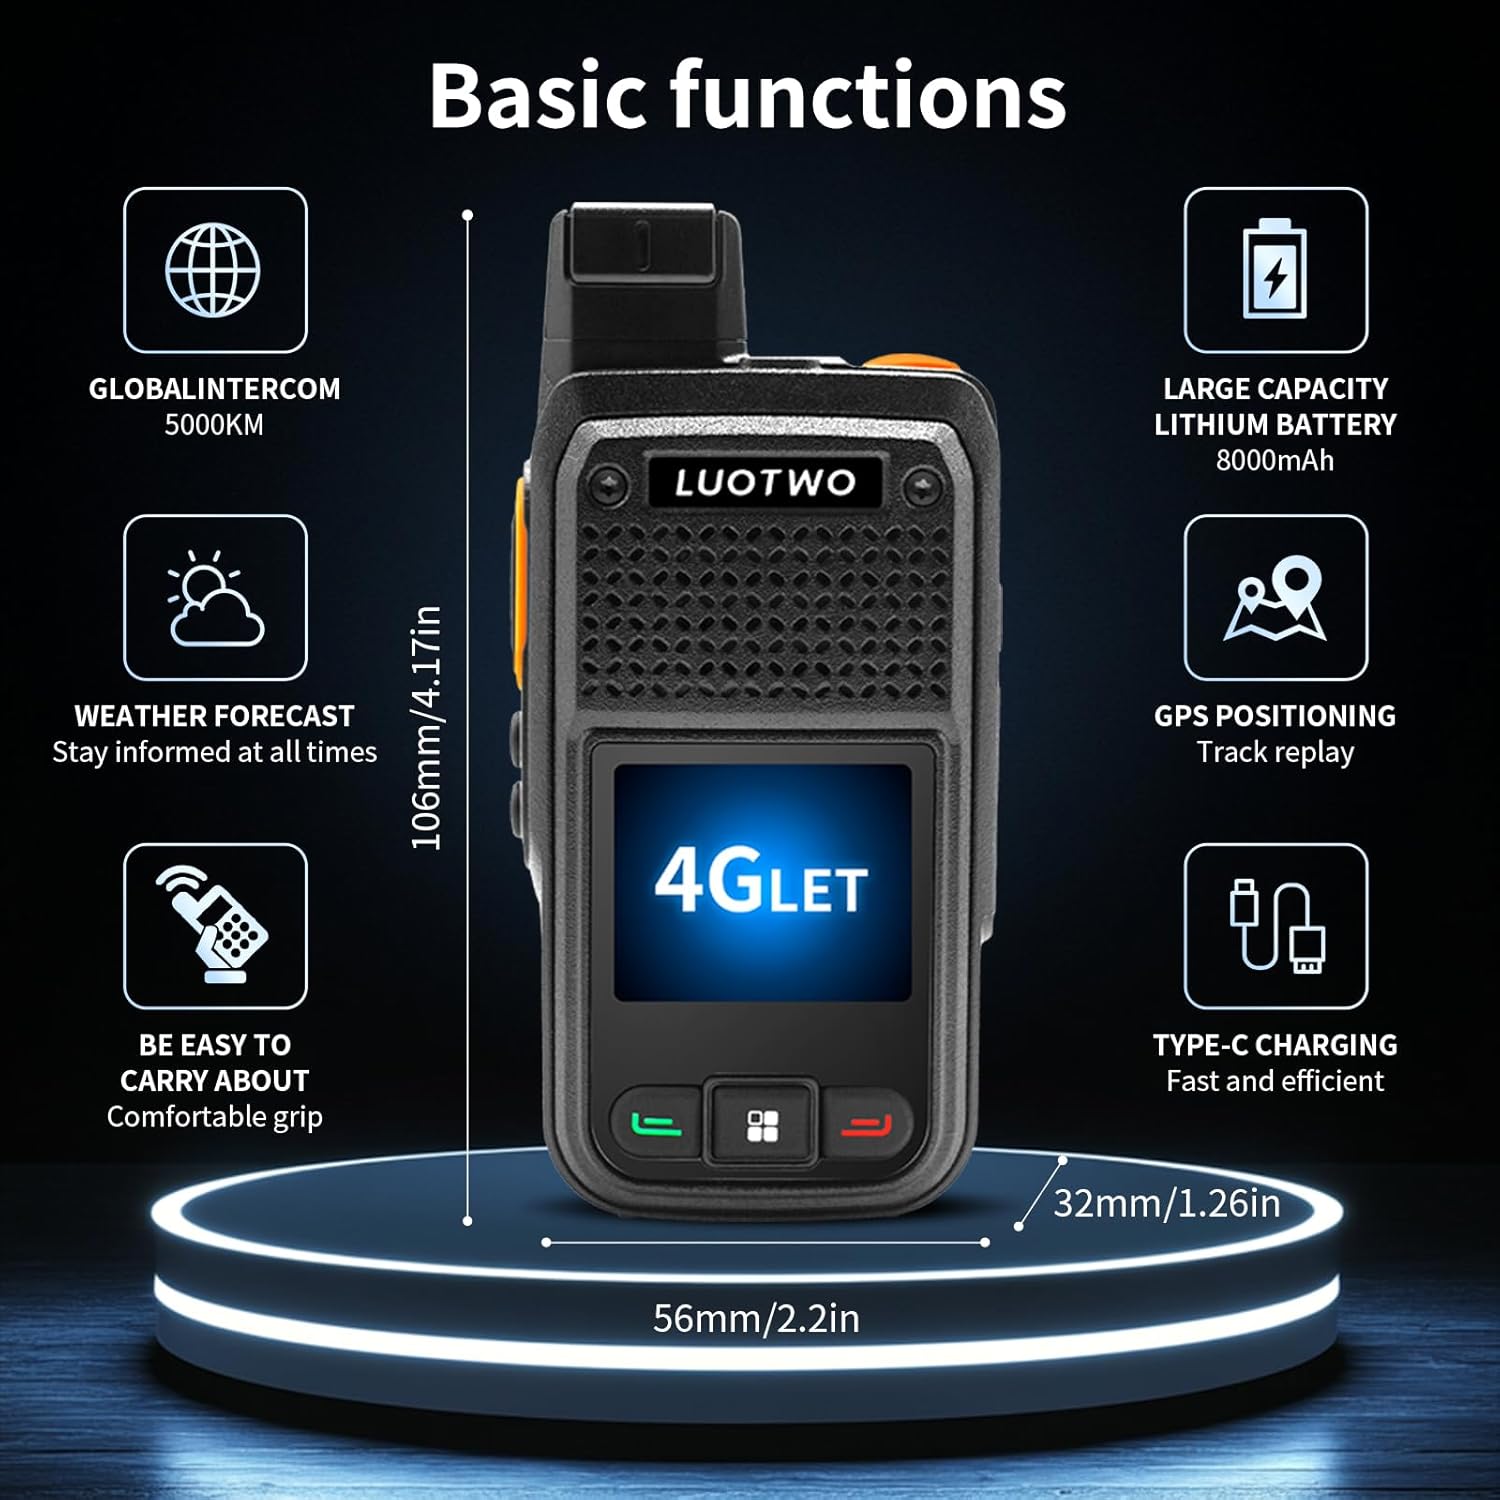
Figure 2: Basic Functions Overview.
A visual representation of the W500's core functionalities, such as global intercom, weather updates, portability, battery capacity, GPS, and charging method.
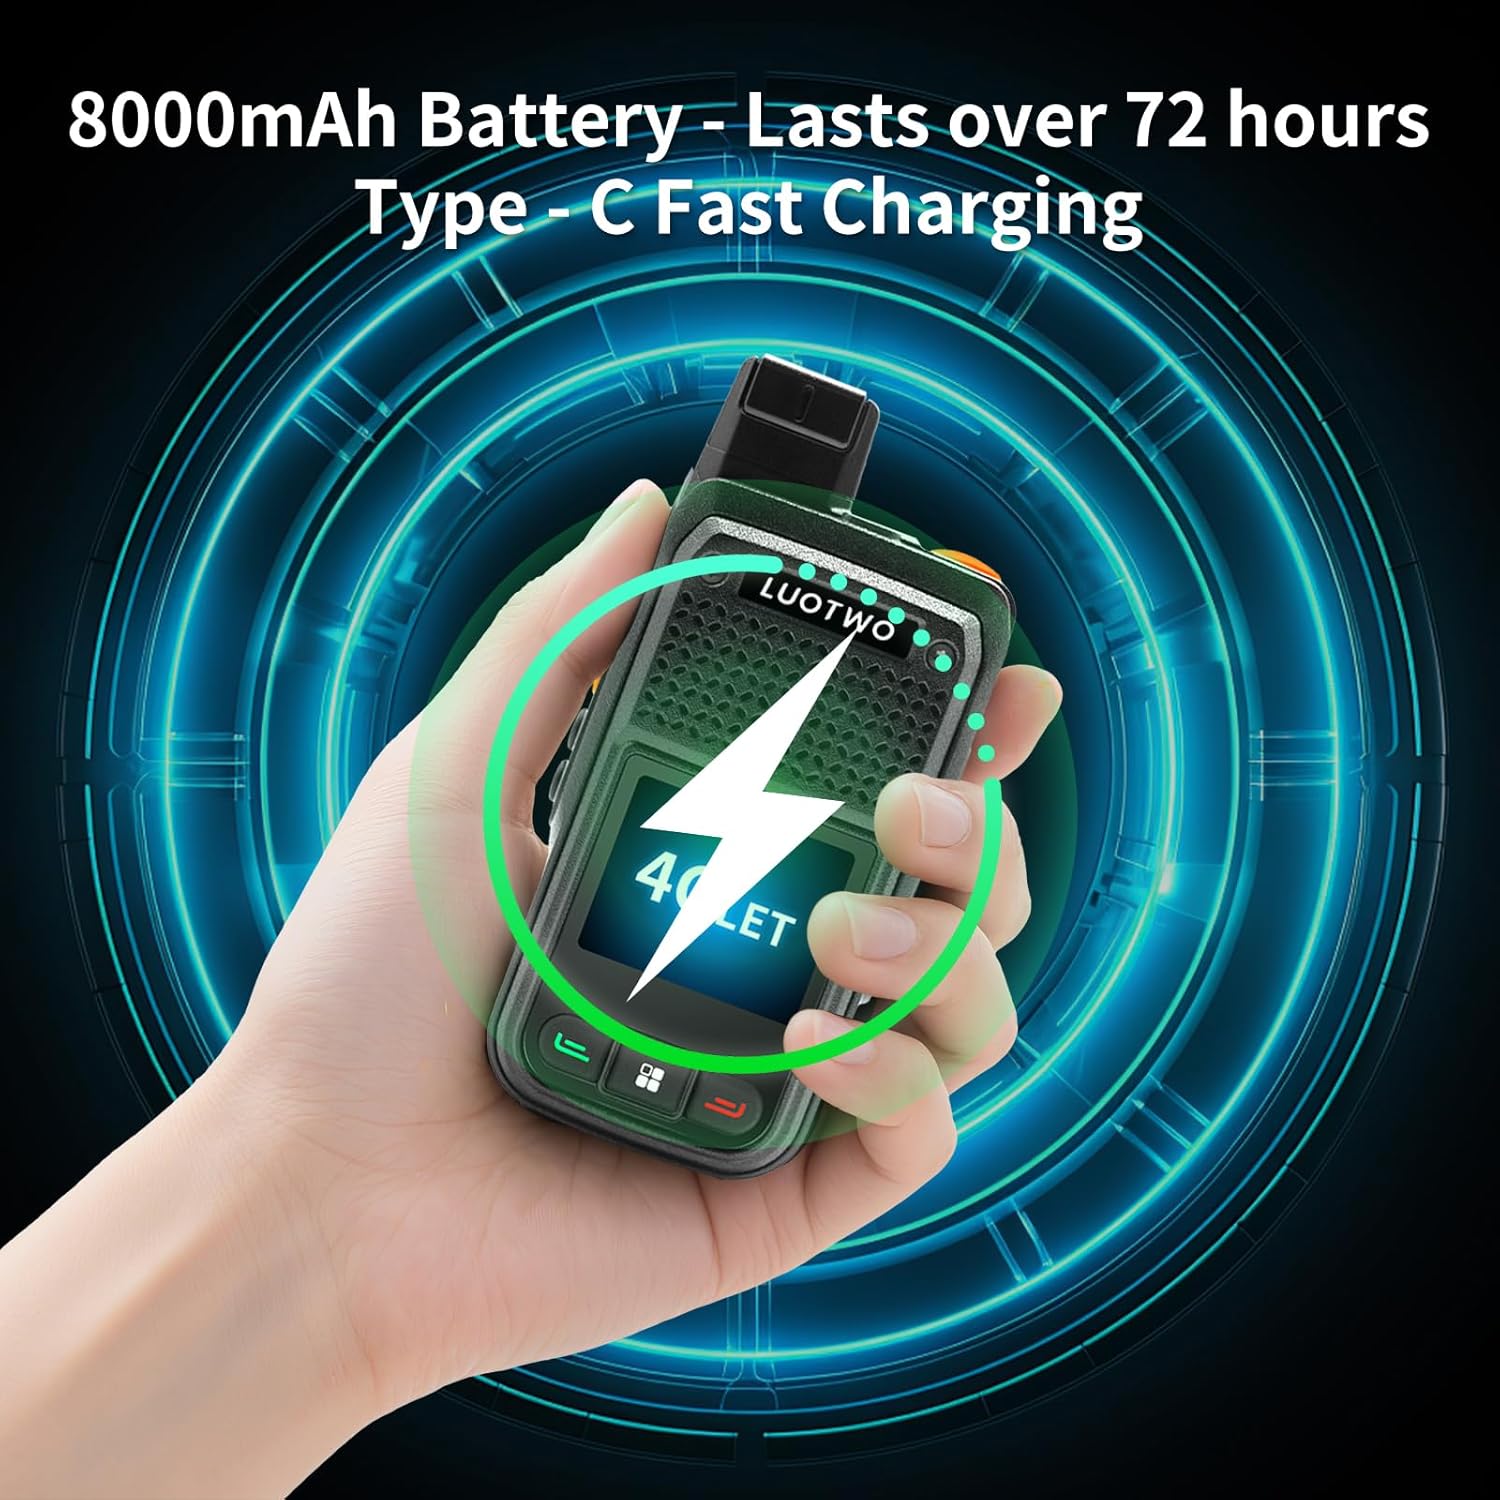
Figure 3: Battery and Charging.
This image highlights the device's 8000mAh battery, offering over 72 hours of use, and its Type-C fast charging capability.

Figure 4: Global Communication.
Showcasing the W500's ability for unlimited global communication through 4G LTE networks and its dual-SIM compatibility.

Figure 5: Intelligent Weather Forecast.
The device's intelligent weather forecast feature is depicted, emphasizing its utility for safe travel and work in various conditions.

Figure 6: GPS Tracking & Weather Intelligence.
This image illustrates the W500's GPS tracking capabilities and integration with weather intelligence for enhanced team security and awareness.

Figure 7: Dual SIM Card Support.
Highlighting the device's dual SIM card support for instant LTE connectivity and global use.
3. Setup Guide
3.1. Unboxing and Initial Inspection
Upon receiving your LUOTWO W500, carefully unbox all components. The package should include:
- 2x LUOTWO W500 Host
- 2x Antenna
- 2x Battery pack
- 2x Charger
- 2x Lanyard
- 2x Manual
Inspect all items for any signs of damage. If any components are missing or damaged, contact customer support immediately.
3.2. Battery Installation
- Remove the battery cover on the back of the device.
- Insert the battery pack into the compartment, ensuring the contacts align correctly.
- Replace the battery cover, pressing firmly until it clicks into place.
3.3. SIM Card Installation
- With the battery removed, locate the SIM card slots within the battery compartment.
- Carefully insert your SIM card(s) into the designated slots. Ensure proper orientation as indicated by the diagrams near the slots.
- Reinstall the battery and battery cover.
3.4. Belt Clip Installation
- Align the belt clip with the screw holes on the back of the device.
- Use the provided screwdriver to secure the belt clip with the screws.
3.5. Headset Connection
To connect a headset, firmly press the headset connector into the dedicated port on the side of the device. Tighten the screw head to secure the headset for stable communication.
Video 1: Headset Installation Guide.
This video demonstrates the correct procedure for installing a headset onto the device, ensuring a secure connection for optimal audio performance. (Note: This video is for F41, but the installation process is similar for W500).
Video 2: General Device Setup and Features.
This video provides a general overview of the device's setup, including battery and belt clip installation, and demonstrates basic functionalities. (Note: This video is for F41, but the setup process is similar for W500).
4. Basic Operation
4.1. Power On/Off
To power on the device, press and hold the power button (usually red) until the screen illuminates. To power off, press and hold the power button again and confirm the shutdown.
4.2. Push-to-Talk (PTT)
The dedicated PTT button on the side of the device allows for instant communication. Press and hold the PTT button to transmit your voice, and release it to listen.
4.3. Volume Control
Adjust the volume using the dedicated volume buttons or the rotary knob located on the top of the device.
4.4. Navigation and Menu
Use the directional keys and the central selection button to navigate through the device's menu and applications. The screen is also touch-sensitive for intuitive interaction.
4.5. Charging
Connect the provided Type-C charger to the charging port at the bottom of the device. The battery indicator on the screen will show the charging status.
5. Advanced Features
5.1. GPS Tracking and Geo-fencing
The W500 supports real-time GPS tracking, allowing you to monitor the location of your team members. Geo-fencing features can be configured to alert you when devices enter or exit predefined areas, enhancing safety and operational efficiency.
Video 3: PoC Dispatch System Features.
This video demonstrates advanced features of a PoC dispatch system, including individual/group calls, GPS location tracking, geo-fencing, and call recording. These features are generally applicable to the W500. (Note: This video is for L71, but illustrates common PoC functionalities).
5.2. Call Recording
The device supports call recording, allowing you to review past communications. This feature is valuable for verifying important information or for training purposes. Access recordings through the dispatch system or device menu.
5.3. Account Management
Manage user accounts and groups through the dedicated management platform. This allows for easy creation of new accounts, assignment of permissions, and organization of communication groups.
5.4. SOS Alarm
In emergency situations, the W500 features an SOS alarm function. Activating this feature will send an alert to predefined contacts or the dispatch center, providing immediate notification of distress.
Video 4: SOS Alarm Demonstration.
This video illustrates the functionality of the SOS alarm feature, showing how it can be activated in emergency scenarios. (Note: This video is for MKMXPTT, but demonstrates a common PoC feature).
5.5. Zello Integration
The W500 is compatible with Zello, a popular Push-to-Talk application, allowing for flexible and extended communication options.
Video 5: Zello Walkie-Talkie Features.
This video showcases the integration and use of Zello on a 4G walkie-talkie, demonstrating its capabilities for communication. (Note: This video is for MKMXPTT, but demonstrates a common PoC feature).
6. Maintenance
To ensure the longevity and optimal performance of your LUOTWO W500, follow these maintenance guidelines:
- Cleaning: Use a soft, dry cloth to clean the device. Avoid harsh chemicals or abrasive materials.
- Battery Care: Charge the battery regularly. Avoid overcharging or completely draining the battery to prolong its lifespan.
- Storage: Store the device in a cool, dry place away from direct sunlight and extreme temperatures when not in use.
- Water Resistance: The device is not waterproof. Avoid exposing it to water or high humidity.
7. Troubleshooting
If you encounter issues with your LUOTWO W500, refer to the following common troubleshooting steps:
- Device not powering on: Ensure the battery is correctly installed and fully charged.
- No network connectivity: Check if the SIM card is properly inserted and activated. Verify network coverage in your area.
- Poor audio quality: Ensure the microphone and speaker are clear of obstructions. Check headset connection if applicable.
- Battery draining quickly: Reduce screen brightness, close unused applications, or consider replacing an aging battery.
For persistent issues, contact customer support.
8. Specifications
| Feature | Specification |
|---|---|
| Brand | LUOTWO |
| Model Number | LUOTWO W500 -2pcs |
| Product Dimensions | 3.2P x 5.6l x 10.6H centimeters |
| Battery Capacity | High-capacity lithium battery (8000mAh mentioned in image, 4600mAh in video) |
| Charging Method | Type-C |
| Max Range | 5000 Kilometers |
| Frequency Range | 700 MHz to 2600 MHz |
| Number of Channels | 10 |
| Voltage | 4.2 Volts (DC) |
| Water Resistance Level | Not waterproof |
| Special Features | Automatic flow, GPS, Weather Forecast |
9. Warranty and Support
The LUOTWO W500 comes with a manufacturer's warranty of 1 year. For warranty claims, technical support, or any inquiries, please refer to the contact information provided with your purchase documentation.
For further assistance, visit the official LUOTWO website or contact your retailer.