Introduction
This manual provides detailed instructions for the safe and efficient use of your DigitConvert M125B 135 Film Negative and Slide Scanner. This device is designed to convert 35mm film negatives and slides into digital JPEG images, allowing you to preserve and share your memories.
Important Safety Information
- Read all instructions before using the device.
- Keep the device away from water or moisture.
- Do not attempt to disassemble or modify the scanner. Refer all servicing to qualified personnel.
- Use only the provided power adapter and USB cable.
- Ensure proper ventilation to prevent overheating.
- Keep out of reach of children.
Package Contents
Verify that all items are present in the package:
- DigitConvert M125B Film Scanner
- USB Cable
- Video Cable
- Power Adapter
- Cleaning Brush
- 35mm Slide Holder
- 35mm Negative Holder
- Quick Feeder for Slides

Image: Contents of the DigitConvert M125B package, including the scanner, cables, power adapter, cleaning brush, and film holders.
Product Overview
Familiarize yourself with the components and controls of your DigitConvert M125B scanner.
Front Panel and Controls
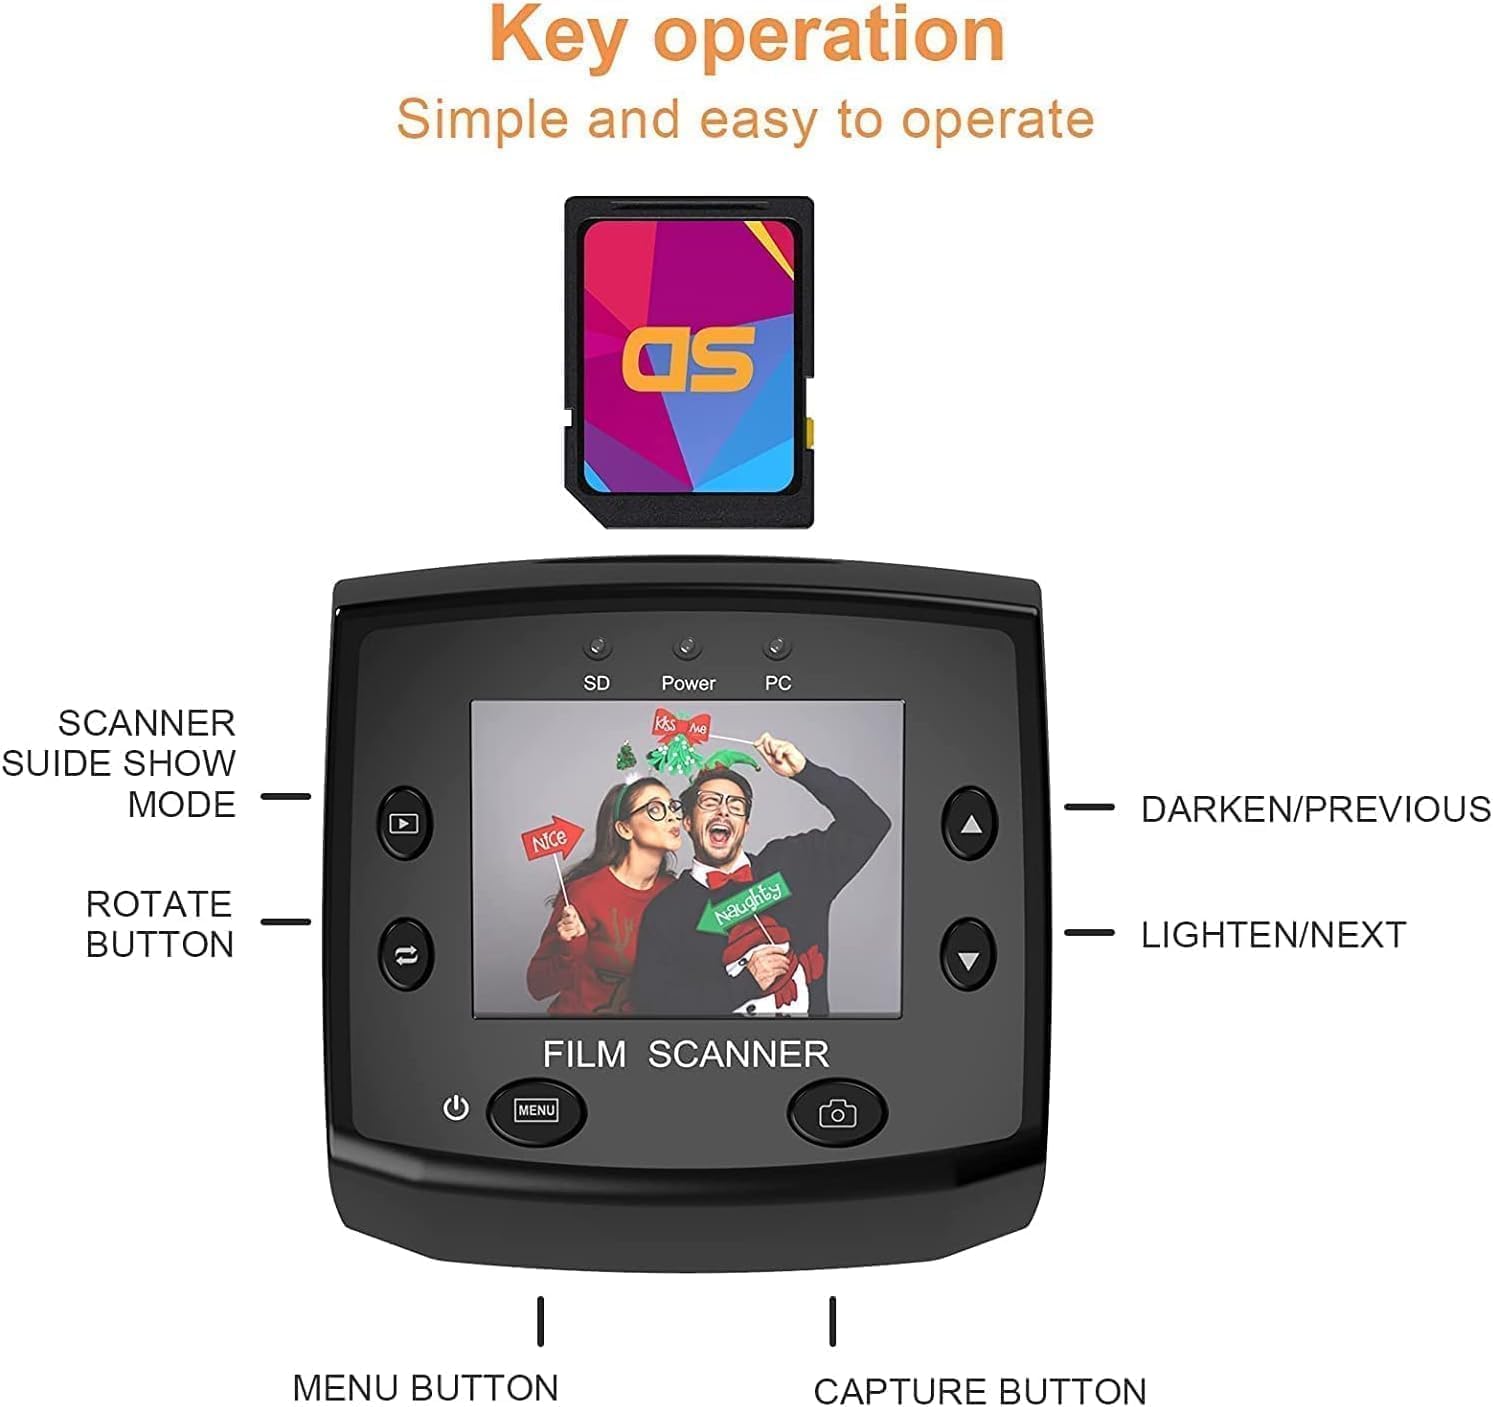
Image: Front view of the scanner showing the 2.4-inch LCD screen and control buttons.
- 2.4-inch TFT LCD Screen: For previewing, viewing, and editing images.
- Power Button: To turn the scanner on or off.
- Menu Button: To access scanner settings.
- Capture Button: To scan and save an image.
- Navigation Buttons (Up/Down/Left/Right): For menu navigation, adjusting brightness/exposure, and moving between images.
- Rotate Button: To rotate the image during preview.
- Scanner Slide Show Mode Button: To initiate a slide show of saved images.
Rear and Side Panels

Image: Rear view of the scanner highlighting the SD card slot, USB output, and TV input.
- SD/MMC Card Slot: For inserting an SD card (up to 32GB, not included) to save scanned images.
- USB Output Port: For connecting to a computer for power and data transfer.
- TV Input Port: For connecting to a television or monitor to view scans on a larger screen.
- Film/Slide Entry Slot: Where film holders or the quick slide feeder are inserted.
Setup
1. Insert SD Card
The scanner requires an SD card (maximum 32GB, formatted as FAT32) to save scanned images. Insert the SD card into the SD/MMC card slot on the rear of the scanner until it clicks into place.

Image: Side view of the scanner showing an SD card being inserted into the slot.
2. Connect Power
Connect the provided USB cable to the scanner's USB port and the other end to the power adapter. Plug the power adapter into a wall outlet. Alternatively, you can connect the USB cable directly to a computer for power.
Operating Instructions
1. Power On
Press the Power button on the front panel to turn on the scanner. The LCD screen will illuminate.
2. Load Film or Slides
Select the appropriate film holder for your media:
- For 35mm Negatives: Place the negative film strip into the 35mm Negative Holder. Ensure the film is flat and correctly aligned within the frames.
- For 35mm Slides: Place individual slides into the 35mm Slide Holder. For multiple slides, use the Quick Feeder. Stack slides into the feeder, then push the lever to advance them one by one into the scanning area. Note: Framed slides should not exceed 2mm thickness.

Image: A 35mm negative film strip correctly placed in the negative holder.

Image: The quick slide feeder attached to the scanner, loaded with multiple slides for continuous scanning.
Once loaded, insert the film holder or quick feeder into the film entry slot on the side of the scanner.
3. Select Film Type
From the main menu, select the correct film type: Positive (for slides), Negative (for color negatives), or Black & White (for black and white negatives). This ensures accurate color reproduction and conversion.
4. Preview and Adjust
The image from your film or slide will appear on the 2.4-inch LCD screen. Use the navigation buttons to adjust brightness or exposure if needed. The Rotate button can be used to orient the image correctly.
5. Capture Image
Once the image is framed and adjusted to your satisfaction, press the Capture button to scan and save the image to the inserted SD card.
6. Transfer to Computer (USB MSDC Mode)
To transfer scanned photos to your computer:
- Ensure the scanner is powered on and connected to your computer via the USB cable.
- The scanner will enter USB MSDC (Mass Storage Device Class) mode.
- Your computer will recognize the SD card in the scanner as a removable drive.
- You can now copy the photos from the SD card to your computer.
Note: The scanner does not support direct scanning and saving of photos to the computer. All scans are saved to the SD card first.

Image: The scanner connected to a laptop via USB, demonstrating the transfer process.
7. View on TV
Connect the scanner to a television or monitor using the provided video cable. This allows you to view your scanned images on a larger screen.

Image: The scanner connected to a television screen, displaying scanned images.
Maintenance
Cleaning the Scanner
To ensure optimal scan quality, keep the film entry slot and internal lens clean. Use the provided cleaning brush to gently remove dust and debris from the film path. Do not use liquid cleaners or abrasive materials.
Troubleshooting
- Scanner does not power on:
- Ensure the power adapter is securely connected to both the scanner and a working power outlet. Try a different outlet or USB port on your computer.
- "Please check the card!" error message:
- This indicates an issue with the SD card. Ensure the SD card is inserted correctly. Try reformatting the SD card to FAT32 on a computer, or try a different SD card (maximum 32GB).
- Slides get stuck in the quick feeder:
- Ensure the thickness of framed slides does not exceed 2mm. Gently push the lever to advance slides. If a slide is stuck, carefully remove the feeder and clear the obstruction. Avoid forcing slides.
- Poor image quality (dust/spots):
- Clean the film entry slot and internal lens using the provided cleaning brush. Ensure your film or slides are clean before scanning.
- Cannot transfer photos to PC:
- Ensure the scanner is in USB MSDC mode when connected to the computer. Check USB cable connection. Verify that the SD card is properly inserted and recognized by the scanner.
Specifications
| Model Number | M125B |
| Scanner Type | Slides/Negatives |
| Connectivity Technology | USB |
| Resolution | 1800 DPI (5/10 Megapixel interpolated) |
| Optical Sensor Technology | CMOS |
| Color Depth | 8 bpp |
| Display | 2.4-inch TFT LCD (480x234) |
| Storage | SD Card (up to 32GB, FAT32 format, not included) |
| Maximum Media Size | 2.4 x 3.6 inches (35mm film/slides) |
| Item Weight | 1.1 pounds (0.5 Kilograms) |
| Package Dimensions | 10.67 x 6.81 x 4.29 inches |
| Minimum System Requirements | Windows XP, VISTA, 7, 8, 10, Mac OS |

Image: Diagram showing the physical dimensions of the scanner (112mm height, 86mm width, 86mm depth).
Warranty and Support
For warranty information and technical support, please refer to the documentation included with your purchase or contact DigitConvert customer service through their official website or the retailer where the product was purchased.