
Introduction
This manual provides detailed instructions for the setup, operation, and maintenance of your MAFLYXDA V1 Video Calling Handheld Security Camera. Please read this manual thoroughly before using the device to ensure proper functionality and safety.
Safety Information
- Ensure the device is used indoors only.
- Use only the provided power adapter and USB cable.
- Keep the device away from water and excessive moisture.
- Do not attempt to disassemble or repair the device yourself. Contact customer support if issues arise.
- Operate within the specified temperature and humidity ranges.
Packaging Contents
Verify that all items are present in the package:
- 1 x MAFLYXDA V1 Camera
- 1 x Camera Base
- 1 x Power Adapter
- 1 x USB Type-C Cable
- 1 x User Manual

Image: Contents of the MAFLYXDA V1 camera package.
Product Overview
The MAFLYXDA V1 is an indoor security camera featuring two-way video calling, 350° horizontal pan, motion tracking, and night vision. It includes a 2.8-inch screen for direct interaction and can be used handheld or docked.

Image: Detailed diagram of the MAFLYXDA V1 camera's physical components and dimensions.
Key Components:
- IPS HD Screen: 2.8-inch display for video calls and viewing.
- Dual MIC: For clear two-way audio communication.
- Call Buttons (1 & 2): For initiating video or voice calls.
- Reset Button: Use a pin to press for 3 seconds to reset the device.
- On/Off Button: Powers the device on or off.
- SD Card Slot: Supports local storage up to 128GB.
- Type-C Charging Ports: Two ports for charging (one on camera, one on base).
- Speaker: For audio output.
Setup
1. Charging the Device
Before first use, fully charge the camera using the provided USB Type-C cable and power adapter. The camera can be charged directly or while docked in its base.

Image: The camera can be used handheld with its built-in battery or powered via its base.
2. App Download and Installation
The MAFLYXDA V1 camera requires the "Im Cam" application for full functionality. Download the "Im Cam" app from your smartphone's app store (iOS or Android).
Upon first opening the app, you may be prompted to agree to security requests for location services, contact data, camera access, network access, and Bluetooth access. These notifications are necessary for initial setup and compliance with regulations. Once Wi-Fi connection is achieved, you may attempt to adjust permissions for location services and contact data if desired.
3. Adding a Wi-Fi Device
- After entering the app homepage, click the [+] icon on the upper right corner or the [Add Device] button to enter the device addition page.
- Follow the on-screen prompts to select the type of camera.
- Ensure the device is in network pairing state. For Wi-Fi devices, select a 2.4GHz Wi-Fi network and enter the Wi-Fi password to proceed. Note: The camera only supports 2.4GHz Wi-Fi networks; 5GHz networks are not supported.
- After successful addition, you can name the device to complete the binding process.

Image: Steps for adding the MAFLYXDA V1 camera to the Im Cam app via Wi-Fi.
4. SD Card Installation (Optional)
The camera supports local storage via an SD card (up to 128GB). Locate the SD card slot on the side of the camera and insert the card until it clicks into place. Ensure the camera is powered off before inserting or removing the SD card.

Image: SD card insertion for local storage.
Operating Instructions
1. Two-Way Video and Voice Calls
The camera features a built-in 2.8-inch screen and two call buttons for easy communication.
- Initiating a Call from Camera: Press one of the call buttons on the camera to initiate a video or voice call to a pre-configured contact.
- Initiating a Call from App: In the "Im Cam" app, select the "video call" or "voice call" option to connect with the camera.
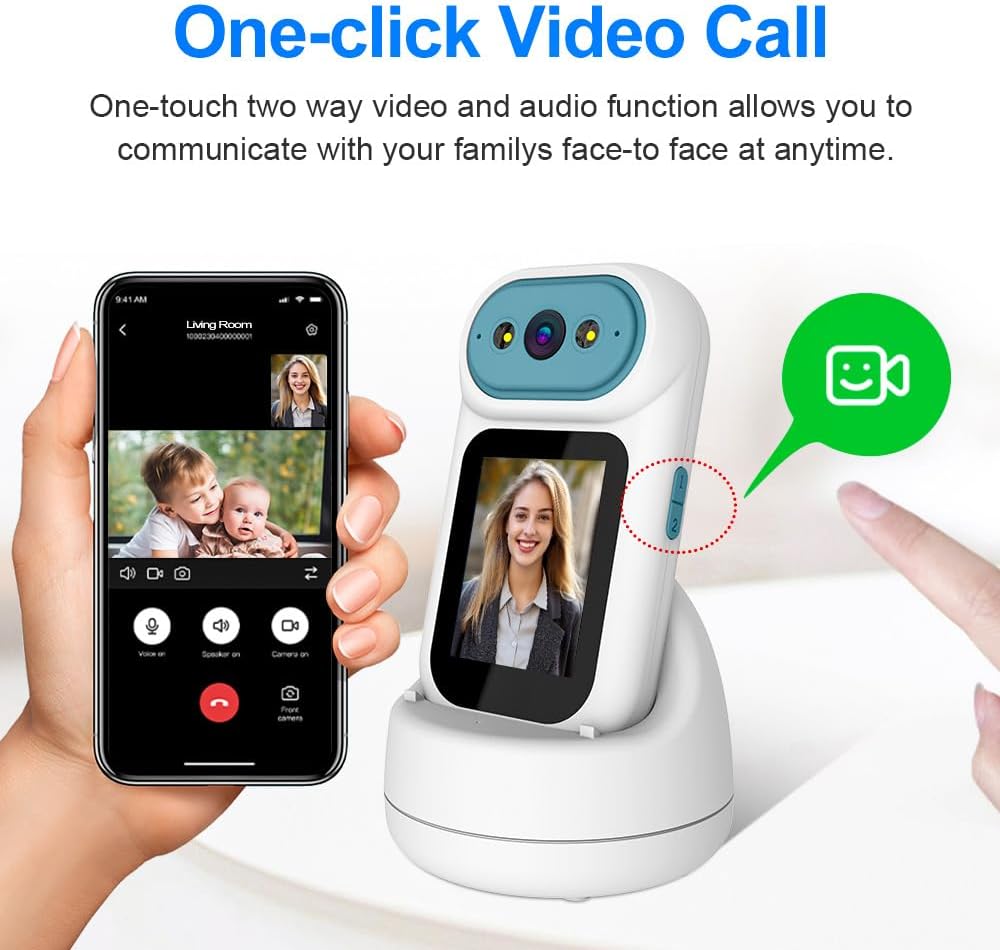
Image: One-click video call functionality.

Image: Example of two-way video and voice communication.
2. Pan and Tilt Control
The camera offers 350° horizontal rotation for comprehensive room monitoring. You can control the camera's movement remotely via the "Im Cam" app.

Image: 350° horizontal pan and AI humanoid detection.

Image: App interface for controlling camera pan.
3. Motion Tracking and Alerts
Enable the motion tracking function in the app settings. The camera will automatically track detected movement and send message notifications and alarm prompts to your smartphone.
4. Night Vision
The camera is equipped with infrared night vision, providing clear images in low-light conditions up to 26.25 feet (8 meters).

Image: Comparison of day and night vision capabilities.
5. Device Sharing
You can share access to your camera with up to 5 other users through the "Im Cam" app. This allows multiple family members to view live feeds and communicate.
- Click the [share] icon in the app.
- Click [add sharing user] and enter the user's name and "Im Cam" app account.
- After sharing, the added user can access the camera.
Note: Only one user can view the camera feed at the same time.
6. Device-to-Device Calls
The camera supports video calls between two MAFLYXDA V1 cameras, allowing communication without a smartphone.
- After connecting your camera, go to Call Settings on the device page in the app.
- Select the button to be configured and click Settings.
- Select your account and the target device that needs to be called, then click Confirm.

Image: Video calling functionality between two MAFLYXDA V1 devices.
7. Privacy Mode
The camera includes a privacy mode feature. Refer to the app settings for details on how to activate and manage this mode to prevent unwanted monitoring.
Maintenance
- Cleaning: Use a soft, dry cloth to clean the camera lens and body. Do not use liquid cleaners or abrasive materials.
- Storage: Store the camera in a cool, dry place when not in use.
- Firmware Updates: Regularly check the "Im Cam" app for available firmware updates to ensure optimal performance and security.
Troubleshooting
1. Device Not Powering On
- Ensure the camera is fully charged or connected to a power source.
- Verify the power adapter and USB cable are functioning correctly.
2. Unable to Connect to Wi-Fi
- Confirm your Wi-Fi network is 2.4GHz. The camera does not support 5GHz Wi-Fi.
- Ensure the Wi-Fi password is entered correctly.
- Move the camera closer to your Wi-Fi router to improve signal strength.
- Try resetting the camera using the reset button (refer to Product Overview for location) and re-attempt the setup process.
3. Excessive Notifications
To manage notification frequency:
- Open the "Im Cam" app.
- Navigate to Profile > Settings > Message notifications. Adjust settings as needed.
- Alternatively, you can manage app notifications through your phone's operating system settings: Go to Settings > Apps > Manage apps > Im Cam > Notifications.

Image: Steps to adjust notification settings for the Im Cam app.
4. Bright Light During Night Vision
If the camera's indicator lights are too bright during night vision:
- In the "Im Cam" app, go to the device page.
- Navigate to Settings > Lighting configuration.
- Select Always turn off infrared to disable the bright infrared lights. Note that this may affect night vision clarity.

Image: App settings for managing infrared lighting.
Specifications
| Feature | Description |
|---|---|
| Model Name | V1 |
| Brand | MAFLYXDA |
| Indoor/Outdoor Usage | Indoor |
| Video Capture Resolution | 1080p (2K HD) |
| Night Vision Range | 8 Meters (26.25 ft) |
| Connectivity Technology | Wireless (2.4G Wi-Fi only) |
| Pan Rotation | 350° horizontally |
| Screen Size | 2.8 inches |
| Storage Options | Local (Max 128GB SD card), Cloud Storage (subscription required) |
| Power Source | Corded Electric (via Type-C), Built-in Battery (2000mAh) |
| Battery Life (Screen Off) | Approx. 4.5 hours |
| Battery Life (Screen On) | Approx. 2.5 hours |
| Product Dimensions (L x W x H) | 3.44 x 3.44 x 6.62 inches |
| Item Weight | 15.8 ounces |
| UPC | 767700188826 |
Warranty and Support
Information regarding warranty and customer service support was not provided at the time of this manual's creation. Please refer to the product packaging or contact the seller directly for any warranty claims or technical assistance.