1. Product Overview

Image: The complete Huhomco Cordless Power Washer kit, showcasing the main gray unit, various nozzles, hose, battery, charger, and the included carrying case.
The Huhomco Cordless Power Washer, Model 6005, is a versatile and portable cleaning device designed for various applications, from household chores to outdoor maintenance. It features a high-performance 300W brushless motor, delivering up to 1450 PSI (100 Bar) of pressure for effective dirt and stain removal. This unit offers three adjustable power levels and can draw water from multiple sources, including a direct faucet connection or self-priming from a bucket, lake, or swimming pool. Equipped with two 4000mAh lithium batteries, it provides extended operation time. The power washer comes with a comprehensive set of nozzles, including a 6-in-1 multifunctional nozzle, a 0° spray nozzle, a 180° rotating nozzle, and a foam bottle, enhancing its cleaning efficiency and adaptability.
2. Important Safety Information
Please read and understand all safety warnings and instructions before operating this power washer. Failure to follow these instructions may result in electric shock, fire, and/or serious injury.
- Personal Safety: Always wear appropriate personal protective equipment, including safety glasses, gloves, and protective footwear, when operating the power washer. Do not direct the water stream at people, pets, or electrical equipment.
- Electrical Safety: Ensure batteries are charged in a dry area. Do not expose the power washer to rain or wet conditions. Do not handle the charger or power washer with wet hands.
- Water Source: Use only clean water. Do not use corrosive or flammable liquids. Ensure the water filter is properly installed to prevent debris from entering the pump.
- Operation: Keep children and bystanders away during operation. Do not operate the power washer if any parts are damaged or missing. Always hold the spray gun firmly with both hands during operation.
- Storage: Store the power washer in a dry, secure location, out of reach of children. Disconnect the battery when not in use and before performing any maintenance.
3. Package Contents
Verify that all items listed below are included in your package. If any items are missing or damaged, please contact customer support.

Image: All components included in the Huhomco Cordless Power Washer kit. This includes the main power washer unit, two 4000mAh batteries, a battery charger, a 5-meter hose, a water filter, a faucet connector, an extension rod, a stop valve, a transition connector, a 0° nozzle, a 180° rotating nozzle, a 6-in-1 nozzle, a soap bottle, a delicate packaging box, and a storage bag.
- Cordless Power Washer Unit (Gray)
- 2 x 4000mAh Lithium-Ion Batteries
- Battery Charger
- 5-Meter Water Hose
- Water Filter
- Faucet Connector
- Extension Rod
- Stop Valve
- Transition Connector
- 0° Spray Nozzle
- 180° Rotating Nozzle
- 6-in-1 Multifunctional Nozzle
- Foam Bottle (Soap Bottle)
- Storage Case
4. Setup Guide
4.1 Charging the Batteries
Before first use, fully charge both 4000mAh lithium-ion batteries. A full charge typically takes 2-3 hours and provides up to 45 minutes of continuous operation.
- Insert the battery into the charger.
- Plug the charger into a standard electrical outlet.
- The indicator light on the charger will show the charging status (refer to charger manual for specific light indications).
- Once fully charged, disconnect the charger from the outlet and remove the battery.

Image: A 21V lithium-ion battery for the power washer, showing its charging port. Ensure the battery is fully charged before use for optimal performance.
4.2 Assembling the Power Washer
Follow these steps to assemble the power washer components:
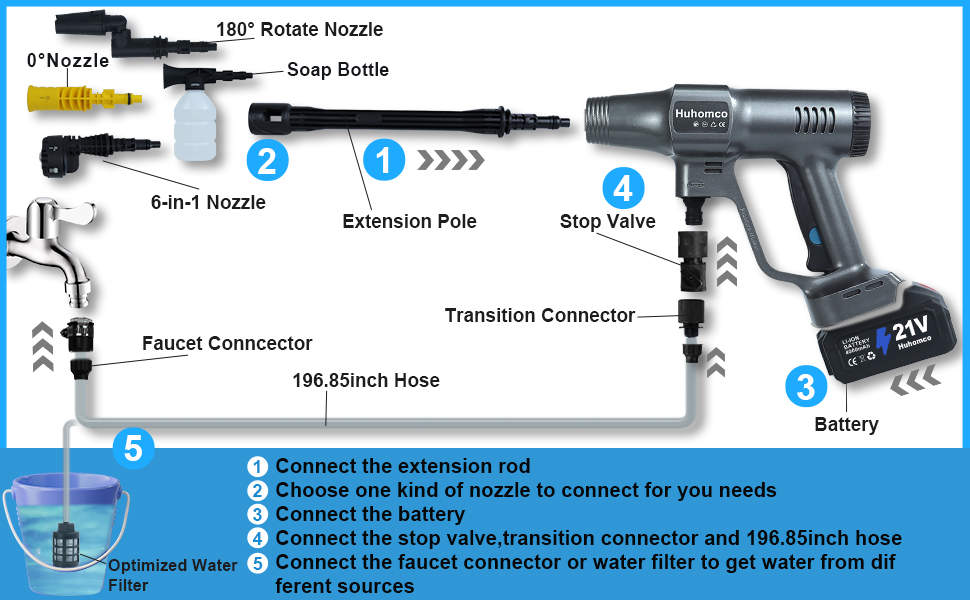
Image: An exploded diagram illustrating the assembly sequence of the power washer. Steps include connecting the extension rod, attaching the desired nozzle, inserting the battery, connecting the stop valve and transition connector to the hose, and finally connecting the water filter or faucet connector to the water source.
- Connect the Extension Rod: Attach the extension rod to the main power washer unit by aligning the connectors and twisting until secure.
- Attach a Nozzle: Select the appropriate nozzle for your task (0°, 180°, 6-in-1, or foam bottle) and attach it to the end of the extension rod. Ensure it clicks into place securely.
- Insert Battery: Slide a charged battery into the battery slot at the base of the power washer handle until it locks into position.
- Connect Hose Components: Attach the stop valve to the power washer's water inlet. Then, connect the transition connector to the stop valve, and finally, connect the 5-meter hose to the transition connector.
4.3 Connecting to a Water Source
The power washer offers two methods for water supply:
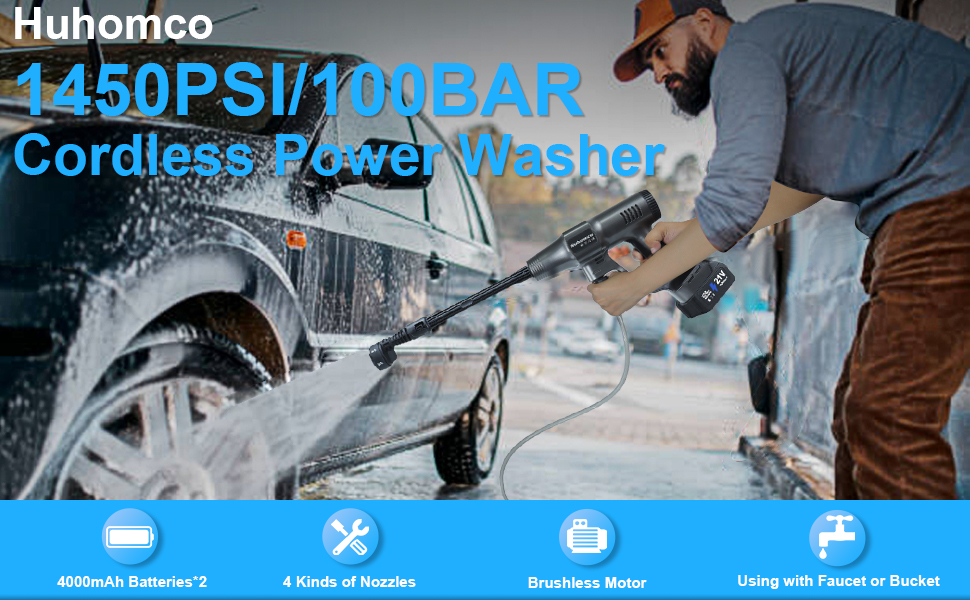
Image: Demonstrates two water intake methods. Method 1 shows the 5-meter hose with a weighted filter submerged in a bucket of water, allowing self-priming from various sources like buckets, lakes, or swimming pools. Method 2 shows the hose connected directly to a faucet using the provided faucet connector, ensuring a continuous water supply.
- Method 1: Self-Priming from a Bucket/Container:
- Attach the weighted water filter to the end of the 5-meter hose.
- Submerge the weighted filter completely into a bucket, lake, or other water container. Ensure the filter is fully immersed to prevent air intake.
- Method 2: Direct Faucet Connection:
- Attach the faucet connector to the end of the 5-meter hose.
- Connect the faucet connector to a standard garden faucet. Ensure a tight seal to prevent leaks.
- Turn on the water supply from the faucet.
5. Operation
5.1 Powering On and Off
Once assembled and connected to a water source with a charged battery, press the power button on the handle to turn the unit on. Release the trigger to stop the water flow.
5.2 Adjusting Pressure Levels
The power washer features three adjustable power levels (gears) to suit different cleaning tasks, ranging from 0 to 100 BAR (approximately 0 to 1450 PSI).
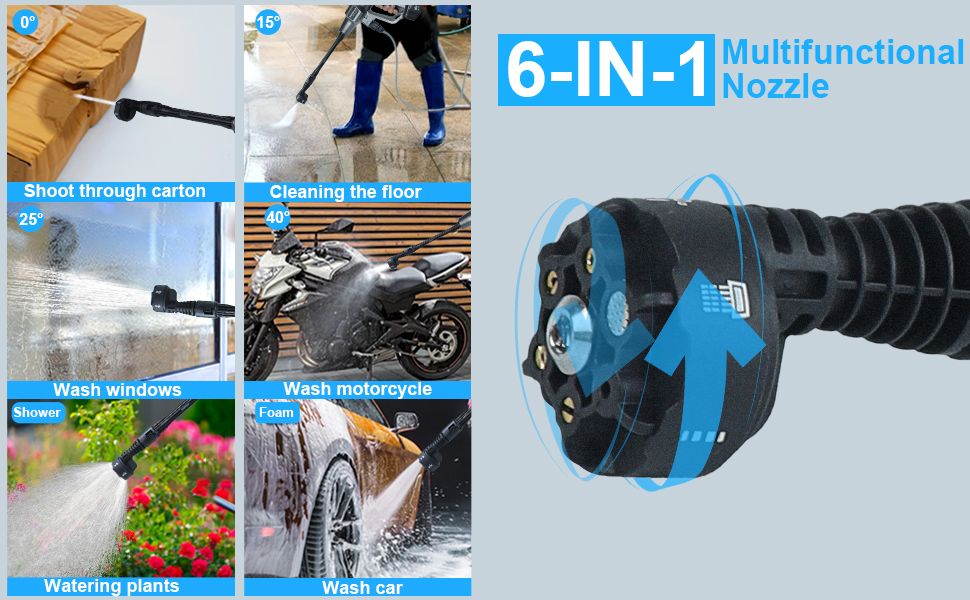
Image: A close-up of the power washer's control panel, highlighting the three gear speed adjustment settings. Users can select between 30 BAR, 50 BAR, and 100 BAR pressure levels to optimize cleaning for various surfaces and tasks.
- Locate the pressure adjustment button/dial on the unit.
- Press or rotate to cycle through the available pressure settings (e.g., low, medium, high).
- Choose a lower pressure for delicate surfaces and higher pressure for stubborn dirt.
5.3 Nozzle Selection and Use
The power washer comes with a versatile set of nozzles for various applications:

Image: A visual guide to the 6-in-1 multifunctional nozzle, demonstrating its different spray patterns and their applications. These include a direct stream (0°), a wider fan spray (15°, 25°, 40°), a shower mode for watering plants, and a foam mode for car washing.
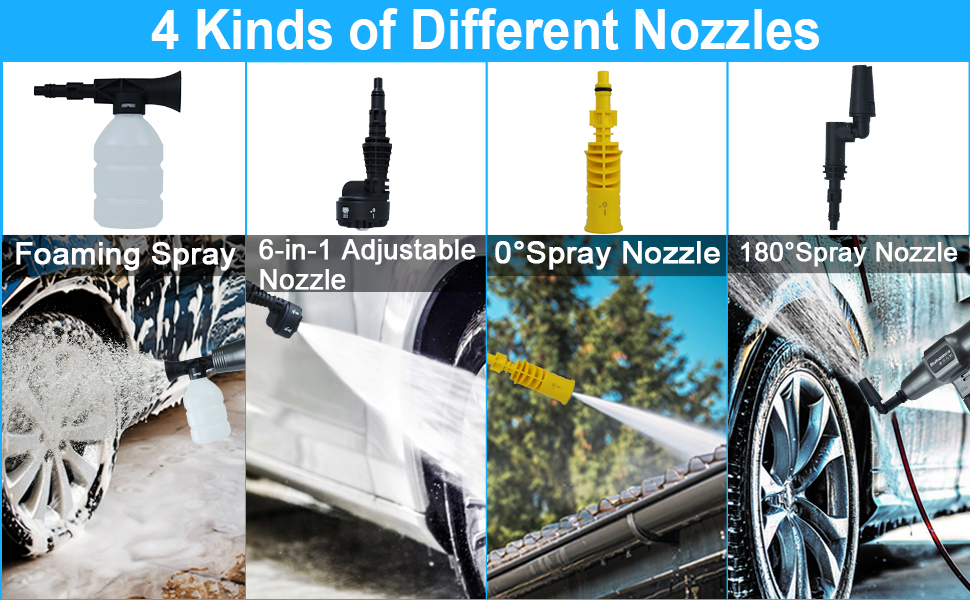
Image: A display of the four distinct nozzles provided: the foaming spray bottle for applying soap, the 6-in-1 adjustable nozzle for multiple spray patterns, the 0° spray nozzle for concentrated high-pressure cleaning, and the 180° spray nozzle for angled cleaning.
- 0° Spray Nozzle: Delivers a powerful, focused stream for blasting away stubborn dirt, grime, and debris from hard surfaces like driveways or vehicle tires. Use with caution on painted or delicate surfaces.
- 180° Rotating Nozzle: Allows adjustment of the spray angle, ideal for reaching difficult areas or for specific cleaning angles.
- 6-in-1 Multifunctional Nozzle: Offers multiple spray patterns (e.g., various fan angles, shower, foam) by rotating the nozzle head. Select the desired pattern based on the cleaning task.
- Foam Bottle (Soap Bottle): Fill with appropriate cleaning solution or car wash soap. Attaches to the power washer to generate rich foam, which helps loosen dirt before rinsing.
To change nozzles, ensure the power washer is off and the trigger is not engaged. Detach the current nozzle and securely attach the desired one.
5.4 General Cleaning Tips
- Always test the spray on an inconspicuous area first to ensure it does not damage the surface.
- Start with a lower pressure setting and gradually increase if needed.
- Maintain a consistent distance from the surface to ensure even cleaning.
- For best results, apply cleaning solutions with the foam bottle, allow them to dwell, then rinse thoroughly with clean water.
6. Maintenance
Regular maintenance ensures the longevity and optimal performance of your power washer.
- After Each Use:
- Disconnect the water supply and remove the battery.
- Run the power washer for a few seconds to clear any remaining water from the pump and hose.
- Clean the exterior of the unit with a damp cloth. Do not use harsh chemicals.
- Rinse all nozzles and accessories with clean water.
- Water Filter Cleaning: Periodically inspect and clean the water filter to prevent clogging and ensure proper water flow. Rinse it under running water to remove any debris.
- Battery Care:
- Store batteries in a cool, dry place away from direct sunlight and extreme temperatures.
- For long-term storage, charge batteries to about 50% capacity.
- Do not store fully discharged batteries for extended periods.
- Storage: Store the power washer and all accessories in the provided carrying case in a dry, frost-free environment. Ensure all components are dry before storage to prevent mold or damage.
7. Troubleshooting
If you encounter issues with your power washer, refer to the following common problems and solutions:
| Problem | Possible Cause | Solution |
|---|---|---|
| No water flow or low pressure |
|
|
| Unit does not turn on |
|
|
| Water leaks from connections |
|
|
| Short battery life |
|
|
8. Technical Specifications
| Feature | Detail |
|---|---|
| Model Number | 6005 |
| Brand | Huhomco |
| Motor Power | 300W Brushless Motor |
| Max Pressure | 1450 PSI (100 Bar) |
| Pressure Levels | 3 (0-100 BAR adjustable) |
| Battery Type | Lithium Ion |
| Battery Capacity | 2 x 4000mAh |
| Working Time (per charge) | Up to 45 minutes |
| Charging Time | 2-3 hours |
| Hose Length | 5 Meters |
| Product Dimensions | 10.24 x 5.91 x 17.32 inches (26 x 15 x 44 cm) |
| Item Weight | 7.7 pounds (3.5 kg) |
| Color | Gray |
9. Warranty and Customer Support
For information regarding the manufacturer's warranty, please refer to the documentation included with your product or contact Huhomco customer support directly. Extended protection plans may also be available for purchase.
For technical assistance, troubleshooting not covered in this manual, or to inquire about replacement parts, please contact Huhomco customer service. Contact details are typically found on the product packaging or the official Huhomco website.
Note: As per the provided data, specific warranty terms are not detailed. Please consult the manufacturer's official channels for the most accurate and up-to-date warranty information.