
Important Safety Information
Always read and understand all safety warnings and instructions before operating the lawn tractor. Failure to follow these instructions may result in serious injury or death. Keep this manual for future reference.
- Ensure all guards and safety devices are in place and functioning correctly before operation.
- Never allow children or untrained persons to operate the lawn tractor.
- Wear appropriate personal protective equipment (PPE), including eye protection, hearing protection, and sturdy footwear.
- Clear the area of debris, rocks, and other objects that could be thrown by the blades.
- Operate the tractor only in daylight or good artificial light.
- Avoid operating on steep slopes. If necessary, mow across the face of slopes, not up and down.
- Turn off the engine and remove the key before performing any maintenance or clearing blockages.
Setup and Initial Preparation
1. Unpacking and Assembly
Carefully remove all components from the packaging. Ensure all parts listed in the packing list are present. Some minor assembly may be required, such as attaching the steering column or seat. Refer to the separate assembly guide for detailed instructions.
2. Battery Charging
The Yard Force 56V 40-Inch LFP Electric Ride-On Lawn Tractor is powered by a 56V 50Ah Lithium Iron Phosphate (LFP) battery. Before first use, fully charge the battery using the provided 57.6V DC 7.5A charger.

Figure 1: The Yard Force 56V 40-Inch LFP Electric Ride-On Lawn Tractor.

Figure 2: Close-up of the charging port located on the tractor's control panel. To charge, lift the orange cover and insert the charger plug firmly.
- Locate the charging port on the tractor.
- Connect the charger to a standard electrical outlet.
- Insert the charger plug into the tractor's charging port.
- Monitor the battery status on the integrated LCD display. The battery is fully charged when the indicator shows 100%.
- Once charging is complete, disconnect the charger from the tractor and then from the outlet.
3. Pre-Operation Checks
- Ensure tires are properly inflated (15" front, 16" rear pneumatic tires).
- Check that the cutting deck is free of debris and blades are sharp and securely fastened.
- Verify that the seat is securely latched.
- Familiarize yourself with all controls, including the emergency stop button.
Operating Instructions
1. Starting and Driving
To start the tractor, insert the key into the ignition and turn it to the "ON" position. The LCD display will illuminate, showing battery status and mileage.

Figure 3: The integrated LCD display provides real-time battery status and mileage tracking.
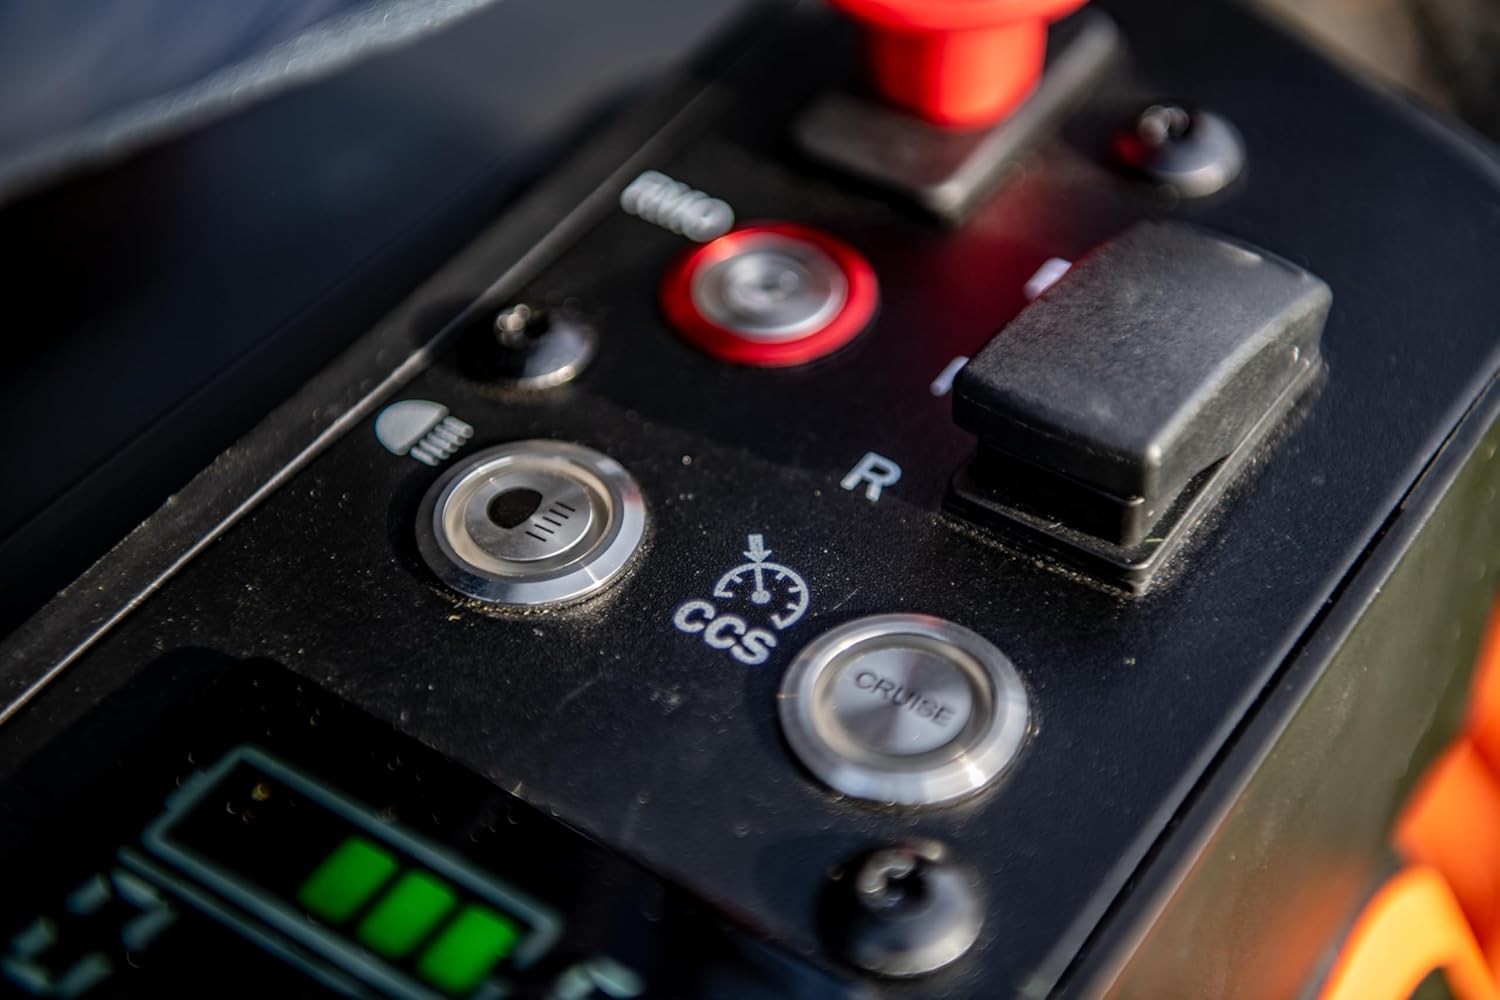
Figure 4: The control panel features a drive selector (F-N-R for Forward, Neutral, Reverse) and a cruise control button (CCS).
- Select the desired direction (Forward or Reverse) using the F-N-R lever.
- Gradually press the foot pedal to accelerate. The tractor has a maximum driving speed of 8 MPH and a mowing speed of 5 MPH. Reverse speed is 3 MPH.
- To engage cruise control, press the "CRUISE" button once the desired speed is reached. Press again or apply the brake to disengage.
2. Mowing Operation
The 40" deck features a 38" (96cm) cutting width with twin blades rotating at 3400 rpm.

Figure 5: A user operating the Yard Force electric ride-on lawn tractor on a grassy area.
- Adjust Cutting Height: Use the 12-position height adjustment lever to set the cutting height between 1.5" and 4.5". Select a higher setting for longer grass and gradually lower it for subsequent passes if needed.
- Engage Blades: Press the red button on the control panel to engage the cutting blades. Ensure no one is near the discharge chute before engaging.
- Mow in Overlapping Passes: For best results, mow in slightly overlapping passes. Avoid sudden turns or stops that could scalp the lawn.
- Mulching/Side Discharge: The tractor supports both mulching and side discharge. Ensure the appropriate attachment (mulch plug or side discharge chute) is installed for your desired cutting method.
3. Using the Optional Bagging Kit
An optional bagging kit is available for grass collection. This kit attaches to the rear of the tractor and collects clippings as you mow.

Figure 6: The optional bagging kit allows for easy collection and disposal of grass clippings.
When the bags are full, disengage the blades, turn off the tractor, and remove the bags for emptying. Always dispose of grass clippings responsibly.
Maintenance
Regular maintenance ensures the longevity and optimal performance of your Yard Force lawn tractor. Always turn off the tractor and remove the key before performing any maintenance.
1. Cleaning the Cutting Deck
After each use, clean the underside of the cutting deck to prevent grass buildup, which can affect cutting performance and lead to corrosion.
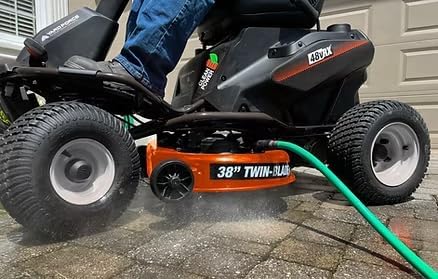
Figure 7: The cutting deck can be easily cleaned by attaching a hose to the wash port and running the blades briefly (refer to manual for detailed steps).
2. Blade Inspection and Sharpening
Inspect the cutting blades regularly for sharpness and damage. Dull or damaged blades can tear grass, leading to an unhealthy lawn. Replace or sharpen blades as needed. Always wear heavy-duty gloves when handling blades.
3. Battery Care
- Store the tractor and battery in a cool, dry place.
- Avoid fully discharging the battery frequently.
- For long-term storage, charge the battery to approximately 50-60% and store in a temperature-controlled environment.
4. Tire Pressure
Check tire pressure periodically to ensure even cutting and optimal traction. Refer to the tire sidewall for recommended pressure.
Troubleshooting
| Problem | Possible Cause | Solution |
|---|---|---|
| Tractor does not start. | Battery is low or dead. Key is not in "ON" position. Safety interlock engaged. | Charge battery. Turn key to "ON". Ensure operator is seated and all safety levers are disengaged. |
| Blades do not engage. | Safety interlock engaged. Blade engagement button not pressed correctly. | Ensure operator is seated and all safety levers are disengaged. Press blade engagement button firmly. |
| Uneven cutting. | Dull or damaged blades. Uneven tire pressure. Cutting deck not level. | Sharpen or replace blades. Check and adjust tire pressure. Refer to manual for deck leveling instructions. |
| Reduced battery life. | Overgrown grass. Frequent use of high-speed/power settings. Battery degradation. | Mow more frequently. Use appropriate speed for conditions. Contact service if battery life significantly reduced. |
Specifications
| Feature | Detail |
|---|---|
| Brand | Yard Force |
| Model Number | YF56vRX-RER38Li50 |
| Power Source | DC (56V 50Ah LFP Battery) |
| Charger | 57.6V DC 7.5A |
| Coverage Area | Up to 2 acres |
| Cutting Deck Width | 40 inches (38 inches / 96cm cutting width) |
| Blade RPM | 3400 rpm (twin blades) |
| Cutting Height Adjustment | 12 positions (1.5" to 4.5") |
| Forward Speed (Driving) | 8 MPH |
| Forward Speed (Mowing) | 5 MPH |
| Reverse Speed | 3 MPH |
| Front Tires | 15 inches pneumatic |
| Rear Tires | 16 inches pneumatic |
| Item Weight | 529 Pounds |
| Product Dimensions (D x W x H) | 66"D x 35"W x 45"H |
| UPC | 846325017688 |
Warranty and Support
For warranty information, technical support, or to purchase replacement parts, please contact Yard Force customer service. Keep your proof of purchase and model number readily available.
A 3-Year Protection Plan is available for this product. Please refer to the separate warranty documentation provided with your purchase for full terms and conditions.
You can also visit the official Yard Force website for additional resources and FAQs: Visit the Yard Force Store
Product Overview Video
Video: Official product overview of the Yard Force 56V 40-Inch LFP Electric Ride-On Lawn Tractor, demonstrating key features and operation.


