1. Introduction
This manual provides comprehensive instructions for the Hagibis M.2 NVMe SSD Enclosure. It covers product features, setup procedures, operational guidelines, maintenance tips, troubleshooting, and detailed specifications. Please read this manual thoroughly before using the product to ensure optimal performance and data safety.
2. Key Features
- M.2 NVMe SSD Compatibility: Supports M.2 NVMe protocol (B+M Key/ M Key) SSDs in 2230/2242/2260/2280 sizes, up to 4TB. Not compatible with M.2 SATA SSDs, M.2 PCIe AHCI SSDs, or M.2 PCIe devices.
- High-Speed Data Transfer: USB 3.2 Gen2 Type-C interface with up to 10Gbps transmission speed, achieving read/write speeds of 1000-1200MB/s. Backward compatible with USB 3.1 Gen1 and USB 3.0.
- Write Protection Key: A physical switch to enable or disable write protection, preventing accidental modification, deletion, or virus infection of data on the SSD.
- Dual Power Outage Protection: Integrated supercapacitor and RTL9210 main control provide an additional 10 seconds of power supply during unexpected power outages. This ensures FTL mapping table updates and cache data writing, protecting data and SSD security.
- 100W PD Fast Charging: Supports PD3.0 fast charging protocol, allowing simultaneous device charging and data transfer without occupying additional ports.
- Wide Compatibility: Plug-and-play support for Windows, Mac OS, Linux, Android, iPhone, and MacBook devices.
- Efficient Heat Dissipation: Aluminum top cover with thermally conductive silicone adhesion ensures quick heat dissipation from the SSD.
3. Setup Guide
3.1 Package Contents
Before proceeding, ensure all items are present in the package:
- Hagibis M.2 SSD Enclosure
- USB-C Cable
- Torx Screws (x4)
- Torx Screwdriver (x1)
- Thermally Conductive Silicone Pad
- User Manual

Image: Contents of the Hagibis M.2 NVMe SSD Enclosure package, including the enclosure, USB-C cable, screws, screwdriver, and thermal pad.
3.2 SSD Installation
- Open the Enclosure: Gently open the top cover of the enclosure. The top cover is made of aluminum alloy, and the lower cover is ABS.
- Insert the SSD: Carefully insert your M.2 NVMe SSD (2230/2242/2260/2280 sizes) into the designated slot on the circuit board. Ensure it is seated correctly.
- Apply Thermal Pad: Peel off the protective film from both sides of the thermally conductive silicone pad and place it directly onto the installed SSD. This aids in heat dissipation.
- Close and Secure: Align the top cover and gently push it down until it clicks into place. Use the provided Torx screws and screwdriver to secure the cover.
- Initial Formatting (New SSDs): If you are using a new M.2 SSD, it must be formatted to exFAT format before use. Connect the enclosure to your computer and follow your operating system's instructions for disk management and formatting.

Image: The Hagibis M.2 NVMe SSD Enclosure with its top cover removed, revealing the internal circuit board and M.2 slot.

Image: A diagram illustrating the compatibility of the enclosure with various M.2 NVMe SSD sizes (2230, 2242, 2260, 2280).

Image: A hand applying a thermal silicone pad onto an M.2 SSD already installed within the enclosure, ensuring proper contact for heat transfer.
3.3 Interface Overview

Image: A schematic diagram highlighting the various ports and features of the Hagibis M.2 NVMe SSD Enclosure, including HOST, PD, USB, Write Protection Switch, and SSD Enclosure Working Indicator.
- HOST Port: Type-C data port for connecting to your phone, tablet, or laptop.
- Power Delivery (PD) Port: Connect a PD charger to charge the device connected to the HOST port. This port also supports USB data functions.
- USB Port: Connect peripherals such as microphones, mice, keyboards, etc.
- Write Protection Switch: Push the button to enable or disable write protection. When enabled, files can only be read, not modified or written. The function takes effect after reinserting the enclosure.
- SSD Enclosure Working Indicator: Provides status feedback.
4. Operating Instructions
4.1 Connecting to Devices
The enclosure supports connection to various devices for data transfer and expansion:
- Smartphones: Connect to your smartphone (e.g., iPhone 15 Pro Max) for recording video or connecting external microphones.
- Tablets: Facilitates easy file transfer for mobile working with tablets.
- Computers: Ideal for working with large files on laptops or desktop computers.

Image: The Hagibis M.2 NVMe SSD Enclosure connected to a smartphone, demonstrating its use for mobile data access.

Image: The Hagibis M.2 NVMe SSD Enclosure connected to a tablet, illustrating its use for file transfer and expanded storage for portable devices.

Image: The Hagibis M.2 NVMe SSD Enclosure connected to a laptop, demonstrating its use for high-speed data transfer with computers.
4.2 Using Write Protection
The write protection switch on the side of the enclosure allows you to protect your data from unintended changes.
- Enable Write Protection: Push the switch towards the locked icon. Once enabled, the SSD will become read-only.
- Disable Write Protection: Push the switch to the opposite side.
- Activation: The write protection setting takes effect only after the enclosure is reinserted or reconnected to the host device.

Image: A close-up of the Hagibis M.2 NVMe SSD Enclosure showing the physical write-protect switch with a lock icon, indicating its function for data security.
4.3 Power Delivery (PD) Functionality
The 100W PD port allows you to charge your connected device while simultaneously using the SSD enclosure for data transfer.
- Connect the enclosure's HOST port to your device (e.g., laptop, phone).
- Connect a PD-compatible charger to the enclosure's PD port. Your device will begin charging.
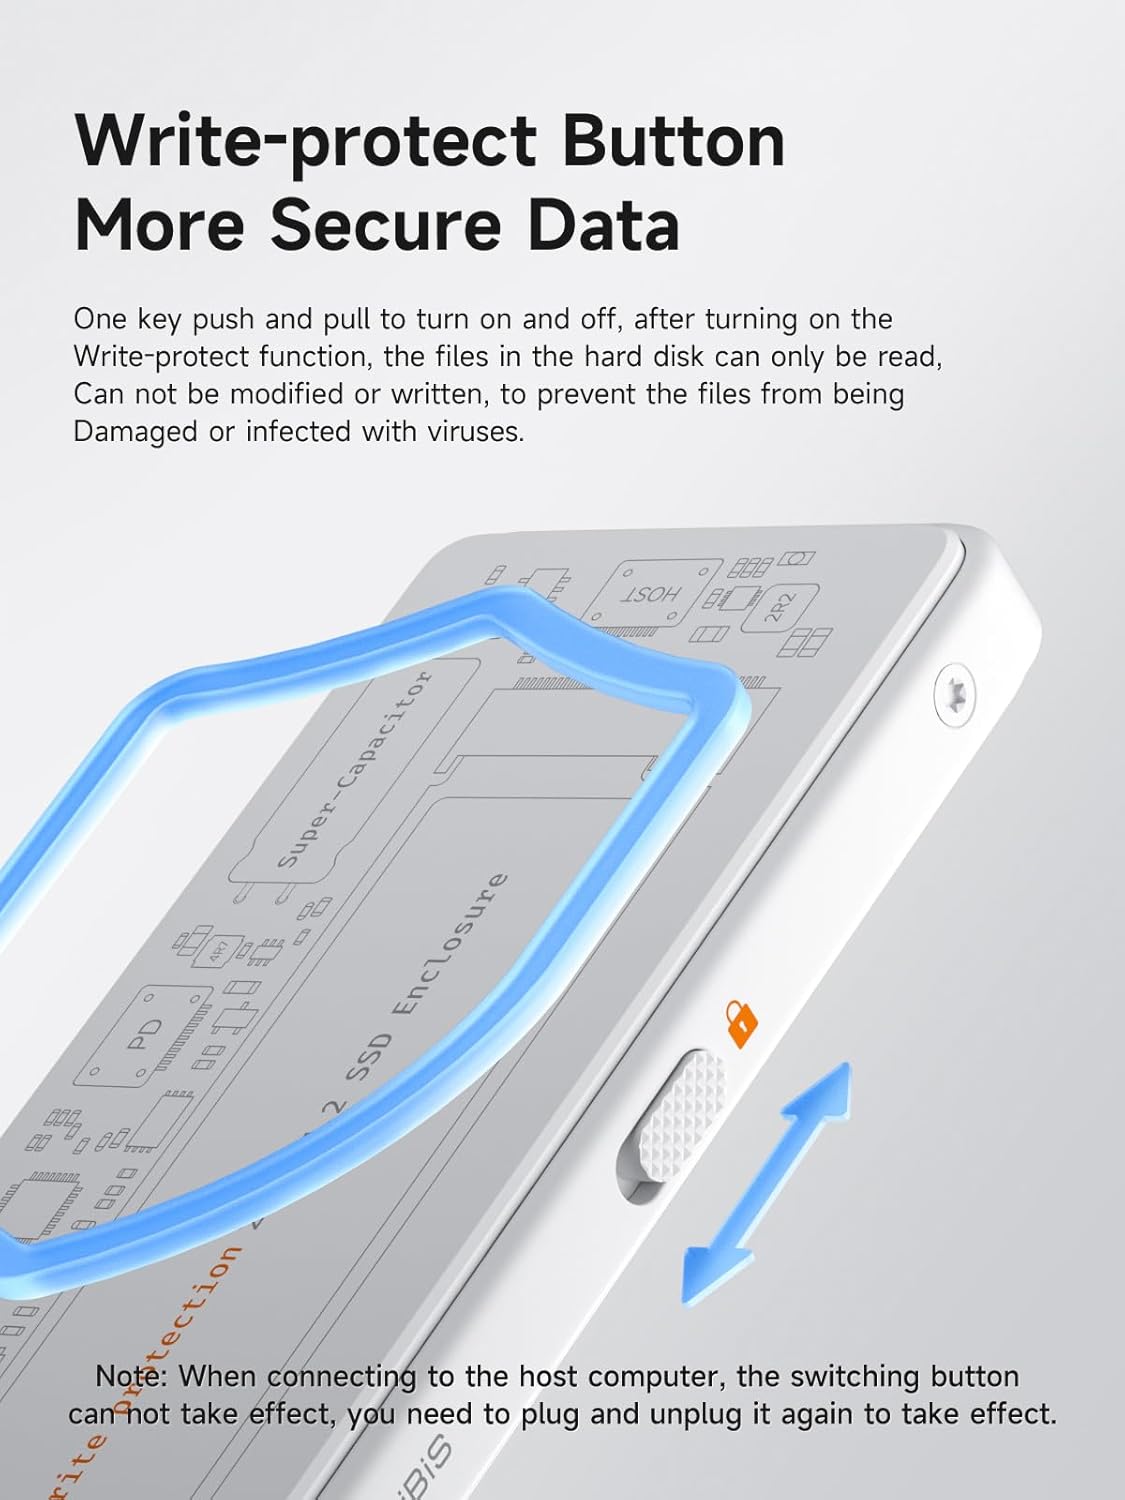
Image: The Hagibis M.2 NVMe SSD Enclosure connected to a laptop, with a charger plugged into its PD port, demonstrating 100W Power Delivery functionality.
4.4 Supercapacitor Data Protection
The built-in supercapacitor provides a safety measure against sudden power loss.
- In the event of an unexpected power failure during data transfer, the supercapacitor provides approximately 10 seconds of power.
- This brief power supply allows the main control to update the FTL mapping table and write cached data to the SSD, preventing data corruption and ensuring SSD integrity.
- Note: It takes 5-6 minutes for the supercapacitor to fully charge. Once fully charged, it will not affect the SSD during file reading or standby mode (not in write mode) if power is lost or the device is unplugged. It also does not increase the number of unsafe shutdowns on the SSD.
Image: An internal view of the Hagibis M.2 NVMe SSD Enclosure's circuit board, highlighting the supercapacitor component responsible for power failure data protection.
5. Maintenance
5.1 Heat Dissipation
The enclosure is designed for efficient heat management to maintain optimal SSD performance and longevity.
- The aluminum top cover, combined with the thermally conductive silicone pad, ensures heat is quickly dissipated from the SSD.
- This downward-pressing alloy top cover design is superior to sleeve-type housings, which can trap heat and affect fast heat dissipation.

Image: A comparison illustrating the effective heat dissipation of the Hagibis enclosure's downward-pressing alloy top cover versus a less efficient sleeve-type housing.
5.2 Cleaning
To clean the enclosure, use a soft, dry cloth. Avoid using liquid cleaners or solvents, as they may damage the device.
6. Troubleshooting
- SSD Not Detected:
- Ensure the SSD is correctly installed and seated firmly in the slot.
- Verify the USB-C cable is securely connected to both the enclosure and your device.
- If it's a new SSD, ensure it has been formatted (e.g., to exFAT) via your computer's disk management utility.
- Check if the write protection switch is accidentally enabled. If so, disable it and reinsert the enclosure.
- Slow Transfer Speeds:
- Ensure your host device's USB-C port supports USB 3.2 Gen2 (10Gbps) for maximum speed. Older USB versions will result in lower speeds.
- Verify that the USB-C cable used is rated for 10Gbps data transfer.
- Confirm that the thermal pad is correctly installed to prevent thermal throttling of the SSD.
- "Display connection might be limited" Message (Windows PC):
- Some users have reported this message when connecting to a Windows PC. This typically relates to USB-C ports that support video output. If you are not using the enclosure for display purposes, this message can generally be ignored.
- Difficulty with Daisy-Chaining Devices:
- While the enclosure offers additional USB-C ports, daisy-chaining multiple high-bandwidth devices may not always be fully supported or stable depending on the host device's capabilities. For critical data transfers, connect the enclosure directly.
- Small Screws and Screwdriver:
- The enclosure uses small Torx screws. Exercise care during installation to avoid stripping them. Keep the provided Torx screwdriver in a safe place to prevent loss.
7. Specifications

Image: A visual representation of the Hagibis M.2 NVMe SSD Enclosure's dimensions and key product parameters.
| Feature | Detail |
|---|---|
| Brand | Hagibis |
| Model | Bianco |
| Material | Aluminum Alloy, ABS |
| Item Weight | 1.8 Ounces (approx. 54g) |
| Memory Storage Capacity | Up to 4 TB (SSD not included) |
| Compatible Devices | Desktop, Gaming Console, Laptop, Smartphone, Tablet |
| Hard Disk Form Factor | M.2 NVMe (2230/2242/2260/2280) |
| Data Transfer Rate | 10 Gigabits Per Second (USB 3.2 Gen 2) |
| Hardware Interface | USB 3.2 Gen 2 Type-C |
| Power Delivery | 100W PD3.0 Support |
| Product Dimensions | 4.2 x 1.7 x 0.4 inches (107mm x 44mm x 10.4mm) |
| Color | White |
8. Product Video Demonstration
Video: An official demonstration of the Hagibis Write Protect M.2 NVMe SSD Enclosure, showcasing its features, installation process, write protection functionality, and connectivity options with various devices.
9. Warranty and Support
9.1 Warranty Information
Specific warranty details for the Hagibis M.2 NVMe SSD Enclosure are provided by the manufacturer. Please refer to the warranty card included in your product packaging or visit the official Hagibis website for the most up-to-date warranty terms and conditions.
9.2 Customer Support
For technical assistance, troubleshooting, or product inquiries, please contact Hagibis customer support through their official channels. You can also visit the Hagibis Store on Amazon for additional product information and support resources.


