1. Introduction
This manual provides comprehensive instructions for the installation, setup, and operation of your Ruitutedianzi 28 Steps Stair Controller with Remote. This reactive lighting system is designed to automatically illuminate LED stair strips, enhancing safety and aesthetics in your home or commercial space.
Package Contents:
- 1 x 28 Steps Stair Light Controller
- 1 x Remote Control
2. Product Overview
The Ruitutedianzi stair lighting controller is a sophisticated unit designed for precise control of up to 28 individual LED stair steps. It features multiple input and output terminals, along with intuitive function buttons and indicator lights. The included remote control allows for convenient adjustment of various settings from a distance.

Figure 2.1: Front view of the 28 Steps Stair Lighting Controller, showing LED indicators, input/output terminals, and control buttons.
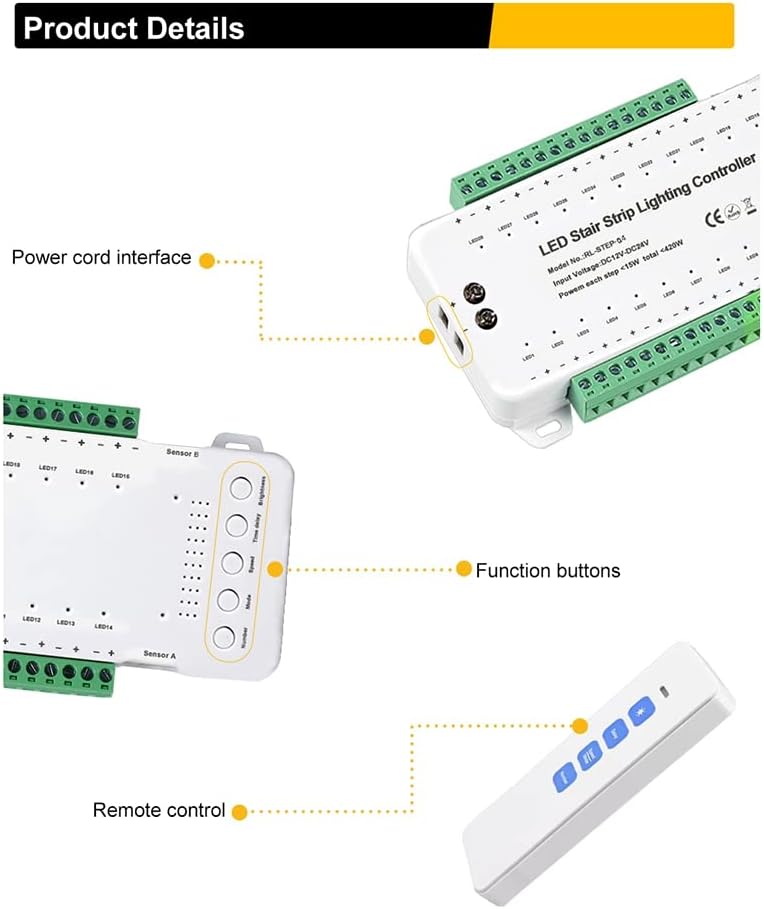
Figure 2.2: Detailed view of the controller highlighting the power cord interface and function buttons, along with the remote control.

Figure 2.3: Dimensional drawing of the stair controller, remote, and sensors, providing measurements for installation planning.
3. Specifications
| Feature | Specification |
|---|---|
| Model Number | RL-STEP-04 |
| Input Voltage | DC12V-24V |
| Output Channels | 28 Channels |
| Power per Step | Less than 15W |
| Total Power | Less than 420W |
| Product Dimensions | 10.24 x 5.91 x 1.57 inches |
| Item Weight | 1.15 pounds |
| Material | Plastic |
4. Installation
Proper installation is crucial for the optimal performance of your stair lighting system. Ensure all power is disconnected before beginning installation.
Wiring Diagram:
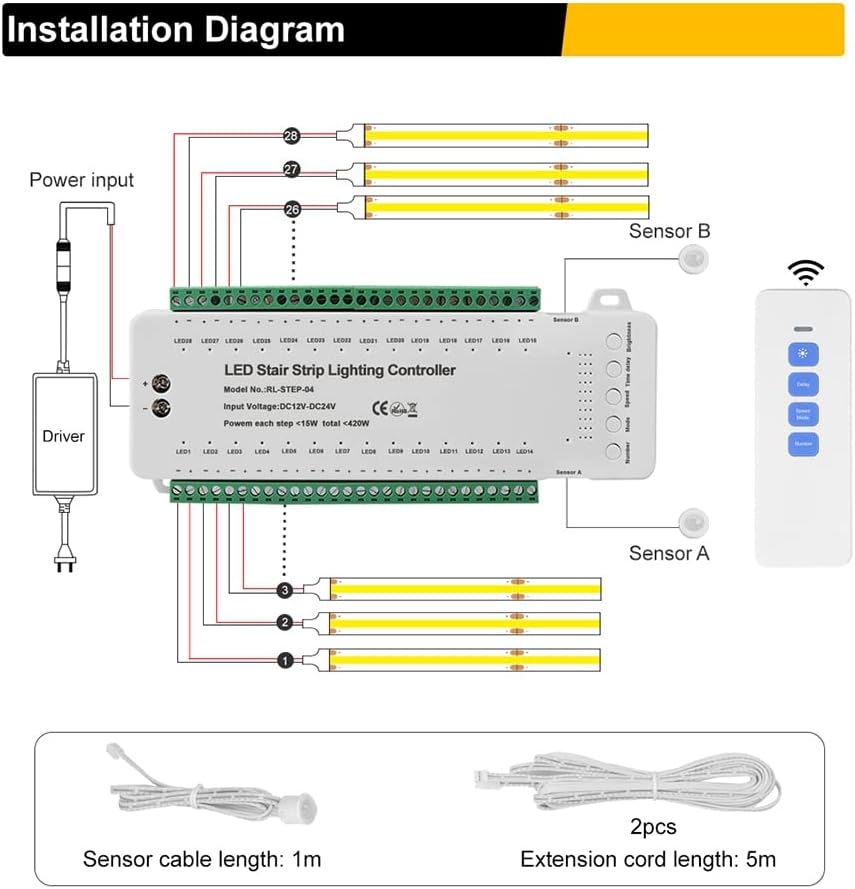
Figure 4.1: Wiring diagram illustrating connections for power input, LED strips (up to 28 steps), and motion sensors (Sensor A and Sensor B).
- Power Input: Connect the DC12V-24V power driver to the designated power input terminals on the controller. Ensure correct polarity.
- LED Strip Connections: Connect each LED stair strip to its corresponding numbered output channel (LED1 to LED28) on the controller. The controller supports up to 28 individual steps.
- Sensor Connections: Connect Sensor A and Sensor B to their respective terminals. Sensor A is typically placed at the bottom of the stairs, and Sensor B at the top, to detect movement. The sensor cable length is 1m, and extension cords of 5m are provided.
- Mounting: Mount the controller in a secure, dry location, away from direct moisture or excessive heat.
5. Setup
After installation, perform the initial setup to configure the controller for your specific stair configuration.
5.1. Set Step Number:
This controller supports up to 28 steps. You need to set the actual number of steps in your installation.

Figure 5.1: Image showing the controller with an emphasis on the "Number" button for setting the step count.
- Long press "Number" Key: Press and hold the "Number" key on the controller to enter the step number setting mode.
- Short press "Number" Key: Briefly press the "Number" key to cycle through and choose the desired step count.
- Long press "Number" Key again: Press and hold the "Number" key again to save the setting.
When setting the step number, each active step will illuminate with a blue signal light. For example, if you set 8 steps, 8 blue signal lights will illuminate.
6. Operating Instructions
The system can be operated using the included remote control. The remote allows adjustment of brightness, delay time, speed, and lighting modes.

Figure 6.1: Diagram of the remote control highlighting the Brightness, Delay, Speed/Mode, and Number buttons.
6.1. Brightness:
Use the "Brightness" button on the remote to adjust the intensity of the LED lights. Short press to cycle through brightness levels.
6.2. Delay Time:
Use the "Delay" button on the remote to set the duration the lights remain on after activation. Short press to cycle through delay times.
6.3. Speed:
The system offers 10 different speeds for the lighting effects. Short press the "Speed/Mode" key on the remote to cycle through the speed settings.

Figure 6.2: Table detailing the 10 available speed settings and their corresponding red signal light indications.
| Speed Setting | Description |
|---|---|
| Speed 1 | 150ms 1 red signal light turn on |
| Speed 2 | 250ms 2 red signal light turn on |
| Speed 3 | 350ms 3 red signal light turn on |
| Speed 4 | 450ms 4 red signal light turn on |
| Speed 5 | 550ms 5 red signal light turn on |
| Speed 6 | 650ms 6 red signal light turn on |
| Speed 7 | 750ms 7 red signal light turn on |
| Speed 8 | 850ms 8 red signal light turn on |
| Speed 9 | 1000ms 9 red signal light turn on |
| Speed 10 | 1200ms 10 red signal light turn on |
6.4. Mode:
The controller offers 9 different lighting modes. Long press the "Speed/Mode" key on the remote to choose a mode. Once the desired mode is selected, long press the "Speed/Mode" key again to save the setting.

Figure 6.3: Table outlining the 9 distinct lighting modes and their descriptions.
| Mode | Description |
|---|---|
| Mode 1 | All steps on |
| Mode 2 | All steps on one by one |
| Mode 3 | All steps on with 2 steps at the time |
| Mode 4 | 1 step on, moving according to Speed setting |
| Mode 5 | 3 steps on, moving according to Speed setting |
| Mode 6 | 1 step chase, moving according to Speed setting |
| Mode 7 | 2 step chase, moving according to Speed setting |
| Mode 8 | Separated chase, moving according to Speed setting |
| Mode 9 | Auto change all modes 1-8 mode |
7. Maintenance
The Ruitutedianzi Stair Controller is designed for low maintenance. To ensure longevity and optimal performance:
- Keep the controller and remote clean and free from dust. Use a soft, dry cloth for cleaning.
- Avoid exposing the unit to moisture or extreme temperatures.
- Ensure all connections remain secure. Periodically check wiring for any signs of wear or damage.
8. Troubleshooting
If you encounter issues with your stair lighting system, refer to the following common problems and solutions:
- Lights not turning on:
- Check power supply to the controller.
- Verify all LED strip connections are secure and correctly polarized.
- Ensure sensors are properly connected and unobstructed.
- Confirm the step number is correctly set on the controller.
- Lights not reacting to movement:
- Check sensor connections.
- Ensure sensors are not blocked or covered.
- Verify sensor placement is optimal for detecting movement at the top and bottom of the stairs.
- Remote control not working:
- Ensure there are no obstructions between the remote and the controller.
- Verify the remote's battery (if applicable, though product specs state no batteries required for the main unit, the remote might have one).
- Incorrect lighting pattern or speed:
- Re-adjust the speed and mode settings using the remote control as described in Section 6.
If problems persist after attempting these solutions, please contact customer support for further assistance.
9. Warranty and Support
This product is manufactured by Ruitutedianzi. For information regarding warranty coverage, technical support, or service, please refer to the seller's policy on the platform where the product was purchased or contact Ruitutedianzi customer service directly. Please have your model number (RL-STEP-04) and purchase details ready when contacting support.