DWVO MADWVIxww4
DWVO Full-Size Floating Bed Frame User Manual
Model: MADWVIxww4 | Brand: DWVO
1. Introduction
This manual provides comprehensive instructions for the assembly, operation, and maintenance of your DWVO Full-Size Floating Bed Frame. This metal platform bed features an innovative floating design, integrated LED lighting, and a convenient charging hub. Please read this manual thoroughly before beginning assembly or operation to ensure safe and correct usage.

Image 1.1: The DWVO Full-Size Floating Bed Frame with integrated LED lighting and charging hub.
2. Safety Information
Adherence to the following safety guidelines is crucial for preventing injury and damage to the product:
- Always assemble the bed frame strictly according to the provided instructions. Do not deviate from the steps.
- Do not exceed the maximum weight limit of 800 lbs (approximately 363 kg) for this bed frame. Overloading can compromise structural integrity and lead to collapse.
- Exercise caution around the floating design to prevent accidental bumps or entrapment, especially for children or pets.
- When using the charging hub, ensure that electrical cords are not pinched or damaged. Do not overload the electrical outlets.
- Use appropriate bedding materials. For infants and young children, ensure bedding is secure and does not pose a suffocation hazard.
- Keep all small parts and packaging materials away from children during and after assembly.
3. Parts List
Before beginning assembly, verify that all components listed below are present and undamaged. If any parts are missing or damaged, please contact customer support immediately.
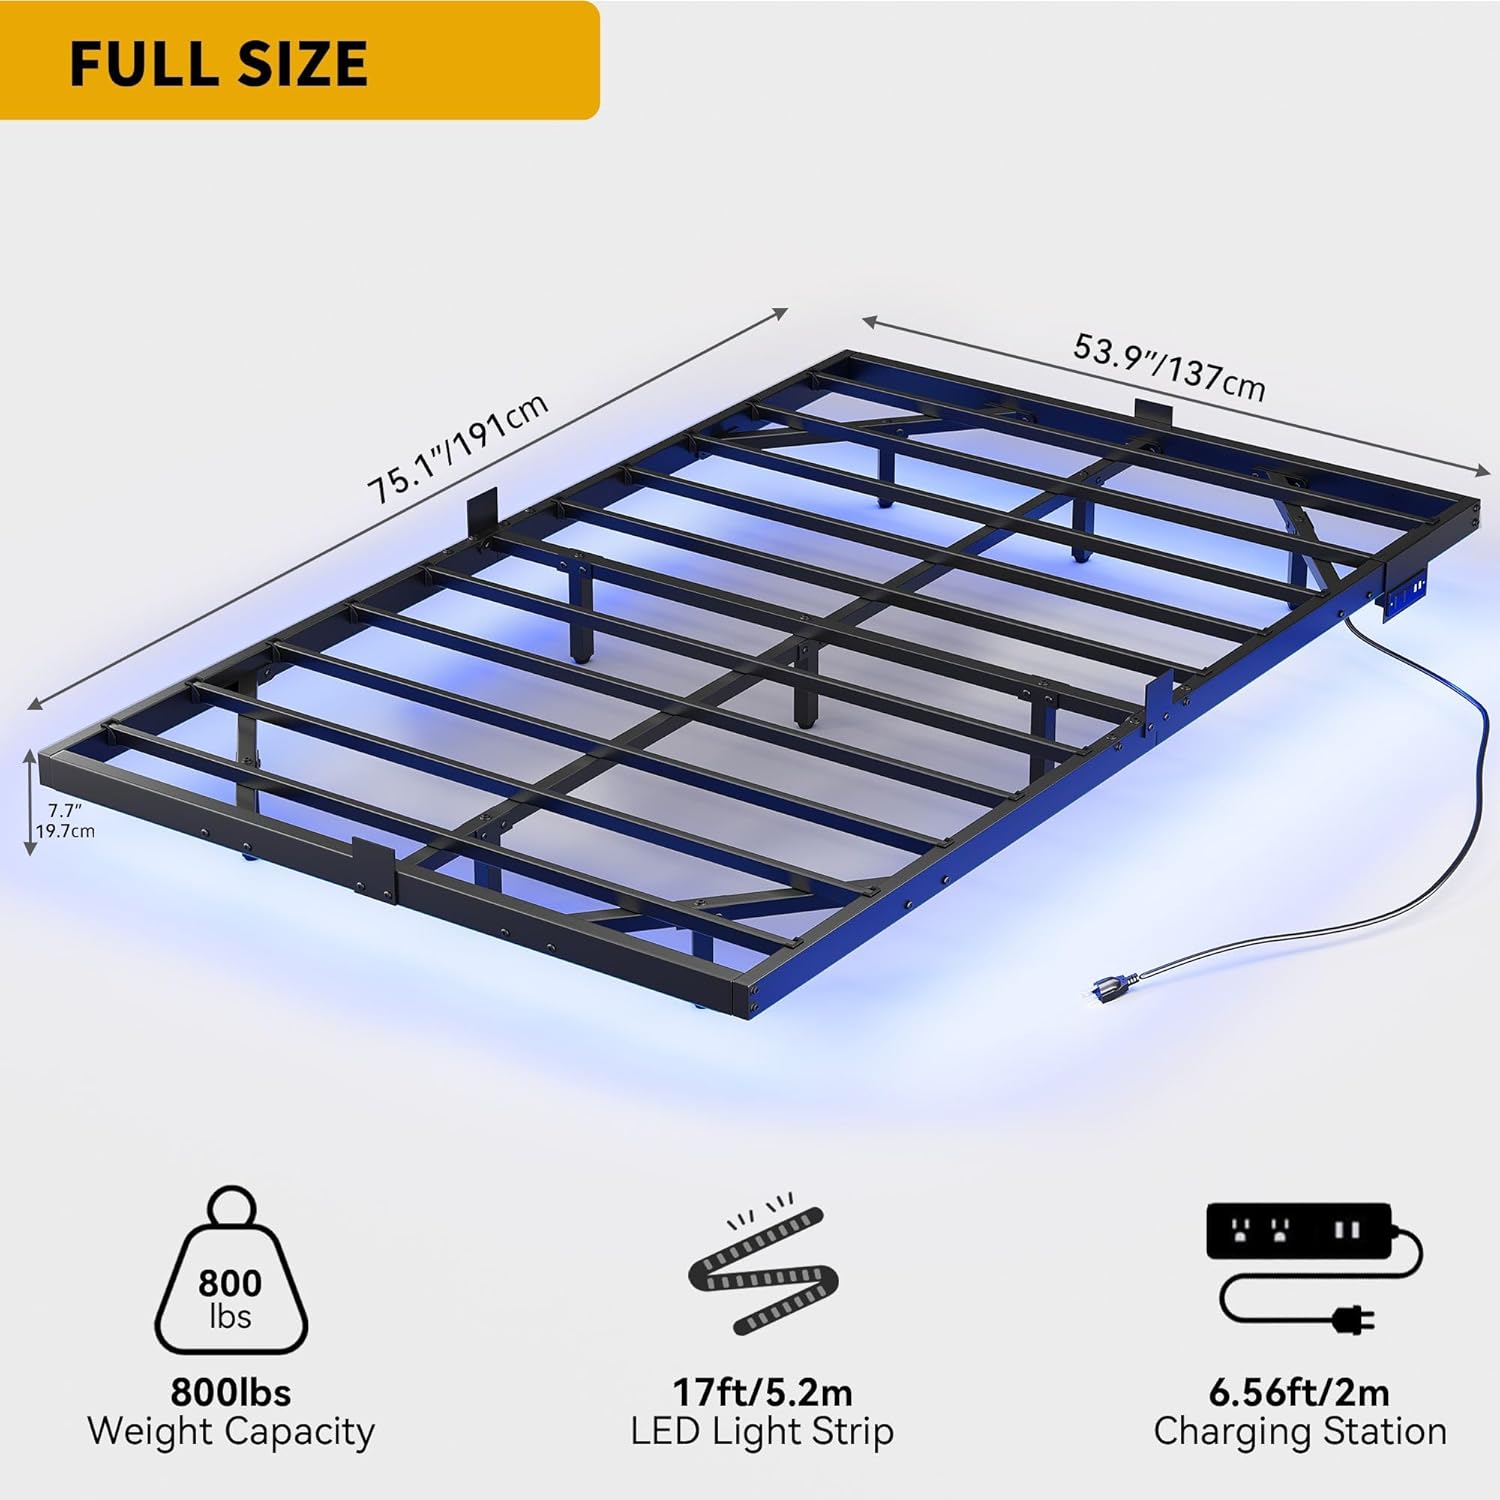
Image 3.1: Overview of bed frame dimensions and key components including the LED light strip and charging station.
The bed frame components include various metal beams, support legs, steel slats, a charging hub, an LED light strip, and all necessary hardware for assembly. Refer to the packing list included with your product for a detailed inventory of all parts and hardware.
4. Assembly Instructions
The DWVO Floating Bed Frame is designed for straightforward assembly. No box spring is needed. It is recommended to have two people for assembly to ensure ease and safety.
- Unpack and Identify: Carefully unpack all components and lay them out on a clean, soft surface to prevent scratches. Identify each part using the provided parts list.
- Assemble the Frame: Connect the main frame sections using the provided bolts and tools. Ensure all connections are secure but do not fully tighten bolts until the frame is fully assembled.
- Attach Support Legs: Install the 9 adjustable support legs to the designated points on the frame. These legs provide robust support and stability.
- Install Steel Slats: Place the 10 metal slats across the frame. Secure them according to the instructions to create a stable mattress foundation.
- Mount Charging Hub: Secure the charging hub to the designated location on the bed frame. Ensure it is firmly attached.
- Apply LED Light Strip: Adhere the 17ft (5.2m) LED light strip to the underside of the bed frame, following the contours for optimal lighting effect. Ensure the surface is clean and dry before application.
- Final Tightening: Once all components are in place and aligned, systematically tighten all bolts and screws to ensure a solid and sturdy construction.
- Mattress Stopper Installation: Install the four iron pieces designed to prevent mattress shifting.

Image 4.1: Details illustrating the mattress stopper, slot design for easy assembly, and sturdy construction with extra support legs.
5. Operating Instructions
5.1. Charging Hub Operation
The integrated charging hub provides convenient power access for your electronic devices.
- Power Connection: Plug the bed frame's main power cord (6.5 feet / 2m) into a standard wall outlet.
- AC Outlets: Use the 2 standard 120V/12A AC outlets for devices requiring wall power.
- USB Ports: Use the 2 USB 5V/2A ports for charging smartphones, tablets, and other USB-powered devices.

Image 5.1: The integrated charging hub for convenient device power.
5.2. LED Mood Lighting Control
The LED lighting system offers customizable ambiance for your bedroom. Use the included remote control to adjust settings.
- Power On/Off: Press the power button on the remote to turn the LED lights on or off.
- Color Selection: Choose from 20 static color options using the color buttons on the remote.
- Dynamic Modes: Select from 22 pre-programmed dynamic lighting patterns.
- Brightness Adjustment: Increase or decrease the brightness of the lights using the dedicated brightness control buttons.
- Speed Adjustment: For dynamic modes, adjust the speed of the light patterns.
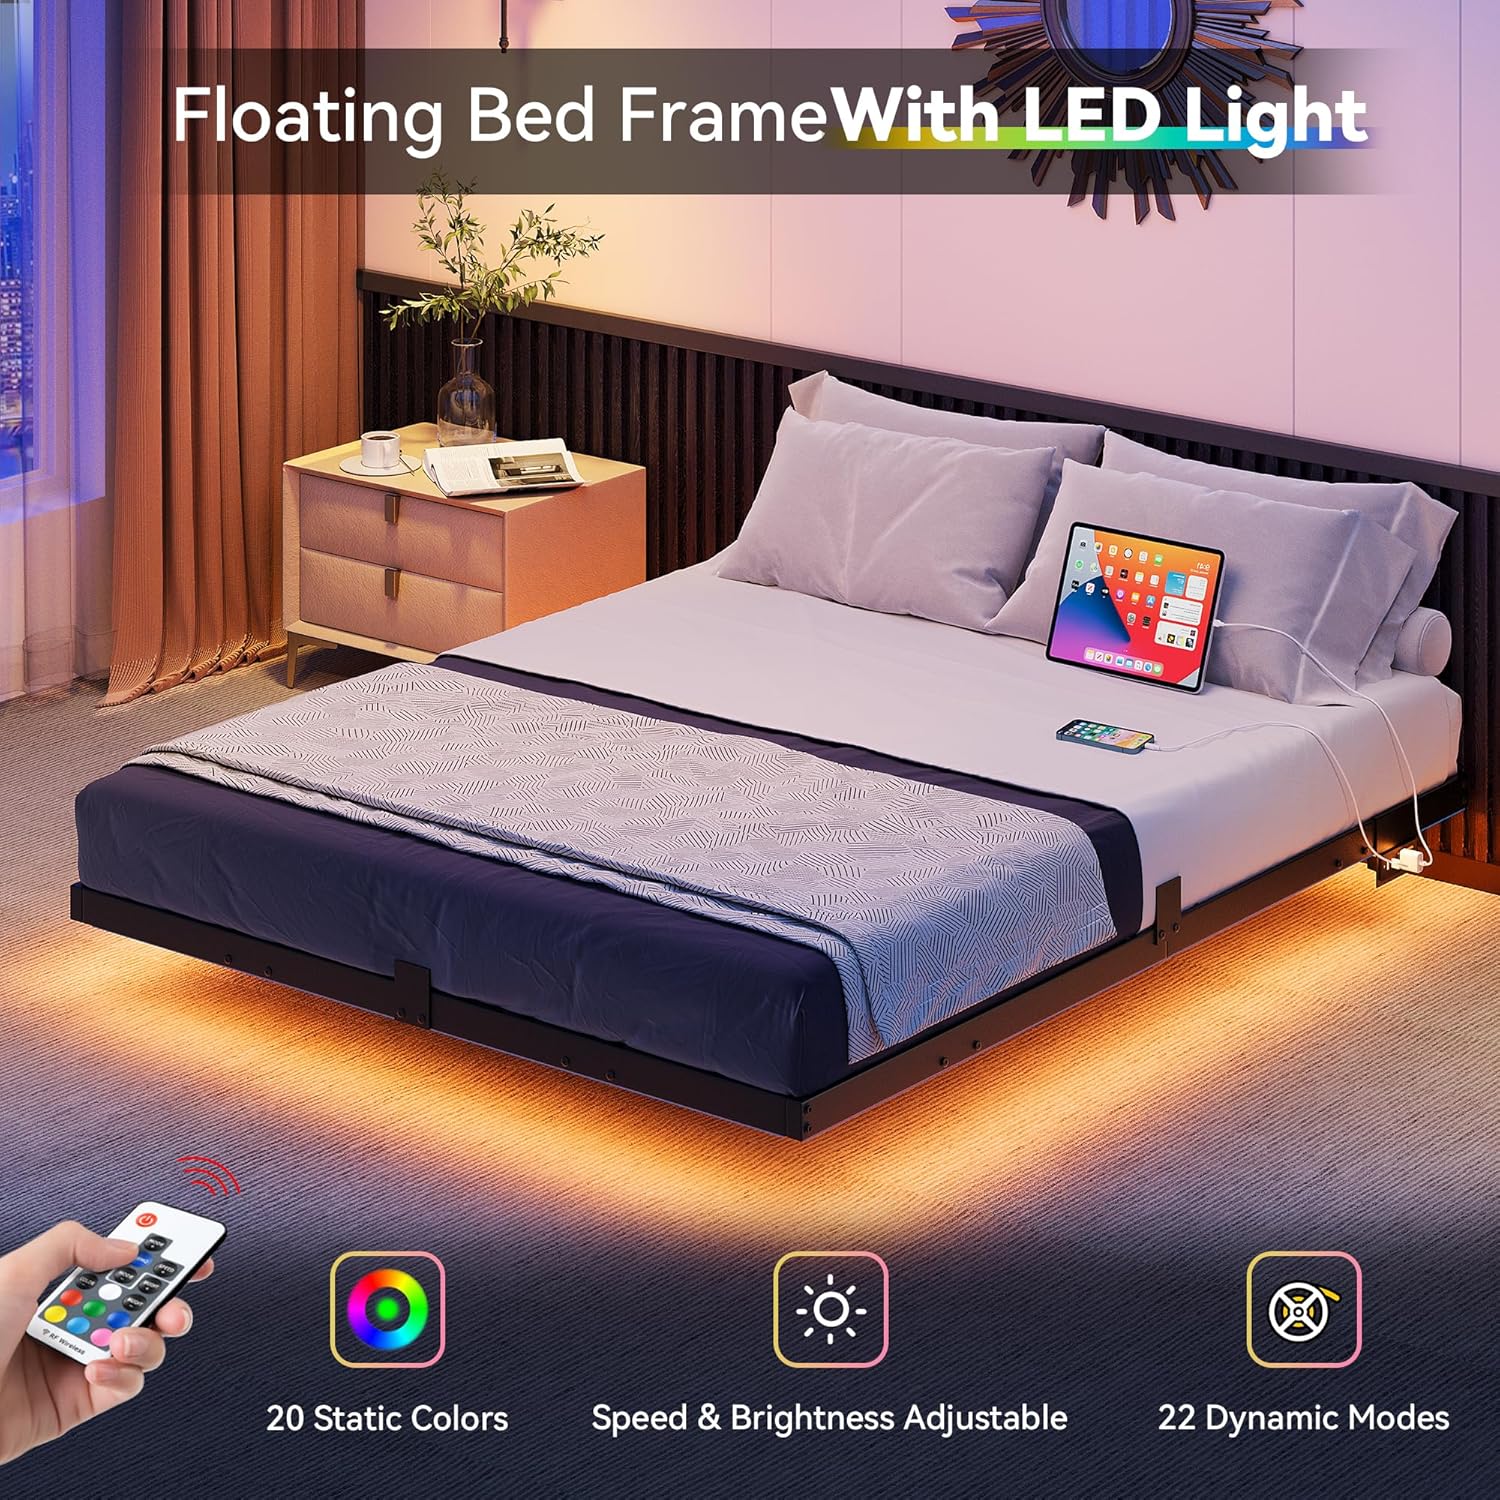
Image 5.2: Control your LED lighting with the included remote, offering various colors and modes.

Image 5.3: Example of the bed frame illuminated with blue LED lighting.
6. Maintenance
Regular maintenance will help prolong the life and appearance of your bed frame.
- Cleaning: Wipe the metal frame with a soft, damp cloth. Avoid using harsh chemicals or abrasive cleaners, as they may damage the polished finish.
- Hardware Check: Periodically check all bolts and screws to ensure they remain tight. Re-tighten if necessary to maintain stability.
- LED Strip Care: Ensure the LED strip remains securely attached. If it begins to peel, re-secure it with appropriate adhesive. Avoid bending or creasing the LED strip sharply.
- Charging Hub: Keep the charging hub free of dust and debris. Do not spill liquids on the hub.
7. Troubleshooting
This section addresses common issues you might encounter with your DWVO bed frame.
| Problem | Possible Cause | Solution |
|---|---|---|
| Bed frame is wobbly or unstable. | Loose bolts or screws; uneven floor. | Ensure all assembly bolts are fully tightened. Check floor for evenness; use shims if necessary under adjustable legs. |
| LED lights are not working. | Power not connected; remote battery dead; LED strip damaged. | Verify the bed frame's power cord is securely plugged into a working outlet. Check remote control battery and replace if needed. Inspect LED strip for visible damage. |
| Charging hub not providing power. | Bed frame not plugged in; device cable faulty; hub malfunction. | Confirm the bed frame is plugged into a live outlet. Test with a different device and charging cable. |
| Mattress slides on the frame. | Mattress stoppers not installed or loose. | Ensure the four mattress stopper pieces are correctly installed and secured. |
8. Specifications
| Feature | Detail |
|---|---|
| Model Number | MADWVIxww4 |
| Size | Full |
| Product Dimensions (L x W x H) | 75.1" x 53.9" x 7.7" (191cm x 137cm x 19.7cm) |
| Weight Capacity | 800 lbs (363 kg) |
| Material | Metal (Steel) |
| Color | Black |
| Finish Type | Polished |
| Item Weight | 32.4 Pounds (14.7 kg) |
| LED Light Strip Length | 17 ft (5.2 m) |
| LED Light Features | 20 Static Colors, 22 Dynamic Patterns, Adjustable Brightness & Speed |
| Charging Hub | 2 Standard AC Outlets (120V/12A), 2 USB Ports (5V/2A) |
| Power Cord Length | 6.5 Feet (2 m) |
| Assembly Required | Yes |
| Box Spring Needed | No |
9. Warranty and Support
For information regarding product warranty, returns, or technical support, please refer to the warranty card included with your purchase or contact DWVO customer service directly. Contact details can typically be found on the product packaging or the official DWVO website.
When contacting support, please have your model number (MADWVIxww4) and purchase date readily available.
Ask a question about this manual
Ask about setup, troubleshooting, compatibility, parts, safety, or missing instructions. Manuals+ will review the question and use this page’s manual context to help answer it.