1. Introduction
Thank you for purchasing the AODK L-Shaped Gaming Desk. This manual provides detailed instructions for the safe assembly, proper operation, and effective maintenance of your new desk. Please read this manual thoroughly before assembly and retain it for future reference.

Image: AODK L-Shaped Gaming Desk in a modern office setting, showcasing its spacious design and integrated monitor stand.
2. Safety Information
- Always follow the assembly instructions carefully. Incorrect assembly can lead to instability and potential injury.
- Ensure all screws and fasteners are securely tightened before use. Periodically check and re-tighten as necessary.
- Do not exceed the maximum load capacity of 50 kg (110 lbs) for the desktop.
- Keep children and pets away during assembly. Small parts can be a choking hazard.
- Place the desk on a level surface to prevent wobbling. Use the adjustable feet to stabilize if needed.
- Do not expose the desk to excessive moisture or direct sunlight, which can damage the material.
- When using the integrated power outlets, ensure devices are compatible with the specified voltage and current (2 AC outlets: 100-240V/15A; 2 USB ports: 5V-2A). Do not overload the outlets.
3. Package Contents
Before beginning assembly, verify that all components listed below are present and undamaged. If any parts are missing or damaged, please contact customer support.
- Desktop panels (L-shaped sections)
- Monitor stand components
- Metal frame components (legs, support bars)
- 4 storage drawers
- Integrated power strip with 2 AC outlets and 2 USB ports
- Headphone hook
- Adjustable feet
- Assembly hardware (screws, bolts, nuts)
- Assembly tools (wrench, screwdriver)
- RGB LED strip with controller
- Instruction manual

Image: Exploded view diagram illustrating all desk components and their respective dimensions for assembly reference.
4. Assembly Instructions
Assembly typically requires two people. Follow the numbered steps in the included assembly guide. All necessary tools are provided.
4.1. Frame Assembly
- Unpack all components and lay them out on a clean, soft surface to prevent scratches.
- Attach the main support beams to the desk legs using the provided hardware. Do not fully tighten screws until all parts are aligned.
- Connect the L-shaped sections of the frame. Ensure the cross-bracing is installed for stability.
- Install the adjustable feet onto the bottom of each leg.
4.2. Desktop and Storage Installation
- Carefully place the desktop panels onto the assembled frame. Secure them with the designated screws.
- Assemble the four storage drawers according to their specific instructions. The drawer unit can be installed on either the left or right side of the desk to suit your preference.
- Install the open shelving units into their designated positions.
- Attach the PC tower stand and the headphone hook as shown in the diagram.
4.3. Monitor Stand and Electrical Components
- Assemble the monitor stand. It is designed for 3-stage height adjustment (9cm, 12cm, 15cm). Choose your desired height during assembly.
- Mount the integrated power strip onto the designated area of the desk.
- Attach the RGB LED strip to the underside of the monitor stand or desktop edge as desired. Connect it to the power source.
- Once all components are in place, fully tighten all screws and fasteners.

Image: The desk fully assembled, highlighting the PC tower stand, headphone hook, and integrated storage options.
5. Operating Instructions
5.1. Integrated Power Outlets
The desk is equipped with a built-in power strip for convenience:
- 2 AC Outlets: Provides 100-240V/15A power for your computer, monitor, and other AC-powered devices.
- 2 USB Ports: Provides 5V-2A power for charging smartphones, tablets, and other USB-powered accessories.
To use, simply plug the desk's main power cord into a wall outlet, then connect your devices to the integrated outlets.

Image: Detail view of the desk's integrated power outlets and USB ports, along with the RGB LED lighting.
5.2. RGB LED Lighting
The integrated RGB LED strip offers customizable lighting to enhance your environment:
- Lighting Modes: Features 10 different illumination modes.
- Color Adjustment: Offers 10 color adjustment modes.
- Memory Function: The LED system remembers your last selected mode when powered off and on.
Use the inline controller to cycle through modes and adjust colors. Refer to the controller's specific markings for function identification.
5.3. Adjustable Monitor Stand
The monitor stand can be adjusted to three different heights to promote ergonomic posture and reduce strain on your neck and shoulders:
- Height Options: 9 cm, 12 cm, and 15 cm.
Adjust the height during assembly or by carefully re-positioning the stand according to the assembly instructions. Ensure monitors are stable after adjustment.
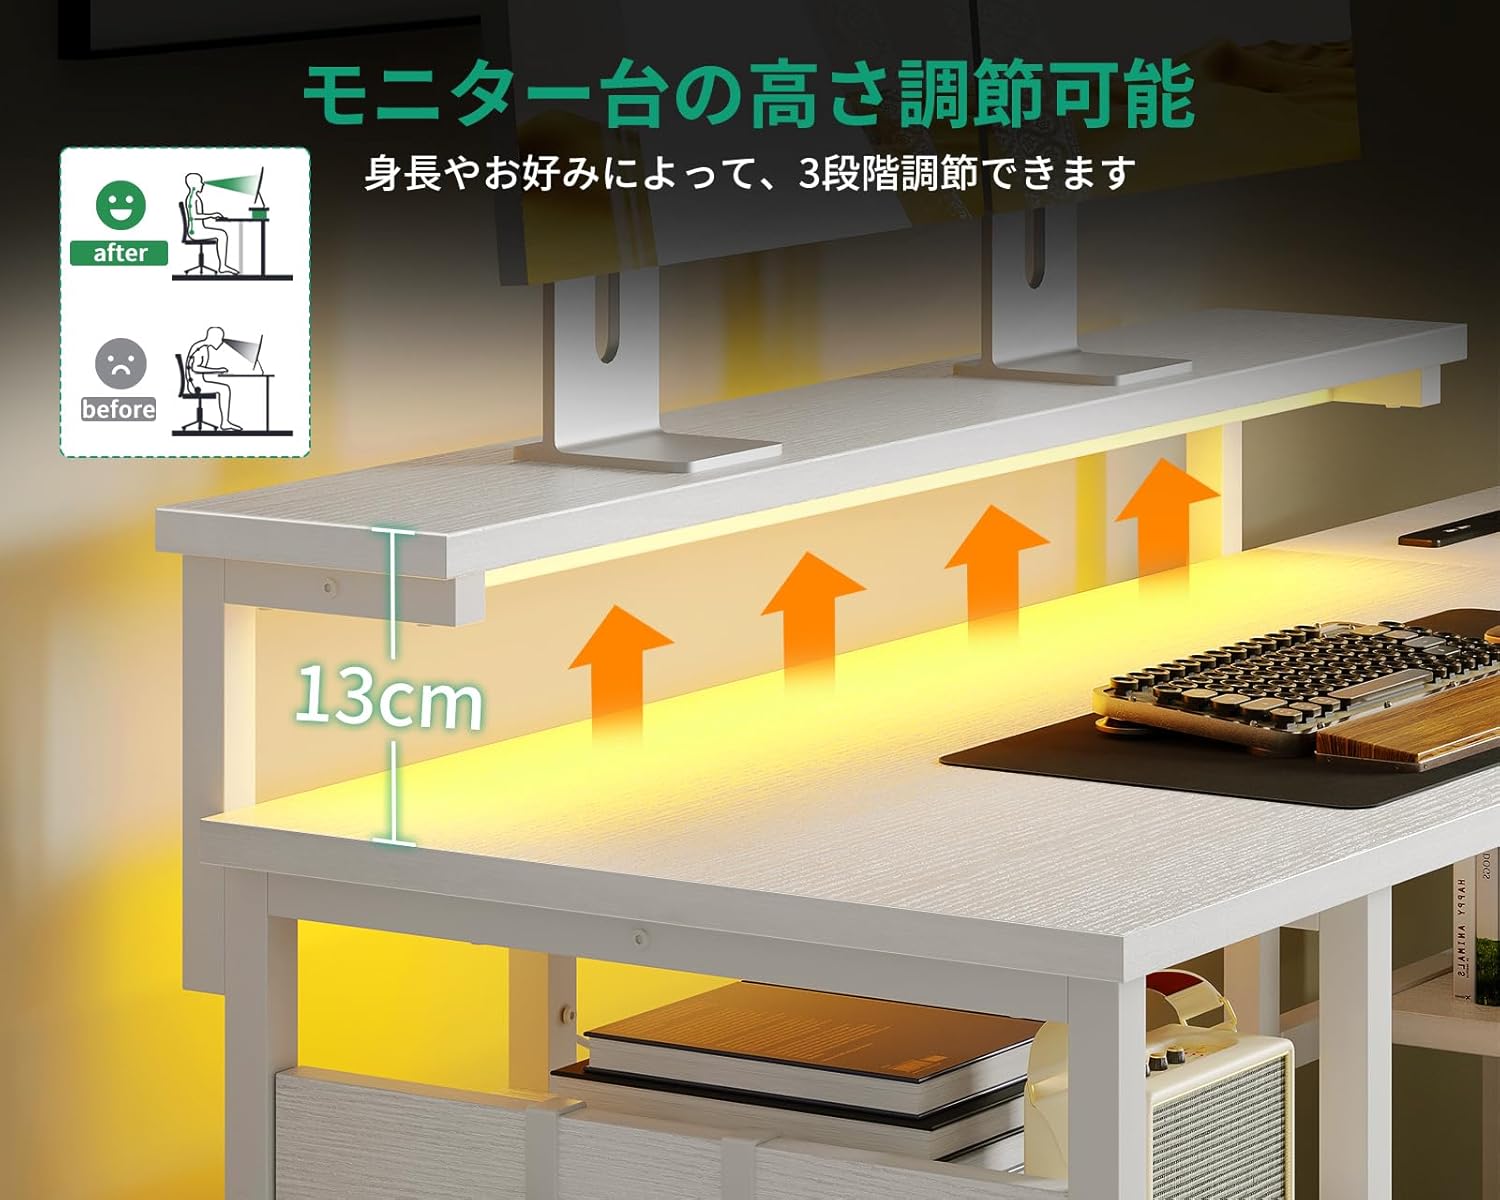
Image: Visual representation of the monitor stand's three adjustable height settings, designed to improve user posture.
5.4. Storage Features
The desk is designed with multiple storage solutions:
- 4 Storage Drawers: Provides enclosed storage for documents, supplies, and personal items. The drawer unit is reversible and can be installed on either side.
- Open Shelves: Ideal for books, binders, or decorative items.
- PC Tower Stand: A dedicated space for your computer tower, keeping it off the floor and improving airflow.
- Headphone Hook: Conveniently located for hanging headphones, keeping your desktop clear.

Image: The desk's storage areas, including drawers and shelves, are highlighted to show their capacity and organization potential.
6. Maintenance
- Cleaning: Wipe the desk surfaces with a soft, damp cloth. Avoid abrasive cleaners or harsh chemicals, as these can damage the melamine finish.
- Spills: Immediately wipe up any spills to prevent water damage or staining. The melamine surface is water-resistant but not waterproof.
- Fasteners: Periodically check all screws and bolts to ensure they remain tight. Re-tighten as needed to maintain stability.
- Electrical Components: Ensure the power cord and integrated outlets are free from damage. Do not attempt to repair electrical components yourself.
7. Troubleshooting
7.1. Desk is Wobbly
- Check Fasteners: Ensure all screws and bolts are fully tightened.
- Level Surface: Verify the desk is on a flat, level floor.
- Adjustable Feet: Use the adjustable feet at the bottom of the legs to compensate for uneven flooring.
7.2. LED Lights Not Working
- Power Connection: Ensure the LED strip is properly connected to its power source and the desk's main power cord is plugged into a functional wall outlet.
- Controller Check: Verify the LED controller is not damaged and is set to an active mode.
7.3. Power Outlets Not Functioning
- Main Power: Confirm the desk's main power cord is securely plugged into a working wall outlet.
- Device Compatibility: Ensure the connected device is compatible with the outlet's voltage and current specifications.
- Overload: Check if the outlets are overloaded. Disconnect some devices and try again.
8. Specifications
| Brand | AODK |
| Model Number | OKTB02020801002JP |
| Shape | L-shaped |
| Desk Type | Computer Desk, Desk with Shelves |
| Product Dimensions (D x W x H) | 110 cm x 135 cm x 76 cm |
| Color | White |
| Material | Melamine Faced Particle Board, Metal Frame |
| Finish Type | Powder Coated (Frame) |
| Special Features | Built-in USB & AC Power Outlets, RGB LED Lighting, Adjustable Monitor Stand, 4 Storage Drawers, Headphone Hook, PC Tower Stand |
| Number of Drawers | 4 |
| Maximum Load Capacity | 50 kg (Desktop) |
| Assembly Required | Yes (Assembly tools and instructions included) |
| Power Outlet Specs | 2 AC Outlets (100-240V/15A), 2 USB Ports (5V-2A) |
9. Warranty and Support
This AODK L-Shaped Gaming Desk comes with a limited warranty. Please refer to the warranty card included in your package for specific terms and conditions.
For technical assistance, missing parts, or any other inquiries, please contact AODK customer support through the retailer where you purchased the product. Please have your model number (OKTB02020801002JP) and purchase date ready when contacting support.