1. Introduction
Thank you for choosing the ALUSSO Motion Sensor Outdoor Flood Light. This manual provides essential information for the safe installation, operation, and maintenance of your new security light. Please read these instructions thoroughly before installation and retain them for future reference.

Image: ALUSSO 30W LED Security Light installed on a house, illuminating the front yard.
2. Safety Information
WARNING: RISK OF ELECTRIC SHOCK. Disconnect power at the fuse or circuit breaker before installing or servicing.
- This product must be installed in accordance with the applicable installation code by a person familiar with the construction and operation of the product and the hazards involved.
- Use only supplied accessories for installation.
- Ensure the balancing mechanism is secure after installation.
- Do not modify or alter the product.
- Do not install near flammable materials.
- This fixture is Class II safety-rated and does not require a ground wire.
3. Package Contents
Verify that all components are present and undamaged before installation.
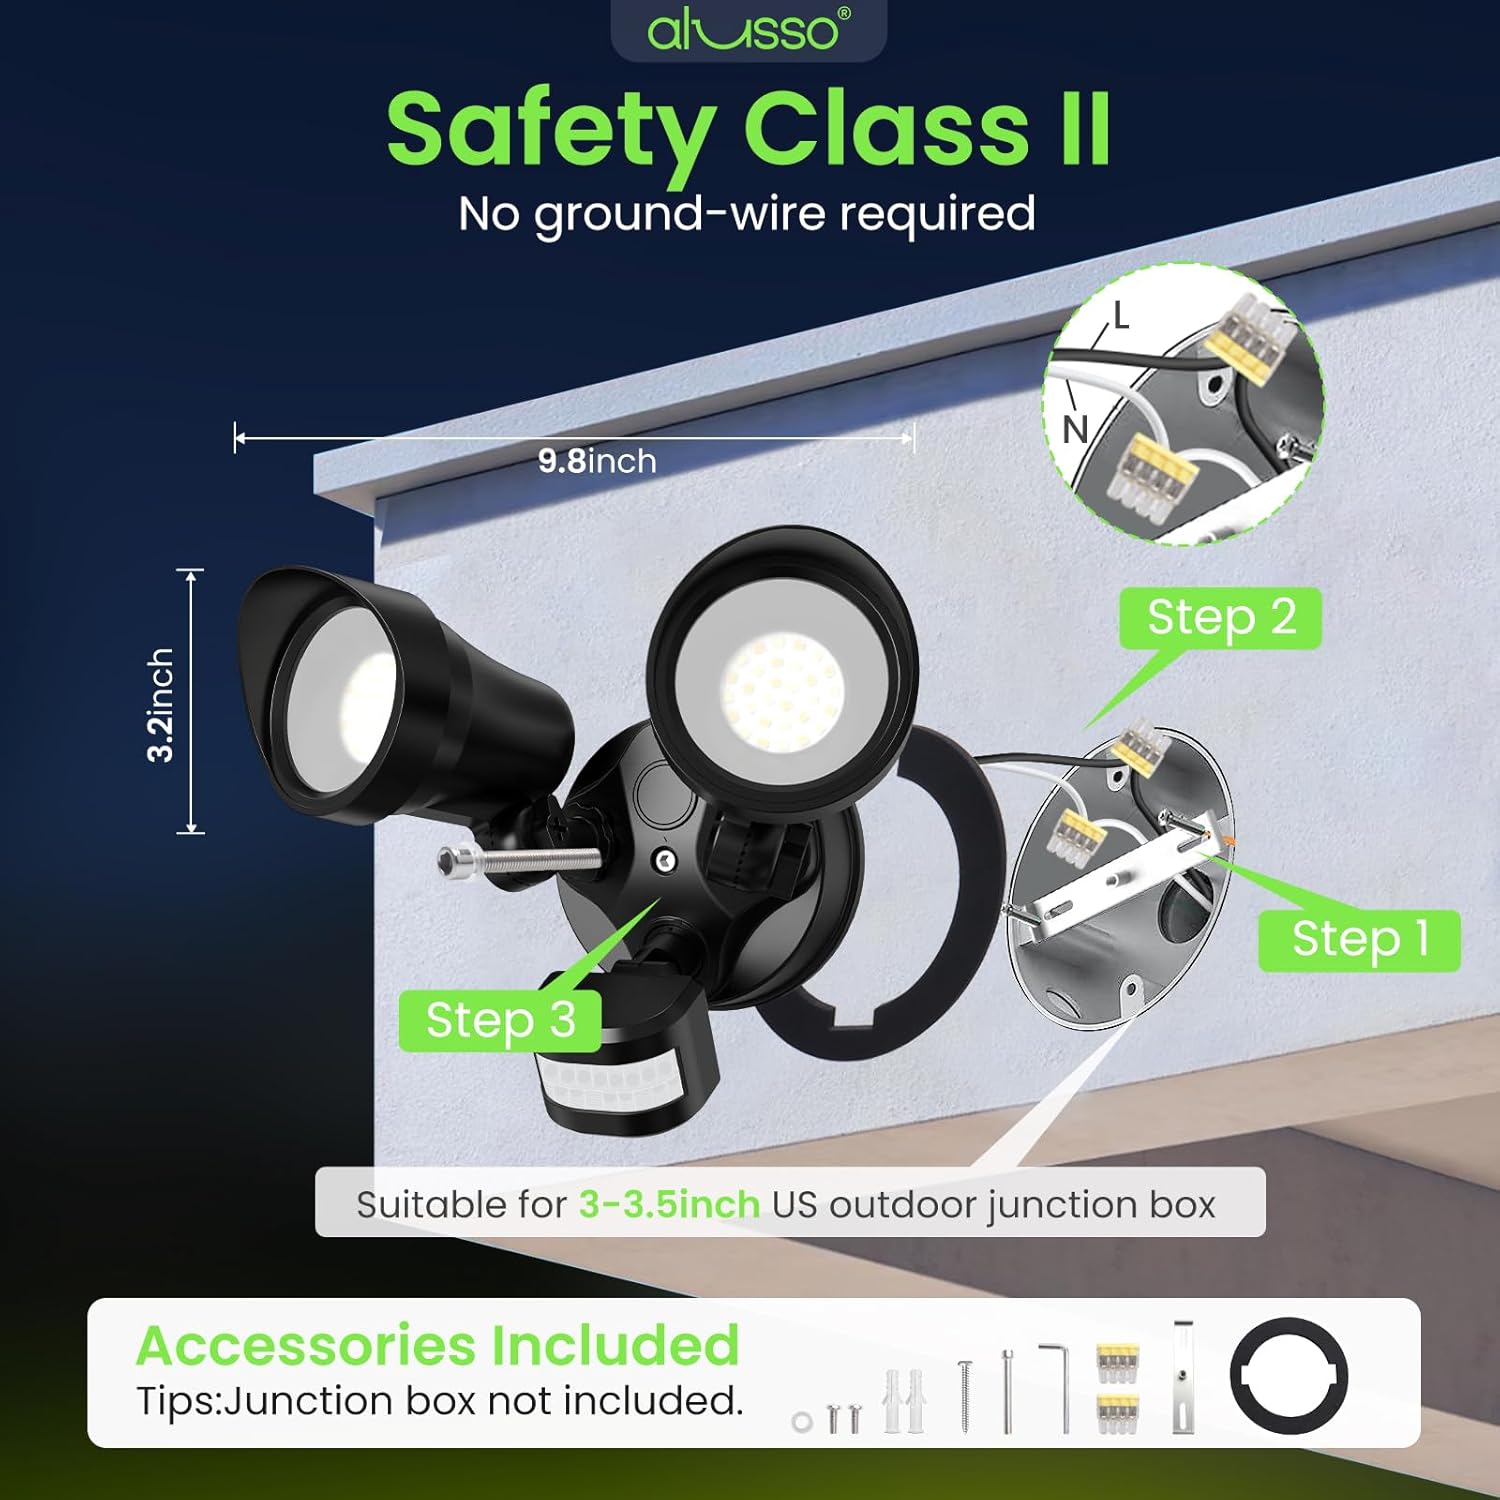
Image: Diagram showing the ALUSSO flood light components and included accessories for installation.
- ALUSSO Motion Sensor Outdoor Flood Light Unit (1)
- Mounting Bracket (1)
- Screws and Wall Anchors (Set)
- Wire Connectors (Yellow Quick-Connects) (Set)
- Waterproof Gasket (1)
- Instruction Manual (1)
- Warranty Card (1)
4. Product Overview
The ALUSSO WL-YDR-230P is a versatile and durable outdoor security light designed to provide powerful illumination and enhanced safety for your property.

Image: Overview of ALUSSO 30W LED Security Light features.
- Power & Brightness: 30W, 3500 Lumens, covering up to 2000 sq. ft.
- Color Temperature (3CCT): Adjustable between 3000K (Warm White), 4000K (Natural White), and 6500K (Daylight).
- Operating Modes (3 Modes): Dusk to Dawn (D2D), Auto (Motion Mode), and On Time (Always On).
- Motion Sensor: 150° wide-angle detection with an adjustable range of 1-40 ft.
- Adjustable Heads: Dual adjustable light heads provide a 100° beam angle, allowing precise light direction.
- Durability: IP65 waterproof rating, UV resistant, and cold resistant for all-weather performance.
- Safety: Class II safety-rated, requiring no ground wire.
5. Setup and Installation
This flood light is designed for hardwired installation. Ensure power is disconnected before proceeding.
- Turn Off Power: Locate the circuit breaker controlling the light fixture and turn off the power.
- Prepare Wiring: If replacing an existing fixture, carefully remove it. Ensure the existing wires (Live and Neutral) are accessible.
- Install Mounting Bracket: Attach the provided mounting bracket to your standard 3" or 3.5" round junction box. Use the appropriate screws and anchors for your mounting surface (wall or soffit).
- Connect Wires: Use the yellow quick-connect terminals to securely connect the light's wires to your household wiring. Connect the white wire from the fixture to the neutral wire, and the black wire from the fixture to the live wire. This is a Class II fixture, so no ground wire connection is needed.
- Attach Fixture: Carefully align the flood light unit with the mounting bracket. Ensure the waterproof gasket is properly seated between the fixture and the mounting surface to prevent moisture ingress. Secure the fixture with the provided screws.
- Adjust Light Heads: Loosen the wing nuts on the light heads to adjust their angle and direction as needed. Tighten the wing nuts to secure the position.
- Recommended Installation Height: For optimal sensor performance, install the light at a height of 6.56-9.84 feet (2-3 meters).

Image: Installation steps for the ALUSSO flood light.

Image: Soffit Mounted and Wall Mounted configurations.
6. Operating Instructions
Your ALUSSO flood light offers adjustable settings for optimal performance.
6.1. Color Temperature (CCT) Adjustment
A dip switch located on the back of the light fixture allows you to select the desired color temperature:
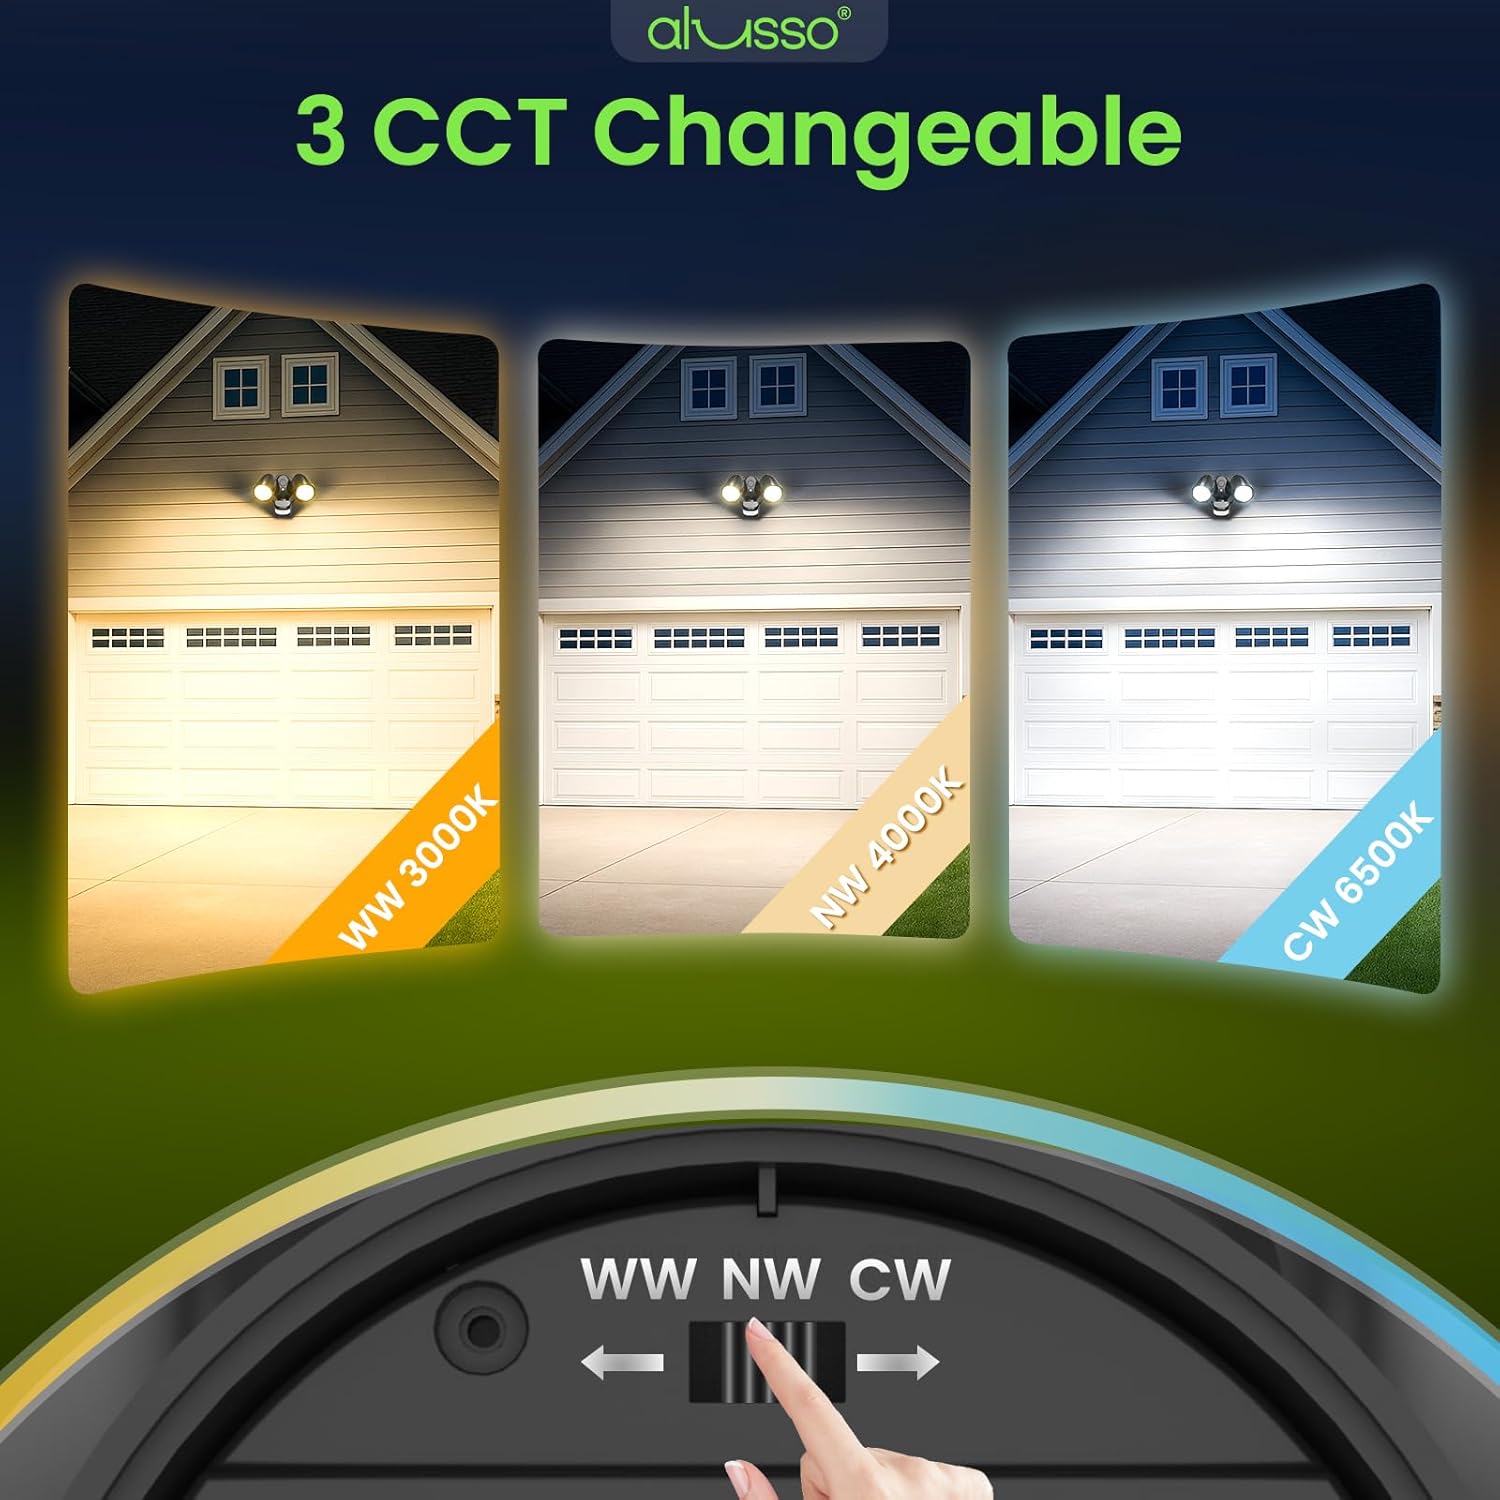
Image: 3 CCT options: Warm White (3000K), Natural White (4000K), and Daylight (6500K).
- WW (Warm White): 3000K
- NW (Natural White): 4000K
- CW (Daylight): 6500K
Note: Adjust the CCT switch before mounting the fixture for easier access.
6.2. Operating Mode Selection
A dip switch on the back of the motion sensor unit allows you to select one of three operating modes:

Image: Three work modes of the ALUSSO flood light.
- D2D Mode (Dusk to Dawn): The light automatically turns on at sunset and turns off at sunrise. The motion sensor is inactive in this mode.
- AUTO Mode (Motion Mode): The light activates when motion is detected within its range. It turns off after a set duration if no further motion is detected.
- ON TIME Mode (Always On): The light is manually controlled via the wall switch. The motion sensor is disabled, and the light remains on until manually switched off.
6.3. Auto Mode Adjustments
When in AUTO Mode, three knobs on the bottom of the motion sensor allow for fine-tuning:

Image: Motion sensor with LUX, SENS, and TIME adjustment knobs.
- LUX (Brightness Sensitivity): Adjusts the ambient light level at which the motion sensor becomes active. Turn towards the sun icon for day and night operation, or towards the moon icon for night-only operation (5-2000 LUX).
- SENS (Detection Range): Controls the sensitivity and detection distance of the motion sensor (1-40 ft).
- TIME (Duration): Sets how long the light remains on after motion is detected and no further motion is sensed (10 seconds to 10 minutes).
Video: Official ALUSSO product video demonstrating features and modes.
7. Maintenance
To ensure the longevity and optimal performance of your ALUSSO flood light, follow these maintenance guidelines:
- Cleaning: Periodically clean the fixture with a soft, damp cloth. Do not use abrasive cleaners or solvents, as they may damage the finish or electrical components.
- Inspection: Regularly inspect the fixture for any signs of damage, loose connections, or wear. Address any issues promptly.
- Sensor Cleaning: Keep the motion sensor lens clean and free from obstructions (e.g., dirt, spiderwebs) to ensure accurate detection.

Image: ALUSSO flood light is durable in all weather conditions.
8. Troubleshooting
If you experience issues with your flood light, refer to the following common problems and solutions:
| Problem | Possible Cause | Solution |
|---|---|---|
| Light does not turn on. | No power, incorrect wiring, mode setting. | Check circuit breaker. Verify wiring connections. Ensure correct operating mode is selected. |
| Motion sensor not detecting. | Incorrect SENS/LUX settings, obstructions. | Adjust SENS to maximum. Adjust LUX towards sun icon. Clear any obstructions from sensor's view. |
| Light stays on continuously. | TIME setting too long, continuous motion, D2D mode selected. | Adjust TIME to a shorter duration. Ensure no constant motion in detection zone. Switch to AUTO mode if D2D is not desired. |
| Light flickers. | Loose wiring, unstable power. | Check all wire connections for tightness. Consult an electrician if power supply is unstable. |
9. Specifications
| Feature | Specification |
|---|---|
| Model Name | 30W Flood Lights Outdoor Motion Sensor |
| Part Number | WL-YDR-230P |
| Wattage | 30 watts |
| Brightness | 3500 Lumens |
| Color Temperature | 3000K/4000K/6500K (Adjustable) |
| Voltage | 120 Volts (AC) |
| Motion Detection Angle | 150° |
| Motion Detection Range | 1-40 ft (Adjustable) |
| Light Duration (Auto Mode) | 10 seconds - 10 minutes (Adjustable) |
| Water Resistance Level | IP65 Waterproof |
| Indoor/Outdoor Usage | Outdoor |
| Installation Type | Hardwired, Wall Mount/Soffit Mount |
| Product Dimensions | 9.45"L x 6.9"W x 5.12"H |
| Item Weight | 1.52 pounds (0.69 Kilograms) |
| Average Life | 30000 Hours |
| Safety Rating | ETL Listed, Class II (no ground wire required) |
10. Warranty and Support
ALUSSO provides a 3-year warranty for this product, as indicated on the packaging. Additionally, a 5-year manufacturer's coverage is offered, ensuring repair or replacement for any defects in materials or workmanship under normal use.
For any inquiries, technical support, or warranty claims, please contact ALUSSO customer service:
- Email: service-support@alussolighting.com
- Website: www.alussolighting.com