1. Product Overview
The JurwheeR Diesel Air Heater Controller LCD Monitor Switch Control Board is designed for efficient and convenient management of 12V and 24V diesel parking heaters. It features an easy-to-read LCD display and versatile control options, including manual fuel filling, timing functions, and remote pairing. Its human-centric design ensures user-friendly operation and wide compatibility across various vehicles.
Key Features:
- Easy-to-Read LCD Display: Provides real-time information for effective heating system monitoring.
- Versatile Control Options: Supports manual fuel filling, timing start/stop, and customizable settings.
- Convenient Remote Pairing: Allows remote operation of the heater.
- Human-Centric Design: User-friendly control button interface for accessible operation.
- Wide Compatibility: Works with both 12V and 24V power supplies, suitable for cars and trucks.
2. Safety Information
Please read and understand all safety instructions before installing or operating the device. Failure to follow these instructions may result in electric shock, fire, or serious injury.
- Ensure the power supply matches the device's voltage requirements (12V or 24V).
- Disconnect power before performing any installation, maintenance, or troubleshooting.
- Install the device in a well-ventilated area to prevent overheating.
- Keep the device away from flammable materials and liquids.
- Do not expose the device to water or extreme moisture.
- Only use original or approved replacement parts.
- If any unusual odors, smoke, or sounds occur, immediately disconnect power and contact support.
3. Setup Instructions
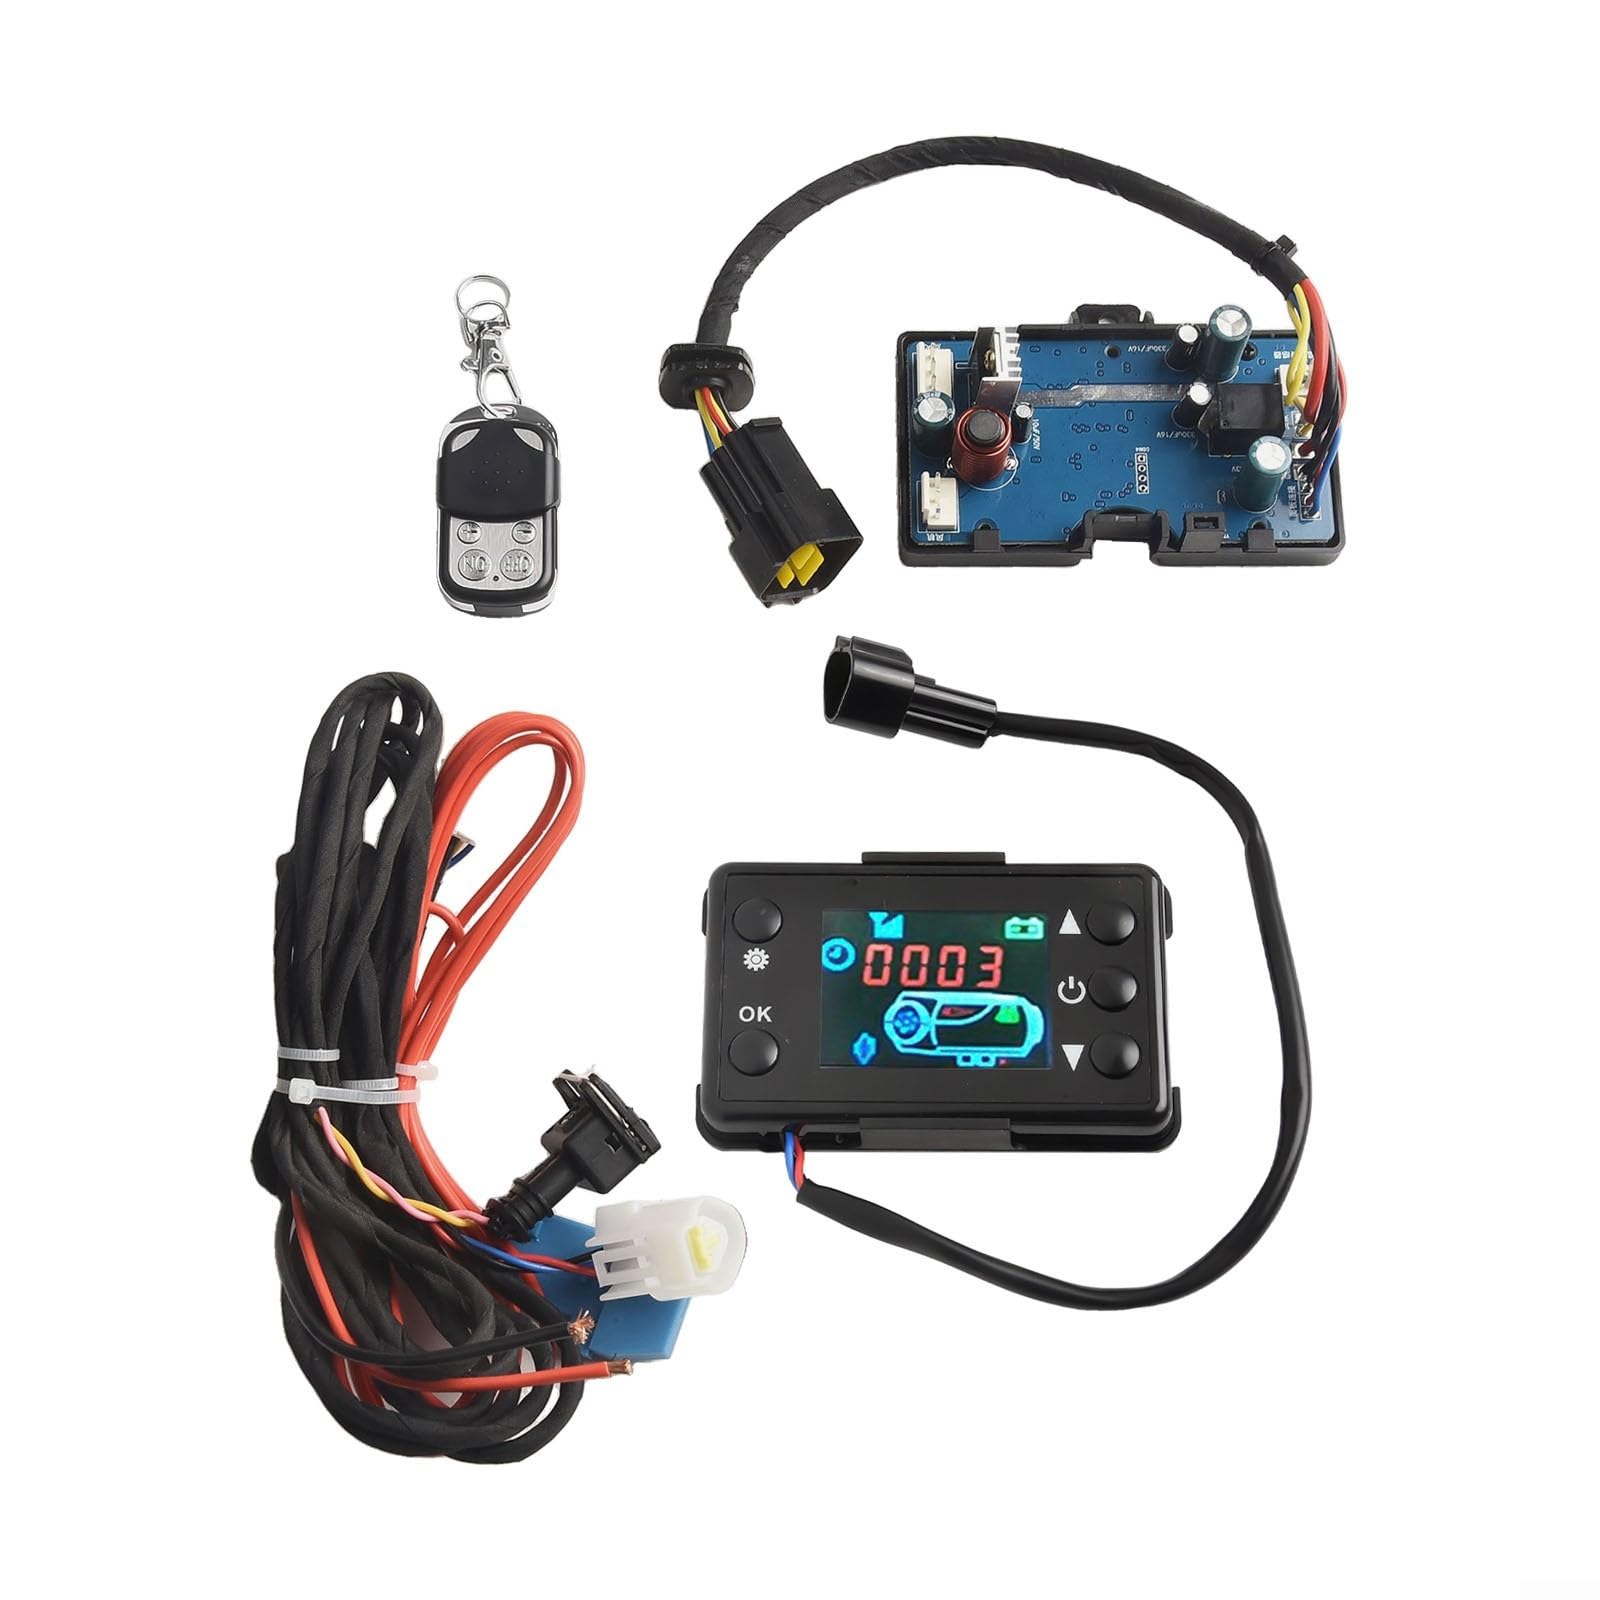
3.1 Package Contents
The package includes the following components:
- 1 x Motherboard
- 1 x 3-wire black LCD switch
- 1 x Remote control
- 1 x Wiring harness
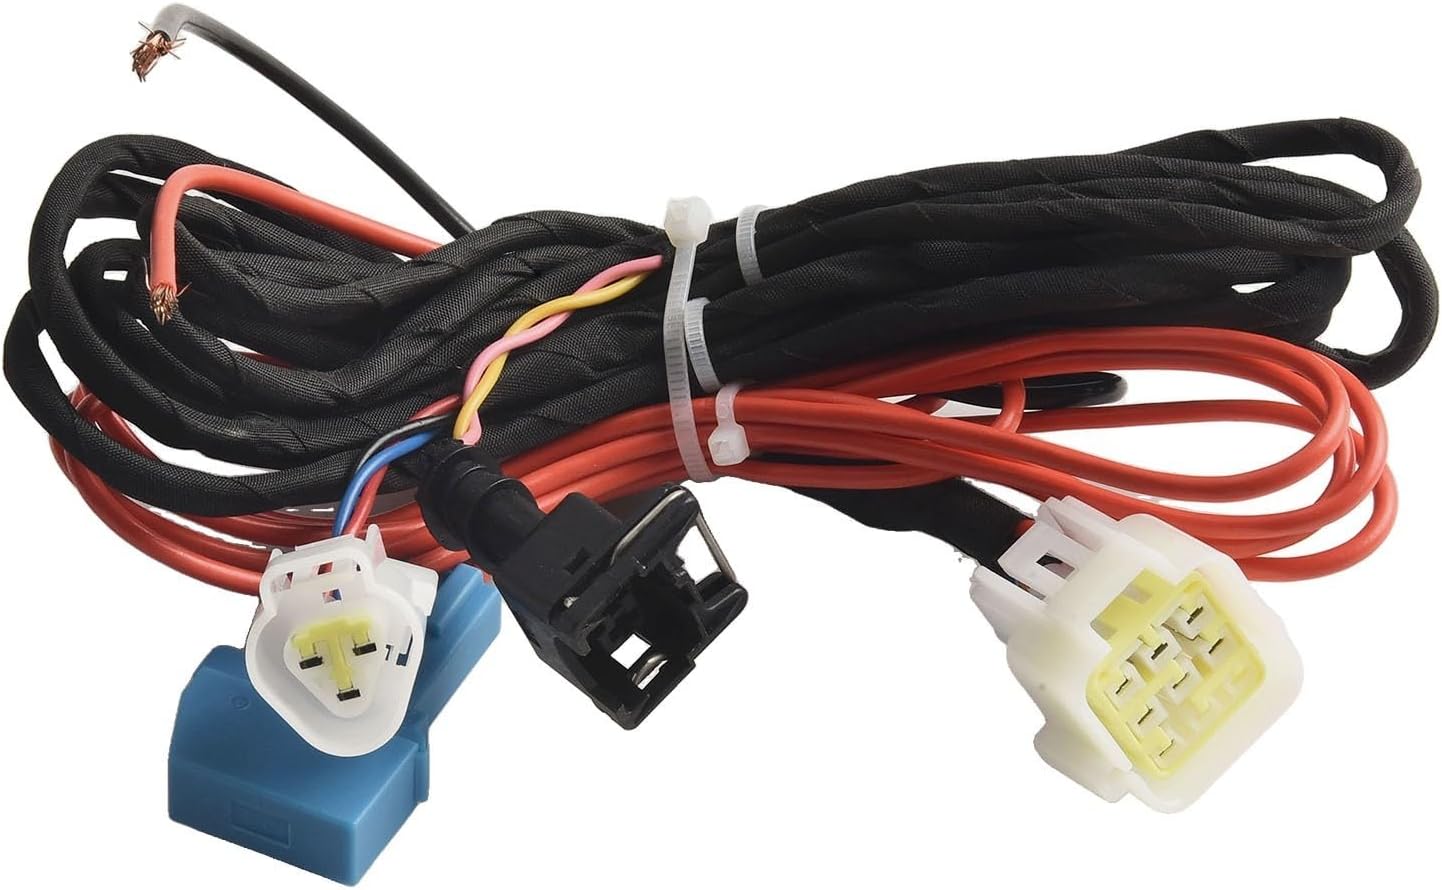
3.2 Wiring Connection
Connect the wiring harness to the control board and the diesel air heater according to the provided diagram. Ensure all connections are secure and correctly polarized (positive to positive, negative to negative).

3.3 Exhaust Pipe and Muffler Installation
Proper installation of the exhaust pipe and muffler is crucial for safe and efficient operation. Use the provided converter pipe to ensure a secure connection between the exhaust pipe and the muffler, then tighten with screws.
4. Operating Instructions
The LCD monitor provides a clear interface for controlling your diesel air heater. Refer to the following instructions for various functions.

4.1 Power On/Off
- To Turn On: In shutdown state, press the [ON/OFF] button.
- To Turn Off: Press the [ON/OFF] button again.
4.2 Language Switch
To change the display language (Chinese, English, Russian, or Voice off):
- In shutdown state, press [ON/OFF] to turn on.
- Long press [ON/OFF] to enter the basic settings.
- Rotate the [Knob] to adjust settings to F4.
- Press the [Knob] to modify.
- Rotate the [Knob] to select your desired language (C for Chinese, E for English, R for Russian, or Voice off).
- Press the [Knob] again to confirm the current data modification.
Refer to Video 3, timestamp 0:03 for a visual guide on language switching.
4.3 Mode Switching
To switch between different operating modes (Temperature Control, Constant Temperature, Ventilation, Hot Topic, Gear Mode):
- In shutdown state, press [ON/OFF] to turn on.
- Press the [Knob] to switch the current mode.
Refer to Video 3, timestamp 0:32 for a visual guide on mode switching.
4.4 Altitude Adjustment
To view altitude data:
- In shutdown state, press [ON/OFF] to turn on.
- Press and hold the [Knob] for 5 seconds to enter the engineering mode.
- Rotate the [Knob] to adjust the item to view the data. Adjust to En06.
- The altitude will be shown in the upper left corner.
Refer to Video 3, timestamp 0:48 for a visual guide on altitude adjustment.
4.5 Remote Pairing
To pair the remote control with the device:
- In shutdown state, press the [Knob] three times in a row.
- Enter the En08 interface, and the screen will display "P-1".
- Press any button on the remote control to match successfully.
- You can now use the remote control to turn the heater on and off normally.

Refer to Video 3, timestamp 1:06 for a visual guide on remote matching.
4.6 Manually Pump Oil
To manually pump oil (useful for initial setup or after running out of fuel):
- In the first power-on state, press and hold the [Knob] for 5 seconds.
- The screen will show a 300-second countdown.
- After the countdown ends, the device will automatically exit, or you can press [ON/OFF] to end the pump oil shutdown.
Refer to Video 3, timestamp 1:21 for a visual guide on manually pumping oil.
4.7 Auto Start-Stop
To configure auto start-stop functionality:
- In shutdown state, press [ON/OFF] to turn on.
- Long press [ON/OFF] to enter the basic settings.
- Rotate the [Knob] to adjust settings to F3.
- Press the [Knob] to modify.
- Rotate the [Knob] to adjust (ON is on, OFF is closed).
- Press the [Knob] again to confirm the current data modification.
Refer to Video 3, timestamp 1:42 for a visual guide on auto start-stop settings.
4.8 Timing Function
To set the timing for heater operation:
- In shutdown state, press [ON/OFF] to turn on.
- Long press [ON/OFF] to enter the basic settings.
- Rotate the [Knob] to adjust settings to F1.
- Press the [Knob] to modify the number of hours. Rotate the [Knob] to adjust.
- Press the [Knob] again to modify the number of minutes. Rotate the [Knob] to adjust.
- Press the [Knob] again to confirm the current data modification.
- Rotate the [Knob] to adjust settings to F2.
- Press the [Knob] to modify the running time (0-10 hours). Rotate the [Knob] to adjust.
- Press the [Knob] again to confirm the current data modification.
Refer to Video 3, timestamp 2:02 for a visual guide on timing functions.
4.9 Bluetooth Connection
To connect the device via Bluetooth using the mobile APP:
- In the shutdown state, press [ON/OFF] to turn it on.
- Press the [Knob] for 5 seconds to enter the engineering mode.
- Rotate the [Knob] to adjust to En09. The display will show the Bluetooth name (e.g., "BLE").
- On your mobile device, open the APP and click "Add Device".
- Select "Bluetooth connection".
- After searching, select the Bluetooth device with the same name as displayed on the controller.
- Confirm binding.
- At this time, the device can be used normally through the APP.
Refer to Video 3, timestamp 2:38 for a visual guide on Bluetooth connection.
5. Maintenance
Regular maintenance ensures optimal performance and longevity of your diesel air heater controller.
- Cleaning: Periodically wipe the LCD screen and control board with a soft, dry cloth. Avoid using abrasive cleaners or solvents.
- Connections: Regularly check all wiring connections for tightness and signs of wear or corrosion.
- Inspection: Inspect the exhaust pipe and muffler for any blockages, damage, or leaks. Ensure proper ventilation around the heater unit.
- Fuel System: Ensure the fuel lines are clear and free from obstructions. Use clean diesel fuel to prevent clogging.
6. Troubleshooting
If you encounter issues with your JurwheeR Diesel Air Heater Controller, refer to the following common troubleshooting steps:
| Problem | Possible Cause | Solution |
|---|---|---|
| Device does not power on | No power supply; Loose wiring; Blown fuse | Check power source; Secure all connections; Replace fuse if necessary |
| Heater not producing heat | Low fuel; Clogged fuel line; Air in fuel system; Incorrect settings | Refill fuel; Check/clean fuel line; Perform manual oil pump; Verify temperature/mode settings |
| Remote control not working | Low battery; Not paired; Out of range | Replace remote battery; Re-pair remote (Section 4.5); Operate within range |
| Error code on display | Specific system fault | Consult the heater's specific error code manual or contact support. |
If the problem persists after attempting these solutions, please contact JurwheeR customer support.
7. Specifications
| Attribute | Detail |
|---|---|
| Brand | JurwheeR |
| Model Number | IKV87QBKFO4IMY9W0VXP63337OD |
| Working Voltage | 12V/24V |
| Power | 2kW/5kW (kVA) |
| Temperature Range | -30-40 °C |
| Product Dimensions | 14 x 11 x 11 cm |
| Item Weight | 400 g |
| Color | As Picture Show |

8. Warranty Information
For warranty details, please refer to the manufacturer's official warranty policy provided with your purchase or on the JurwheeR website. Keep your proof of purchase for any warranty claims.
9. Customer Support
If you have any questions, require technical assistance, or need to report an issue, please contact JurwheeR customer support through the contact information provided on the product packaging or the official JurwheeR website.