1. Introduction
This manual provides essential information for the safe and effective installation, operation, and maintenance of your LBAXSXP Xenon D3S Headlight Ballast Unit. Please read this manual thoroughly before installation and retain it for future reference.
2. Safety Information
WARNING: Risk of Electric Shock and Injury.
- Always disconnect the vehicle's battery before attempting any electrical work.
- Installation should only be performed by qualified personnel.
- Do not open the ballast unit. High voltage is present inside, even when disconnected.
- Ensure proper grounding to prevent electrical hazards.
- Wear appropriate personal protective equipment (PPE), such as safety glasses and gloves.
- Verify compatibility with your vehicle's electrical system and D3S Xenon bulbs before installation.
3. Package Contents
Verify that all items are present and undamaged upon opening the package.
- 1 x LBAXSXP Xenon D3S Headlight Ballast Unit (Model: 10R-044663)
4. Product Overview
The LBAXSXP Xenon D3S Headlight Ballast Unit is designed to provide stable power to D3S Xenon bulbs, ensuring optimal performance and longevity. It features advanced protection mechanisms for reliable operation.
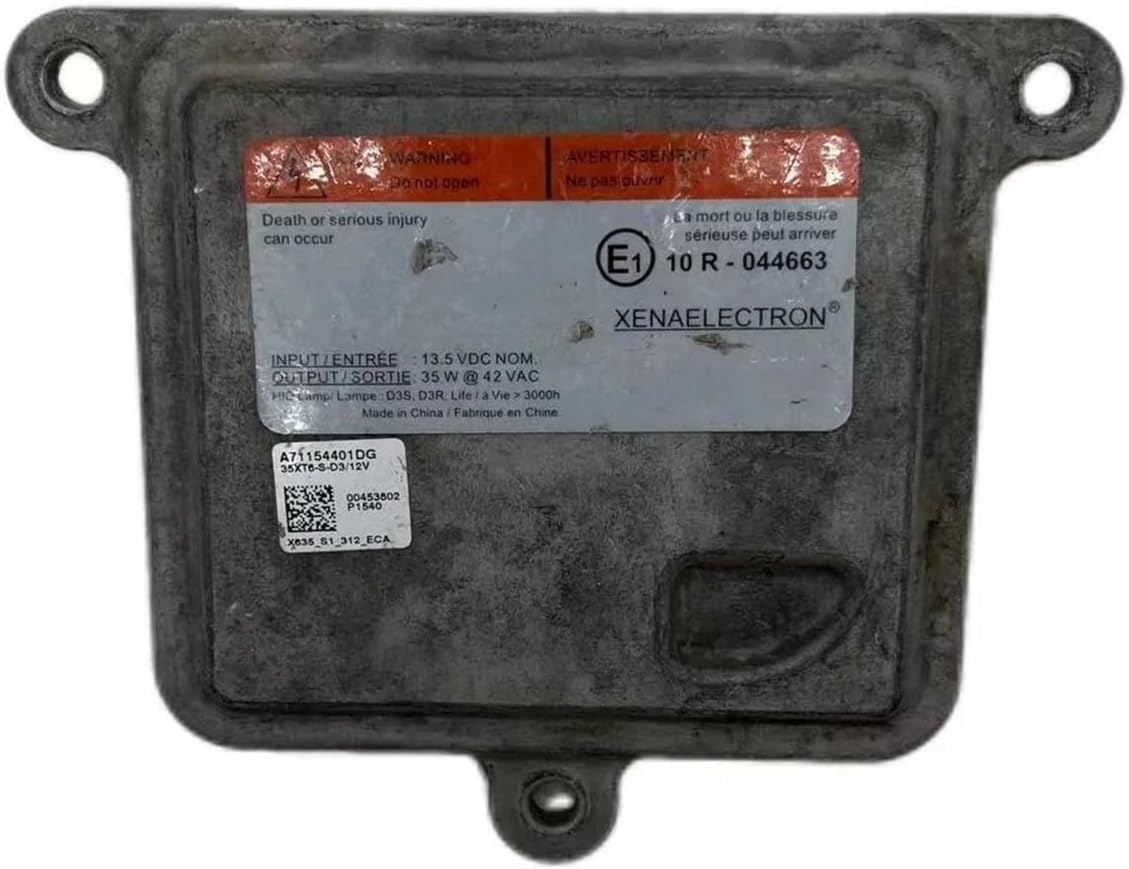
Figure 4.1: Front view of the LBAXSXP Xenon D3S Headlight Ballast Unit. The label clearly displays the model number 10R-044663, input voltage of 13.5V DC, and output of 35W at 42V AC, along with safety warnings.

Figure 4.2: Rear view of the ballast unit, illustrating the main power input connector and the output connector for the D3S bulb, along with integrated heat dissipation fins.
Key Features:
- High Brightness Lighting: Designed to provide intense illumination while maintaining energy efficiency.
- Advanced Protection: Incorporates over-temperature, over-current, and short-circuit protection for enhanced safety and durability.
- Stable Output: Delivers constant output lamp power, optimizing lighting performance.
- Automatic Protection: Features an automatic protection function to improve operational reliability.
5. Installation
This section outlines the general steps for installing the Xenon D3S Headlight Ballast Unit. Specific vehicle procedures may vary. Consult your vehicle's service manual for detailed instructions.
Required Tools (Not Included):
- Basic automotive hand tools (wrenches, screwdrivers)
- Multimeter (for testing connections)
- Safety glasses and gloves
Installation Steps:
- Prepare the Vehicle: Ensure the vehicle is turned off and the ignition key is removed. Disconnect the negative terminal of the vehicle's battery to prevent accidental electrical discharge.
- Access the Headlight Assembly: Depending on your vehicle model, you may need to remove the bumper, fender liner, or other components to access the headlight assembly.
- Locate the Existing Ballast: Identify the old ballast unit. It is typically mounted on the bottom or side of the headlight housing.
- Disconnect Wiring: Carefully disconnect the electrical connectors from the old ballast. Note the orientation of the connectors.
- Remove Old Ballast: Unscrew or unclip the old ballast from its mounting location.
- Install New Ballast: Mount the new LBAXSXP Xenon D3S Headlight Ballast Unit in the same location, ensuring it is securely fastened.
- Connect Wiring: Connect the vehicle's wiring harness to the new ballast. Ensure all connections are firm and correctly seated. Connect the D3S bulb to the ballast output.
- Test Functionality: Before reassembling the vehicle, reconnect the battery and test the headlight function. Ensure both low beam and high beam (if applicable) operate correctly.
- Reassemble Vehicle: Once functionality is confirmed, reassemble any removed vehicle components.
NOTE: Improper installation can lead to damage to the ballast, bulb, or vehicle electrical system. Seek professional assistance if you are unsure about any step.
6. Operation
The LBAXSXP Xenon D3S Headlight Ballast Unit operates automatically once installed and connected to the vehicle's electrical system and a D3S Xenon bulb. When the headlights are activated, the ballast initiates the D3S bulb.
- Startup Phase: In the startup phase, the ballast provides a high voltage pulse to ignite the Xenon gas in the D3S bulb. This process is typically very quick.
- Stable Operation: After ignition, the ballast regulates the current and voltage to maintain a constant output lamp power, ensuring stable and consistent light output from the D3S bulb.
- Protection Features: The ballast is equipped with internal protection functions, including over-temperature, over-current, and short-circuit protection, to safeguard the unit and the vehicle's electrical system from potential damage.
If the headlight does not illuminate or flickers, refer to the Troubleshooting section.
7. Maintenance
The LBAXSXP Xenon D3S Headlight Ballast Unit is designed for long-term, maintenance-free operation. However, periodic checks can help ensure optimal performance.
- Visual Inspection: Periodically inspect the ballast and its connections for any signs of corrosion, loose wiring, or physical damage.
- Cleanliness: Ensure the area around the ballast is free from excessive dirt or debris, which could impede heat dissipation.
- Connection Integrity: Verify that all electrical connections remain secure.
Do not attempt to open or repair the ballast unit. Refer any issues to qualified service personnel.
8. Troubleshooting
If you encounter issues with your LBAXSXP Xenon D3S Headlight Ballast Unit, refer to the following common problems and solutions:
| Problem | Possible Cause | Solution |
|---|---|---|
| Headlight does not turn on. |
|
|
| Headlight flickers or turns off intermittently. |
|
|
| Error message on vehicle dashboard. |
|
|
If the problem persists after attempting these solutions, contact customer support or a qualified automotive technician.
9. Specifications
| Feature | Detail |
|---|---|
| Model Number | 10R-044663, 35XT6-S-D3/12V A71154400DG |
| Input Voltage | 13.5V DC (Nominal) |
| Output Power | 35W @ 42V AC |
| Compatible Bulb Type | D3S Xenon |
| Dimensions (Approx.) | 1.18 x 0.79 x 0.39 inches (Package Dimensions, actual unit may vary slightly) |
| Item Weight (Approx.) | 1.76 ounces |
| Protection Features | Over-temperature, Over-current, Short-circuit protection |
10. Warranty and Support
Specific warranty information for this product may be provided by the seller at the time of purchase. Please refer to your purchase documentation for details regarding warranty coverage and duration.
For technical support or inquiries, please contact the seller or manufacturer through the platform where the product was purchased. Provide your product model number (10R-044663) and purchase details for efficient assistance.


