1. Introduction
Thank you for choosing the Maromamix MX-2525UK Electric Wax Melts Warmer. This manual provides essential information for the safe and efficient use of your new fragrance burner. Please read these instructions carefully before use and retain them for future reference.
2. Safety Instructions
- Always use this product in a well-ventilated area.
- Keep out of reach of children and pets.
- Avoid direct skin contact with undiluted essential oils.
- Do not ingest essential oils or wax melts.
- If you experience any adverse reactions, discontinue use and consult a healthcare professional.
- Ensure the warmer is unplugged before cleaning or adding/removing wax.
- Do not operate the warmer if the cord or plug is damaged.
- Do not immerse the electrical unit in water or any other liquid.
- Place the warmer on a stable, heat-resistant surface, away from flammable materials.
3. Package Contents
- 1 x Maromamix MX-2525UK Electric Wax Melts Warmer
- 1 x Removable Silicone Dish
4. Product Features
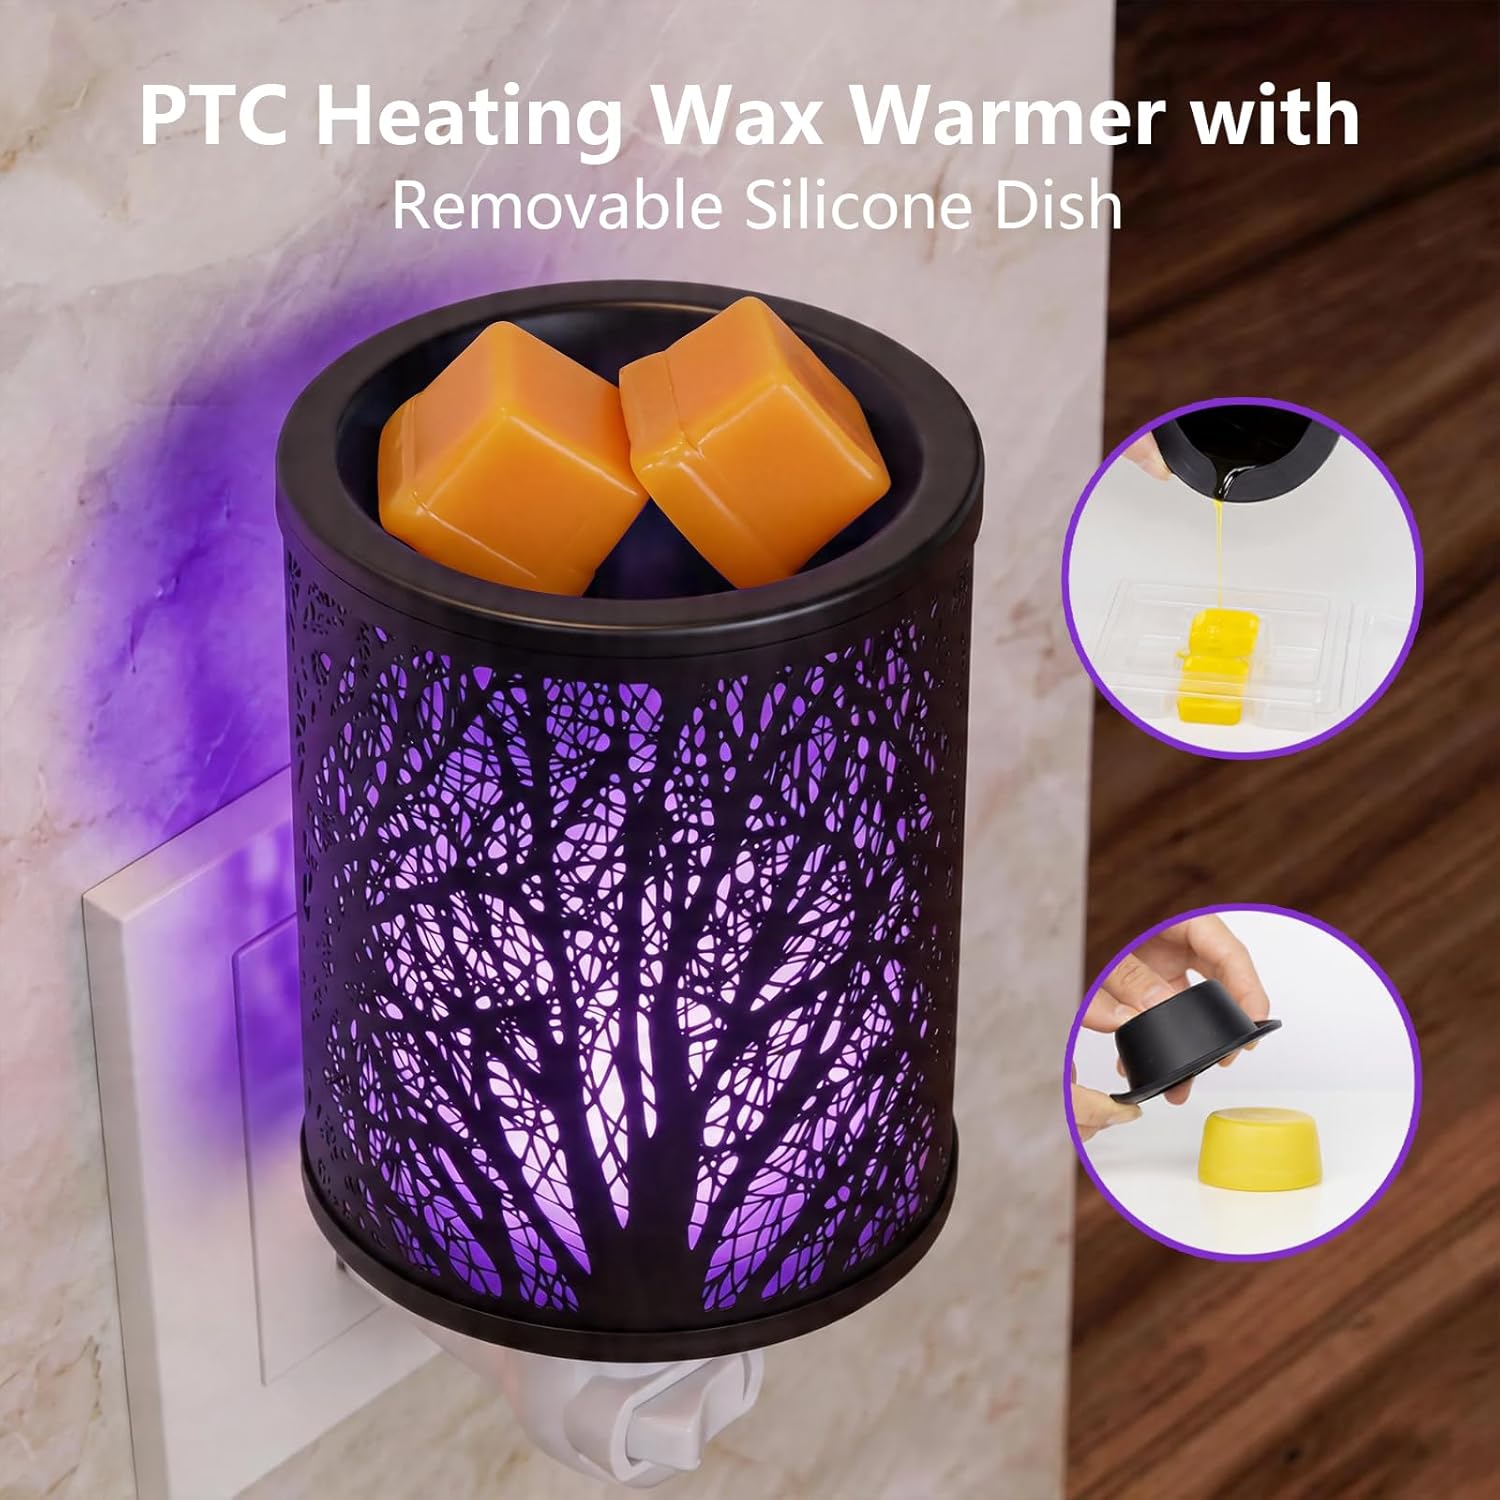
- Elegant Tree Pattern Design: The metal cover features a decorative tree pattern, enhancing home decor.
- Safe PTC Heating: Utilizes PTC heating technology, eliminating the need for bulbs and reducing fire risk.
- 7-Color LED Light: Offers a delightful 7-color LED light feature that can cycle automatically or be set to a single color.
- Removable Silicone Dish: Designed for easy wax removal and cleaning, allowing for quick scent changes.
- 90° Rotatable Plug: Allows for flexible placement in various wall outlets.
5. Setup
- Unpack the wax warmer and its components.
- Ensure the removable silicone dish is properly seated in the top of the warmer unit.
- Plug the warmer into a standard wall outlet. The 90° rotatable plug allows for vertical or horizontal orientation.


6. Operating Instructions
- Add Wax Melts: Place your desired amount of wax melts into the removable silicone dish. Do not overfill.
- Turn On: Flip the switch located on the warmer to the 'ON' position. The warmer will begin to heat the wax and illuminate.
- Light Color Selection:
- To cycle through the 7 colors automatically, simply turn the warmer on.
- To lock a specific color, turn the warmer off and then back on within 3 seconds when your desired color is displayed.
- Enjoy Fragrance: The PTC heating element will efficiently melt the wax, releasing fragrance into your space.
- Turn Off: When finished, flip the switch to the 'OFF' position and unplug the warmer from the outlet.

7. Maintenance and Cleaning
- Cool Down: Always ensure the warmer is unplugged and completely cool before attempting to clean it.
- Remove Wax: Once the wax has solidified in the silicone dish, gently press the bottom of the dish to pop out the hardened wax. This allows for easy disposal and scent changes.
- Clean Dish: The silicone dish can be wiped clean with a soft, damp cloth. Do not use abrasive cleaners.
- Clean Warmer Unit: Wipe the exterior of the warmer unit with a soft, dry cloth. Do not use water or cleaning sprays directly on the electrical components.
8. Troubleshooting
| Problem | Possible Cause | Solution |
|---|---|---|
| Warmer does not turn on. | Not plugged in correctly; power switch is off; no power at outlet. | Ensure the warmer is securely plugged into a working outlet. Check the power switch is in the 'ON' position. Test the outlet with another device. |
| Wax is not melting. | Warmer is not on; insufficient time for heating. | Verify the warmer is turned on. Allow 15-30 minutes for the PTC heating element to fully melt the wax. |
| Light is not changing colors. | Light mode is set to a fixed color. | Turn the warmer off and then on again, waiting more than 3 seconds before turning it back on to re-enable the 7-color cycle mode. |
| Weak fragrance throw. | Old wax melts; poor ventilation; room size. | Replace old wax melts with fresh ones. Ensure adequate ventilation. Consider using multiple warmers for larger rooms. |
9. Specifications
- Brand: Maromamix
- Model Name: MX-2443US
- Model Number: MX-2525UK
- Color: Tree
- Material: Metal
- Power Source: Corded Electric
- Special Feature: Compact, Multiple Light Setting
- Mounting Type: Wall Mount
- Coverage: Medium room
- Automatic Shutoff: No
10. Warranty and Support
For warranty information or technical support, please contact Maromamix customer service through the retailer where the product was purchased. Please have your model number (MX-2525UK) and purchase date available when contacting support.