Huanyu B0DP42CT8Q
Huanyu Pottery Wheel and Cordless Paint Sprayer User Manual
Model: B0DP42CT8Q
1. Introduction
This manual provides comprehensive instructions for the safe and effective use of your Huanyu Pottery Wheel Ceramic Machine and Huanyu Cordless Paint Sprayer. Please read this manual thoroughly before operation and retain it for future reference.

Figure 1.1: The complete Huanyu Pottery Wheel and Cordless Paint Sprayer kit. This image displays both the green pottery wheel machine with its control panel and foot pedal, alongside the bright green and black cordless paint sprayer with its paint container and two batteries. Various pottery tools and paint sprayer accessories are also visible.
2. Safety Information
Always observe basic safety precautions to reduce the risk of fire, electric shock, and personal injury.
- Read all instructions before using the appliance.
- Keep the work area clean and well-lit. Cluttered or dark areas invite accidents.
- Do not operate power tools in explosive atmospheres, such as in the presence of flammable liquids, gases, or dust.
- Keep children and bystanders away while operating a power tool.
- Wear appropriate personal protective equipment (PPE), such as safety glasses, gloves, and dust masks, especially when using the paint sprayer.
- Disconnect the power source before making any adjustments, changing accessories, or storing the appliance.
- Do not expose the appliance to rain or wet conditions. Water entering a power tool will increase the risk of electric shock.
- Use only accessories specified by the manufacturer.
- Store idle appliances out of the reach of children and do not allow persons unfamiliar with the appliance or these instructions to operate the appliance.
3. Package Contents
Verify that all items listed below are included in your package. If any items are missing or damaged, please contact customer support.
- Huanyu Pottery Wheel Ceramic Machine x 1
- Huanyu Cordless Paint Sprayer x 1
- Foot Pedal for Pottery Wheel x 1
- Pottery Wheel Bat System (1 bat, 2 extra inserts) x 1 set
- Pottery Tools Set x 1
- 21V 4.0Ah Batteries x 2
- Battery Charger x 1
- Copper Nozzles (1.0/1.5/1.8/2.0/2.5mm) x 5
- Paint Container x 1
- Cleaning Brush x 1
- Funnel x 1
- Filter Papers x 1 set
- Gloves x 1 pair
- User Manual x 1
4. Pottery Wheel Setup
4.1 Unpacking and Placement
- Carefully remove all components from the packaging.
- Place the pottery wheel machine on a stable, level, and sturdy surface. Ensure there is adequate space around the machine for comfortable operation and to prevent accidental spills.
- Connect the foot pedal cable to the designated port on the pottery wheel machine.
- Plug the power cord into a suitable electrical outlet.
4.2 Attaching the Bat System
The pottery wheel features a standard bat system for easy removal of finished pieces.

Figure 4.1: Visual guide for installing the bat system on the pottery wheel. This image shows three steps: 1) placing the main bat, 2) inserting the two smaller bat inserts into the main bat, and 3) the fully assembled bat system on the wheel head.
- Place the main bat (the largest circular piece) onto the wheel head, aligning the central hole.
- Insert the two smaller bat inserts into the designated slots on the main bat. Ensure they fit snugly.
- The bat system is now ready for use.
5. Pottery Wheel Operation
5.1 Powering On and Speed Control
The pottery wheel offers dual speed control via an LCD touch screen or a foot pedal.
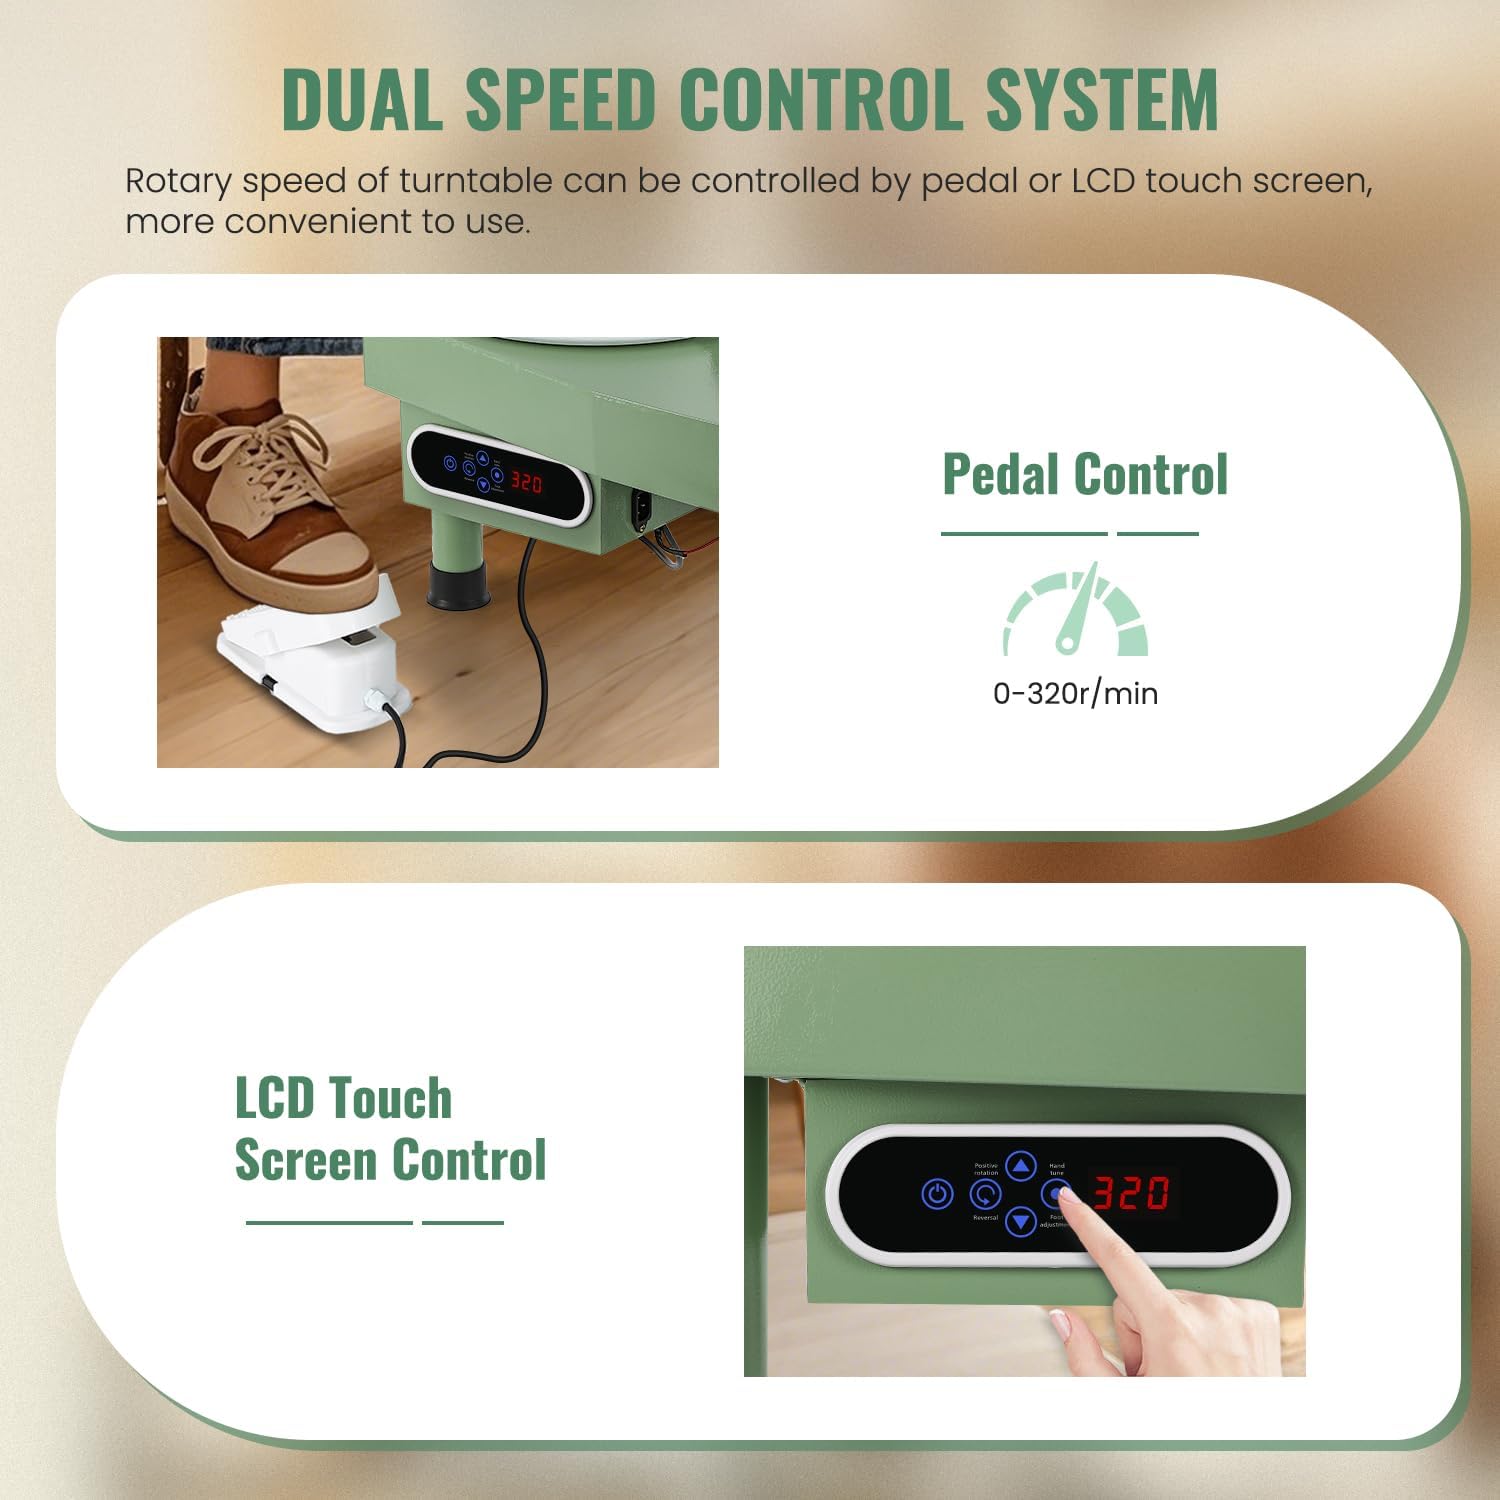
Figure 5.1: Illustration of the pottery wheel's dual speed control system. The top part shows a foot pressing the pedal for speed control, while the bottom part highlights the LCD touch screen control panel with its buttons and digital display.
- Press the power button on the control panel to turn on the machine. The LCD screen will illuminate.
- Using the Foot Pedal: Press the foot pedal to start the wheel rotation. Vary the pressure on the pedal to adjust the speed from 0 to 320 RPM.
- Using the LCD Touch Screen: Use the '+' and '-' buttons on the control panel to set the desired rotation speed. The current speed will be displayed on the LCD.
5.2 Changing Rotation Direction
The wheel supports both clockwise and counter-clockwise rotation.
Figure 5.2: Diagram showing the two rotary directions available on the pottery wheel: clockwise and counter-clockwise. This image also reiterates the 12-inch (30cm) wheel diameter.
Press the direction button on the control panel to toggle between clockwise and counter-clockwise rotation as needed for your throwing technique.
5.3 Throwing Pottery

Figure 5.3: A person demonstrating the use of the Huanyu Pottery Wheel, centering clay on the rotating wheel head. The image highlights the ease of finding the center with this machine.
- Prepare your clay by wedging it to remove air bubbles.
- Place a lump of clay firmly in the center of the wheel head or bat.
- Start the wheel at a moderate speed using either the foot pedal or LCD control.
- Using wet hands and appropriate pottery tools, begin to center the clay.
- Once centered, proceed with your desired throwing technique to form your pottery piece.
- When finished, stop the wheel and carefully remove your pottery piece, either directly from the wheel head or by detaching the bat.

Figure 5.4: A collage showcasing different stages of pottery creation and the use of various tools. The image includes close-ups of shaping clay on the wheel, trimming a pot, and the full set of pottery tools provided with the machine.
6. Cordless Paint Sprayer Setup
6.1 Battery Charging and Installation
- Before first use, fully charge both 21V 4.0Ah batteries using the provided charger. The charger indicator light will change when charging is complete.
- Insert a fully charged battery into the battery slot at the base of the paint sprayer handle until it clicks into place.
6.2 Preparing Paint and Nozzle Selection
- Prepare your paint according to the manufacturer's instructions, ensuring it is properly diluted for spraying. Use the provided funnel and filter papers to strain the paint and prevent clogs.
- Pour the prepared paint into the paint container and securely attach it to the sprayer gun.
- Select the appropriate copper nozzle (1.0/1.5/1.8/2.0/2.5mm) based on the viscosity of your paint and desired spray pattern.
- 1.0mm / 1.5mm: For dilution atomization spraying (e.g., solutions, thin paints).
- 1.8mm / 2.0mm: For high atomization spraying (e.g., paint, topcoat).
- 2.5mm: For primer, latex paint, etc.
- Attach the selected nozzle to the sprayer head, ensuring it is tightened securely.

Figure 6.1: Close-up view of the five durable copper nozzles (1.0mm, 1.5mm, 1.8mm, 2.0mm, 2.5mm) included with the paint sprayer, along with their recommended uses for different paint types and atomization levels.
7. Cordless Paint Sprayer Operation
7.1 Adjusting Spray Patterns and Flow
The paint sprayer allows for adjustment of spray patterns and paint flow volume.
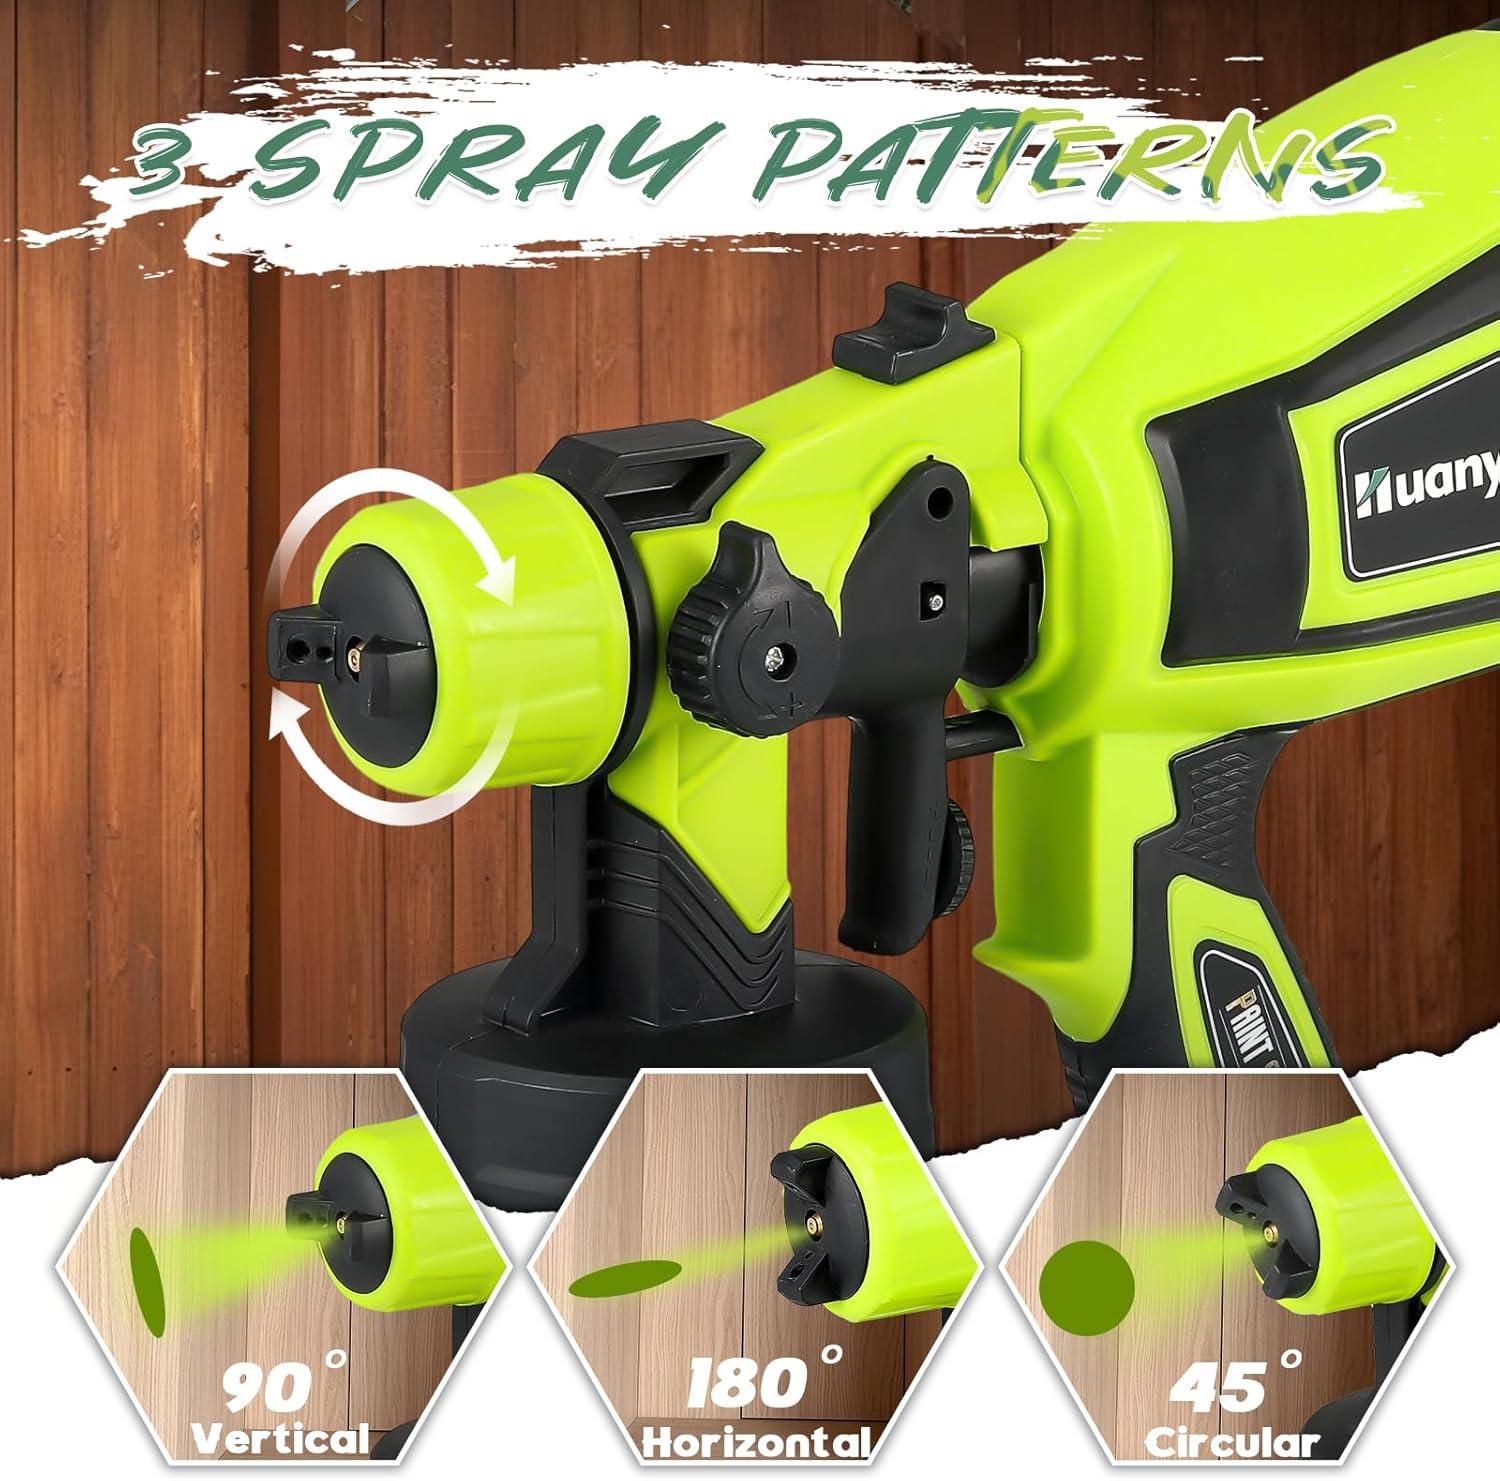
Figure 7.1: Diagram illustrating the three adjustable spray patterns: 90° Vertical, 180° Horizontal, and 45° Circular. The image shows how to rotate the nozzle cap to switch between these patterns.

Figure 7.2: Visual guide for adjusting the spray volume and spray length on the paint sprayer. The top section shows a dial for spray volume adjustment, and the bottom section shows a knob for spray length adjustment, with corresponding spray density indicators.
- Spray Patterns: Rotate the air cap on the front of the sprayer to select one of three spray patterns:
- Vertical (90°): For horizontal surfaces.
- Horizontal (180°): For vertical surfaces.
- Circular (45°): For small, intricate areas or corners.
- Spray Volume Adjustment: Use the dial located on the top of the sprayer to increase or decrease the paint flow volume.
- Spray Length Adjustment: Use the knob near the nozzle to adjust the spray length, which affects the atomization and coverage.
7.2 Spraying Technique

Figure 7.3: A collage demonstrating various applications of the cordless paint sprayer, including painting a fence, a garage door, furniture, and stairs, showcasing its versatility for different surfaces and projects.
- Hold the sprayer approximately 6-12 inches (15-30 cm) from the surface.
- Press the trigger to start spraying.
- Move the sprayer in smooth, even strokes, overlapping each pass slightly to ensure uniform coverage.
- Avoid tilting the sprayer excessively to prevent paint from not reaching the suction tube.
- Release the trigger to stop spraying.
- Always test the spray pattern and flow on a scrap piece of material before beginning your project.
8. Maintenance
8.1 Pottery Wheel Cleaning
- After each use, disconnect the power.
- Wipe down the wheel head, bat, and machine body with a damp sponge to remove all clay residue.
- Do not use abrasive cleaners or immerse the machine in water.
- Ensure the control panel and motor area remain dry.
8.2 Paint Sprayer Cleaning
Proper cleaning after each use is crucial to prevent clogging and ensure longevity.
- Disconnect the battery from the sprayer.
- Empty any remaining paint from the container.
- Fill the container with appropriate cleaning solution (water for water-based paints, mineral spirits for oil-based paints).
- Reattach the container and spray the cleaning solution through the nozzle until it runs clear.
- Disassemble the nozzle, air cap, and paint container. Clean all parts thoroughly with the provided cleaning brush and cleaning solution.
- Rinse all parts with clean water (if using water-based paints/cleaners) and allow them to dry completely before reassembly and storage.
- Clean the exterior of the sprayer with a damp cloth. Do not immerse the motor housing in water.
9. Troubleshooting
9.1 Pottery Wheel Issues
| Problem | Possible Cause | Solution |
|---|---|---|
| Wheel does not turn on. | No power; loose connection. | Check power cord connection; ensure outlet is functional. |
| Wheel speed is inconsistent. | Foot pedal issue; motor malfunction. | Check foot pedal connection; contact customer support if issue persists. |
| Excessive vibration. | Uneven surface; damaged wheel head. | Ensure machine is on a level surface; inspect wheel head for damage. |
9.2 Paint Sprayer Issues
| Problem | Possible Cause | Solution |
|---|---|---|
| No spray or weak spray. | Clogged nozzle; insufficient paint; low battery. | Clean nozzle; refill paint; charge battery. |
| Uneven spray pattern. | Incorrect nozzle selection; paint too thick; dirty nozzle. | Select correct nozzle; dilute paint; clean nozzle. |
| Paint leakage. | Loose connections; damaged seals. | Tighten all connections; inspect seals for damage. |
10. Specifications
10.1 Huanyu Pottery Wheel Ceramic Machine
- Wheel Diameter: 30 cm (12 inches)
- Speed Control: LCD Touch Screen / Foot Pedal
- Speed Range: 0-320 RPM (minimum 60 RPM)
- Motor Type: Stepless Speed Regulation Motor
- Wheel Material: Aluminum Alloy
- Rotation Direction: Clockwise / Counter-clockwise
10.2 Huanyu Cordless Paint Sprayer
- Battery: 2 x 21V 4.0Ah Lithium-ion
- Nozzles: 5 Copper Nozzles (1.0/1.5/1.8/2.0/2.5mm)
- Spray Modes: Horizontal, Vertical, Circular
- Adjustments: Adjustable Spray Flow Rate, Adjustable Spray Length
11. Warranty and Support
Huanyu products are manufactured to high-quality standards. For warranty information, technical support, or replacement parts, please contact Huanyu customer service through the retailer where you purchased the product or visit the official Huanyu website. Please have your product model number (B0DP42CT8Q) and purchase date ready when contacting support.
This manual is subject to change without prior notice.
Ask a question about this manual
Ask about setup, troubleshooting, compatibility, parts, safety, or missing instructions. Manuals+ will review the question and use this page’s manual context to help answer it.