B0DP3B3XG3
Instruction Manual for Replacement Turntable Stylus Needle
Model: Red Replacement Stylus (B0DP3B3XG3)
1. Introduction
This manual provides essential information for the installation, operation, and maintenance of your new replacement turntable stylus needles. Designed for a wide range of record players, these ruby stylus needles ensure optimal sound reproduction and extend the life of your vinyl records. Please read this manual thoroughly before use to ensure proper handling and performance.
2. Product Overview
The replacement stylus is a critical component of your turntable's cartridge, responsible for tracking the grooves of your vinyl records and converting mechanical vibrations into electrical signals. This product includes three high-quality ruby stylus needles, designed for durability and precise audio playback.
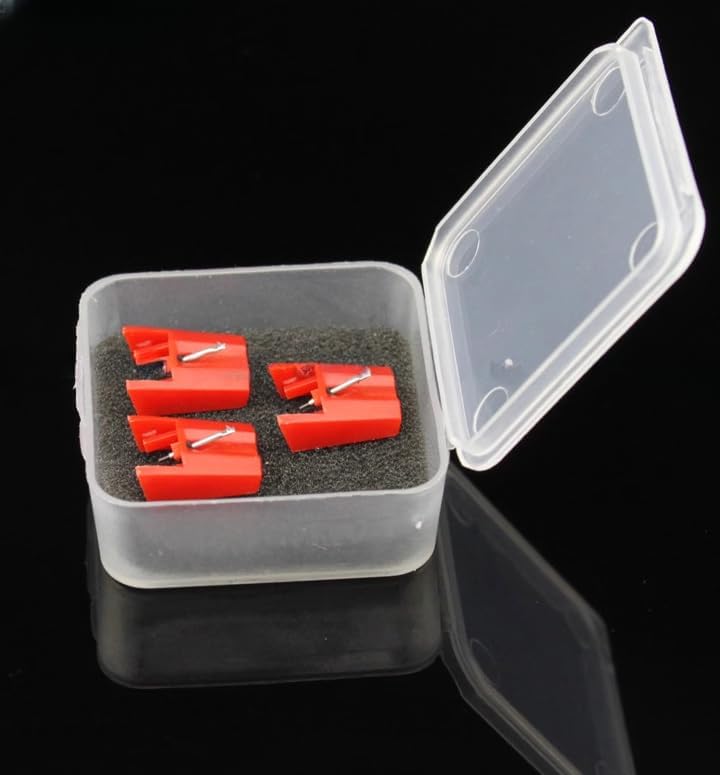
Figure 2.1: Three red replacement styluses neatly packaged in a protective clear plastic case.

Figure 2.2: The compact size of the replacement styluses, shown resting in a hand.

Figure 2.3: A detailed view of a single replacement stylus, emphasizing the ruby needle tip.
3. Compatibility
These replacement stylus needles are compatible with a wide range of turntable models. Please refer to the list below to confirm compatibility with your specific record player:
Compatible ION Turntables:
- ION PROFILE PRO, PROFILE, PROFILE PLUS, PROFILE LP USB DELUXEI
- ITTUSB05, ITTUSB, ITTUSB1, ITTCD10, IPTUSB
- TTUSB05, TTUSB, TTUSB10, PTUSB, LPDOCK
- ITT03X, IDJ03, DJ02M
- LPDock, LP2CD, LP2Flash, IProfile, Profile Flash, Profile Pro, Profile Lp
- ITTUSB05, ITTUSB, ITTUSB10, ITTCD10, IDJ03, ITT02A, ITT03
- TTUSB, TTUSB05, TTUSB05XL, TTUSB10, TTUSBDC
Compatible Fisher Turntables:
- ST09D, STW17J, STW40J
- MT223A, MT228, MT229, MT851, MT854, MT855A
Compatible Gemini Turntables:
- CN1000, XL series, XL100, XL300, XL500, TT01
Compatible Goodmans Turntables:
- CRN-2500-1, GSP400, GSP400S
Compatible Kenwood/Trio Turntables:
- N69, P31, P110
Compatible Sharp/Optonica Turntables:
- STY158
Compatible Steepletone Turntables:
- SSTY3
Compatible KAM Turntables:
- BDX350, KC1, KS1, DDX1200, DDX2000, DDX3000, DDX3800, DDX4000 (Note: Will not fit DDX1200B, DDX2000B)
Compatible MINISTRY OF SOUND Turntables:
- CT01, TT100, TT1000
Compatible Numark Turntables:
- Groovetool RS, GTRS, TTUSB, TT1600, TT1600 mk2, TT1610, TT1650
Compatible Otto Turntables:
- ST09D, STW40J, DCX702, DCX22, DCX1000, DCX1050
Compatible PFANSTIEHL Turntables:
- 901-D7, F1395, FP320
Compatible Pyle Turntables:
- PLTTB1, PLTT2BU, PLTTB3U
Compatible Sony Turntables:
- CN234, CN251, PSLX150, PSLX150H, PSJ10, PSJ11, PSJ20, PSLX495, PSLX49, PSLX49P, PSLX52, PSLX52P, PSLX55, PSLX56P, PSLX56, PSLX57, PSLX6, PSLX66, PSLX150H, PSLX300H (May also fit PSLX44P, PSLX46P in some countries)
4. Setup: Replacing Your Stylus
Replacing a turntable stylus is a delicate process that requires care to avoid damaging the cartridge or tonearm. Follow these steps carefully:
- Power Off: Ensure your turntable is completely powered off and unplugged from the wall outlet to prevent accidental damage.
- Secure Tonearm: Gently secure the tonearm in its rest to prevent it from moving during the stylus replacement.
- Remove Old Stylus:
- Locate the existing stylus on the cartridge. It is usually a small plastic housing with the needle protruding from the bottom.
- Gently grasp the stylus housing (not the needle itself) and pull it straight down or forward, depending on your cartridge design. It should detach with a slight click or gentle pull. Avoid twisting or applying excessive force.
- Install New Stylus:
- Carefully align the new replacement stylus with the cartridge body. The stylus typically has a specific orientation and will only fit one way.
- Gently push the new stylus upwards or backwards into the cartridge until it clicks securely into place. Ensure it is seated firmly and flush with the cartridge body. Do not force it.
- Inspect: Visually inspect the newly installed stylus to ensure it is straight and properly aligned. The needle should be clearly visible and centered.
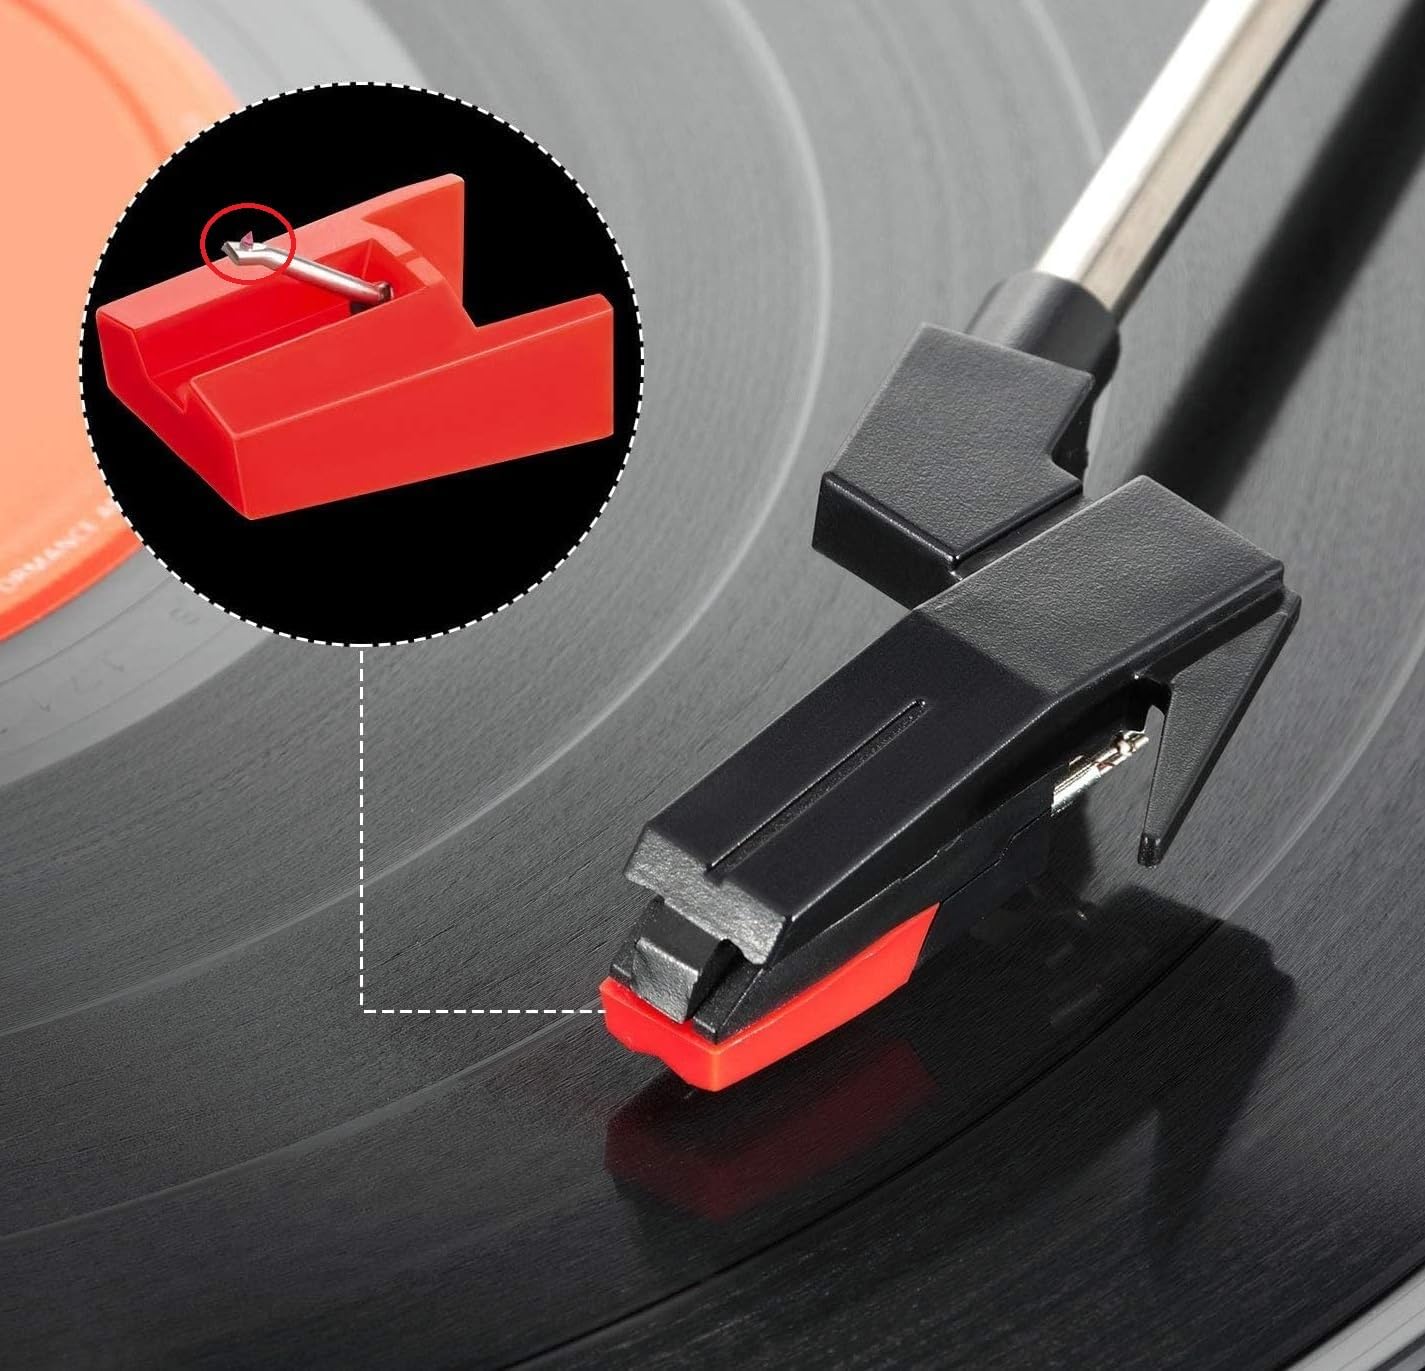
Figure 4.1: Illustration of a stylus being installed onto a turntable's tonearm and cartridge assembly.
5. Operating Your Turntable with New Stylus
Once the new stylus is installed, you can resume normal operation of your turntable. The stylus is designed to accurately track the grooves of your vinyl records, translating the physical undulations into electrical signals that are then amplified and converted into sound.
- Record Placement: Carefully place your vinyl record onto the turntable platter.
- Tonearm Positioning: Gently lift the tonearm using the cueing lever (if available) and position the stylus over the lead-in groove of the record.
- Lowering the Stylus: Slowly lower the tonearm using the cueing lever, allowing the stylus to gently descend onto the record. Avoid dropping the tonearm, as this can damage the stylus or record.
- Playback: The stylus will now begin to track the record's grooves, and audio playback will commence.
6. Maintenance and Care
Proper maintenance of your stylus will ensure optimal sound quality and extend its lifespan. A clean stylus is crucial for accurate tracking and preventing damage to your records.
- Regular Cleaning: Use a soft stylus brush (sold separately) to gently brush the stylus tip from back to front (never side to side or front to back) after every few plays. This removes dust and debris that can accumulate.
- Avoid Touching: Never touch the stylus tip with your fingers, as oils and dirt can transfer and degrade performance.
- Record Cleanliness: Always play clean records. Dust and grime on records are the primary cause of stylus wear and poor sound quality.
- Storage: When not in use, ensure the tonearm is secured in its rest and, if your turntable has one, the stylus guard is in place. Store replacement styluses in their protective case.
- Replacement Schedule: Styluses wear out over time. While the lifespan varies based on usage and care, it is generally recommended to replace your stylus every 500-1000 hours of playback, or sooner if you notice a degradation in sound quality (e.g., distortion, sibilance) or visible wear on the tip.
7. Troubleshooting
If you encounter issues after replacing your stylus, consider the following common problems and solutions:
| Problem | Possible Cause | Solution |
|---|---|---|
| No sound or very low sound | Stylus not fully seated; incorrect input selected on amplifier; loose cables. | Ensure stylus is firmly clicked into cartridge. Check amplifier input and all audio connections. |
| Distorted or muffled sound | Dirty stylus; worn stylus; incorrect tracking force (if adjustable). | Clean stylus with a stylus brush. If sound persists, replace stylus. Consult turntable manual for tracking force adjustment. |
| Skipping or jumping | Dirty record; dirty stylus; damaged record; turntable not level; incorrect tracking force. | Clean record and stylus. Ensure turntable is on a stable, level surface. Check tracking force. |
| Humming or buzzing noise | Grounding issue; interference from other electronics; loose connections. | Ensure turntable is properly grounded. Move turntable away from other electronic devices. Check all cable connections. |
8. Specifications
- Product Type: Replacement Turntable Stylus Needle
- Stylus Material: Ruby
- Color: Red
- Quantity: 3 PCS
- Compatibility: Designed for various ION, Fisher, Gemini, Goodmans, Kenwood/Trio, Sharp/Optonica, Steepletone, KAM, MINISTRY OF SOUND, Numark, Otto, PFANSTIEHL, Pyle, and Sony turntable models (refer to Compatibility section for full list).
- ASIN: B0DP3B3XG3
- Country of Origin: China
- Cartridge Type: Moving Magnet (MM) (Note: Cartridge not included)
9. Warranty and Support
For specific warranty information regarding this product, please refer to the terms provided by your retailer or contact the seller directly. As this is a replacement part, warranty coverage may vary.
If you have further questions or require technical assistance, please reach out to the seller or manufacturer through the platform where the product was purchased. Always provide your product model number (B0DP3B3XG3) and a detailed description of your issue for efficient support.
no relevant documents
Ask a question about this manual
Ask about setup, troubleshooting, compatibility, parts, safety, or missing instructions. Manuals+ will review the question and use this page’s manual context to help answer it.