1. Introduction
Thank you for choosing the avigator Coffee Maker with Grinder. This appliance is designed to provide a versatile coffee brewing experience, allowing you to enjoy freshly ground hot or iced coffee with customizable settings. Please read this manual thoroughly before use to ensure proper operation and maintenance.

Figure 1: Front view of the avigator Coffee Maker with Grinder.
2. Important Safety Instructions
- Read all instructions before operating the appliance.
- Do not immerse the appliance, cord, or plug in water or other liquids.
- Close supervision is necessary when any appliance is used by or near children.
- Unplug from outlet when not in use and before cleaning. Allow to cool before putting on or taking off parts, and before cleaning the appliance.
- Do not operate any appliance with a damaged cord or plug, or after the appliance malfunctions or has been damaged in any manner.
- The use of accessory attachments not recommended by the appliance manufacturer may result in fire, electric shock, or injury to persons.
- Do not use outdoors.
- Do not let cord hang over edge of table or counter, or touch hot surfaces.
- Do not place on or near a hot gas or electric burner, or in a heated oven.
- Always attach plug to appliance first, then plug cord into the wall outlet. To disconnect, turn any control to 'off', then remove plug from wall outlet.
- Do not use appliance for other than intended use.
- Scalding may occur if the lid is removed during the brewing cycle.
3. Package Contents
Upon unpacking, please ensure all items listed below are present and in good condition:
- avigator Coffee Brewer
- 5-cup glass carafe
- Removable reservoir
- Paper filters (5pcs)
- Measuring spoon
- Cleaning brush
4. Product Overview
Familiarize yourself with the components of your avigator coffee maker:
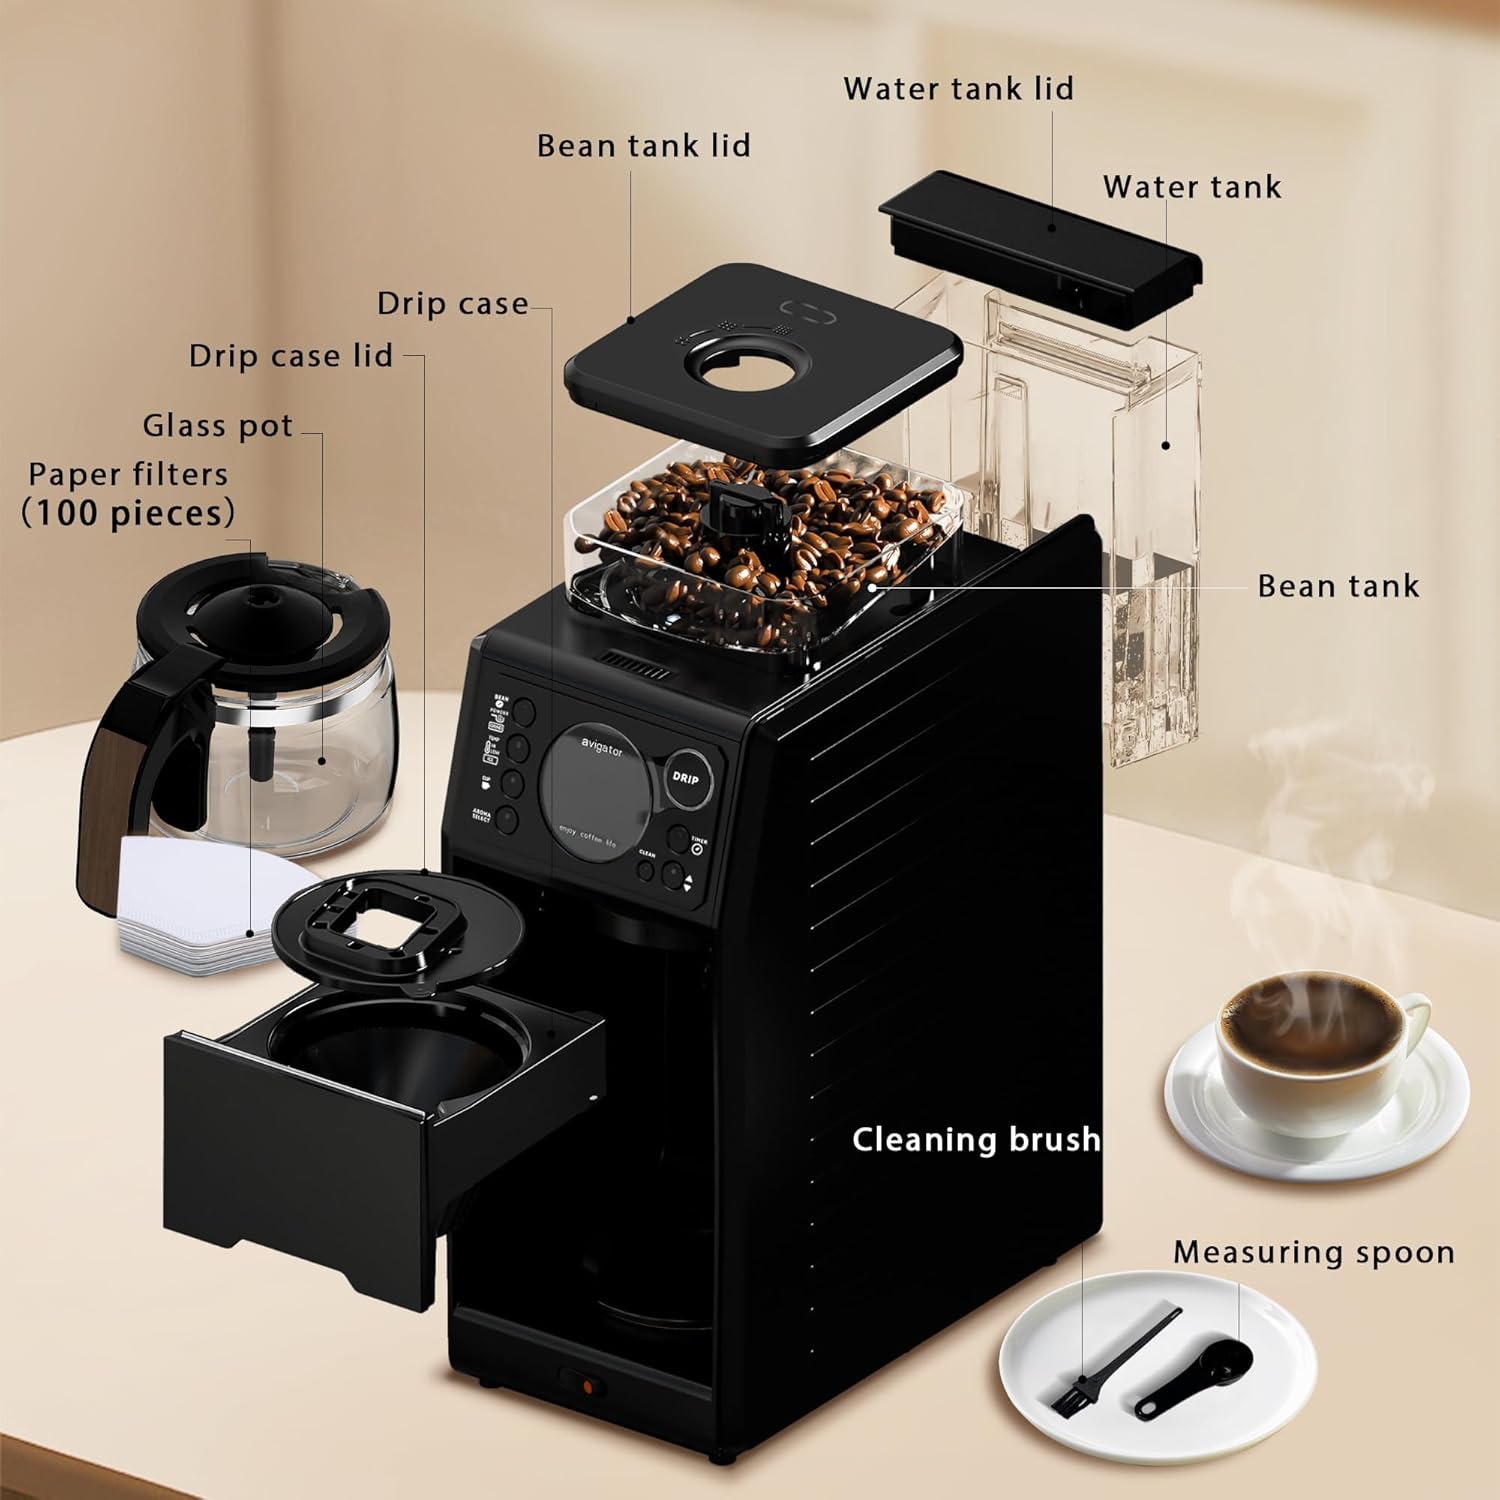
Figure 2: Exploded view of the avigator Coffee Maker components.
The main unit features a control panel with an LCD display, a bean tank with an adjustable grinder, a removable water tank, and a brewing area for the glass carafe.
5. Setup
- Unpacking: Carefully remove all components from the packaging. Remove any protective films or stickers.
- Initial Cleaning: Wash the glass carafe, removable water reservoir, and drip case with warm, soapy water. Rinse thoroughly and dry. Wipe the exterior of the main unit with a damp cloth.
- Water Tank Installation: Fill the removable water reservoir with fresh, cold water up to the desired level (refer to markings for hot or iced coffee). Reinstall the water tank securely into its position at the back of the unit. Ensure it is correctly seated to avoid "E1" warnings on the panel.
- Bean Tank / Powder Tray: Open the bean tank lid. If using whole beans, fill the bean tank (maximum 120g). If using pre-ground coffee, place a paper filter in the drip case and add the desired amount of ground coffee using the measuring spoon.
- Carafe Placement: Place the empty glass carafe on the heating plate in the brewing compartment.
Video 1: Unboxing and initial setup of the avigator Coffee Maker, demonstrating component handling and water filling.
6. Operating Instructions
6.1. Grinding Coffee Beans
The avigator coffee maker features a built-in grinder for fresh coffee. You can adjust the coarseness of the grind:
- Rotate the knob on the bean tank lid to select your desired grind setting (Fine, Medium, Coarse).
- Press the 'BEAN' button on the control panel to select whole bean mode.

Figure 3: Adjustable grind settings on the bean hopper.
Video 2: Demonstration of how to make freshly brewed coffee starting from grinding whole beans.
6.2. Customized Brewing Options
Select your preferred brewing parameters using the control panel:
- Coffee Type: Press 'BEAN' for whole beans or 'POWDER' for pre-ground coffee.
- Temperature/Brewing Method: Select 'TEMP HI' for light roasts (194°F), 'TEMP LOW' for darker roasts (181.4°F), or 'ICE' for iced coffee.
- Aroma Strength: Press 'AROMA SELECT' to cycle through Mild, Medium, or Strong options.
- Cup Quantity: Press 'CUP' to select 1, 2, 3, 4, or 5 cups.

Figure 4: Control panel with aroma selection options.
6.3. 24H Programmable Brewing
Set a timer for automatic brewing:
- Press the 'TIMER' button.
- Use the up/down arrows to set the desired brewing time (up to 24 hours in advance).
- Confirm your selection by pressing 'DRIP'. The machine will automatically brew at the set time.

Figure 5: Display showing 24H programmable brewing feature.
6.4. Starting the Brewing Process
After selecting all your desired settings, press the 'DRIP' button to start brewing. The thermal plate will keep hot coffee warm for approximately 30 minutes after brewing.
Video 3: Demonstration of making a pot of hot coffee with the avigator 5-cup coffee maker.
Video 4: User experience and demonstration of the coffee maker's features, including grinding and brewing.
7. Maintenance
7.1. Self-Cleaning Function
The avigator coffee maker features three self-cleaning modes for convenience:
- Press the 'CLEAN' button to cycle through the cleaning modes:
- C1: Cleans the outlet of the main unit.
- C2: Cleans the inside of the main unit with boiling water (or the water tank).
- C3: Cleans the inside of the bean grinder.
It is recommended to perform these cleaning cycles once every 20 uses.
7.2. Manual Cleaning
- The 5-cup glass carafe and removable reservoir are easy to clean. Wash them with warm, soapy water after each use.
- Use the provided cleaning brush to remove any coffee grounds residue from the drip case and grinder area.
- The appliance is not dishwasher safe.
8. Troubleshooting
Refer to the table below for common error displays and their solutions:
| Error Code | Cause | Workaround |
|---|---|---|
| E1 | The water tank is not installed correctly or there is no/not enough water in the water tank. | Reinstall the water tank in the correct position and fill it with enough water. |
| E2 | You have not cleaned the machine for a long time, or the water tank is not installed correctly. | Install it correctly and clean the machine. |
| E3 | The bean tank is not installed correctly, or there are no coffee beans in the bean tank. | Install the bean tank correctly, or add coffee beans. |
| E4 | The machine is overheating. | Turn off the power and allow the machine to cool down for about 5 minutes, then restart. |
Video 5: This video demonstrates the unboxing and setup, including a close-up of the error display guide on the machine.
9. Specifications
| Feature | Detail |
|---|---|
| Brand | avigator |
| Model Name | 5-cup coffee maker |
| Item Model Number | ACGM3002#103 |
| Color | Black |
| Product Dimensions | 6.7"D x 0.72"W x 5"H |
| Special Feature | Lightweight |
| Coffee Maker Type | Drip Coffee Machine |
| Style | Classic |
| Specific Uses For Product | Americano, Iced Coffee |
| Included Components | Filter |
| Operation Mode | Fully Automatic |
| Voltage | 1200 Volts |
| Number of Items | 2 |
| Human Interface Input | Buttons |
| Coffee Input Type | whole bean |
| Is Dishwasher Safe | No |
| Power Source | AC adapter |
| UPC | 702262406384 |
| Item Weight | 17 pounds |

Figure 6: Product dimensions of the avigator Coffee Maker.
10. Warranty and Support
For warranty information or technical support, please refer to the documentation included with your product or contact avigator customer service. Keep your purchase receipt as proof of purchase.