1. Introduction
Thank you for choosing the PUCKIPUPPY Husky Electric Tricycle. This manual provides essential information for the safe operation, assembly, maintenance, and troubleshooting of your new electric trike. Please read it thoroughly before your first ride to ensure proper use and to maximize your riding experience.
The PUCKIPUPPY Husky Electric Tricycle is designed for adults, offering a stable and comfortable ride with its 48V 17.4AH battery, 960W peak motor, and 20-inch fat tires. It features a robust aluminum frame, rear differential for enhanced stability, and a spacious rear storage basket, making it suitable for various uses from commuting to cargo transport.

Image: Overview of the PUCKIPUPPY Husky Electric Tricycle, highlighting its robust design and key components.
2. Safety Information
Your safety is paramount. Always adhere to the following guidelines to prevent injury or damage to your tricycle.
- Wear a Helmet: Always wear an approved helmet and appropriate safety gear while riding.
- Pre-Ride Check: Before each ride, inspect brakes, tires, battery charge, and all fasteners to ensure they are secure and functioning correctly.
- Weight Limit: Do not exceed the maximum load capacity of 500 lbs (350 lbs standard load). Overloading can affect stability and performance.
- Battery Safety: Use only the provided charger. Do not expose the battery to extreme temperatures or puncture it. Ensure the battery is locked securely before riding.
- Road Conditions: Be aware of your surroundings. Adjust your speed and riding style to suit road conditions, weather, and traffic.
- Traffic Laws: Obey all local traffic laws and regulations.
- Age and Skill: This tricycle is intended for adults. Riders should have a minimum height of 5 feet and possess basic cycling skills.
3. What's in the Box
Upon unpacking, ensure all components are present and undamaged:
- 1 × PUCKIPUPPY Electric Tricycle
- 1 × Removable 48V 17.4AH Battery
- 1 × Fast-Charging Charger
- 1 × Rear Storage Basket
- 3 × Fenders (1 Front & 2 Rear)
- 1 × Oversized Semi-Recumbent Backrest
- 1 × Instruction Manual
- Riding Kit Package (Cell phone holder, water cup holder, bike mirrors, locks, tricycle cover cloth)
- Two additional saddle seatpost options (with and without shock)
Note: Please do not discard the large packaging box used to hold the electric tricycle until assembly is complete and you have verified all parts.
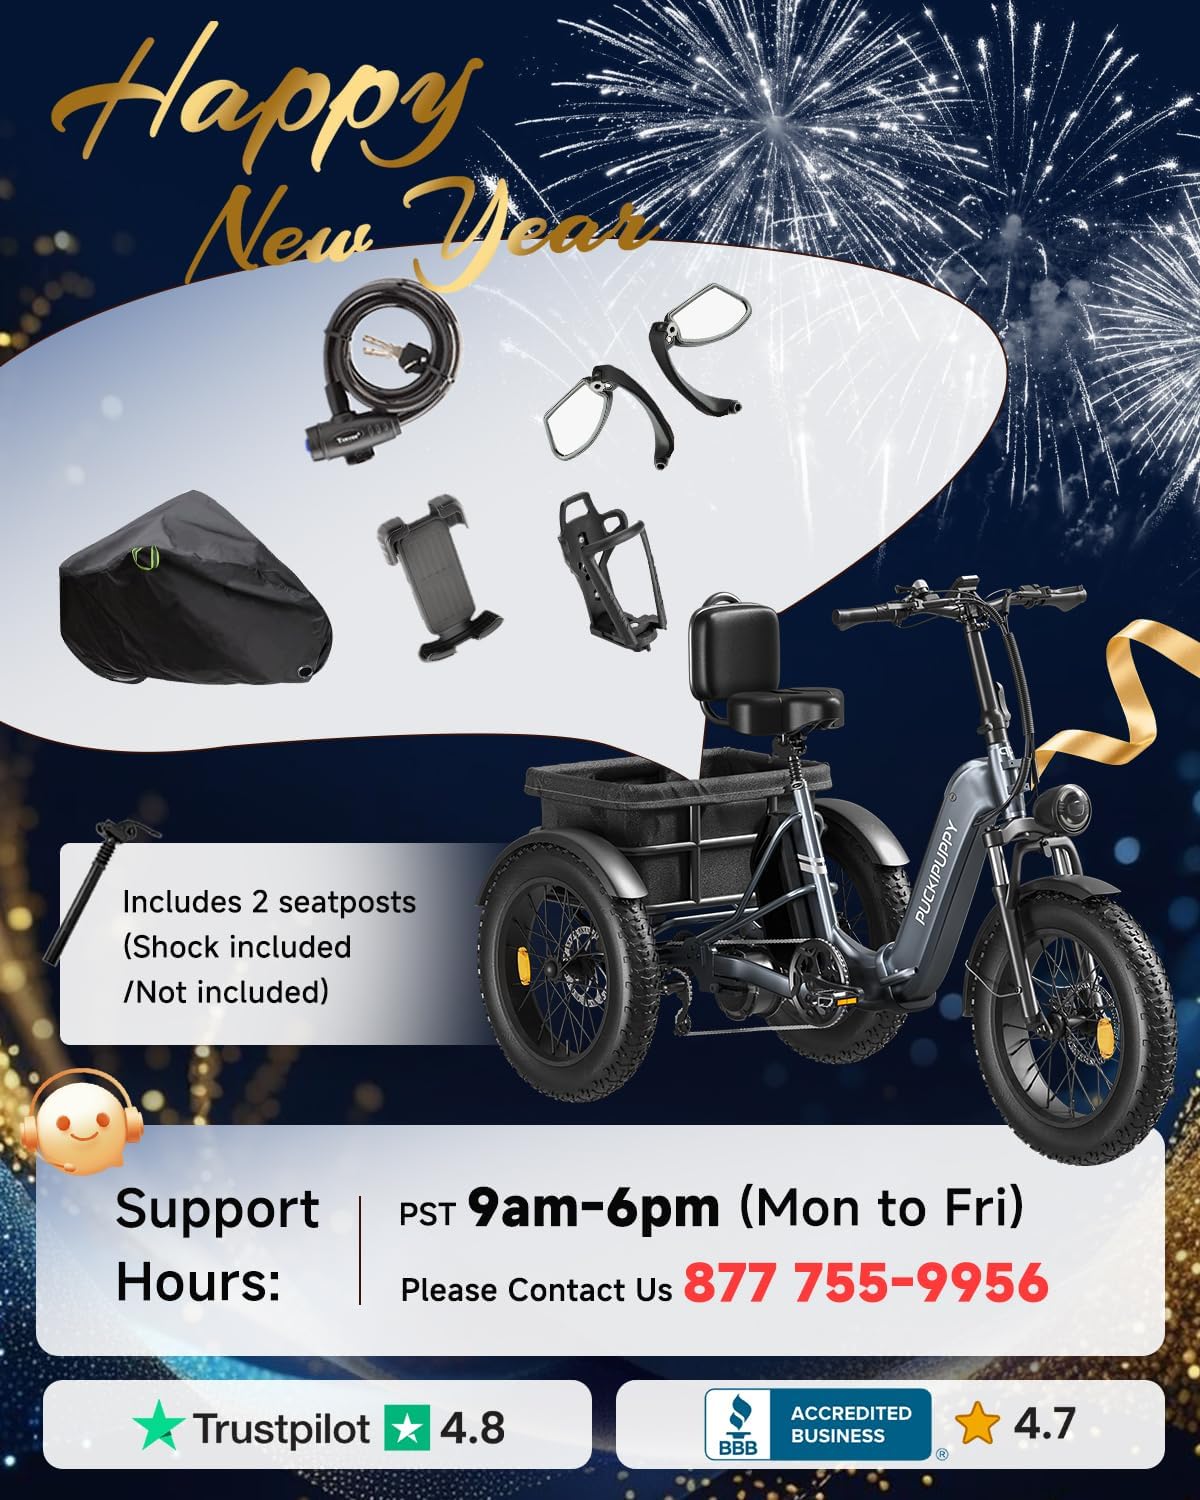
Image: The PUCKIPUPPY Electric Tricycle as it appears in its shipping box.
4. Setup and Assembly
The PUCKIPUPPY Husky Electric Tricycle comes 85% pre-assembled. Follow these steps for final assembly.
4.1. Unpacking and Initial Frame Setup
Carefully remove the tricycle and all components from the packaging. Cut any zip ties or protective wrapping.
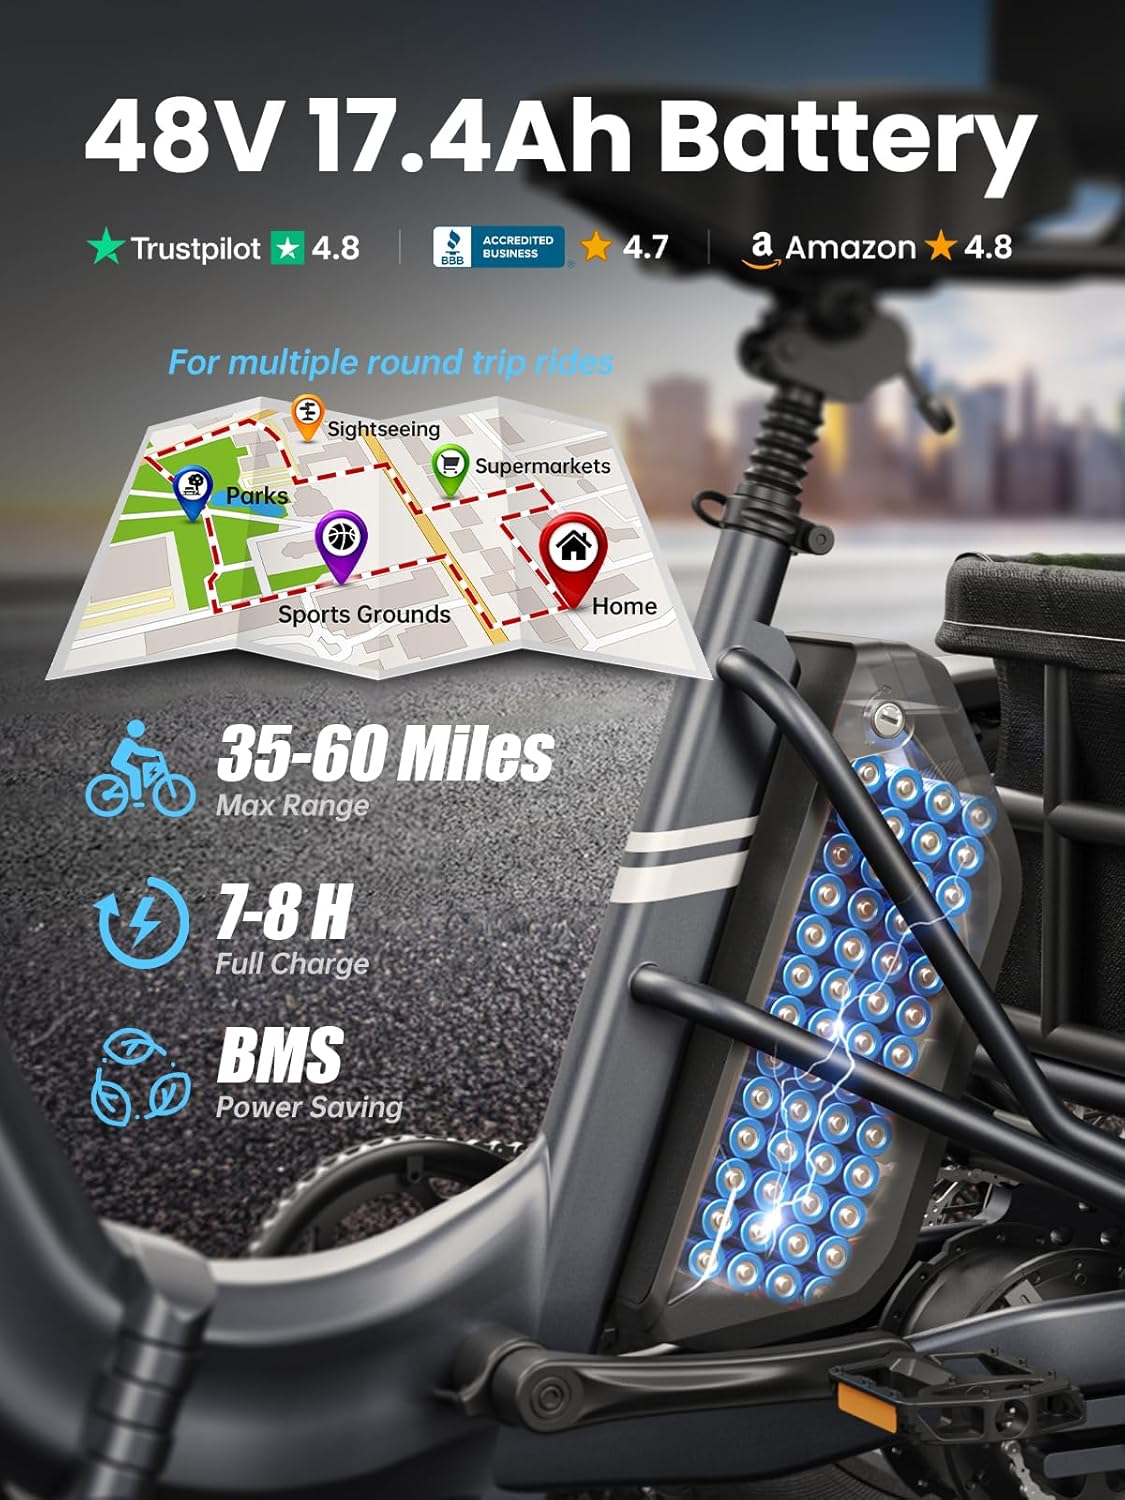
Image: The PUCKIPUPPY Electric Tricycle and its components after being unpacked.
Rotate the folding frame to align it horizontally, then flip the latch to lock the frame securely in place.
4.2. Handlebar Installation
- Insert the handlebar stem into the trike's head tube.
- Unfasten the handlebar clamp.
- Loosen the screw on top of the stem.
- Rotate the handlebar to the correct riding position.
- Fully tighten the screw on top of the stem.
- Finally, tighten the handlebar clamp to secure it.
4.3. Front Wheel Assembly
- Remove the bracket from the front fork.
- Remove the plastic protection sheet from the front brake caliper.
- Remove the nuts from the front wheel axle.
- Mount the front wheel onto the front fork, ensuring the brake rotor aligns with the caliper.
- Tighten the nuts with a wrench to secure the tire.

Image: Detailed view of the front wheel and fork, showing the brake disc and axle.
4.4. Fender and Light Installation
- Install the front wheel fender by attaching its supports to the front fork.
- Install the front light to its designated position on the front fork and tighten the screws.
- For the rear mudguards, install the linkage to each mudguard and tighten the screws.
- Align the screw holes of the mudguards with the storage basket frame and secure them.
4.5. Rear Storage Basket Assembly
- Secure the storage basket to the rear frame using the pre-drilled holes and provided fasteners.
- Adjust the mudguards to the appropriate height and fix all screws.
- Attach the included cloth bag to the inside of the storage basket.

Image: The rear storage basket and mudguards installed on the tricycle.
4.6. Battery Installation
- Insert the 48V 17.4AH battery into its compartment on the tricycle frame.
- Insert the key and turn it to lock the battery securely in place.

Image: The removable 48V 17.4AH battery integrated into the tricycle frame.
4.7. Seat and Pedal Installation
- Insert the seat post with the attached backrest saddle into the frame.
- Adjust the seat height to your preference.
- Tighten and secure the seat post clamp.
- Install the left and right pedals according to their respective 'L' and 'R' logos. Use a wrench to complete pedal installation, ensuring they are tightly secured.

Image: The adjustable seat with backrest, designed for comfort.
4.8. LCD Odometer Mounting
- Mount the LCD odometer to the handlebar in a visible position.
- Connect the necessary cables and tighten the screws to secure the display.

Image: The integrated LCD dashboard displaying speed, gears, and light status.
4.9. Assembly Video Guide
For a visual guide on the assembly process, please watch the official installation video:
Video: PUCKIPUPPY Electric Trike Installation Steps. This video demonstrates the complete assembly process for the electric tricycle.
5. Operating Instructions
5.1. Powering On/Off
- Ensure the battery is securely locked into the frame.
- Locate the power button on the battery and switch it to the 'ON' position.
- On the handlebar, press and hold the power button on the LCD display to start the tricycle. The display will illuminate.
- To power off, press and hold the power button on the LCD display again.
5.2. Riding Modes
Your PUCKIPUPPY Husky Electric Tricycle offers two primary riding modes:
- Pedal Assist Mode: Engage the pedal assist system by pedaling. The motor will provide assistance, making pedaling easier. This mode offers a top speed of up to 20 MPH.
- Electric Throttle Mode: Use the thumb throttle on the handlebar to engage the motor without pedaling. This mode provides a top speed of up to 15 MPH.
The range of 45-60 miles is achievable in pedal assist mode and varies based on factors like road conditions, riding mode, weather, rider's weight, and battery level.
5.3. LCD Dashboard Functions
The integrated LCD dashboard provides real-time information and controls:
- Speed Display: Shows current riding speed.
- Driving Gears: Indicates the current pedal assist level (ECO, Standard, Power).
- Headlight/Taillight Control: Buttons to turn the integrated LED headlight and taillight on or off.
- Battery Level: Displays the remaining battery charge.

Image: The tricycle's safety lighting system, featuring an 800 lumens bright front light and a rear warning lamp.
5.4. Braking System
The tricycle is equipped with all-aluminum alloy triple disc brakes with an integrated parking system and power cutoff sensor for reliable stopping power.
- Squeeze the brake levers to engage the brakes.
- To activate the parking brake, squeeze the levers and jam the brake holes to keep the trike braked when stationary.
6. Maintenance
Regular maintenance ensures the longevity and optimal performance of your electric tricycle.
6.1. Battery Care and Charging
The 48V 17.4AH removable Li-ion battery requires proper care:
- Charging: You can charge the battery directly on the tricycle or remove it for separate charging. Connect the fast-charging charger to the battery and a power outlet. The indicator light on the charger will show charging status (red for charging, green for fully charged). Full charging takes approximately 7-8 hours.
- Storage: Store the battery in a cool, dry place away from direct sunlight and extreme temperatures. If storing for extended periods, charge the battery to 50-70% every 2-3 months.
- Safety: Do not attempt to open or modify the battery pack. Avoid short-circuiting the terminals.

Image: The 48V 17.4AH removable battery, shown during charging.
6.2. General Maintenance Tips
- Tires: Regularly check tire pressure. The 20-inch fat tires require specific pressure for optimal performance and comfort. Refer to the tire sidewall for recommended PSI.
- Brakes: Inspect brake pads and rotors for wear. Ensure brake levers operate smoothly and provide adequate stopping power. Adjust or replace as needed.
- Chain and Drivetrain: Keep the chain clean and lubricated. Check for any loose components in the drivetrain.
- Fasteners: Periodically check all nuts, bolts, and quick-release levers for tightness.
- Cleaning: Clean the tricycle with a damp cloth. Avoid using high-pressure washers directly on electrical components.
7. Troubleshooting
This section addresses common issues you might encounter with your PUCKIPUPPY Husky Electric Tricycle.
| Problem | Possible Cause | Solution |
|---|---|---|
| Tricycle does not power on. | Battery not charged or not properly installed. | Ensure battery is fully charged and securely locked. Check battery power switch is ON. |
| Motor not providing assistance. | Low battery, loose connections, or sensor issue. | Check battery charge. Inspect all electrical connections. Ensure brake levers are not partially engaged. |
| Brakes feel weak or noisy. | Worn brake pads, contaminated rotors, or cable adjustment needed. | Inspect brake pads for wear and replace if necessary. Clean rotors. Adjust brake cable tension. |
| Unusual noises during operation. | Loose components, dry chain, or tire rubbing. | Check all fasteners. Lubricate the chain. Inspect tires for proper alignment and clearance. |
If you encounter an issue not listed here or cannot resolve a problem, please contact PUCKIPUPPY customer service for assistance.
8. Specifications
Key technical specifications for the PUCKIPUPPY Husky Electric Tricycle:
- Model: Husky
- Bike Type: Electric tricycle for adults, Electric cargo trike, 3 wheel electric bike, Step-thru etrike, Folding electric trike, Fat tire electric trike
- Age Range: Adults (Elderly-friendly, Mobility-impaired-friendly)
- Brand: PUCKIPUPPY
- Number of Speeds: 7
- Color: Gray
- Wheel Size: 20 Inches
- Frame Material: Aluminum
- Suspension Type: Front suspension forks, Seatpost Spring, Backrest Saddle with Shock Absorption
- Special Features: Adjustable Seat, Rear Basket, Dual Disc Brake, Foldable, LCD-Display, Rear Differential
- Brake Style: All Aluminum Alloy Triple Disc Brakes with Integrated Parking System and Power Cutoff Sensor (180mm Large Rotors)
- Power Source: 960W Peak High-Performance Rear Hub Motor & 48V 17.4AH Removable Li-ion Battery
- Lithium Battery Energy Content: 835 Watt Hours
- Maximum Weight Recommendation: 500 Pounds
- Item Weight: 121 Pounds
- Minimum User Height: 5 Feet
- Model Year: 2024
Video: Front and Seat Tube Suspension, Dual Shock Absorption System. This video highlights the comfort features of the tricycle's suspension system.

Image: Illustration of the rear differential, enhancing stability and maneuverability during turns and on complex road surfaces.
9. Warranty and Support
9.1. Warranty Information
PUCKIPUPPY offers the following warranty for your electric tricycle:
- 30-Day Money-Back Guarantee: For 30 days after the date of purchase, you may return your undamaged PUCKIPUPPY product for a refund. To be eligible, the item must be in the same condition as received, unworn, unused, or the ebike must have less than ten (10) miles on the odometer. All original items (charger, keys, hardware, etc.) and original packaging must be included. Proof of purchase is required.
- 3-Year Frame Warranty: The tricycle frame is covered by a 3-year warranty.
- 1-2 Year Accessories and Parts Warranty: All accessories and parts are covered by a 1-2 year warranty.
- Lifelong Technical Consulting Support: PUCKIPUPPY provides lifelong technical consulting support.
9.2. Customer Support
Our professional team is always ready to help PUCKIPUPPY customers. For quality after-sales processing and assistance with any issues, please contact us:
- Telephone: 877-755-9956
- Support Hours: Monday to Friday, 9 AM - 6 PM PST