Introduction
Thank you for choosing the Viaozutis Retro Storage Cabinet. This versatile piece of furniture is designed to enhance your living space with its functional storage solutions and elegant retro aesthetic. Ideal for use as a coffee bar cabinet, a storage unit in the bathroom, kitchen, or living room, it features adjustable shelves and multiple drawers to accommodate various items. This manual provides essential information for assembly, operation, maintenance, and troubleshooting to ensure you get the most out of your new cabinet.
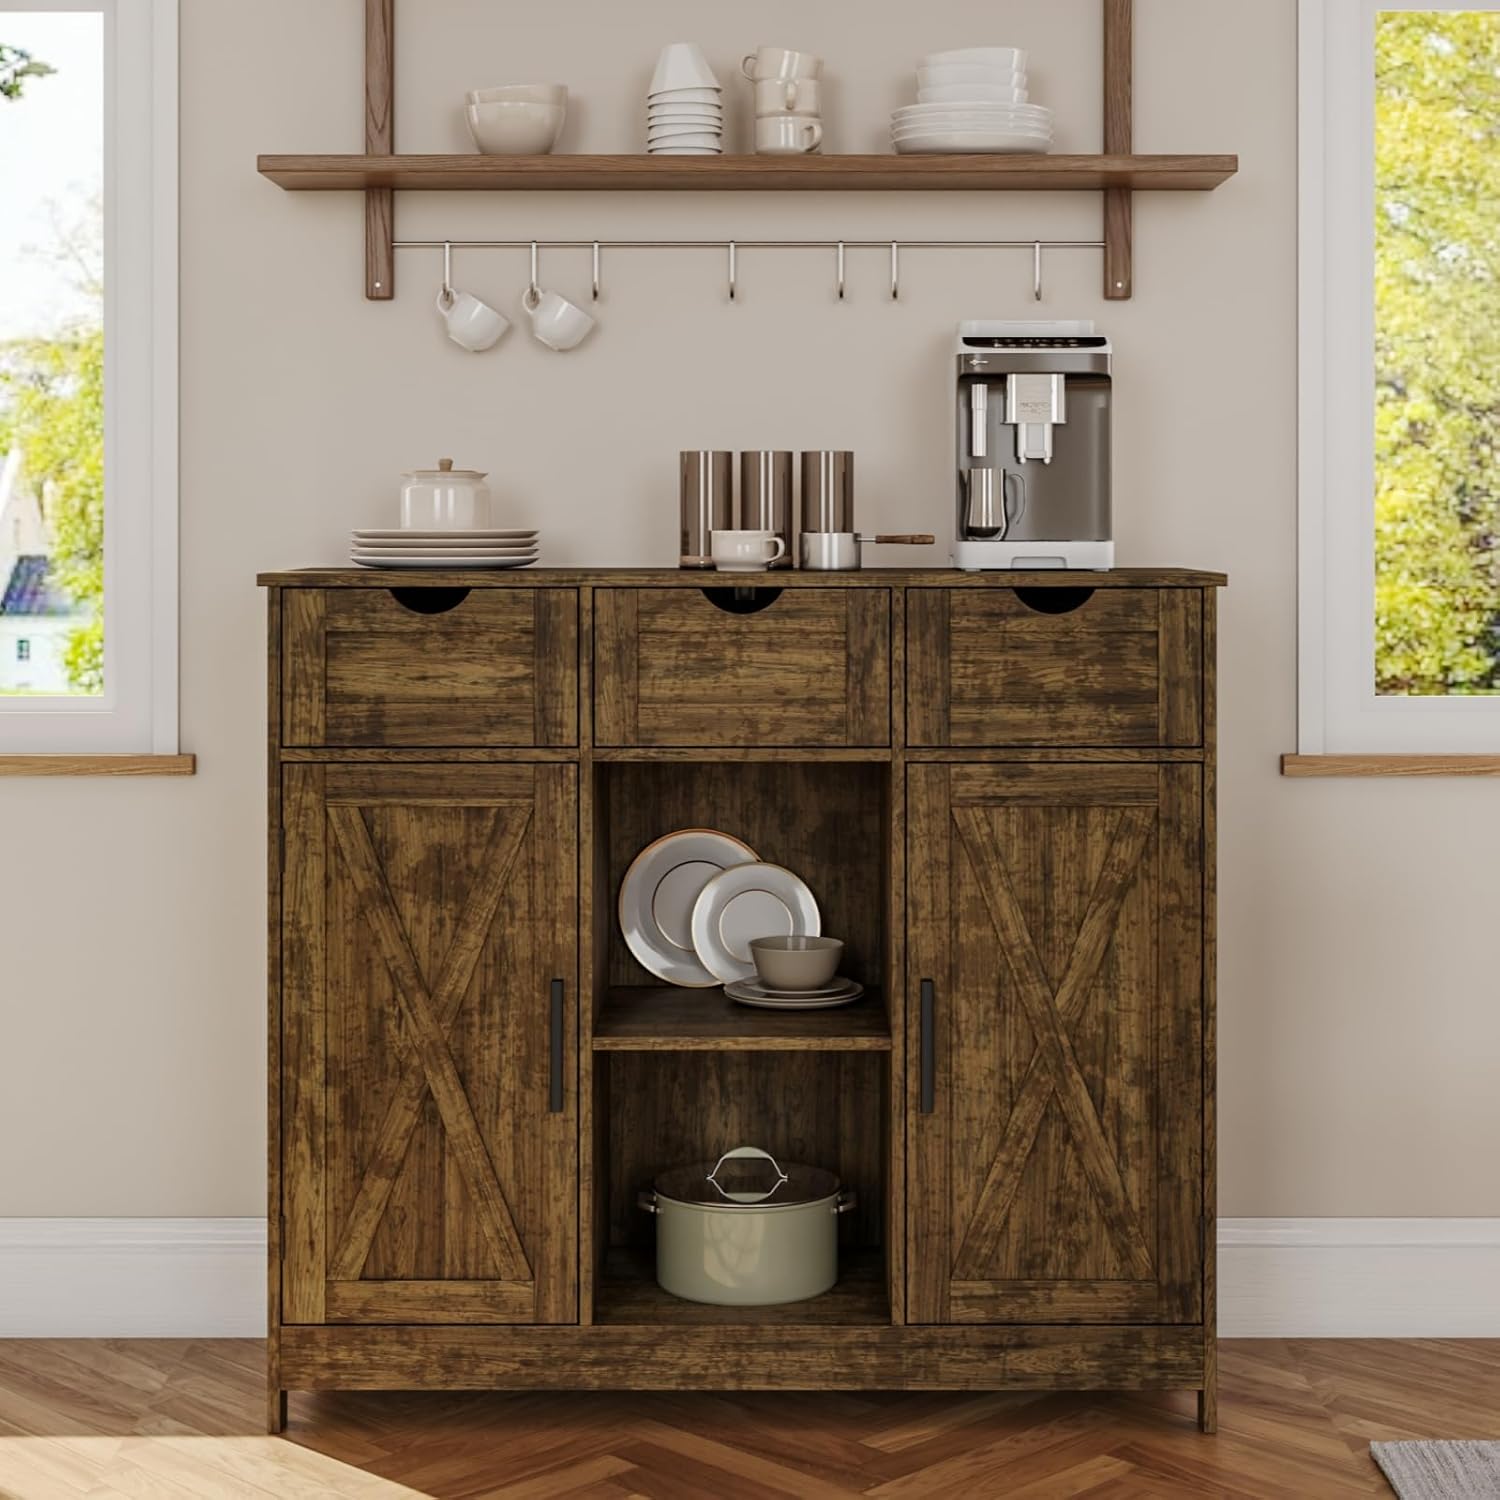
Image 1.1: The Viaozutis Retro Storage Cabinet, showcasing its design and potential placement in a home environment.
Product Features
- High-Quality Material: Constructed from premium medium-density fiberboard, ensuring durability and a long lifespan. Its stylish appearance and exquisite craftsmanship add elegance to any room.
- Adjustable Shelves: Features two adjustable shelves, allowing for customized storage configurations based on item size and height, maximizing space efficiency.
- Ample Storage: Includes three spacious drawers and two cabinet doors, providing diverse storage options for various household items.
- Compact Design: With dimensions of 11.81"D x 35.43"W x 31.49"H, it is designed to fit well in smaller spaces while still offering significant storage capacity.
- Easy Assembly: Comes with clearly numbered parts and step-by-step instructions for straightforward and frustration-free assembly.
- Sturdy and Safe: Equipped with anti-tip hardware to ensure stable and secure placement, enhancing safety in your home.
Product Specifications
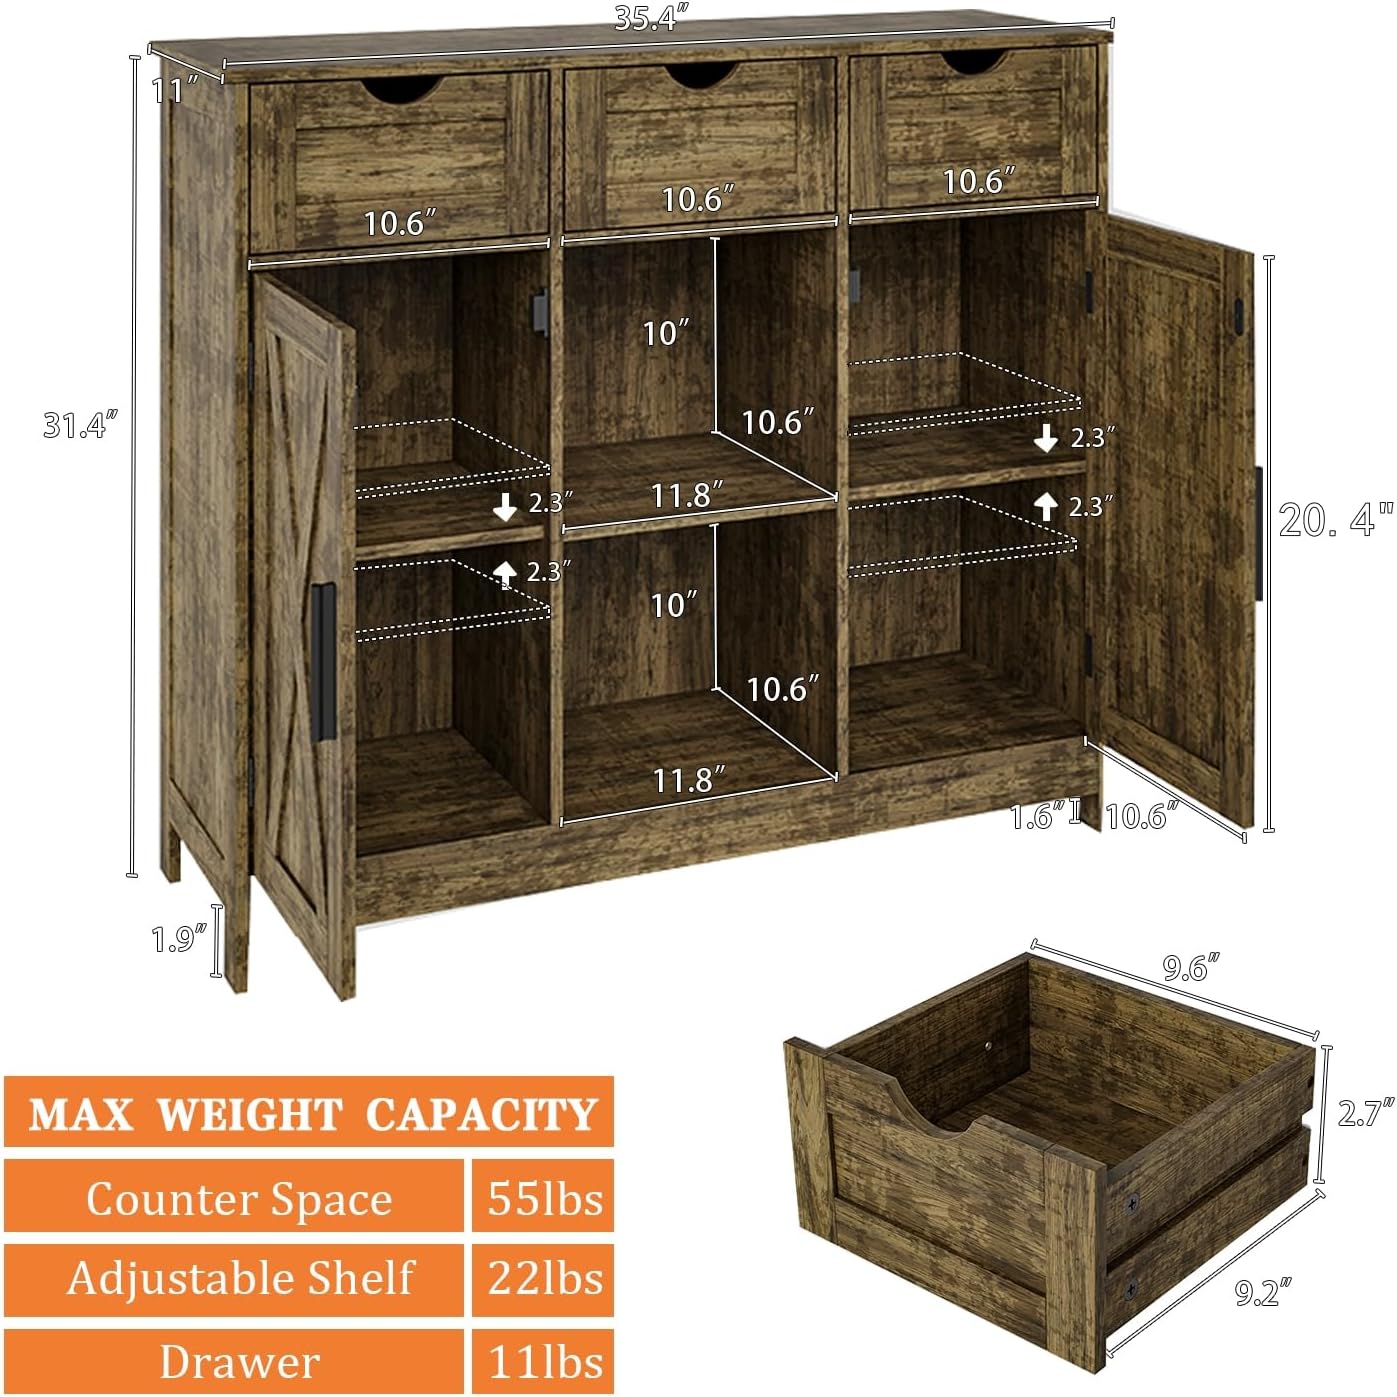
Image 2.1: Detailed dimensions and maximum weight capacities for the cabinet's counter space, adjustable shelves, and drawers.
| Specification | Detail |
|---|---|
| Brand | Viaozutis |
| Model Name | a |
| Item Model Number | a-3 |
| Color | Retro |
| Product Dimensions | 11.81"D x 35.43"W x 31.49"H |
| Item Weight | 42.4 pounds |
| Material | Engineered Wood |
| Number of Shelves | 2 (adjustable) |
| Number of Drawers | 3 |
| Mounting Type | Freestanding |
| Assembly Required | Yes |
| UPC | 029082711239 |
Setup and Assembly
Before You Begin
- Unpack all components and verify against the parts list provided in your packaging.
- Ensure you have all necessary tools, typically a Phillips head screwdriver and a hammer (not included).
- Assemble on a soft, clean surface to prevent scratching the cabinet's finish.
- Keep children and pets away from the assembly area.
Assembly Steps
Follow the detailed, step-by-step instructions and diagrams included in your product packaging. Each part is clearly numbered for easy identification. The general assembly process involves:
- Frame Assembly: Connect the side panels, top, and bottom panels using the provided hardware. Ensure all connections are secure.
- Back Panel Installation: Attach the back panel to the assembled frame. This adds stability to the unit.
- Drawer Construction: Assemble the three drawers according to the instructions. Install the drawer slides onto both the drawers and the cabinet frame.
- Door Installation: Attach the two cabinet doors using the provided hinges. Ensure the hinges are properly aligned for smooth operation.
- Shelf Placement: Insert the adjustable shelves into your desired positions within the cabinet compartments.
- Hardware Attachment: Securely attach all handles and knobs to the drawers and doors.
- Anti-Tip Hardware: For safety, install the anti-tip hardware to secure the cabinet to a wall, especially if placing it in a high-traffic area or a home with children or pets.


Image 3.1: Examples of hardware components such as hinges and handles, crucial for assembly.
Operating Instructions
Adjusting Shelves
The cabinet features two adjustable shelves, allowing you to customize the storage space to fit items of various heights. To adjust a shelf:
- Empty the shelf of all contents.
- Carefully lift the shelf and remove the shelf pins from their current holes.
- Reinsert the shelf pins into the desired new holes, ensuring they are level.
- Place the shelf back onto the pins, ensuring it is stable before placing items on it.

Image 4.1: The cabinet's interior, highlighting the adjustable shelf feature for flexible storage.

Image 4.2: Detail of the adjustable shelf pin system, illustrating how to change shelf height.
Using Drawers and Doors
The three drawers operate on smooth slides for easy opening and closing. The two cabinet doors are equipped with sturdy hinges for reliable access to the interior compartments.
- Avoid overloading drawers to ensure smooth operation and prevent damage to the slides.
- Close drawers and doors gently to prevent wear and tear.
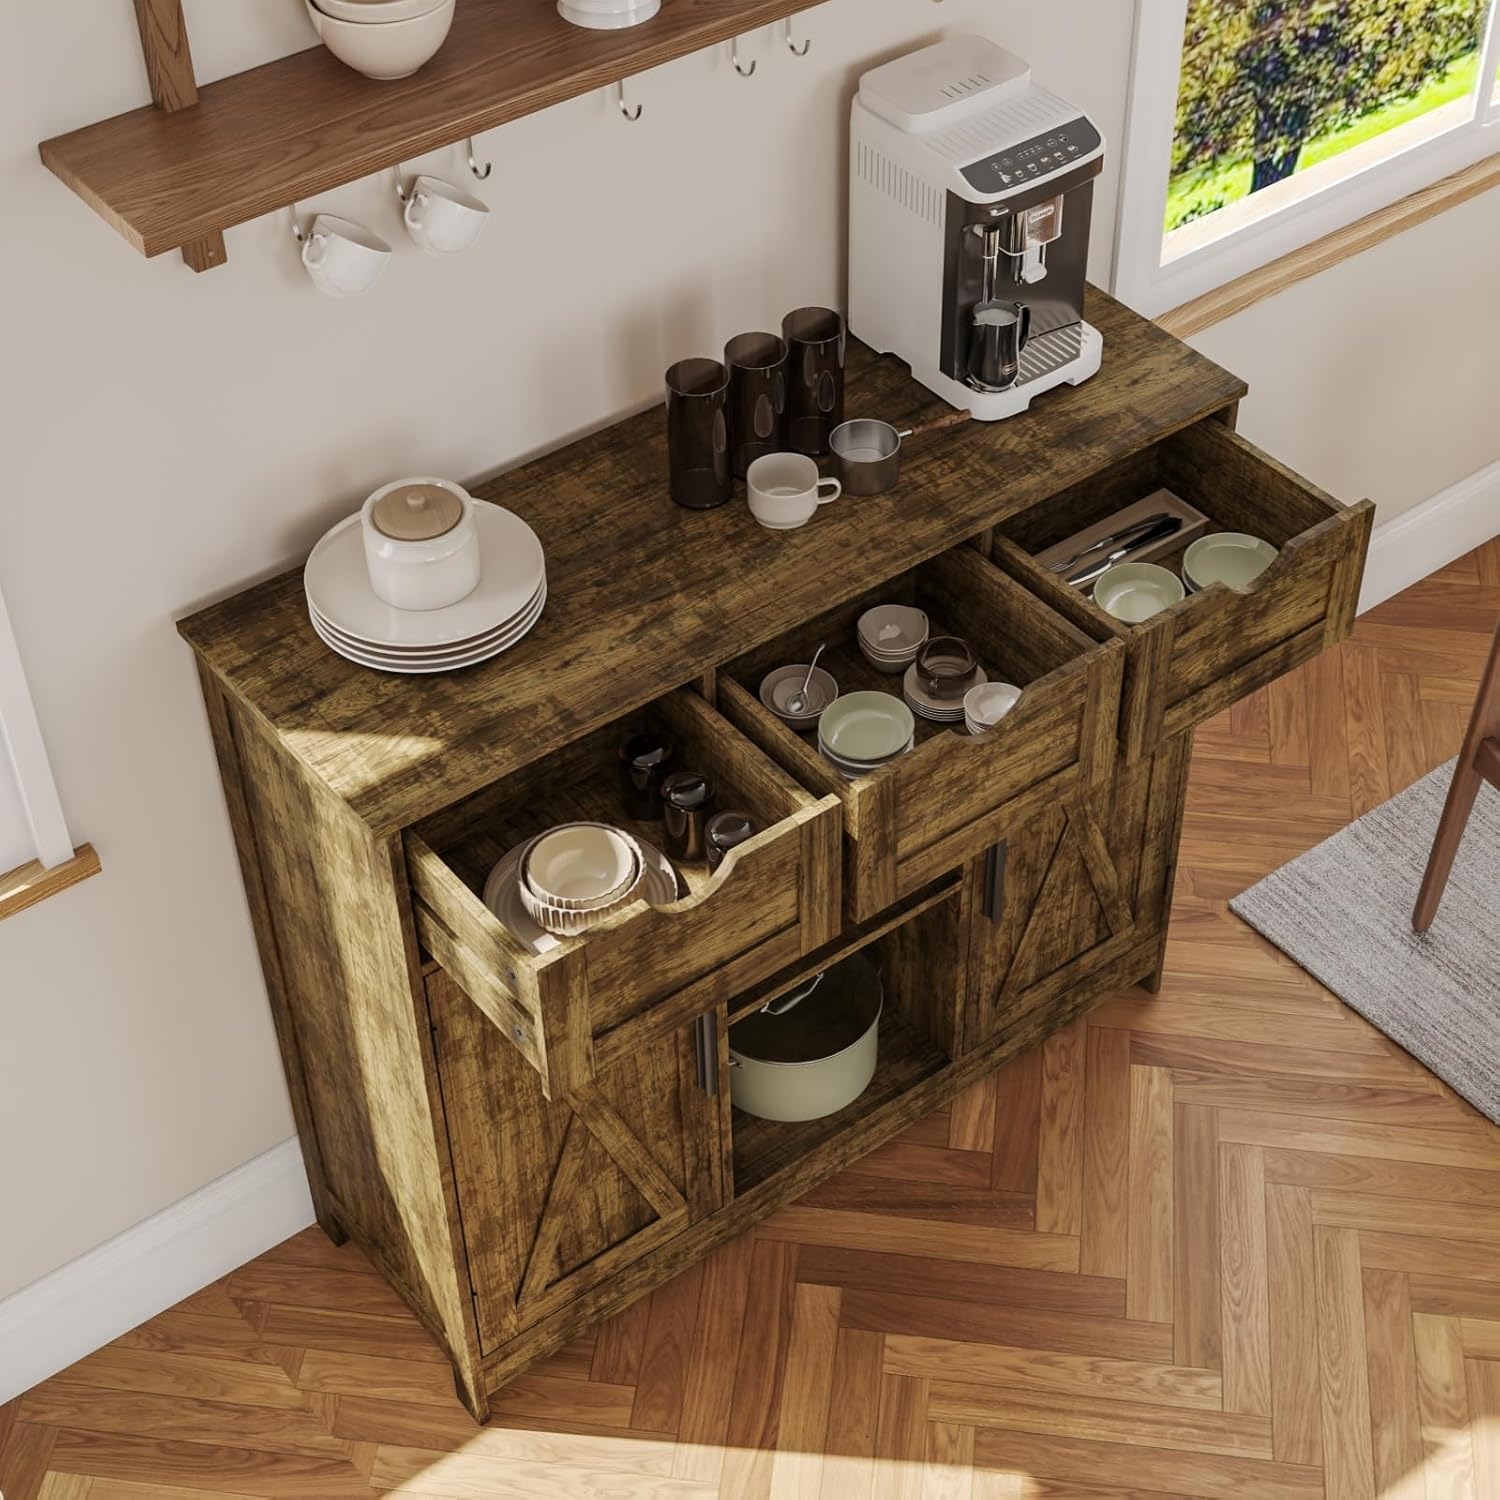
Image 4.3: The cabinet with drawers extended, demonstrating their capacity for organizing smaller items.
Care and Maintenance
Proper care will help maintain the appearance and longevity of your Viaozutis Retro Storage Cabinet.
- Cleaning: Wipe surfaces with a soft, damp cloth. Avoid using harsh chemicals, abrasive cleaners, or polishes that may damage the finish.
- Spills: Immediately wipe up any spills to prevent moisture damage or staining.
- Sunlight Exposure: Avoid prolonged exposure to direct sunlight, which can cause fading or discoloration of the finish.
- Heat and Moisture: Do not place hot items directly on the surface. Use coasters or protective pads. Keep the cabinet away from excessive moisture or humidity.
- Hardware: Periodically check and tighten all screws and hardware to ensure stability.
Troubleshooting Common Issues
| Problem | Possible Cause | Solution |
|---|---|---|
| Cabinet is wobbly or unstable. | Loose hardware; uneven floor. | Check and tighten all assembly screws. Ensure the cabinet is on a level surface; use shims if necessary. Install anti-tip hardware. |
| Drawers do not slide smoothly. | Misaligned drawer slides; overloaded drawer; debris in slides. | Verify drawer slides are correctly installed and aligned. Reduce weight in the drawer. Clean any dust or debris from the slides. |
| Cabinet doors do not close properly. | Misaligned hinges; obstruction. | Adjust the hinges to realign the doors. Check for any items obstructing the door's path. |
| Surface scratches or minor damage. | Accidental impact; abrasive cleaning. | For minor scratches, use a furniture repair marker or wood filler that matches the finish. Avoid abrasive materials for cleaning. |
Warranty and Customer Support
For any questions, concerns, or issues not covered in this manual, please contact Viaozutis customer support. Refer to your purchase documentation for specific warranty details and contact information. Please have your model number (a-3) and purchase date ready when contacting support.
Manufacturer: Viaozutis
For the most up-to-date support information, please visit the official Viaozutis store on Amazon: Viaozutis Store