1. Introduction
This manual provides detailed instructions for the installation, operation, and maintenance of your SAMA V60 Mid-Tower PC Case. The SAMA V60 is designed to accommodate a wide range of PC components, offering excellent cooling performance and a modern aesthetic with its curved tempered glass panels. Please read this manual thoroughly before beginning your PC build to ensure proper assembly and functionality.
2. Features
- Elegant Curved Glass Design: Two curved tempered glass panels provide a wide view of internal components.
- Exceptional Cooling Performance: Pre-installed with 7 ARGB PWM fans and an integrated fan hub for efficient thermal management.
- Wide Compatibility: Supports ATX, MATX, ITX, and Back Connect motherboards. Accommodates GPUs up to 445mm, CPU air coolers up to 160mm, and ATX power supplies up to 210mm.
- Advanced Connectivity: Front I/O panel includes USB Type-C, USB 3.0 (x2), and audio ports.
- Durable & Functional Design: Constructed with SPCC steel and tempered glass, featuring top and bottom dust filters for easy maintenance.
- Generous Storage Space: Supports up to 2 x 3.5-inch HDDs or 2 x 2.5-inch SSDs with shared brackets, and 7 PCI expansion slots.
- Liquid Cooling Support: Compatible with 360mm AIO radiators on the top and bottom.
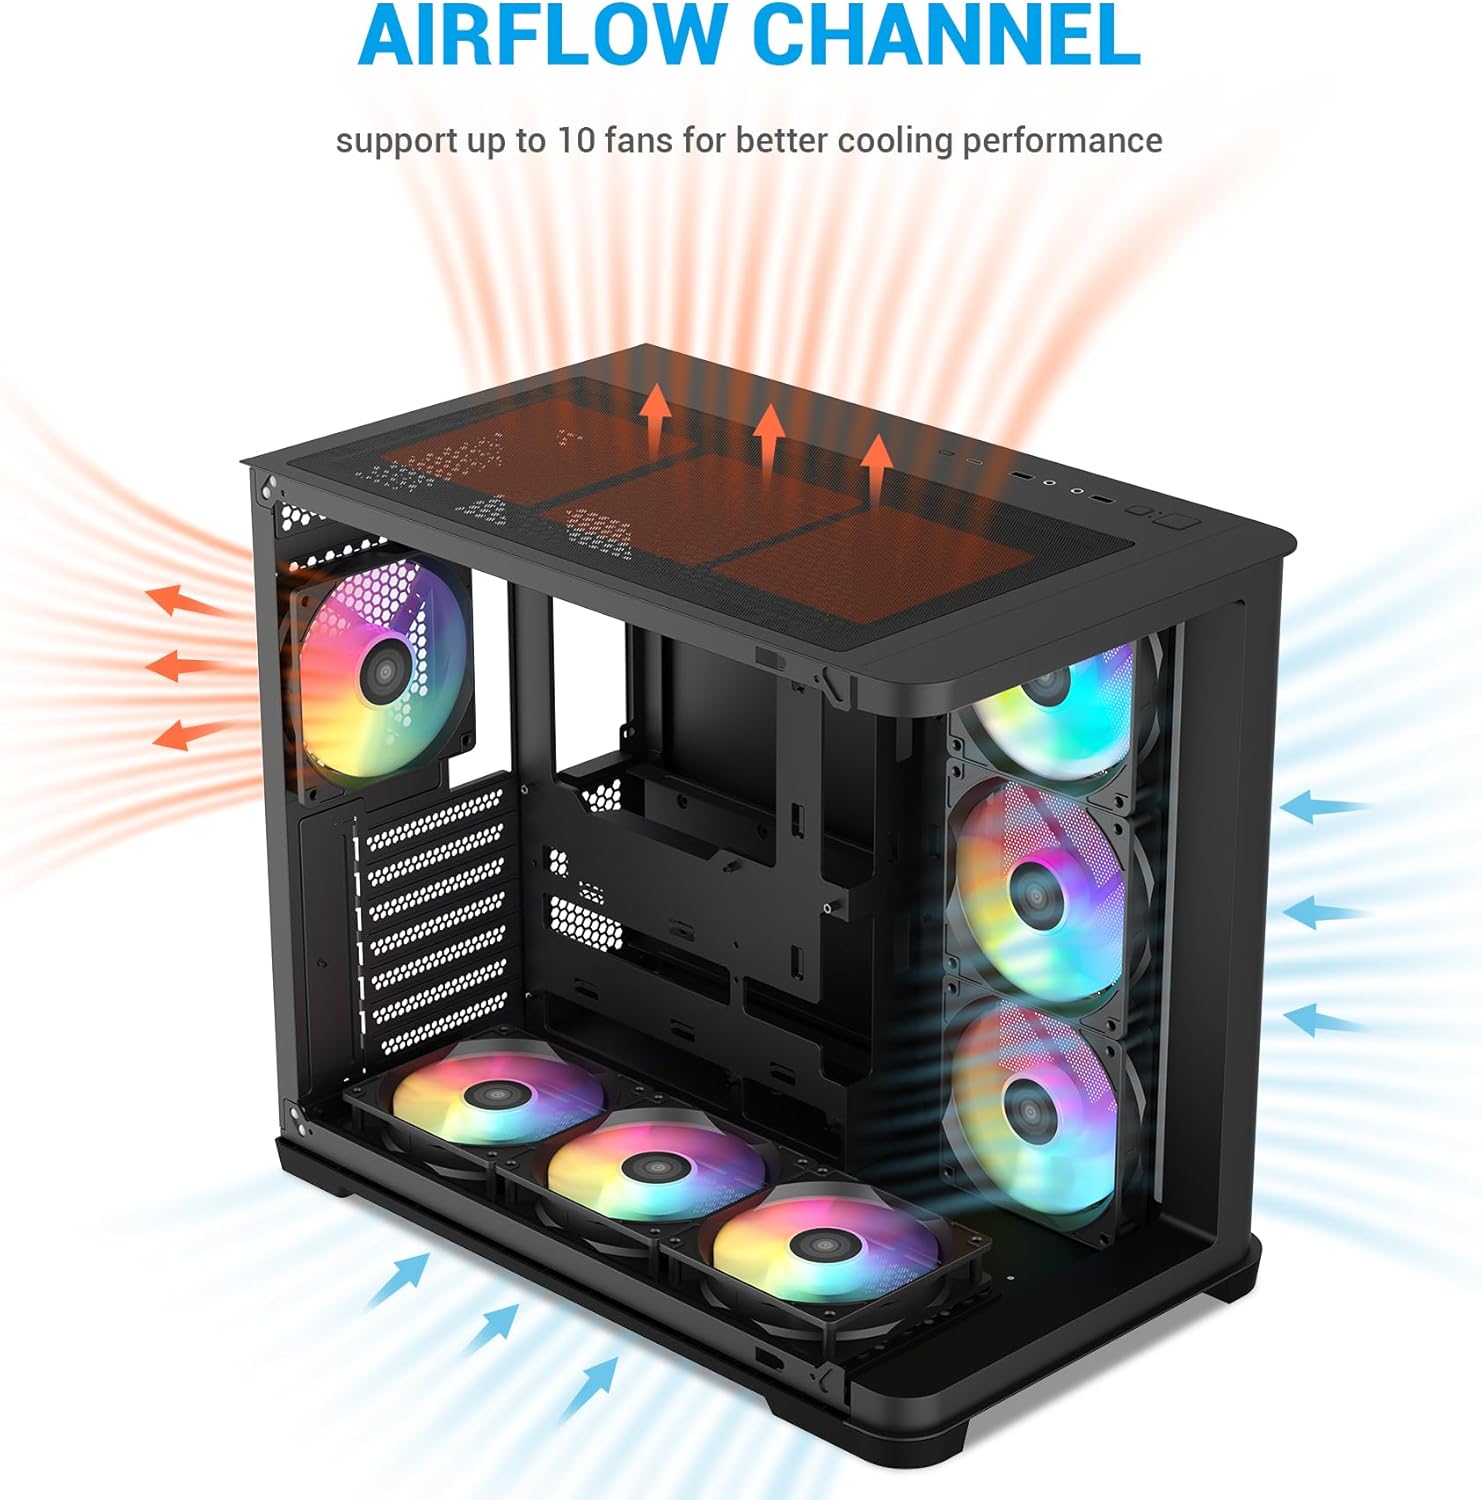
Figure 2.1: Overview of SAMA V60 PC Case with pre-installed fans and dimensions (475mm x 285mm x 398mm).

Figure 2.2: The SAMA V60 features dual curved tempered glass panels for a wide-angle view and enhanced visual appeal.
3. Specifications
| Specification | Detail |
|---|---|
| Model Name | V60 |
| Case Type | Mid Tower |
| Dimensions (D x W x H) | 475mm x 285mm x 398mm |
| Material | Alloy Steel, Tempered Glass |
| Motherboard Compatibility | ATX, MATX, ITX, Back-Connect |
| Pre-installed Fans | 7 x ARGB PWM Fans (1x Rear 120mm, 6x Side/Bottom 120mm Reverse) |
| Fan Support | Up to 10 fans (120mm x 10 or 140mm x 4) |
| Radiator Support | Top: 360/280/240/140/120mm, Bottom: 360/240/120mm, Side: 280/240/140/120mm, Rear: 120mm |
| GPU Length Clearance | Up to 445mm |
| CPU Cooler Height Clearance | Up to 160mm |
| PSU Length Clearance | Up to 210mm |
| Drive Bays | 2 x 3.5" HDD (shared), 2 x 2.5" SSD (shared) |
| Expansion Slots | 7 |
| Front I/O Ports | 1 x USB Type-C, 2 x USB 3.0, HD Audio, Reset Button, Power Button, LED Control Button |
| Item Weight | 8.2 kg |

Figure 3.1: Diagram illustrating CPU cooler height, graphic card length, and AIO/fan support for the SAMA V60 case.
4. Setup Guide
Follow these steps for assembling your PC components within the SAMA V60 case.
4.1 Motherboard Installation
- Ensure the correct standoffs are installed for your motherboard size (ATX, MATX, or ITX).
- Carefully place your motherboard into the case, aligning it with the standoffs and I/O shield opening.
- Secure the motherboard with screws.

Figure 4.1: Motherboard support areas for ITX, M-ATX, and ATX form factors within the SAMA V60 case.
4.2 Storage Device Installation
The SAMA V60 supports 3.5" HDDs and 2.5" SSDs.
- Locate the drive plate behind the motherboard tray and the bottom fan position for shared 3.5" HDD and 2.5" SSD brackets.
- Mount your storage devices using the provided screws.

Figure 4.2: Locations for 3.5" HDDs and 2.5" SSDs, along with PSU clearance, in the SAMA V60 case.
4.3 Power Supply Unit (PSU) Installation
- Install your ATX power supply (up to 210mm) into the designated rear mount area.
- Secure the PSU with screws.
4.4 Graphics Card (GPU) and Expansion Card Installation
- Remove the necessary PCI expansion slot covers.
- Insert your GPU (up to 445mm) or other expansion cards into the PCIe slots on your motherboard.
- Secure the cards with screws.
4.5 Fan and Radiator Installation
The SAMA V60 comes with 7 pre-installed ARGB PWM fans. Additional fans or radiators can be installed as needed.
- For optimal airflow, ensure fans are oriented correctly (intake/exhaust).
- Connect the pre-installed fan hub to your power supply via the SATA cable.
- Connect the fan hub's ARGB cable to your motherboard's 3-pin 5V ARGB header for software control, or use the case's LED button for built-in effects.

Figure 4.3: Connect the SATA cable (male) from the fan control panel to the SATA cable (female) from the power supply.
5. Operating Instructions
5.1 Front Panel I/O Usage
The front panel provides convenient access to essential ports and controls.
- Power Button: Turns the PC on or off.
- Reset Button: Restarts the PC.
- USB Type-C: For connecting modern peripherals.
- USB 3.0 (x2): For high-speed data transfer.
- HD Audio (Headset): For connecting headphones and microphones.
- LED Button: Controls the lighting effects of the pre-installed ARGB fans.

Figure 5.1: Diagram of the front panel I/O, including LED, Type-C, Headset, USB 3.0, Reset, and Power buttons.
5.2 ARGB Fan Control
The pre-installed ARGB fans can be controlled via the case's LED button or synchronized with your motherboard's ARGB software.
- Case Button Control: Press the LED button on the front panel to cycle through various pre-set ARGB lighting modes.
- Motherboard Software Sync: To control fan colors using your motherboard's ARGB software (e.g., ASUS Aura Sync, MSI Mystic Light), hold down the LED button on the case for several seconds until the fans switch to sync mode. Ensure the fan hub's ARGB cable is connected to your motherboard's 3-pin 5V ARGB header.
6. Maintenance
6.1 Dust Filter Cleaning
The SAMA V60 is equipped with magnetic dust filters on the top and bottom to prevent dust accumulation.
- Gently remove the magnetic dust filters from the top and bottom panels.
- Clean the filters using compressed air or by rinsing them with water. Ensure they are completely dry before reattaching.
- Reattach the filters to their respective positions.

Figure 6.1: Locations of the removable magnetic dust filters on the top and bottom of the SAMA V60 case.
6.2 General Cleaning
For general cleaning of the case exterior and interior:
- Use a soft, damp cloth to wipe down exterior surfaces. Avoid abrasive cleaners.
- For interior cleaning, use compressed air to remove dust from components and fan blades.
- Handle tempered glass panels with care to avoid scratches or damage.
7. Troubleshooting
7.1 Fans Not Lighting Up or Synchronizing
- Check Power Connection: Ensure the fan hub is properly connected to your power supply via the SATA cable.
- Check ARGB Connection: Verify that the fan hub's 3-pin 5V ARGB cable is securely connected to the corresponding header on your motherboard.
- Switch Control Mode: If using motherboard software for ARGB control, ensure the fan hub is in sync mode. To activate sync mode, hold down the LED button on the case's front panel for several seconds.
- Software Issues: If using motherboard software, ensure it is up-to-date and correctly configured.
7.2 Poor Airflow or High Temperatures
- Clean Dust Filters: Regularly clean the top and bottom dust filters as described in Section 6.1.
- Fan Orientation: Verify that all fans are installed with the correct orientation for intake and exhaust to create an effective airflow path. The SAMA V60 is designed for positive pressure with side and bottom fans as intake, and rear/top fans as exhaust.
- Cable Management: Ensure cables are neatly managed behind the motherboard tray to avoid obstructing airflow.
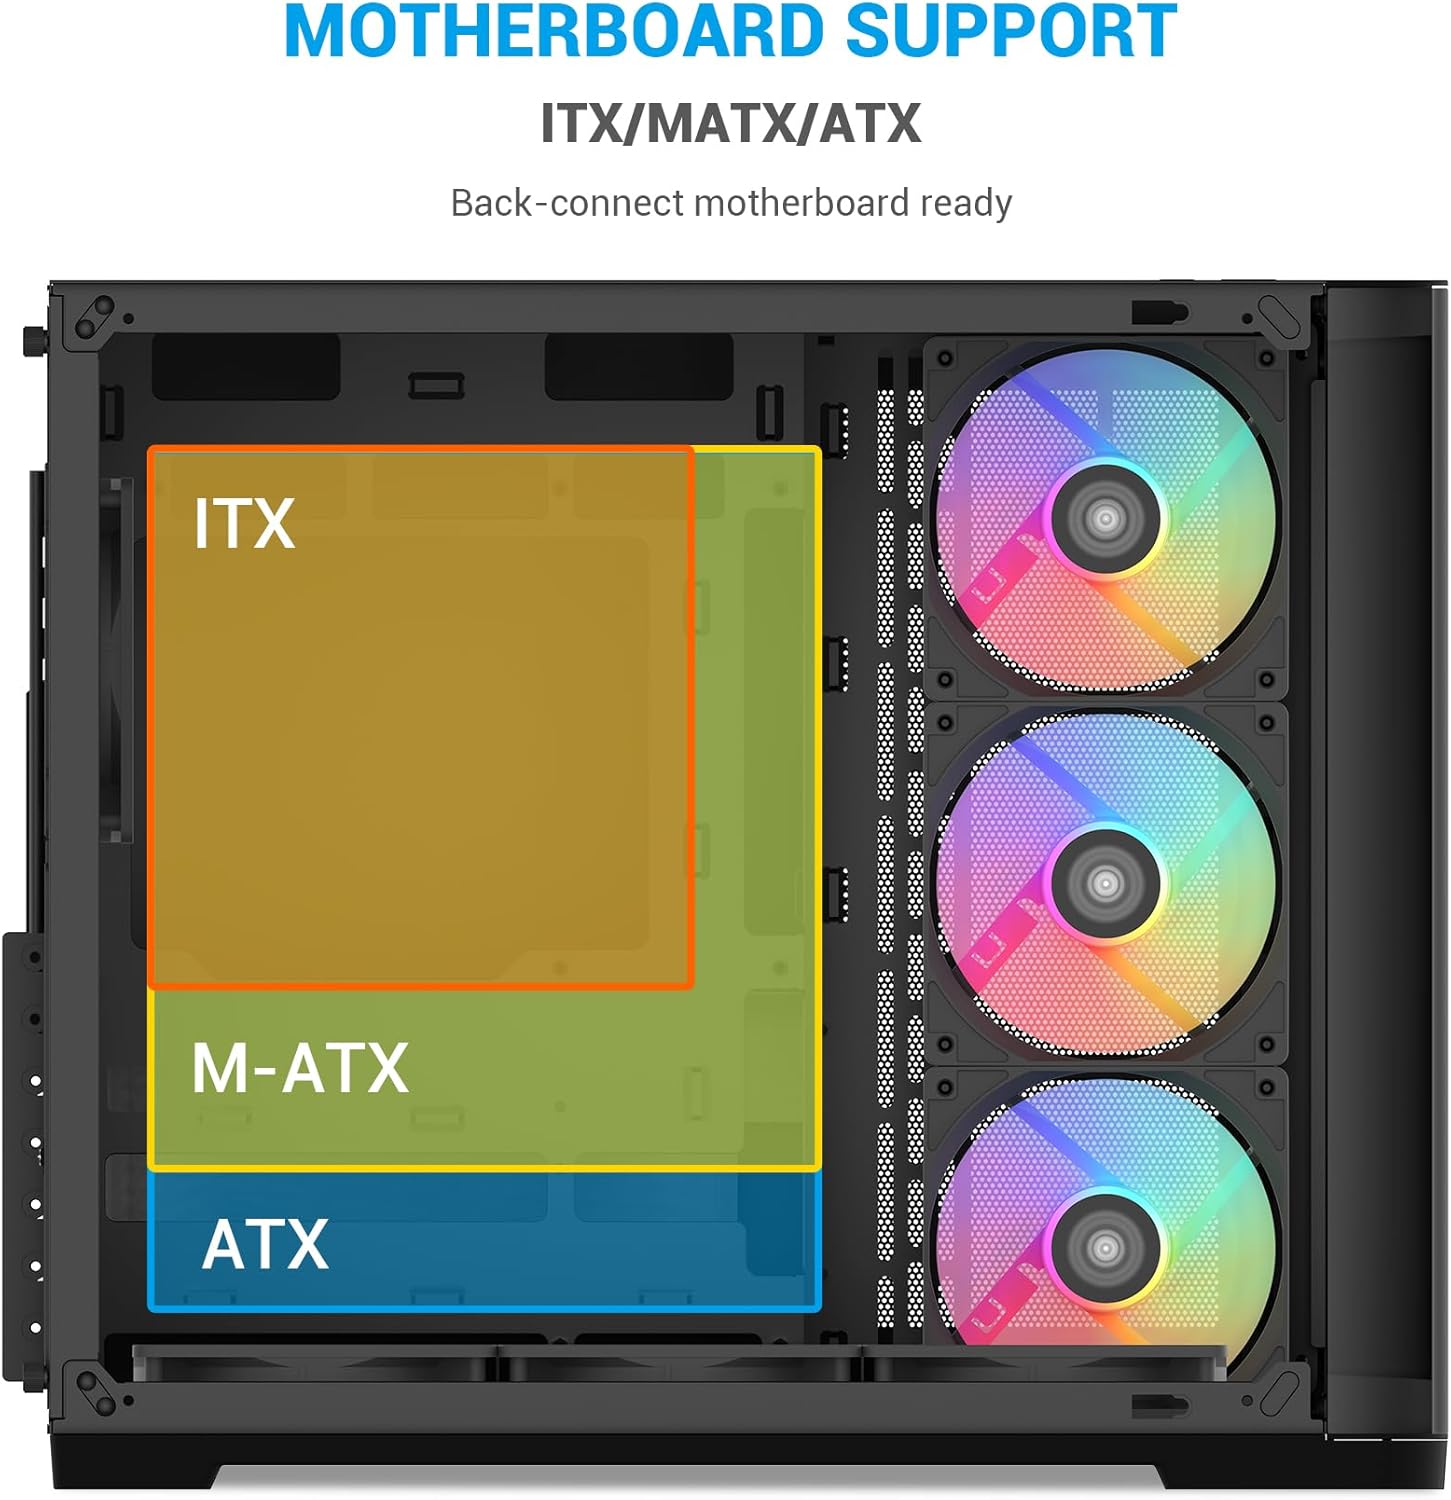
Figure 7.1: Diagram illustrating the optimal airflow channel within the SAMA V60 case, supporting up to 10 fans for better cooling performance.
8. Warranty and Support
For warranty information, technical support, or any inquiries regarding your SAMA V60 PC Case, please refer to the official SAMA website or contact SAMA customer service directly. Keep your proof of purchase for warranty claims.
Official SAMA Website: Visit the SAMA Store