Aheaplus YHCC-10A
Aheaplus YHCC-10A 8FT Wood Closet Organizer System Instruction Manual
Model: YHCC-10A | Brand: Aheaplus
Introduction
This manual provides detailed instructions for the assembly, operation, and maintenance of your Aheaplus YHCC-10A 8FT Wood Closet Organizer System. Please read this manual thoroughly before beginning installation to ensure proper setup and safe use of the product. Retain this manual for future reference.

Image: The Aheaplus 8FT Wood Closet Organizer System, showcasing its central tower with shelves and drawers, flanked by hanging rods and upper shelves, all in a White Oak finish.
Package Contents
Before assembly, verify that all components listed below are present and undamaged. If any parts are missing or damaged, contact Aheaplus customer support.
- Central Tower Unit (with pre-drilled holes for shelves and drawers)
- 4 Wooden Drawers (including slides and hardware)
- Adjustable Shelves for Tower Unit
- 4 Expandable Hanging Rods (26 to 47 inches)
- Wall Mounting Brackets and Hardware
- Assembly Hardware (screws, dowels, cam locks, etc.)
- Instruction Manual

Image: Close-up view highlighting key features: expandable depth rods, adjustable height shelves, and four large wooden drawers within the central tower.
Specifications
| Feature | Detail |
|---|---|
| Model Number | YHCC-10A |
| Brand | Aheaplus |
| Color | White Oak |
| Material | Engineered Wood, Metal |
| Overall Dimensions (Approx.) | 96 inches (Width) x 15.8 inches (Depth) x 80 inches (Height) |
| Hanging Rod Length | Expandable from 26 inches to 47 inches |
| Weight Capacity | Up to 1000 lbs (evenly distributed) |
| Mounting Type | Wall Mount |

Image: Technical diagram illustrating the dimensions and weight capacity of the closet system, including the central tower, hanging rods, and drawers.
Setup and Installation
Tools Required (Not Included):
- Phillips Head Screwdriver
- Drill with appropriate drill bits (for pilot holes and wall anchors)
- Level
- Measuring Tape
- Pencil
- Stud Finder (recommended for secure wall mounting)
- Utility Knife or Scissors (for packaging)
- Safety Glasses (recommended)
Pre-Installation Checklist:
- Unpack all components and lay them out on a clean, soft surface to prevent scratches.
- Identify all parts using the provided parts list in your physical manual.
- Ensure you have all necessary tools.
- Clear the installation area.
- Determine your desired configuration. The system is designed for spaces 4-9 ft wide and can be customized.
Assembly Steps:
Follow the numbered steps provided in the physical assembly guide included with your product. The general sequence is:
- Assemble the Central Tower: Begin by constructing the main tower unit, attaching side panels, top, and bottom.
- Install Drawer Slides: Attach the drawer slides to the interior of the central tower.
- Assemble Drawers: Construct the four wooden drawers and install their corresponding slides. Insert drawers into the tower.
- Attach Wall Mounting Brackets: Secure the wall mounting brackets to the top and sides of the central tower.
- Mount the Central Tower: Position the assembled tower against the wall. Use a stud finder to locate wall studs for secure attachment. Mark and drill pilot holes, then secure the tower to the wall using the provided hardware. Ensure it is level.
- Install Upper Shelves: Attach the upper shelves to the wall above the central tower using the provided brackets. Ensure they are level and securely fastened.
- Install Hanging Rods: Attach the hanging rod brackets to the wall at your desired height. Insert and expand the hanging rods to fit the width of your closet space.
- Adjust Shelves: Place the adjustable shelves within the central tower at your preferred heights.
Note: For optimal stability and safety, it is highly recommended to mount the system directly into wall studs. If studs are not available, use appropriate heavy-duty wall anchors (not always included, may need to be purchased separately based on wall type).
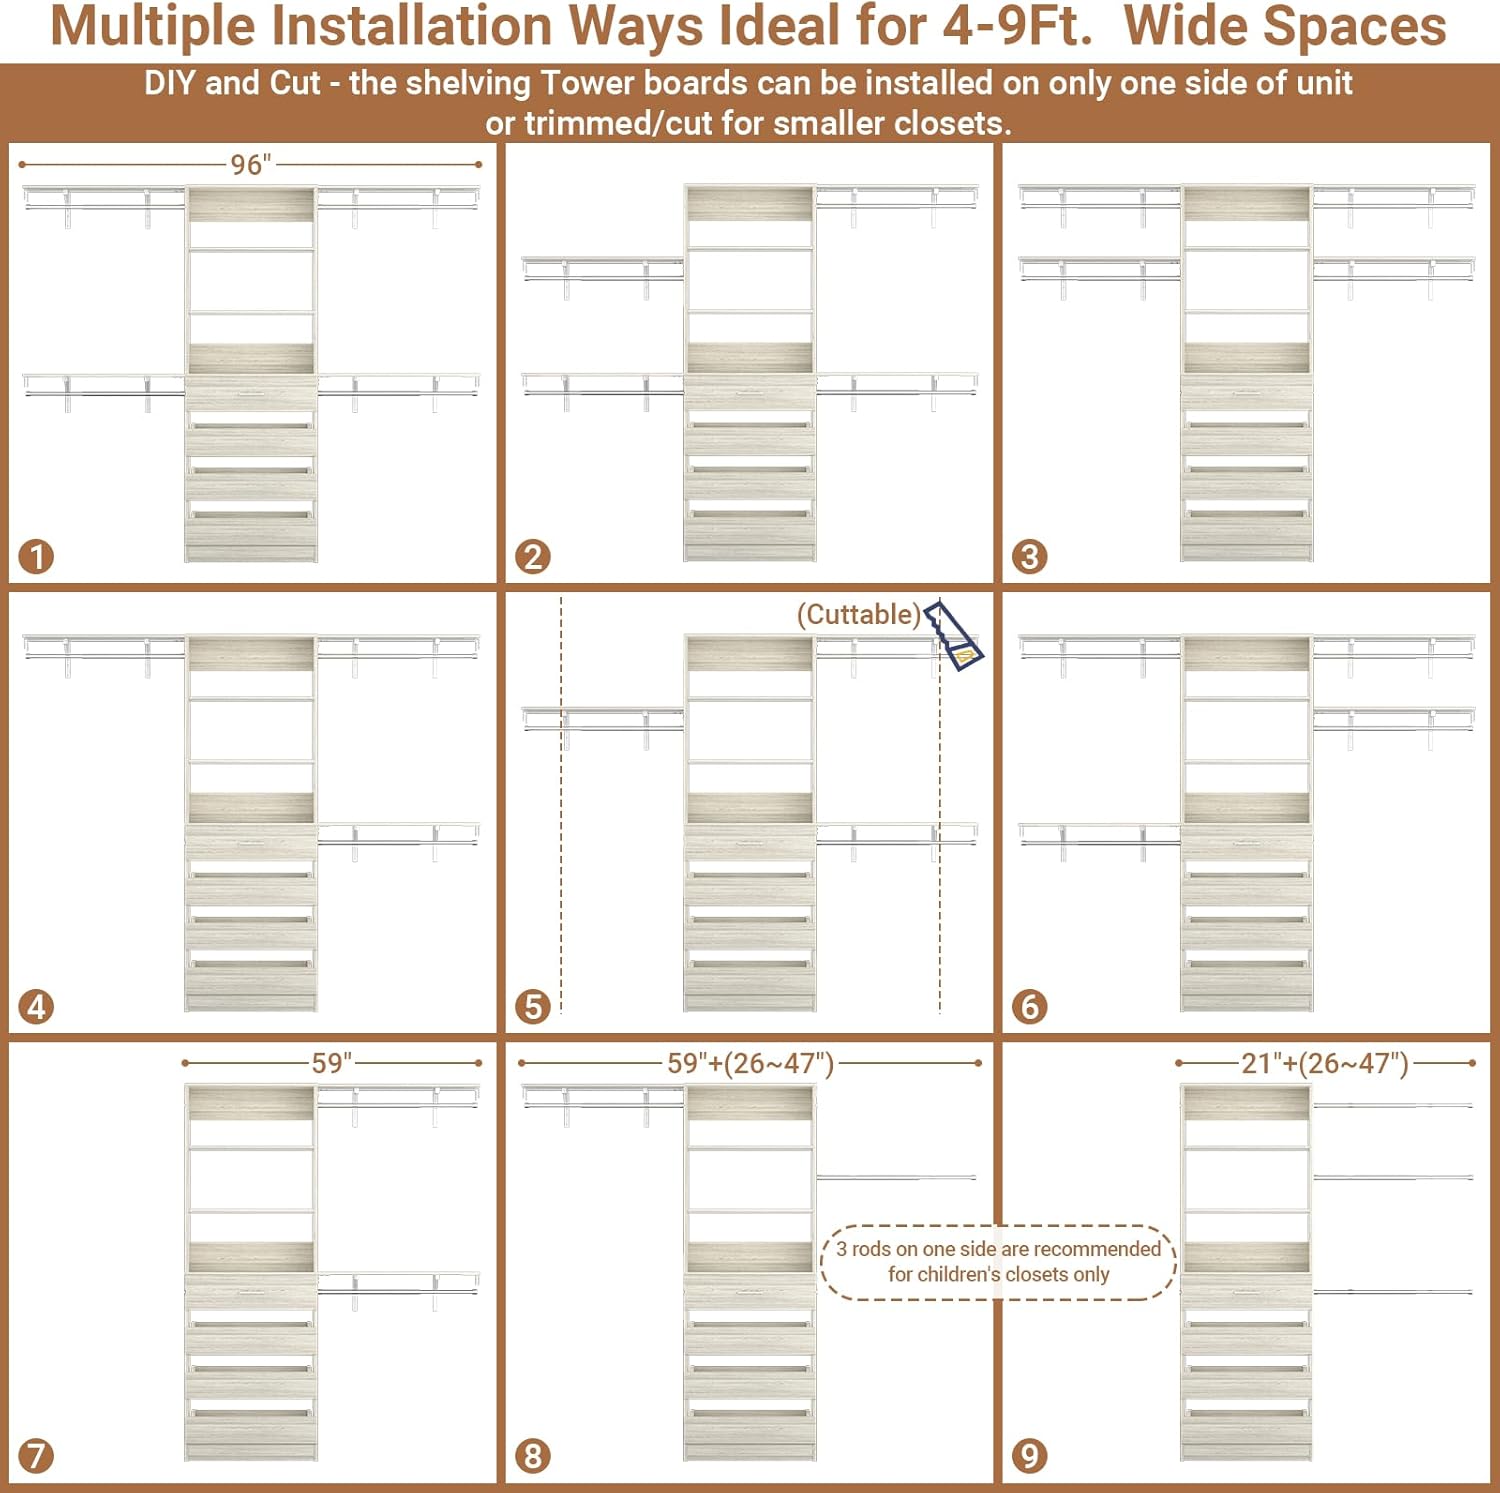
Image: Various installation layouts demonstrating how the Aheaplus closet system can be configured for different closet sizes, including options for cutting shelves to fit.
Operation and Usage
Adjusting Shelves:
The central tower features adjustable shelves. To change the height of a shelf, carefully lift the shelf, remove the support pins from their current holes, reposition them into the desired holes, and then place the shelf back onto the pins. Ensure all four pins are securely seated before placing items on the shelf.
Using Hanging Rods:
The four hanging rods are expandable, allowing them to fit various closet widths. To adjust the length, twist the rod to unlock, extend or retract to the desired length, and then twist in the opposite direction to lock it securely in place. Ensure the rods are firmly seated in their brackets before hanging clothes.
Drawer Usage:
The four wooden drawers operate on smooth glides. Pull the drawer handle to open and push to close. Avoid overloading drawers to ensure smooth operation and prevent damage to the glides.
Care and Maintenance
- Cleaning: Wipe surfaces with a soft, damp cloth. Avoid abrasive cleaners or harsh chemicals that may damage the finish.
- Dusting: Regularly dust all surfaces with a dry, soft cloth.
- Hardware Check: Periodically check all screws and fasteners to ensure they are tight. Retighten if necessary to maintain stability.
- Weight Distribution: Distribute weight evenly across shelves and hanging rods to prevent sagging or damage. Do not exceed the maximum weight capacity of 1000 lbs.
- Avoid Moisture: Keep the closet system away from excessive moisture or humidity to prevent warping or damage to the engineered wood.
Troubleshooting
- Issue: System feels unstable or wobbly.
- Solution: Ensure all wall mounting brackets are securely fastened to wall studs. Check all assembly screws and cam locks for tightness. Verify the unit is level on the floor.
- Issue: Drawers do not slide smoothly.
- Solution: Check for obstructions in the drawer glides. Ensure drawers are not overloaded. Verify that the drawer slides are correctly installed and aligned. Lubricate glides with a silicone-based lubricant if necessary.
- Issue: Hanging rods sag or detach.
- Solution: Ensure the hanging rods are fully expanded and locked into position. Verify that the rod brackets are securely mounted to the wall and that the weight on the rods does not exceed their capacity.
- Issue: Missing parts during assembly.
- Solution: Double-check the package contents against the parts list in the manual. If parts are genuinely missing, contact Aheaplus customer support for assistance.
Warranty and Support
For warranty information, product support, or to order replacement parts, please contact Aheaplus customer service. Refer to the contact information provided in your product packaging or visit the official Aheaplus website.
Aheaplus Customer Service: Please refer to the contact details provided with your purchase or on the Aheaplus official website.
Online Resources: For additional tips, FAQs, and product registration, visit the Aheaplus Brand Store on Amazon.