1. Introduction
The HT617B is a portable 2-channel digital thermometer designed for accurate temperature measurement in various applications, including liquid temperature for blast furnaces and liquid hydrogen. It supports multiple thermocouple types (K, J, T, E, N, S, R) and offers features such as dual-channel input, MAX/MIN/AVG readings, data hold, and temperature difference measurement. This manual provides detailed instructions for the proper use, setup, and maintenance of your device.
2. Package Contents
Please check the package for the following items:
- 1 x Dual Input Thermometer (HT617B)
- 2 x K-Type Thermocouple Probes
- 1 x Carry Case
- 1 x User Manual (English)
3. Product Overview

Figure 3.1: Front view of the HT617B Digital Thermometer, showing the display and control buttons.

Figure 3.2: Labeled diagram of the HT617B, indicating the T1/T2 thermocouple input terminals, high-definition backlit display, and various control buttons.
3.1 Key Components and Buttons
- T1/T2 Thermocouple Probe Input Terminals: Connect K-type or other compatible thermocouple probes here.
- High-definition Backlit Display: Shows temperature readings, units, and various indicators.
- H/☀ (Data Hold / Backlight) Button: Short press to hold current readings; long press to toggle backlight.
- C/F/K SET (Unit Switch) Button: Short press to switch between Celsius (℃), Fahrenheit (℉), and Kelvin (K). Long press for settings.
- T1/T2 T1-T2 (Temperature Difference) Button: Switches between displaying T1, T2, or the difference between T1 and T2.
- TYPE (Thermocouple Type Selection) Button: Selects the type of thermocouple (J, K, T, E, N, S, R).
- REC (MAX/MIN/AVG Selection) Button: Cycles through maximum, minimum, and average temperature readings.
- Power Button: Turns the device on or off.

Figure 3.3: Dimensions of the HT617B Digital Thermometer (133mm x 60mm x 32mm).
4. Specifications

Figure 4.1: Detailed technical parameters for the HT617B Digital Thermometer.
| Function | Range | Accuracy |
|---|---|---|
| Type K | -200.0℃ to +1372℃ / -328.0℉ to +2501℉ | ±[0.15%rdg+1℃(1.8℉)] |
| Type J | -210.0℃ to +1200℃ / -346.0℉ to +2192℉ | ±[0.15%rdg+1℃(1.8℉)] |
| Type T | -200.0℃ to +400℃ / -418.0℉ to +752℉ | ±[0.15%rdg+1℃(1.8℉)] |
| Type E | -150.0℃ to +950℃ / -238.0℉ to +1742℉ | ±[0.15%rdg+1℃(1.8℉)] |
| Type R | 0℃ to +1767℃ / 32℉ to +3212℉ | ±[0.2%rdg+1℃(1.8℉)] |
| Type S | 0℃ to +1767℃ / 32℉ to +3212℉ | ±[0.2%rdg+1℃(1.8℉)] |
| Type N | 0℃ to +1300℃ / -328.0℉ to +2372℉ | ±[0.15%rdg+1℃(1.8℉)] |
| T1-T2 | ±[0.5%rdg+1℃(1.8℉)] | |
| Display | 9999 | |
| Resolution | <1000℃: 0.1℃/℉/K; ≥1000℃: 1℃/℉/K | |
| Dual-channel input | ✓ | |
| Max/Min/Avg | ✓ | |
| Data hold | ✓ | |
| Temperature difference measurement | ✓ | |
| Backlight | ✓ | |
| Relative clock | ✓ | |
| Thermocouple offset | ✓ | |
| Auto power-off | ✓ | |
| Low battery indicator | ✓ | |
| Power | 3 x 1.5V AAA batteries (Not included) | |
| Environmental Conditions | Altitude <2000m | |
| Operating Temperature and Humidity | -20~60℃ (<80% RH) | |
| Storage Temperature and Humidity | -10~60℃ (<70% RH, Remove the battery) | |
| Item Size | 133 * 60 * 32mm / 5.23 * 2.36 * 1.25in | |
| Item Weight | 116g / 4.09oz | |
5. Setup
5.1 Battery Installation
- Locate the battery compartment cover on the back of the device.
- Open the cover by sliding or unscrewing it.
- Insert three (3) 1.5V AAA batteries, ensuring correct polarity (+/-).
- Close the battery compartment cover securely.
5.2 Connecting Thermocouple Probes
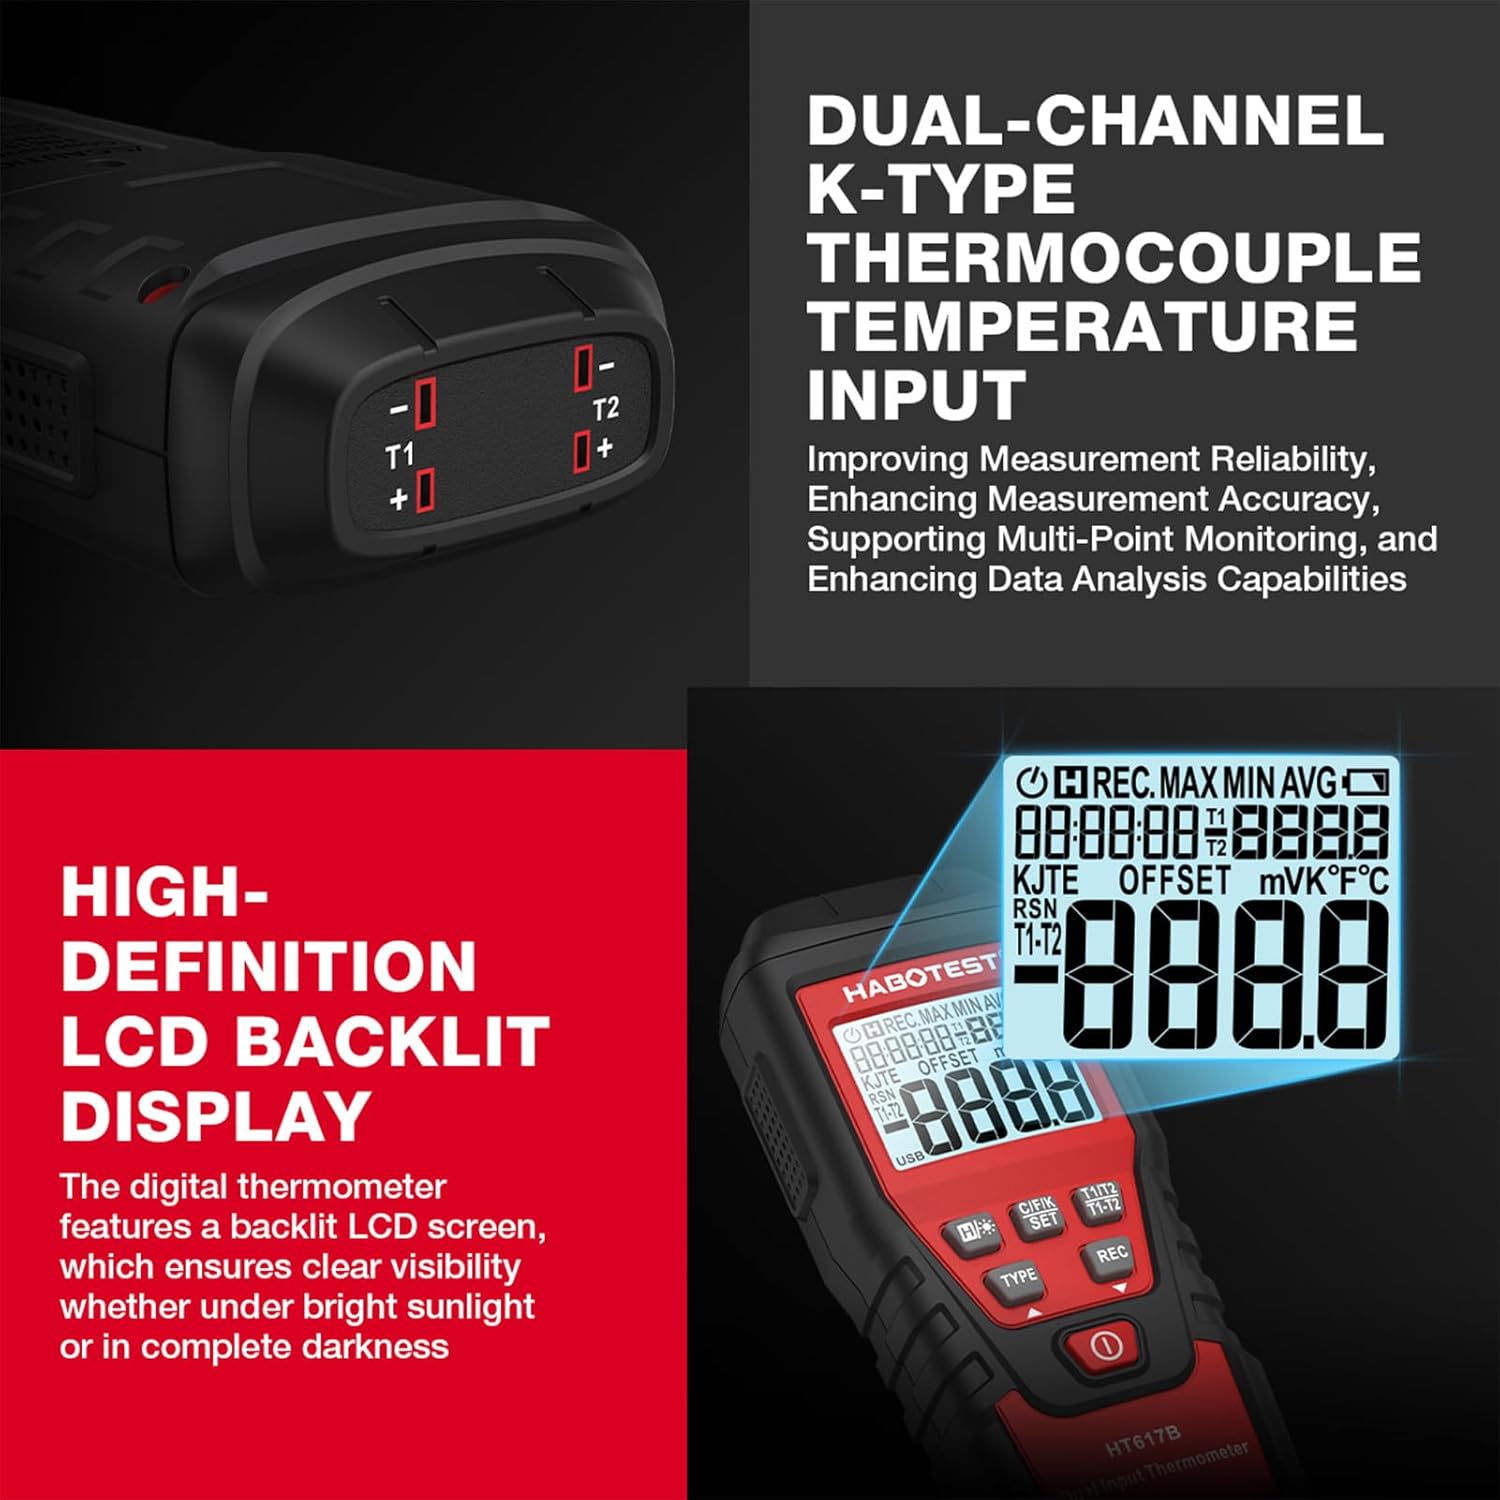
Figure 5.1: Close-up of the dual-channel thermocouple input terminals (T1 and T2).
- Identify the T1 and T2 input terminals at the top of the thermometer.
- Connect the thermocouple probes to the desired input terminals (T1 or T2). Ensure the positive (+) and negative (-) terminals of the probe match those on the thermometer.
- The device is equipped with K-type thermocouples. If using other types, ensure they are compatible and select the correct type in the settings.
6. Operating Instructions
6.1 Power On/Off
Press the Power button (red button at the bottom) to turn the thermometer on or off.
6.2 Unit Switching (℃/℉/K)
Short press the C/F/K SET button to cycle through Celsius (℃), Fahrenheit (℉), and Kelvin (K) temperature units for the displayed readings.
6.3 Thermocouple Type Selection

Figure 6.1: The HT617B supports various thermocouple types including K, J, T, E, R, S, and N.
Press the TYPE button to select the appropriate thermocouple type (J, K, T, E, N, S, R) corresponding to the probe connected. The default is K-type.
6.4 Dual-Channel Measurement
The HT617B can display readings from both T1 and T2 channels simultaneously. The display will show T1 and T2 readings. You can switch the main display and temperature difference display using the T1/T2 T1-T2 button.
6.5 MAX/MIN/AVG Function
Press the REC button to cycle through the maximum (MAX), minimum (MIN), and average (AVG) temperature readings recorded since the function was activated. Press and hold the REC button to clear the recorded data and start a new recording session.
6.6 Data Hold
Short press the H/☀ button to freeze the current temperature reading on the display. Press it again to release the hold and resume live readings.
6.7 Backlight
Long press the H/☀ button to turn the display backlight on or off. The backlight improves visibility in low-light conditions.
6.8 Temperature Difference Measurement (T1-T2)
Press the T1/T2 T1-T2 button to display the temperature difference between the T1 and T2 channels (T1-T2). Press again to return to individual channel display.
6.9 Relative Clock
The device features a relative clock function. Refer to the on-screen indicators for its status.
6.10 Thermocouple Offset
The thermometer includes an electrical compensation function to account for thermocouple errors, enhancing overall accuracy. This can be adjusted via the SET menu (long press C/F/K SET button).
6.11 Auto Power Off
To conserve battery life, the device will automatically power off after a period of inactivity. This feature can typically be disabled or adjusted in the settings menu (long press C/F/K SET button), if desired.
7. Maintenance
7.1 Cleaning
Wipe the device with a soft, damp cloth. Do not use abrasive cleaners or solvents. Ensure the device is dry before storage or next use.
7.2 Storage
When not in use for extended periods, remove the batteries to prevent leakage and damage to the device. Store the thermometer and probes in the provided carry case in a cool, dry place, away from direct sunlight and extreme temperatures. Recommended storage temperature and humidity: -10~60℃ (<70% RH).
7.3 Battery Replacement
When the low battery indicator appears on the display, replace all three AAA batteries promptly to ensure accurate readings and proper operation. Refer to Section 5.1 for battery installation instructions.
8. Troubleshooting
| Problem | Indication | Possible Cause / Solution |
|---|---|---|
| Ambient Temperature Over Indication | Display shows "OL" | The ambient temperature is outside the meter's operating range. Move to an environment within -20~60℃. |
| Measured Object Temperature Over Indication | Display shows "---" | The measured temperature exceeds the thermocouple's or device's maximum range. Ensure the correct thermocouple type is selected and the temperature is within its specified range. |
| Low Battery | Battery symbol displayed | Battery voltage is low. Replace all three 1.5V AAA batteries. |
| Negative Polarity | Automatically displays "-" symbol | This is a normal indication for negative temperature readings. No action required. |
| Inaccurate Readings | Readings seem incorrect | Ensure thermocouple probes are securely connected and the correct thermocouple type is selected. Check for damaged probes. Consider performing a thermocouple offset calibration if available. |
| Device does not power on | No display, no response | Check battery installation and ensure batteries are new or fully charged. |
9. Warranty and Support
For warranty information and technical support, please refer to the documentation provided with your purchase or contact the seller directly. Keep your purchase receipt as proof of purchase for any warranty claims.