1. Product Overview
This manual provides instructions for the installation, operation, and maintenance of your Westinghouse 42-inch Alloy Ceiling Fan (Model 7222500) and its accompanying Four Speed Black Ceiling Fan Remote Control (Model 7787900). The ceiling fan features an oil rubbed bronze finish with reversible walnut and family oak finish blades, and an integrated LED light kit. The remote control offers convenient operation with backlit buttons.
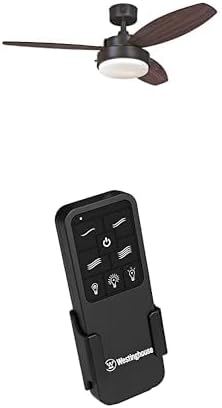
Image 1.1: Westinghouse 42-inch Alloy Ceiling Fan with integrated LED light and the accompanying black remote control unit. The fan features three blades and a central light fixture, while the remote has multiple buttons for fan speed, light control, and power.
2. Safety Information
Read all instructions carefully before beginning installation. Failure to follow these instructions could result in electric shock, fire, or personal injury.
- Ensure the power is turned off at the circuit breaker or fuse box before installation or servicing.
- All wiring must be in accordance with national and local electrical codes. If you are unfamiliar with wiring, consult a qualified electrician.
- The mounting structure must be capable of supporting the weight of the fan (at least 35 lbs).
- Do not operate the fan with damaged blades. Replace any damaged blades immediately.
- Avoid placing objects in the path of the fan blades.
- This fan is designed for indoor use only.
3. Package Contents
Verify that all components are present before beginning installation:
- 42-inch Ceiling Fan unit (Model 7222500)
- Reversible Walnut and Family Oak Finish Blades
- Light Kit with Opal Frosted Glass
- Two (2) Medium Base 8 Watt T7 LED Bulbs
- Four Speed Black Ceiling Fan Remote Control (Model 7787900)
- Remote Control Receiver
- Wall Mounting Bracket for Remote Control
- Down Rod
- Hardware Pack (screws, washers, wire nuts, etc.)
4. Installation and Setup
This ceiling fan is designed for down rod only installation. Professional installation is recommended if you are not familiar with electrical wiring.
4.1 Mounting the Fan
- Turn off power at the circuit breaker.
- Secure the mounting bracket to the ceiling junction box, ensuring it can support the fan's weight.
- Assemble the down rod with the fan motor housing.
- Carefully lift the fan assembly and hang it from the mounting bracket.
4.2 Wiring the Fan and Remote Receiver
The remote control kit includes a receiver that must be wired between the fan and the household electrical supply.
- Connect the receiver wires to the household wiring and the fan wires according to the wiring diagram provided in the fan's packaging. Ensure all connections are secure with wire nuts.
- Carefully tuck the wired receiver into the fan's canopy.
- Attach the fan blades to the motor housing.
- Install the light kit and insert the two 8-watt T7 LED bulbs.
4.3 Remote Control Setup
- Insert batteries (not included) into the remote control.
- Mount the remote control wall bracket in a convenient location using the provided screws.
5. Operation
Once installed and powered on, operate your ceiling fan and light using the remote control.
5.1 Remote Control Functions
- Power Button (⏻): Turns the fan and light On/Off.
- Fan Speed Buttons (≈, ≈≈, ≈≈≈, ≈≈≈≈): Select one of four fan speeds.
- Fan On/Off Button: Toggles the fan motor On or Off independently of the light.
- Light On/Off Button (💡): Toggles the light kit On or Off independently of the fan.
- Dimmer Buttons (↑, ↓): Increase or decrease the brightness of the light kit.
5.2 Summer/Winter Operation (Reverse Function)
The fan features a reverse function for year-round comfort. A switch on the fan motor housing (typically located above the blades) controls the direction of rotation.
- Summer Mode: Blades rotate counter-clockwise, pushing air down to create a cooling breeze.
- Winter Mode: Blades rotate clockwise, drawing air up to circulate warm air trapped near the ceiling.
Always turn off the fan and wait for the blades to stop completely before changing the direction of rotation.
6. Maintenance
Regular maintenance ensures optimal performance and longevity of your ceiling fan.
- Cleaning: Use a soft, damp cloth to clean the fan blades and motor housing. Do not use abrasive cleaners or solvents. Ensure power is off before cleaning.
- Blade Screws: Periodically check that all blade screws are tight. Loose screws can cause wobbling and noise.
- Light Bulbs: Replace LED bulbs only with the specified type (Medium Base 8 Watt T7 LED bulbs) or equivalent.
7. Troubleshooting
If you experience issues with your ceiling fan, refer to the following common problems and solutions:
| Problem | Possible Cause | Solution |
|---|---|---|
| Fan does not start. | No power to the fan; loose wire connections; remote control not paired or batteries dead. | Check circuit breaker. Verify all wire connections are secure. Replace remote batteries. Re-pair remote if necessary (refer to remote manual). |
| Fan wobbles. | Loose blade screws; unbalanced blades; loose mounting bracket. | Tighten all blade screws. Ensure blades are balanced (balancing kit may be required). Check mounting bracket for secure installation. |
| Light does not work. | Bulb loose or burnt out; loose wire connection in light kit; remote control issue. | Check bulb tightness and replace if burnt out. Verify light kit wiring. Check remote batteries and functionality. |
| Remote control not responding. | Dead batteries; remote not paired with receiver; interference. | Replace batteries. Follow pairing instructions for the remote and receiver. Ensure no strong radio interference nearby. |
8. Specifications
| Feature | Detail |
|---|---|
| Model Numbers | Fan: 7222500, Remote: 7787900 |
| Fan Size | 42 Inch |
| Installation Type | Down Rod Only |
| Recommended Room Size | Up to 100 square feet (10 ft x 10 ft) |
| Airflow (High Speed) | 2897 CFM |
| Energy Usage (without lights) | 53 W |
| Airflow Efficiency | 55 CFM/W |
| Light Kit | Opal Frosted Glass, includes two medium base 8 watt T7 LED bulbs |
| ASIN | B0DNRLK124 |
| Date First Available | November 21, 2024 |
9. Warranty and Support
Warranty information for Westinghouse products is typically included with the product packaging or available on the official Westinghouse website. For specific warranty details, technical support, or replacement parts, please visit the Westinghouse Store on Amazon or the official Westinghouse brand website.
When contacting support, please have your model numbers (7222500 and 7787900) and ASIN (B0DNRLK124) ready.