1. Introduction
Thank you for choosing the MoTak Commercial Gas Convection Oven, Model MCO-1-SGL. This manual provides essential information for the safe and efficient operation, installation, and maintenance of your new convection oven. Please read this manual thoroughly before installation and operation to ensure proper use and to prevent injury or damage.
This full-size, single-deck convection oven features stainless steel construction, double-pane thermal glass windows, five chrome-plated racks with ten positions, and a solid-state thermostat with a temperature range of 250°F to 550°F. It includes a 60-minute timer, electronic spark ignition, and a two-speed fan motor for optimal cooking performance. An LP conversion kit is included for versatility.

Figure 1: Front view of the MoTak Commercial Gas Convection Oven, showcasing its stainless steel exterior and double-pane glass doors.
2. Safety Information
WARNING: Improper installation, adjustment, alteration, service, or maintenance can cause property damage, injury, or death. Read the installation, operating, and maintenance instructions thoroughly before installing or servicing this equipment.
- This appliance is designed for commercial use only. It is not intended for residential installation or operation.
- Installation and service must be performed by a qualified installer, service agency, or the gas supplier.
- Keep the appliance area clear and free from combustible materials, gasoline, and other flammable vapors and liquids.
- Do not obstruct the flow of combustion and ventilation air.
- Never store anything on top of the oven.
- Ensure adequate ventilation in the installation area.
- Always disconnect power before cleaning or servicing.
- Hot surfaces: Exercise extreme caution when operating the oven. Surfaces will be hot during and after use.
3. Setup and Installation
3.1 Unpacking and Inspection
Carefully unpack the oven and inspect it for any shipping damage. Report any damage immediately to the carrier and your dealer. Do not discard the packaging materials until the unit has been inspected and installed.
3.2 Leg Installation
The oven comes with 25.6-inch legs with bullet feet. Attach the legs securely to the designated mounting points on the bottom of the oven. Ensure all legs are tightened to provide a stable and level base for the unit.
3.3 Placement and Clearances
Place the oven on a level, non-combustible surface in a well-ventilated area. Maintain adequate clearances from combustible walls and materials as per local fire codes and manufacturer recommendations. Ensure proper ventilation for exhaust and air intake.

Figure 2: Side view of the convection oven, illustrating its compact design and leg structure.
3.4 Gas Connection
This oven is designed for natural gas operation but includes an LP conversion kit. Gas connection must be performed by a qualified technician in accordance with all local and national codes. The oven requires a 54,000 BTU gas supply.
- Ensure the gas supply matches the oven's requirements (Natural Gas or LP after conversion).
- Connect the gas line to the designated gas entry point at the rear of the oven.
- Check all connections for leaks using a non-corrosive leak detection solution.

Figure 3: Detail of the gas entry point located on the rear panel of the oven, clearly labeled for connection.

Figure 4: Rear view of the oven, highlighting the gas entry connection and the fan motor assembly.
3.5 Electrical Connection
The oven requires a 120V/60/1-ph electrical supply, 5.9 amps, with a NEMA 5-15P cord. Connect the oven to a dedicated, properly grounded electrical outlet. Do not use extension cords.
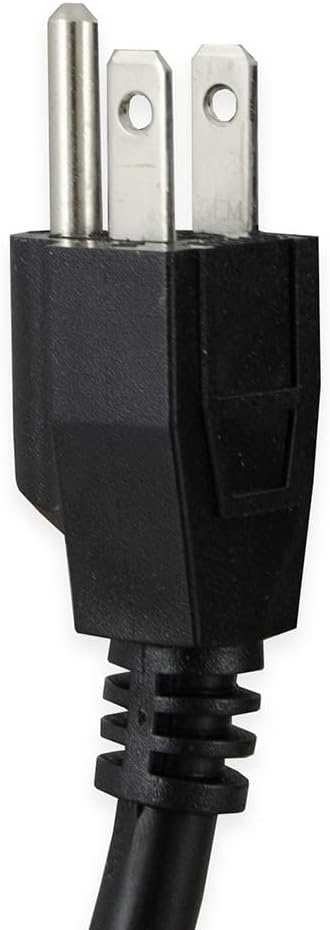
Figure 5: The NEMA 5-15P power plug, indicating the required electrical connection type for the oven.
3.6 Stacking Kit
This unit includes a stacking kit, allowing for the secure placement of another identical oven on top to maximize kitchen space. Follow the instructions provided with the stacking kit for proper and safe assembly.
4. Operating Instructions
4.1 Controls Overview
The control panel features a solid-state thermostat for temperature control (250°F to 550°F), a 60-minute timer, and controls for the two-speed fan motor. An electronic spark ignition system ensures reliable startup.
4.2 Initial Startup and Burn-Off
Before first use, operate the oven empty at its maximum temperature (550°F) for approximately 30 minutes to burn off any manufacturing oils or residues. Ensure the area is well-ventilated during this process.
4.3 Preheating
- Turn the oven ON.
- Set the desired temperature using the thermostat control.
- Allow the oven to preheat until the indicator light signals that the set temperature has been reached.
4.4 Loading the Oven
The oven features five chrome-plated racks with ten rack positions, spaced 1-1/2 inches apart. Distribute food evenly on the racks to allow for proper air circulation and consistent cooking. Avoid overloading the oven.

Figure 6: Interior view of the oven, showing the five chrome-plated racks and multiple rack positions for versatile cooking.
4.5 Cooking
- Place food into the preheated oven.
- Set the timer for the desired cooking duration, if applicable.
- Monitor cooking progress through the double-pane thermal glass windows.
- The two-speed fan motor can be adjusted to optimize convection cooking for various food types.
4.6 Shut-Off
After cooking, turn the temperature control to the OFF position. The oven also features a manual shut-off for safety.
5. Maintenance and Cleaning
Regular cleaning and maintenance will extend the life and performance of your MoTak convection oven. Always ensure the oven is cool and disconnected from power before cleaning.
5.1 Exterior Cleaning
Wipe down stainless steel surfaces with a damp cloth and a mild, non-abrasive cleaner. Dry thoroughly to prevent water spots. Do not use steel wool or abrasive pads, as they can scratch the finish.
5.2 Interior Cleaning
The oven features a porcelain enamel interior for easier cleaning. After the oven has cooled, remove racks and wipe down the interior with a damp cloth and a mild detergent. For stubborn stains, use a commercial oven cleaner designed for porcelain enamel, following the product's instructions. Rinse thoroughly and dry.
5.3 Rack Care
The chrome-plated racks can be removed for cleaning. Wash them with warm, soapy water and a non-abrasive sponge. Rinse and dry completely before returning them to the oven.
5.4 Routine Inspection
Periodically inspect the gas connections, electrical cord, and fan motor for any signs of wear or damage. Any issues should be addressed by a qualified service technician.
6. Troubleshooting
| Problem | Possible Cause | Solution |
|---|---|---|
| Oven not heating | No power; Gas supply off; Ignition failure | Check power connection; Ensure gas valve is open; Contact service technician for ignition issues. |
| Uneven cooking | Overloading; Fan malfunction; Improper rack placement | Reduce load; Ensure fan is operating; Distribute food evenly. |
| Excessive smoke/odor | Food spills; Initial burn-off; Improper ventilation | Clean interior thoroughly; Ensure adequate ventilation; This is normal during initial burn-off. |
| Fan not operating | Power issue; Motor malfunction | Check power; Contact service technician. |
For issues not listed or if solutions do not resolve the problem, contact a qualified service technician.
7. Specifications
| Feature | Detail |
|---|---|
| Model | MCO-1-SGL |
| Dimensions (D x W x H) | 40.3"D x 38"W x 61.5"H |
| Weight | 579 pounds |
| BTU Input | 54,000 BTU |
| Voltage | 120V/60/1-ph |
| Amperage | 5.9 amps |
| Plug Type | NEMA 5-15P |
| Temperature Range | 250°F to 550°F |
| Racks | 5 chrome-plated, 10 positions |
| Fan Motor | Two-speed, 1/2 HP |
| Interior Material | Porcelain Enamel |
| Exterior Material | Stainless Steel |
| Included Components | LP conversion kit, Stacking kit |
8. Warranty and Support
For warranty information and technical support, please refer to the documentation provided at the time of purchase or contact your authorized MoTak dealer. Keep your purchase receipt and model number handy when contacting support.
For additional resources, you may visit the Generic Store on Amazon.