AKEYDIY BL-12
AKEYDIY BL-12 3-in-1 Auto Cap Heat Press Machine User Manual
Model: BL-12
1. Introduction
Thank you for choosing the AKEYDIY BL-12 3-in-1 Auto Cap Heat Press Machine. This manual provides essential information for the safe and efficient operation of your new heat press. Please read all instructions carefully before use and retain this manual for future reference.

Image 1.1: AKEYDIY BL-12 3-in-1 Auto Cap Heat Press Machine with included accessories.
2. Safety Instructions
To prevent injury or damage to the machine, always follow these basic safety precautions:
- Read all instructions thoroughly before operating the machine.
- Keep the machine out of reach of children and pets.
- Operate the machine in a well-ventilated area to dissipate heat and fumes.
- Do not touch the heating element or other hot surfaces during or immediately after operation. Use heat-resistant gloves when handling hot items.
- Unplug the machine from the power outlet when not in use, before cleaning, or when changing accessories.
- Do not operate the machine if the power cord or plug is damaged. Contact customer support for assistance.
- Ensure the machine is placed on a stable, flat, and heat-resistant surface.
- Never immerse the machine in water or other liquids.
3. Package Contents
Verify that all items listed below are included in your package:
- 1 x AKEYDIY BL-12 Heat Press Machine
- 3 x Interchangeable Cap Platens (various sizes)
- 1 x Blank Cap
- 1 x Pair of Heat-Resistant Gloves
- 1 x Roll of Heat Transfer Tape
- 5 x Patterned DTF Stickers
- 1 x Power Cord
- 1 x Instruction Manual (this document)

Image 3.1: Visual representation of all items included in the product package.
4. Product Overview
The AKEYDIY BL-12 is an automatic heat press designed for transferring designs onto various cap styles. It features a user-friendly digital control panel and interchangeable platens for versatility.
Key Components:
- Heating Element: The upper platen that heats to the set temperature.
- Knob-Style Digital Control Panel: An LCD screen with a rotary knob for setting temperature and time.
- Automatic Press & Release Mechanism: Automatically lowers and raises the heating platen.
- Interchangeable Lower Cap Platens: Three different sizes to accommodate various cap types.
- Cap Holder/Stretcher: Helps secure the cap and prevent creases during pressing.
- Anti-Slip Pads: Located at the base for stability.
- Auto Shut-Off Feature: Automatically powers off after 30 minutes of standby for safety and energy saving.
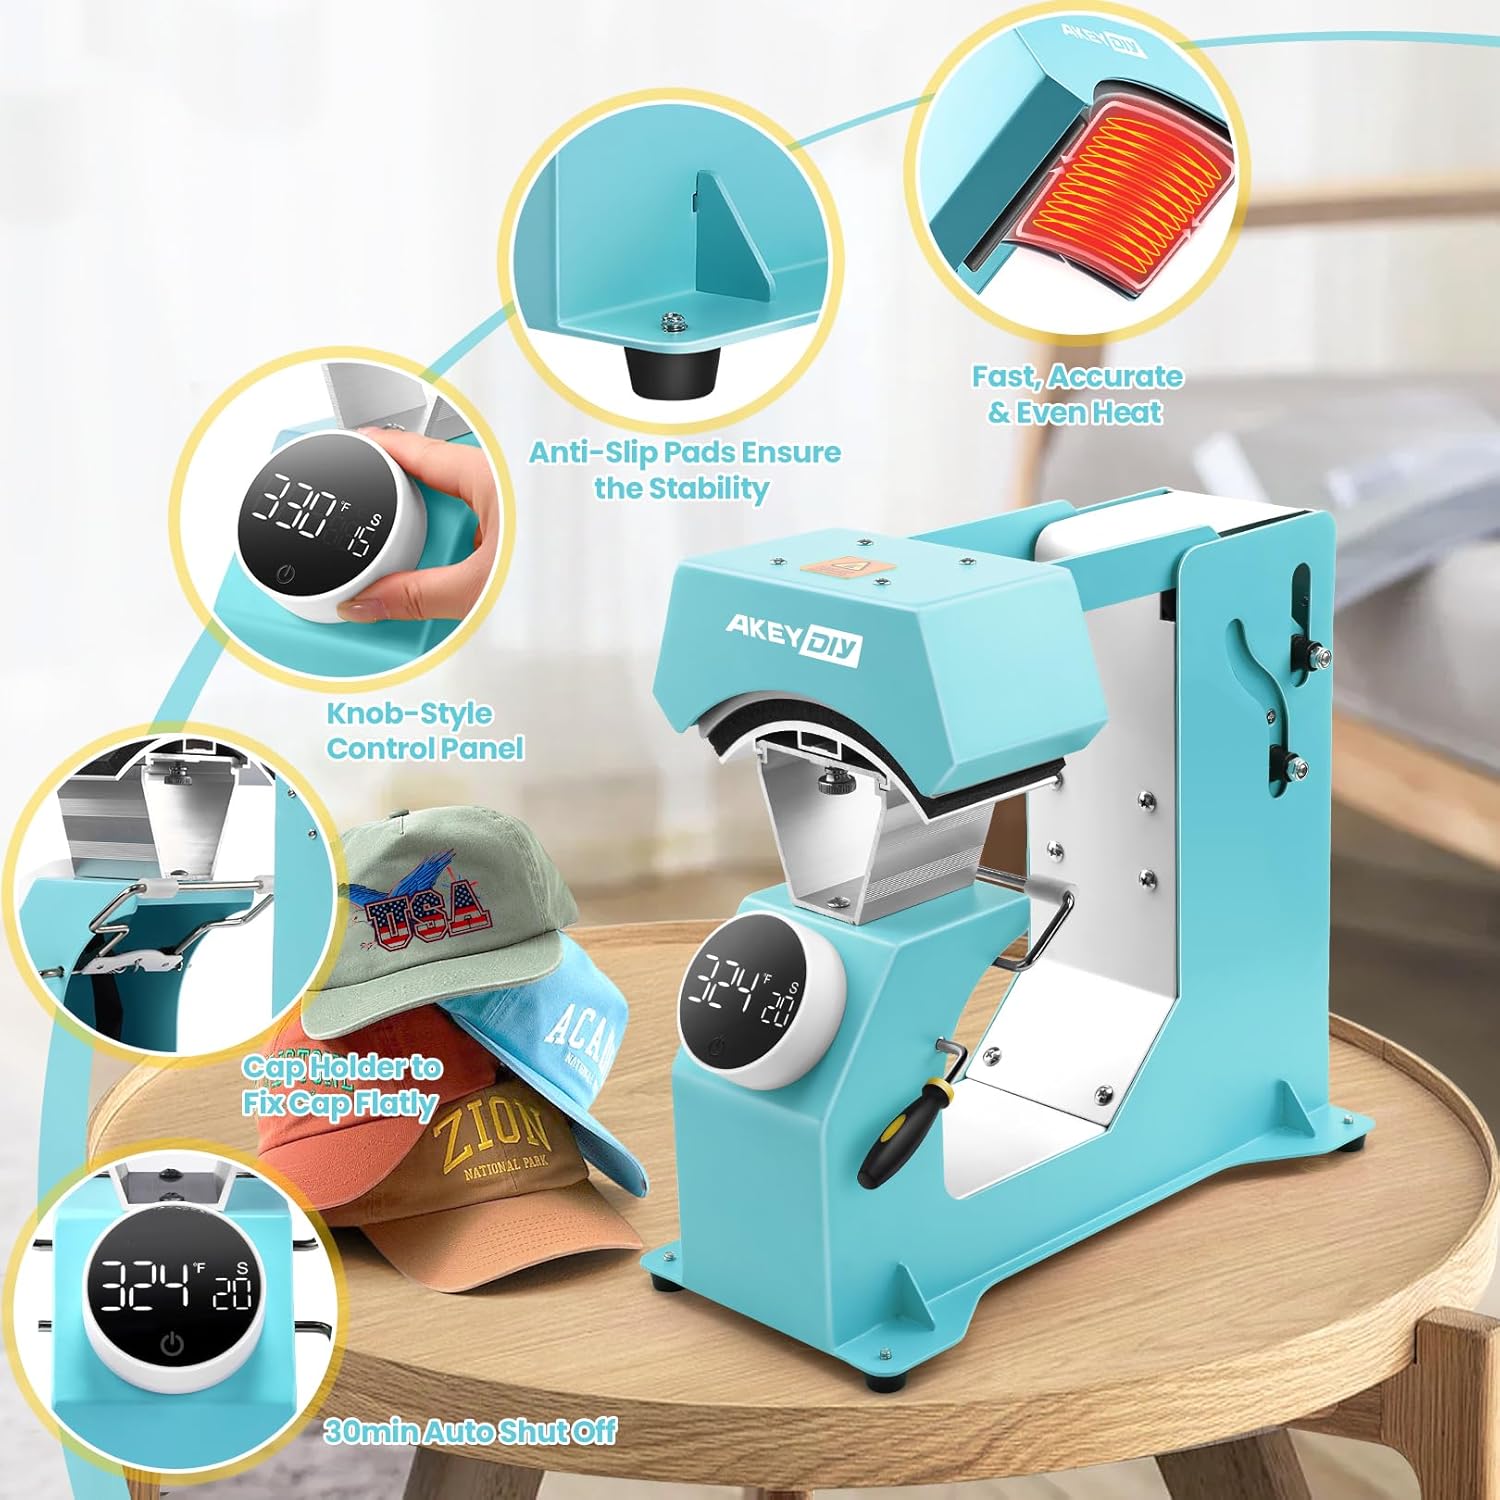
Image 4.1: Overview highlighting key features such as the control panel, heating element, and cap holder.

Image 4.2: Close-up view of the knob-style digital control panel.
5. Setup
Follow these steps to set up your heat press machine:
- Unpack: Carefully remove all components from the packaging.
- Placement: Place the heat press on a sturdy, level, and heat-resistant surface. Ensure there is adequate space around the machine for ventilation and safe operation.
- Power Connection: Connect the power cord to the machine and then plug it into a grounded electrical outlet.
- Install Platen: Select the appropriate interchangeable cap platen for your project. Slide the chosen platen into the designated slot on the machine until it clicks securely into place.
6. Operating Instructions
This section details the steps for operating your AKEYDIY BL-12 heat press machine.
6.1. Power On/Off
- Power On: After connecting to power, short press the power button on the control panel to turn on the machine. The display will illuminate.
- Power Off: Press and hold the power button for approximately 3 seconds to shut down the machine.
6.2. Setting Temperature and Time
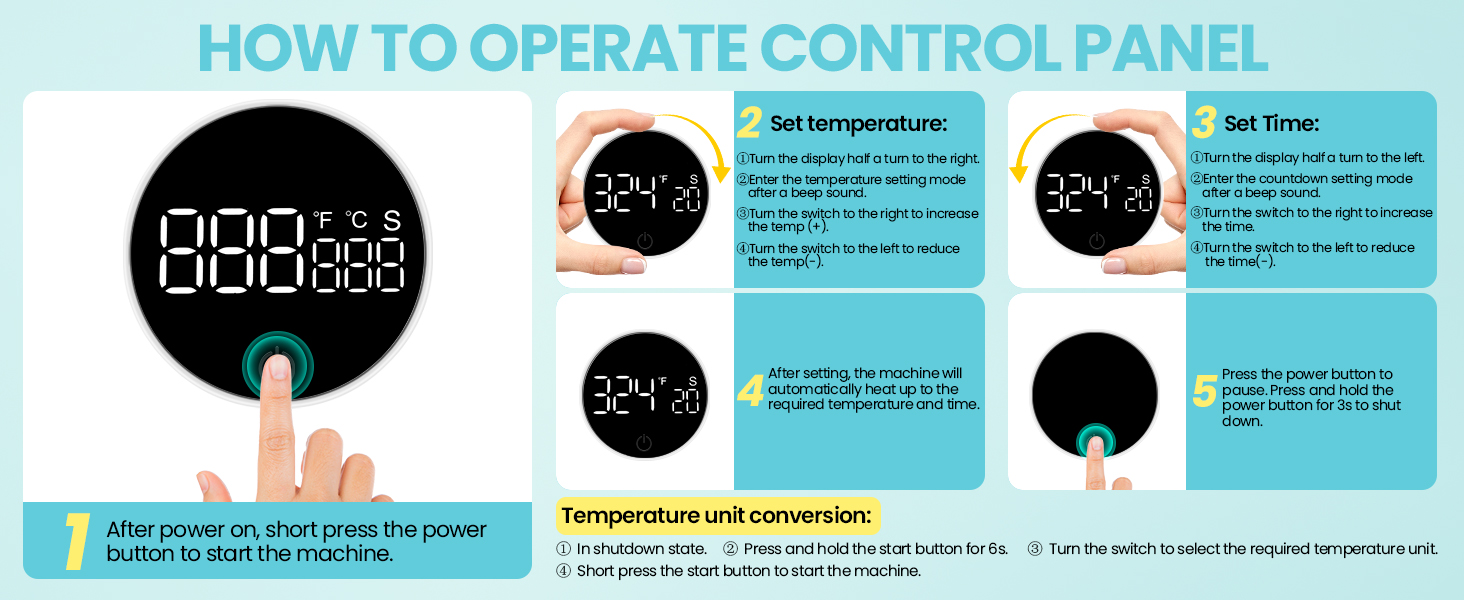
Image 6.1: Step-by-step guide for using the control panel to set temperature and time.
- Set Temperature: Turn the knob clockwise (to the right) to enter temperature setting mode. The temperature value will flash. Continue turning the knob clockwise to increase the temperature or counter-clockwise to decrease it. The maximum temperature is 401°F (205°C).
- Set Time: Turn the knob counter-clockwise (to the left) to enter time setting mode. The time value will flash. Continue turning the knob counter-clockwise to increase the time or clockwise to decrease it. The time range is 1-999 seconds.
- Confirm Settings: The machine will automatically begin heating to the set temperature once both settings are entered.
6.3. Temperature Unit Conversion (°F/°C)
To switch between Fahrenheit and Celsius:
- Ensure the machine is in the shutdown state.
- Press and hold the power button for approximately 6 seconds.
- Turn the knob to select your desired temperature unit (°F or °C).
- Short press the power button to start the machine with the new unit.
6.4. Performing a Heat Press

Image 6.2: Visual guide for the heat pressing process, from heating to automatic opening.
- Preheat: Turn on the machine and set your desired temperature and time. Allow the heating plate to reach the set temperature.
- Prepare Cap: Place the cap onto the lower platen, ensuring it is centered and smooth. Use the cap stretcher if needed to prevent creases.
- Position Design: Carefully place your transfer material (e.g., sublimation paper, DTF sticker) onto the cap in the desired position. Secure with heat transfer tape if necessary.
- Initiate Press: Press the start button on the control panel. The upper heating platen will automatically lower and apply pressure.
- Automatic Release: Once the set time countdown is complete, the machine will automatically release and open.
- Remove Item: Using heat-resistant gloves, carefully remove the pressed cap from the machine.

Image 6.3: The automatic pressing and opening mechanism in action.
7. Interchangeable Platens
The AKEYDIY BL-12 comes with three interchangeable lower cap platens to accommodate various cap sizes and styles.
- Platen Sizes: The included platens are approximately 5.51 x 3 inches, 5.9 x 2.75 inches, and 5.9 x 3.85 inches.
- Changing Platens: To change a platen, ensure the machine is off and cool. Gently slide the currently installed platen out of its slot. Align the desired platen with the slot and slide it in until it is securely seated.
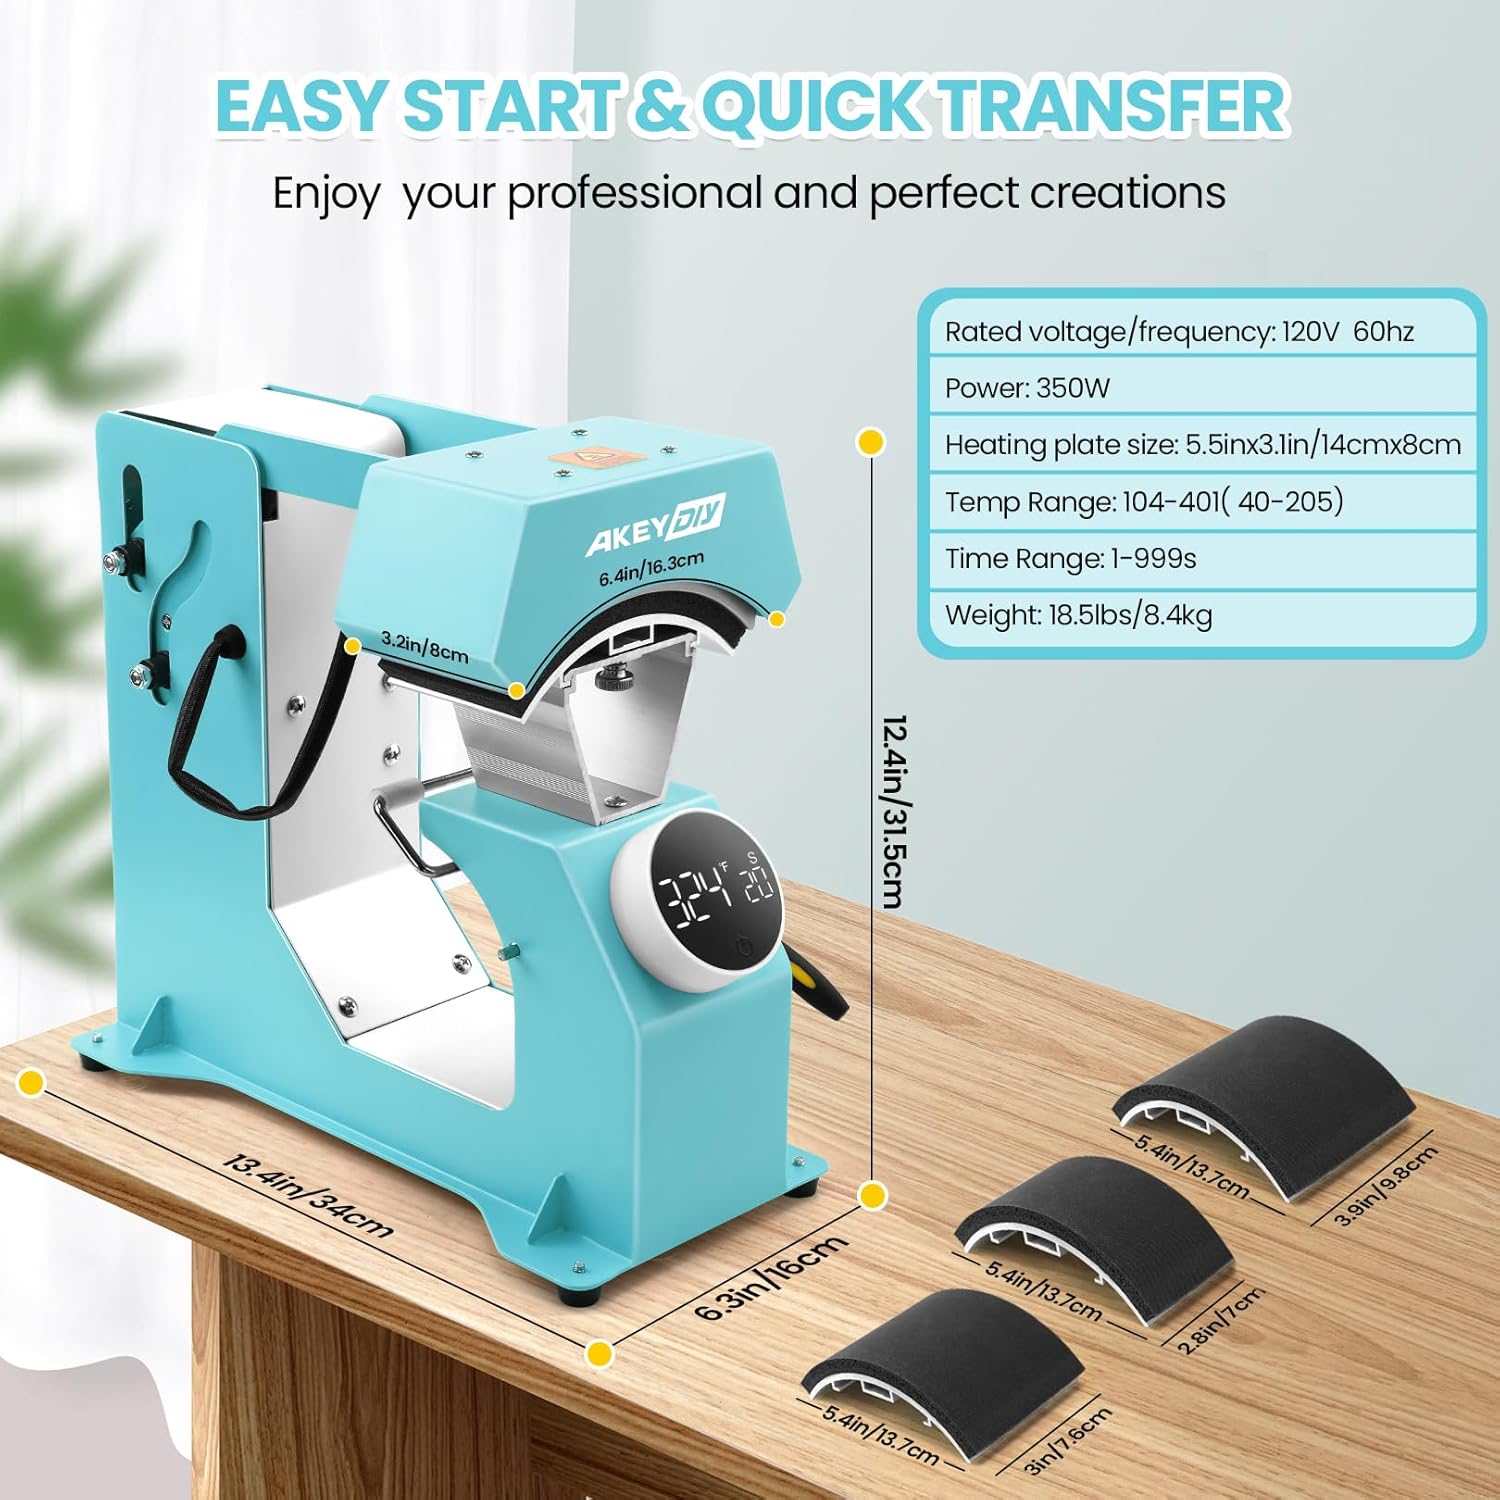
Image 7.1: Illustration of the machine's dimensions and the sizes of the three interchangeable cap platens.
8. Maintenance
Regular maintenance ensures the longevity and optimal performance of your heat press machine.
- Cleaning: Ensure the machine is unplugged and completely cool before cleaning. Wipe down the exterior with a soft, damp cloth. For the heating platen, use a non-abrasive cloth and a mild cleaner if necessary. Avoid harsh chemicals.
- Storage: Store the machine in a dry, dust-free environment when not in use.
- Inspection: Periodically check the power cord for any signs of damage. Ensure all moving parts operate smoothly.
9. Troubleshooting
If you encounter issues with your heat press, refer to the table below for common problems and solutions.
| Problem | Possible Cause | Solution |
|---|---|---|
| Machine does not power on. | No power supply; power button not pressed correctly. | Check power cord connection and wall outlet. Ensure power button is short-pressed to turn on. |
| Uneven heat transfer or poor adhesion. | Incorrect temperature/time; uneven pressure; dirty platen; incorrect material placement. | Verify temperature and time settings. Ensure cap and transfer material are flat and centered. Clean the platen. |
| Machine does not press or release automatically. | Obstruction; settings not confirmed; malfunction. | Check for any physical obstructions. Ensure temperature and time settings are properly entered. If issue persists, contact customer support. |
| Temperature/Time display is inaccurate or flickering. | Electrical interference; internal sensor issue. | Unplug and replug the machine. If the problem continues, contact customer support. |
10. Specifications
- Model Number: BL-12
- Rated Voltage/Frequency: 120V~60Hz
- Power: 350W
- Heating Plate Size: 5.51 x 3.1 inches (14cm x 8cm)
- Temperature Range: 104-401°F (40-205°C)
- Time Range: 1-999 seconds
- Item Weight: 18.96 pounds (8.62 kg)
- Product Dimensions: 12"L x 7"W x 14"H (30.5cm L x 17.8cm W x 35.6cm H)
- Material: Aluminum
11. Warranty and Support
For information regarding warranty coverage, technical support, or replacement parts, please refer to the manufacturer's official website or contact AKEYDIY customer service directly. Contact details are typically provided on the product packaging or the manufacturer's website.
Ask a question about this manual
Ask about setup, troubleshooting, compatibility, parts, safety, or missing instructions. Manuals+ will review the question and use this page’s manual context to help answer it.