1. Introduction
The EASYGUARD EC013 is a compact and versatile DIY alarm system designed for both DC12V cars and motorcycles. This system offers essential security features with a focus on easy installation, making it suitable for users who prefer a straightforward setup. Its integrated unit and siren design save space while providing robust protection against unauthorized access and theft.

Image 1.1: Overview of the EASYGUARD EC013 alarm system components, including the main unit with integrated siren, two remote controls, LED indicator, and wiring harness.
2. What's in the Box
Upon opening the package, please verify that all the following components are included:
- Control module (main unit with integrated siren)
- Two (2) Key fobs (remote controls)
- Wire harness
- LED indicator

Image 2.1: Detailed view of all included product accessories: the alarm unit & siren, two remote controls, the LED indicator, and the main wire harness.
3. Specifications
| Feature | Detail |
|---|---|
| Item Model Number | EC013 |
| Item Weight | 2.2 pounds (approx. 1 kg) |
| Product Dimensions | 6.69 x 5.91 x 1.97 inches (17 x 15 x 5 cm) |
| Batteries | 2 CR2 batteries required (included for remote controls) |
| Wireless Remote | Yes |
| Compatibility | DC12V cars and motorcycles |
| Manufacturer | ieasyguard.com |
| UPC | 762206595901 |
4. Installation Guide
The EASYGUARD EC013 is designed for easy DIY installation, requiring connection of only a few wires. Please follow the wiring diagram carefully to ensure proper functionality and avoid damage to your vehicle or the alarm system.
4.1. Wiring Diagram

Image 4.1: Detailed wiring diagram showing connections for the alarm system. Ensure all connections are secure and insulated.
4.2. Connection Steps
- Red Wire: Connect to the positive (+) terminal of the DC 12V battery.
- Black Wire: Connect to the negative (-) terminal of the DC 12V battery (ground).
- White Wire: Connect to ACC (+) (Accessory power, typically active when ignition is on).
- Orange Wire: Connect to Ignition Cut (-) (This wire is used to interrupt the ignition circuit for engine immobilization. Consult a professional if unsure about this connection).
- Blue Wire: Connect to the Door Trigger (-) (Connect to the vehicle's door pin switch that provides a negative signal when the door is opened).
- LED Indicator: Plug the LED indicator into its designated port on the main unit. Mount the LED in a visible location on your dashboard.
Important: Ensure all connections are properly insulated to prevent short circuits. If you are not confident with electrical wiring, it is recommended to seek professional assistance.
5. Operating Instructions
The EC013 alarm system is operated using the provided remote controls. Familiarize yourself with the button functions for optimal use.
5.1. Remote Control Functions
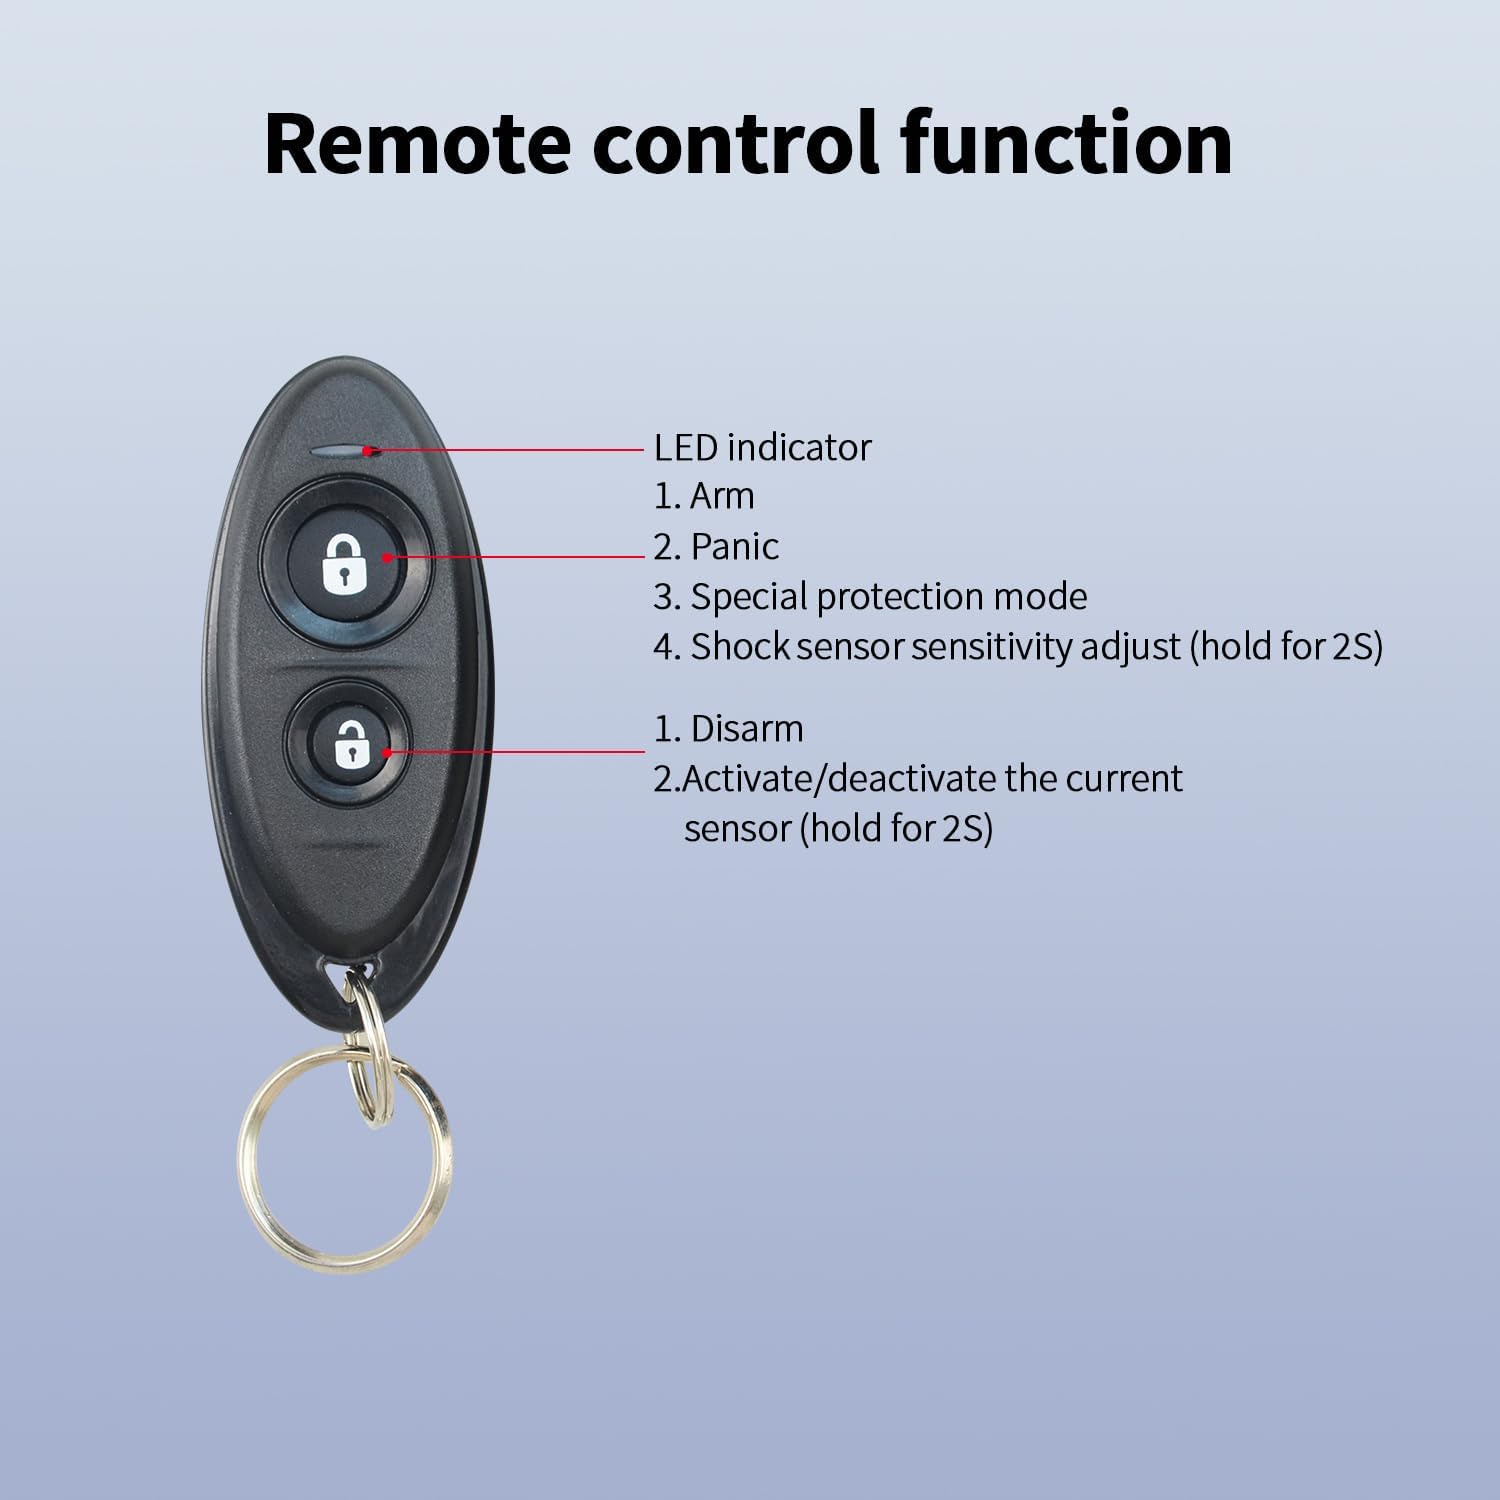
Image 5.1: Diagram illustrating the functions of the remote control buttons.
- Top Button (Locked Padlock Icon):
1. Arm: Press once to arm the alarm system. The vehicle will be protected.
2. Panic: Press and hold for 2 seconds to activate the panic alarm.
3. Special Protection Mode: This mode is activated when the system is armed.
4. Shock Sensor Sensitivity Adjust: Press and hold for 2 seconds to enter shock sensor sensitivity adjustment mode. - Bottom Button (Unlocked Padlock Icon):
1. Disarm: Press once to disarm the alarm system.
2. Activate/Deactivate Current Sensor: Press and hold for 2 seconds to toggle the current sensor on or off.
5.2. Protection Modes
The EC013 features different protection modes to enhance vehicle security.
5.2.1. Night Protection Mode
This mode provides comprehensive protection during nighttime or when the vehicle is parked for extended periods. It triggers the alarm based on multiple inputs:
- 2-stage shock sensor trigger
- ACC (Accessory) trigger
- Door trigger
- Current sensor trigger

Image 5.2: Illustration of Night Protection mode, showing how different triggers (shock, ACC, door, current sensor) activate the 120dB alarm.
5.2.2. Special Protection Mode
This mode focuses on core intrusion detection, triggering the alarm based on key access points:
- ACC (Accessory) trigger
- Door trigger
- Current sensor trigger

Image 5.3: Illustration of Special Protection mode, highlighting ACC, door, and current sensor triggers for the 120dB alarm.
6. Maintenance
To ensure the longevity and optimal performance of your EASYGUARD EC013 alarm system, follow these general maintenance guidelines:
- Keep Dry: Avoid exposing the main unit and remote controls to water or excessive moisture.
- Temperature: Do not expose the system to extreme temperatures (very hot or very cold) for prolonged periods.
- Remote Battery: Replace the CR2 batteries in the remote controls when the LED indicator on the remote becomes dim or the range decreases.
- Cleanliness: Periodically wipe the main unit and remote controls with a soft, dry cloth. Do not use harsh chemicals or abrasive cleaners.
- Wiring Check: Occasionally inspect the wiring connections for any signs of wear, corrosion, or loose connections.
7. Troubleshooting
If you encounter issues with your EC013 alarm system, refer to the following common problems and their solutions:
| Problem | Possible Cause | Solution |
|---|---|---|
| System does not arm/disarm with remote. | Dead remote battery; Remote out of range; Interference. | Replace remote battery; Move closer to vehicle; Check for strong radio interference. |
| Alarm triggers unexpectedly (false alarms). | Shock sensor sensitivity too high; Loose wiring; Environmental factors (wind, heavy vehicles). | Adjust shock sensor sensitivity (refer to remote functions); Check all wiring connections; Consider parking location. |
| Siren does not sound. | Siren wire disconnected; Faulty siren/unit. | Check the siren connection to the main unit; Contact support if connections are secure. |
| LED indicator not working. | LED disconnected; Faulty LED or unit. | Ensure LED is properly plugged in; Contact support. |
If the problem persists after attempting these solutions, please contact customer support.
8. Warranty & Support
8.1. Warranty Information
The EASYGUARD EC013 DIY Car & Motorcycle Alarm System comes with a 1-year warranty from the date of purchase. This warranty covers manufacturing defects and malfunctions under normal use. It does not cover damage caused by improper installation, misuse, accidents, or unauthorized modifications.
Please retain your proof of purchase for warranty claims.
8.2. Customer Support
For technical assistance, warranty claims, or any questions regarding your EASYGUARD EC013 alarm system, please contact the manufacturer:
- Manufacturer Website: ieasyguard.com
- Amazon Store: Visit the EASYGUARD Store on Amazon for product information and support resources.
When contacting support, please have your product model number (EC013) and purchase details ready.