FOXWELL RT1000
FOXWELL RT1000 Automatic Brake Bleeder Kit
Model: RT1000
Introduction
The FOXWELL RT1000 Automatic Brake Bleeder Kit is an advanced tool designed for efficient and precise brake fluid replacement. Utilizing new constant pressure technology with dual pulse alternating suction, it ensures thorough removal of old brake fluid and injection of new fluid, preventing air from entering the system. This kit simplifies the brake bleeding process, allowing for one-person operation and enhancing overall brake performance.
Safety Information
Always prioritize safety when working with automotive systems and fluids. Read and understand all instructions before operating the RT1000. Failure to follow safety guidelines may result in injury or damage to the vehicle.
- Wear appropriate personal protective equipment (PPE), including safety glasses and gloves, to protect against brake fluid contact.
- Ensure the vehicle is on a level surface and properly supported with jack stands before beginning any work.
- Brake fluid is corrosive. Avoid contact with painted surfaces, skin, and eyes. In case of contact, rinse immediately with plenty of water.
- Dispose of old brake fluid responsibly according to local regulations.
- Do not operate the machine in wet conditions or near flammable materials.
- Ensure the power supply is 110V as specified for the device.
Product Overview and Components
The FOXWELL RT1000 kit includes the main brake fluid change machine, a master cylinder bleeder adapter, and various accessories for comprehensive brake system maintenance.

Figure 1: Overview of the FOXWELL RT1000 Automatic Brake Bleeder Kit, showing the main unit, fluid reservoirs, hoses, and the master cylinder adapter.

Figure 2: Close-up of the Master Cylinder Adapter, highlighting its aluminum alloy construction and rubber sealing ring for leak-free connection.
Key Features:
- Constant Pressure Technology: Ensures consistent fluid flow and prevents air ingress.
- Dual Pulse Operation: Alternating suction and injection for efficient fluid exchange and impurity removal.
- Built-in Dual Vacuum Pump: Provides strong, continuous suction without external pumps.
- Adjustable Pressure Control: Knob and gauge for real-time monitoring and precise pressure setting.
- Safety Protections: Includes fluid shortage, low-pressure, and high-pressure safeguards.
- One-Person Operation: Simplifies the bleeding process significantly.
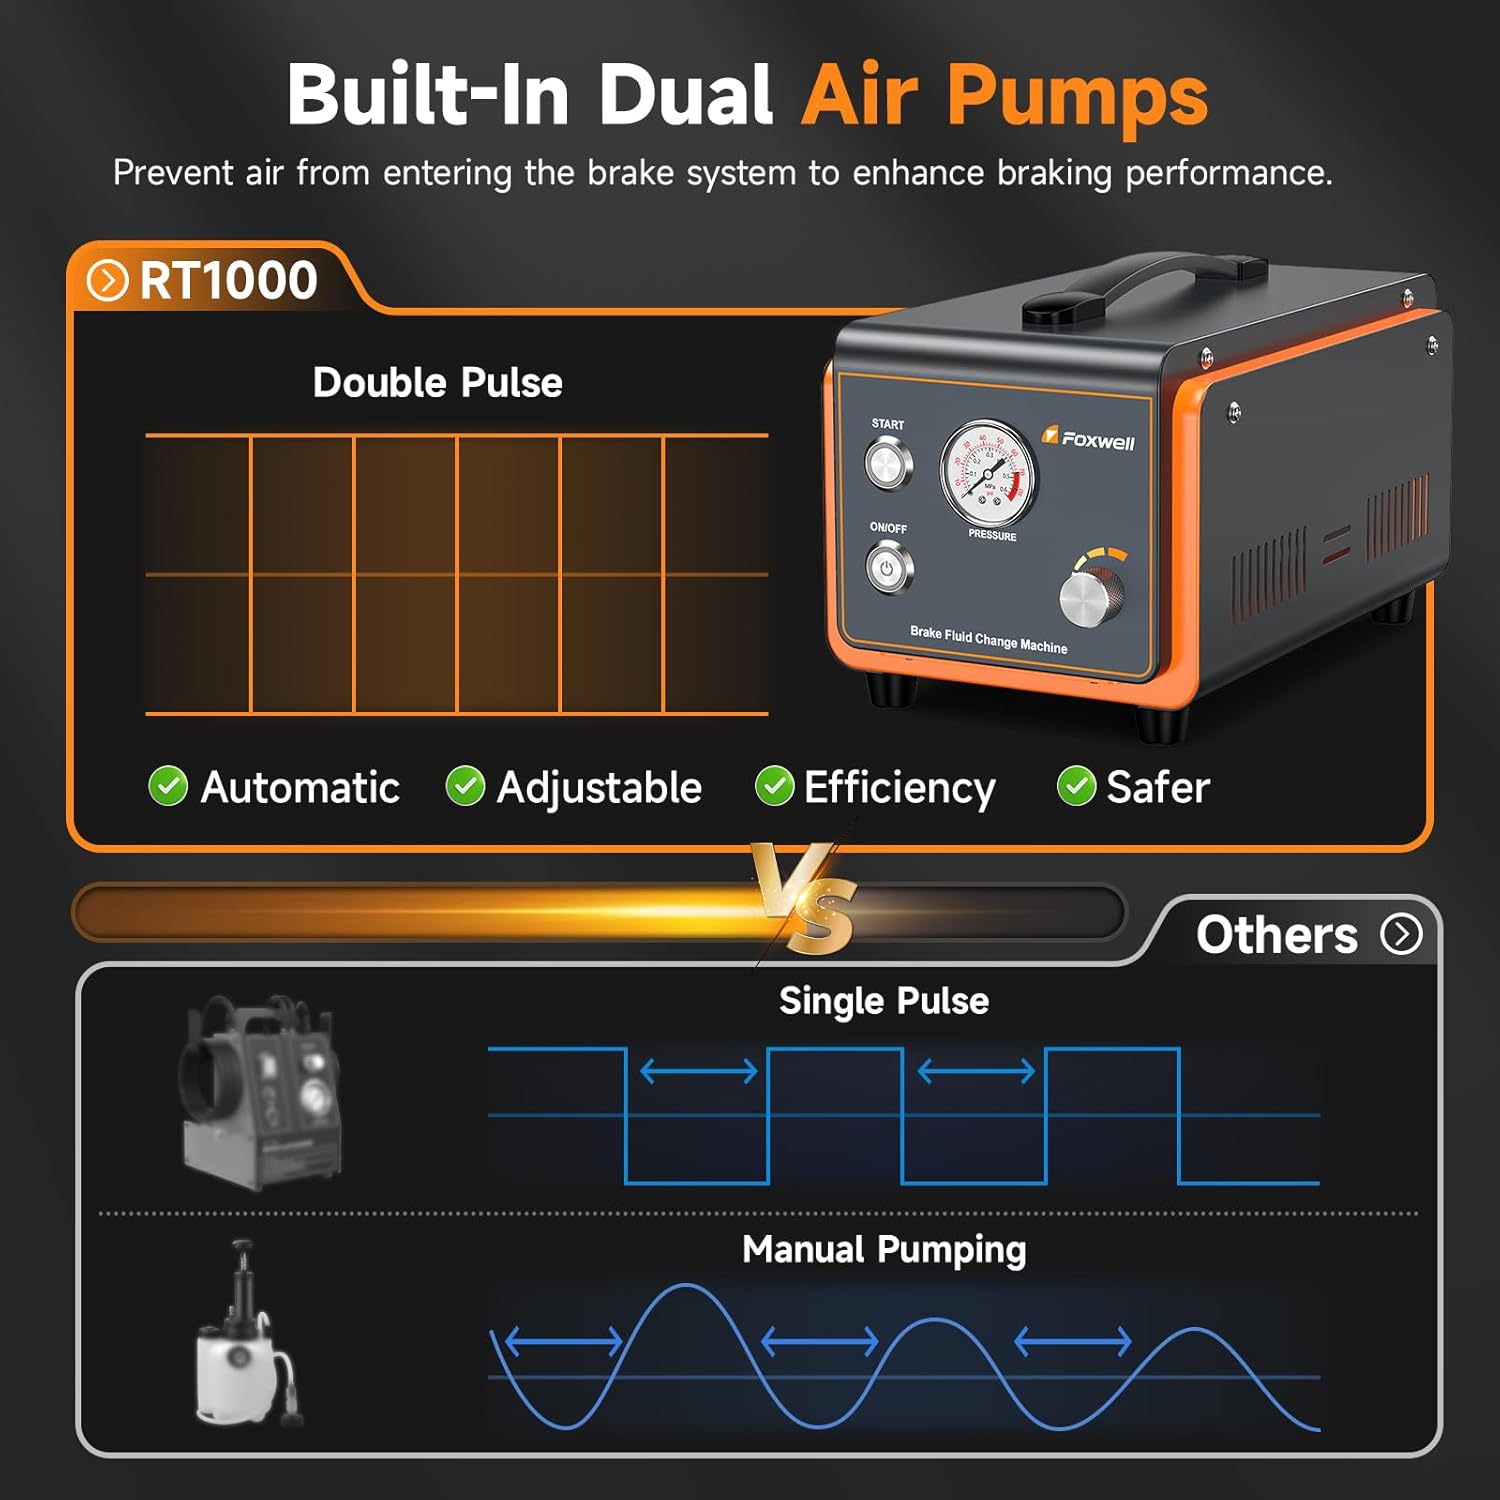
Figure 3: Illustration demonstrating the RT1000's dual pulse technology for automatic, adjustable, efficient, and safer brake bleeding compared to single pulse or manual pumping methods.
Setup and Preparation
- Prepare the Vehicle: Ensure the vehicle is parked on a level surface. Turn off the engine and engage the parking brake.
- Access Brake Fluid Reservoir: Locate and open the vehicle's brake fluid reservoir.
- Connect Master Cylinder Adapter: Securely attach the provided master cylinder adapter to the vehicle's brake fluid reservoir. Ensure a tight seal to prevent leaks.
- Connect Filling Hose: Connect the filling hose from the RT1000 machine to the master cylinder adapter.
- Fill New Brake Fluid: Pour new, clean brake fluid into the RT1000's designated fluid container. Ensure the fluid level is sufficient for the entire bleeding process.
- Connect Power: Plug the RT1000 machine into a standard 110V power outlet.

Figure 4: Proper connection of the RT1000's filling hose to the vehicle's brake fluid reservoir using the master cylinder adapter.
Operating Instructions
Follow these steps for a successful brake fluid exchange:
- Initial Setup: Ensure all connections are secure and the new brake fluid is in the machine's reservoir.
- Power On: Press the "ON/OFF" button to power on the RT1000.
- Adjust Pressure: Turn the adjustable knob to set the desired operating pressure. The recommended pressure value is 0.2 MPa. Monitor the pressure gauge in real-time.
- Connect to Brake Sub-Cylinders: Attach the appropriate hose from the RT1000 to the brake bleeder screw on each wheel caliper, starting with the wheel furthest from the master cylinder (typically rear passenger, then rear driver, front passenger, front driver).
- Start Bleeding: Press the "START" button on the RT1000. The machine will begin the automatic brake fluid exchange process. The dual pulse technology will remove old fluid and inject new fluid simultaneously.
- Monitor Fluid Flow: Observe the fluid coming out of the bleeder screw. Continue the process until clear, bubble-free new brake fluid is visible.
- Close Bleeder Screw: Once the fluid is clear, close the bleeder screw on the caliper.
- Repeat for All Wheels: Repeat steps 5-7 for all remaining wheels.
- Finish: After bleeding all wheels, press the "ON/OFF" button to turn off the RT1000. Disconnect all hoses and the adapter.
- Check Fluid Level: Top off the vehicle's brake fluid reservoir to the MAX line with new brake fluid.
- Test Brakes: Before driving, pump the brake pedal several times to ensure a firm pedal feel. Test the brakes at low speed in a safe area.

Figure 5: The "START" button for one-click operation and the adjustable pressure knob on the RT1000 unit.

Figure 6: Visual guide for the four main steps: Pouring new fluid, connecting to cylinder, connecting to sub-cylinders, and starting the fluid change.
Note: Before replacing the brake fluid, the filling line must be exhausted first.
Protection Features
The RT1000 is equipped with several protection mechanisms to ensure safe and reliable operation:
- Fluid Shortage Protection: The machine automatically stops operation if the filling bottle becomes empty, preventing air from entering the brake system.
- Low-Pressure Protection: If the internal pressure drops too low, the machine will stop working. Adjust the pressure to 0.2 MPa and press "START" to resume operation.
- High-Pressure Protection: The system includes a 0.3 MPa limit to prevent damage from excessively high pressure during operation.

Figure 7: Diagram illustrating the Fluid Shortage, Low-Pressure, and High-Pressure protection mechanisms of the RT1000.
Maintenance
Proper maintenance ensures the longevity and optimal performance of your RT1000 kit:
- Cleaning: After each use, clean the machine and all hoses with a damp cloth. Ensure no brake fluid residue remains on the exterior.
- Storage: Store the RT1000 and its accessories in a clean, dry place, away from direct sunlight and extreme temperatures.
- Hose Inspection: Regularly inspect hoses and connections for any signs of wear, cracks, or damage. Replace damaged components immediately.
- Fluid Disposal: Always dispose of used brake fluid according to local environmental regulations. Do not pour it down drains or onto the ground.
Troubleshooting
| Problem | Possible Cause | Solution |
|---|---|---|
| Machine does not start. | Power cord not connected; Pressure too low. | Ensure power cord is securely plugged in. Adjust pressure to 0.2 MPa and press "START" for a few seconds. |
| Brake fluid not flowing. | Hoses kinked or blocked; Fluid reservoir empty; Incorrect pressure setting. | Check hoses for obstructions. Refill fluid reservoir. Verify pressure is set correctly (0.2 MPa). |
| Air still in brake lines after bleeding. | Improper connection; Bleeder screw not fully open; Insufficient bleeding time. | Ensure all connections are tight. Fully open bleeder screw. Extend bleeding time until no bubbles are visible. |
| Fluid leakage from connections. | Loose connections; Damaged O-rings/seals. | Tighten all connections. Inspect and replace any damaged O-rings or seals. |
Specifications
- Model: FOXWELL RT1000
- Power Supply: 110V AC
- Recommended Operating Pressure: 0.2 MPa
- Maximum Pressure Limit: 0.3 MPa
- Technology: Constant Pressure, Dual Pulse
- Compatibility: Designed for use with most Honda and Acura vehicles (e.g., Civic, Accord, HR-V, CR-V, Pilot, Passport, MDX, RDX, TLX, Integra, RLX).

Figure 8: List of compatible Honda and Acura vehicle models for the master cylinder adapter.
Warranty and Support
For warranty information, technical support, or service inquiries, please refer to the official FOXWELL website or contact their customer service department. Keep your purchase receipt as proof of purchase.
For further assistance, visit the FOXWELL Store on Amazon.