1. Introduction
Thank you for choosing the EAST OAK Pyramid Patio Heater, Model TS48SR4. This manual provides essential information for the safe assembly, operation, maintenance, and troubleshooting of your new outdoor heater. Please read all instructions carefully before use and retain this manual for future reference.
This heater is designed for outdoor use only and operates on propane gas, providing up to 48,000 BTU of heat. It features a durable stainless steel construction, a quartz glass tube for visible flame, and multiple safety mechanisms.
2. Important Safety Information
WARNING: For Outdoor Use Only. Improper installation, adjustment, alteration, service, or maintenance can cause injury or property damage. Read the installation, operating, and maintenance instructions thoroughly before installing or servicing this equipment.
- Always keep combustible materials at least 48 inches (122 cm) away from the heater.
- Do not use the heater in enclosed spaces, as it consumes oxygen and produces carbon monoxide.
- Ensure the heater is placed on a firm, level surface to prevent tipping.
- Do not operate the heater in windy conditions without proper stabilization.
- Never store or use gasoline or other flammable vapors and liquids in the vicinity of this or any other appliance.
- Keep children and pets away from the heater, especially when in operation.
- Do not touch hot surfaces. Use handles or knobs.
- Turn off the gas supply at the cylinder when the heater is not in use.
- If the flame extinguishes unexpectedly, the gas supply will automatically shut off.
- The heater is equipped with an anti-tip safety switch that cuts off the flame if tilted more than 45 degrees.
- Not recommended for use when it is raining. Use a protective cover when storing.

Figure 2.1: Triple Safety Protection System. This image displays the heater tilting, with icons indicating Anoxic Protect, Tip-over Protection, and Flame-out Protection, ensuring user safety.
3. Package Contents
Before assembly, ensure all parts are present and undamaged. Refer to the diagram below for component identification.

Figure 3.1: Dimensional Breakdown Diagram. This diagram illustrates all individual components of the patio heater and their relative positions for assembly.
- Reflector
- Flame Screen
- Glass Tube (4.7 inches diameter)
- Upper Support
- Protective Guard
- Silicone Ring
- Control Box
- Side Panels (with embossed design)
- Front Panel (with embossed design)
- Wheels
- Bottom Plate
- Stainless Steel Burner
- Hardware (screws, nuts, washers)
- 5AA Battery (for ignition)
4. Assembly Instructions
Follow these steps carefully for proper assembly. It is recommended to have two people for certain steps.
- Unpack Components: Carefully remove all parts from the packaging. Check against the package contents list and diagram.
- Assemble Base: Attach the wheels to the bottom plate. Secure the side and front panels to the bottom plate, ensuring the magnetic door mechanism is correctly oriented for propane tank access.
- Install Control Box: Mount the control box within the base structure, connecting any pre-attached gas lines as instructed.
- Insert Glass Tube: Carefully place the silicone ring, then insert the quartz glass tube into the central column. Ensure it is seated securely.
- Attach Protective Guard: Secure the protective guard around the glass tube using the provided hardware.
- Mount Upper Support and Burner: Attach the upper support structure and then the stainless steel burner assembly to the top of the main column.
- Install Reflector: Place the reflector on top of the burner assembly, securing it with the appropriate fasteners.
- Connect Propane Tank: Place a 20lb propane tank (not included) into the base. Connect the gas hose from the heater to the propane tank valve, ensuring a tight seal. Perform a leak test with soapy water before first use.
- Insert Ignition Battery: Locate the ignition button/housing and insert the provided 5AA battery.
5. Operating Instructions
5.1. Pre-Operation Checklist
- Ensure the heater is on a stable, level surface.
- Verify all gas connections are secure and free of leaks.
- Confirm no combustible materials are within 48 inches of the heater.
- Check that the propane tank valve is fully open.
5.2. Ignition
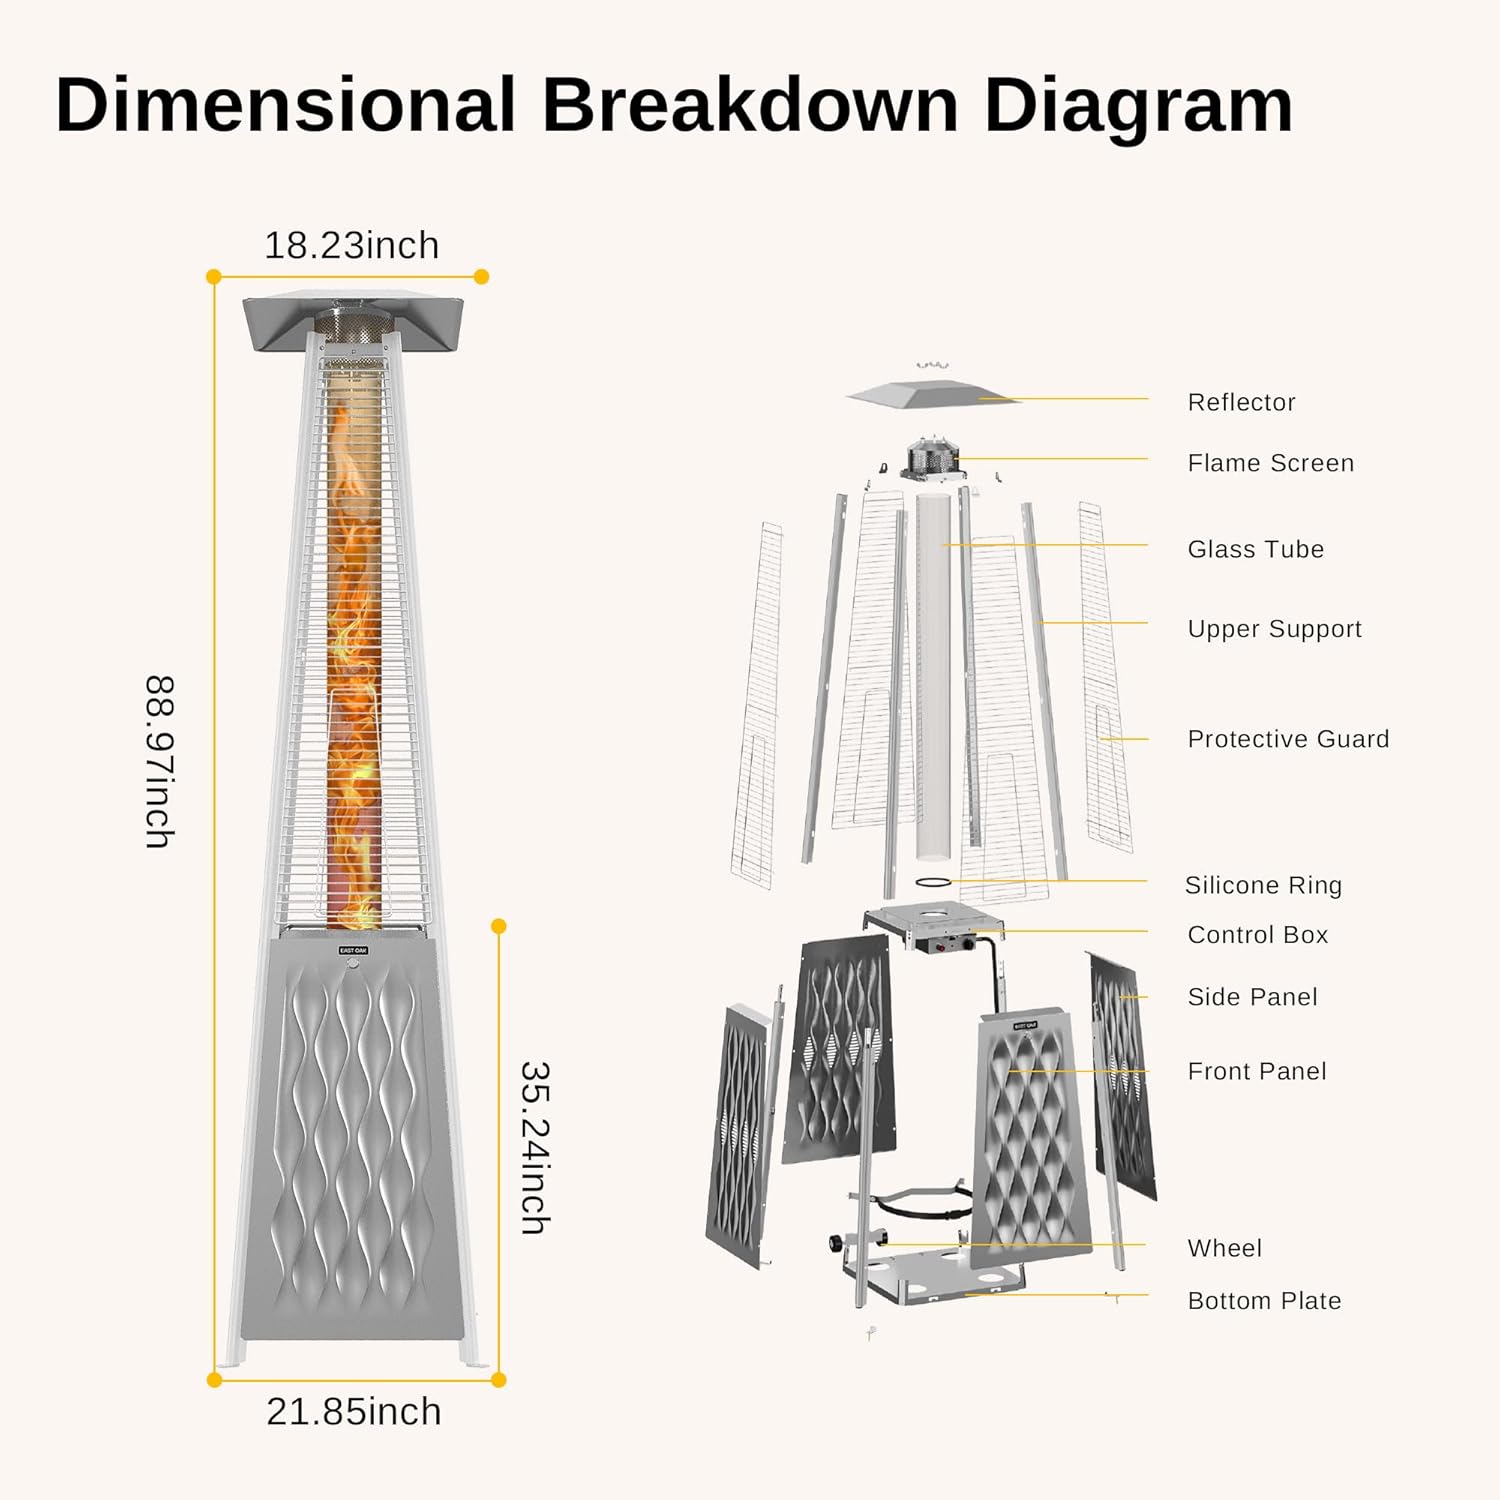
Figure 5.1: Quick Pulse Ignition. This image shows the control knob and ignition button for easy startup.
- Turn the control knob to the 'LOW' position.
- Press and hold the ignition button for 5-10 seconds while simultaneously turning the control knob to the 'HIGH' position.
- Observe the flame through the glass tube. If the flame does not ignite, release the button, wait 5 minutes, and repeat the process.
- Once ignited, continue to hold the ignition button for 10-15 seconds to allow the thermocouple to heat up and engage the safety valve.
- Release the ignition button. The flame should remain lit.
5.3. Adjusting Heat
Rotate the control knob between 'LOW' and 'HIGH' to adjust the heat output to your desired level. The heater provides up to 48,000 BTU for a wide heat range.
5.4. Shutting Down the Heater
- Turn the control knob to the 'OFF' position.
- Close the valve on the propane tank.
- Allow the heater to cool completely before moving or storing.
6. Maintenance
6.1. Cleaning
- Always ensure the heater is off and completely cool before cleaning.
- Wipe exterior surfaces with a soft, damp cloth. Do not use abrasive cleaners or solvents.
- Periodically inspect the burner and flame screen for debris. Clean gently with a soft brush if necessary.
- Clean the quartz glass tube with a glass cleaner and a soft cloth when cool.
6.2. Storage
- Disconnect the propane tank and store it in a well-ventilated area, away from direct sunlight and heat sources.
- Remove the 5AA battery from the ignition system if the heater will not be used for an extended period.
- Cover the heater with a protective cover to shield it from weather and dust.
- Store the heater in a dry, sheltered location.

Figure 6.1: Key Features for Maintenance. This image shows the stainless steel burner, magnetic door for gas tank access, and the sturdy protective guard.
7. Troubleshooting
| Problem | Possible Cause | Solution |
|---|---|---|
| Heater will not ignite | No gas flow; Ignition battery dead or incorrectly installed; Air in gas line; Thermocouple not heating. | Check propane tank level and valve; Replace 5AA battery; Purge air from gas line by attempting ignition several times; Hold ignition button longer after ignition. |
| Flame goes out during operation | Low gas pressure; Heater tilted; Strong wind; Thermocouple issue. | Check propane tank level; Ensure heater is upright and stable; Relocate heater to a less windy area; Contact customer support if thermocouple is suspected. |
| Low heat output | Low gas pressure; Control knob set too low. | Check propane tank level; Adjust control knob to a higher setting. |
| Smell of gas | Gas leak. | Immediately turn off gas supply at the tank. Do not operate. Perform a leak test with soapy water. If leak persists, contact customer support. |
8. Specifications
| Feature | Detail |
|---|---|
| Model Number | TS48SR4 |
| Brand | EAST OAK |
| Heat Output | 48,000 BTU (Max) |
| Fuel Type | Propane Gas (20lb tank recommended) |
| Ignition Type | One-Button Pulse Ignition (requires 5AA battery) |
| Safety Features | CSA Certified, Anti-Tip Protection, Flame-Out Protection |
| Construction Material | Powder-Coated Aluminum Exterior, 304 Stainless Steel Burner, Quartz Glass Tube |
| Product Dimensions (D x W x H) | 20.63" x 20.63" x 91.3" |
| Item Weight | 69.5 lbs |
| Heating Coverage | Up to 10-foot diameter |
9. Warranty and Support
For warranty information or technical support, please refer to the warranty card included with your product or visit the official EAST OAK website. You may also contact customer service directly for assistance with product issues, replacement parts, or general inquiries.
Contact Information: Please refer to your purchase documentation or the manufacturer's website for the most current customer support contact details.


