1. Introduction
Thank you for choosing the Cozy Castle Large Record Player Stand. This versatile mid-century modern cabinet is designed to enhance your living space while providing organized storage for your vinyl records, audio components, and other media. It can function as a record player stand, vinyl storage cabinet, cube organizer, bookcase, or display cabinet, seamlessly blending with various decor styles.
This manual provides detailed instructions for assembly, setup, operation, and maintenance to ensure you get the most out of your new furniture. Please read all instructions carefully before beginning assembly.

Figure 1.1: The Cozy Castle Large Record Player Stand, fully assembled and in use, showcasing its storage capabilities for vinyl records and audio equipment.
2. Safety Information
Please observe the following safety precautions to prevent injury or damage to the product:
- Read All Instructions: Ensure you understand all assembly steps before proceeding.
- Keep Children Away: Small parts can be a choking hazard. Keep children and pets away during assembly.
- Use Proper Tools: Use only the tools specified or recommended in the assembly guide.
- Two-Person Assembly: For safety and ease, it is recommended that two people assemble this unit.
- Anti-Tip Kit: Always install the included anti-tip parts to secure the cabinet to a wall, especially in homes with children or pets, to prevent tipping.
- Weight Limits: Do not exceed the specified weight limits for shelves (25 lbs per cube) and the console top (100 lbs). Overloading can cause instability and damage.
- Electrical Safety: When using the built-in power outlet, ensure all connected devices are within the specified voltage and current limits (125V/12A). Do not overload the power strip.
3. Package Contents
Before assembly, verify that all parts listed below are present and undamaged. If any parts are missing or damaged, please contact customer support.
- Wooden Panels (various sizes, numbered)
- Assembly Hardware (screws, dowels, cam locks, etc.)
- Legs (4-6 depending on design)
- Anti-Tip Kit (wall anchor, strap, screws)
- 3AC Power Strip with 6.6 ft Power Cord
- Instruction Manual

Figure 3.1: The main structure of the record player stand, empty, illustrating the various compartments and overall design.
4. Assembly Instructions
Follow the numbered steps provided in the included assembly guide. It is recommended to assemble the unit on a soft, clean surface to prevent scratches.
- Unpack and Identify: Carefully unpack all components and lay them out. Identify each part using the numbered labels and the parts list in the separate assembly guide.
- Assemble Main Frame: Begin by connecting the main horizontal and vertical panels as indicated in the step-by-step diagrams. Ensure all cam locks and screws are tightened securely.
- Install Shelves: Insert the internal shelves into their designated slots.
- Attach Legs: Securely attach the four sturdy legs to the bottom of the cabinet using the provided hardware.
- Install Power Strip: Place the 3AC power strip into the designated cube on the upper right. Route the power cord through the perforated hole for cable management.
- Attach Anti-Tip Kit: For safety, attach the anti-tip kit to the back of the cabinet and secure it to a wall stud using appropriate wall anchors.
Once assembled, ensure the stand is stable and level before placing any items on it.
5. Setup and Placement
After assembly, position your record player stand in its desired location. Consider the following for optimal setup:
- Level Surface: Ensure the stand is placed on a flat, level surface to prevent wobbling and ensure the stability of your record player.
- Component Placement:
- The deep turntable table (console top) is ideal for your record player and stereo speakers (up to 100 lbs).
- The upper cubbies are suitable for CDs, DVDs, or 7" EPs (approx. 200 units).
- The front flip bin and lower cubbies are designed for vertical storage of LPs (approx. 300 units).
- The cube with the built-in outlet is perfect for receivers, amplifiers, or other audio components requiring power.
- Cable Management: Utilize the perforated holes in the back of the power strip cube for neat and organized cable routing.

Figure 5.1: The stand configured with a record player, amplifier, and various media, highlighting its functional design.
6. Operating the Built-in Outlet
Your Cozy Castle Record Player Stand includes a convenient 3AC power strip to power your audio equipment directly from the unit.
- Connect to Wall Outlet: Plug the 6.6 ft power cord from the stand's built-in power strip into a standard 125V wall outlet.
- Plug in Devices: Connect your record player, amplifier, speakers, or other electronic devices to the 3 AC outlets on the power strip.
- Power Rating: The power strip is rated for 125V/12A. Do not exceed this maximum load to prevent electrical hazards.
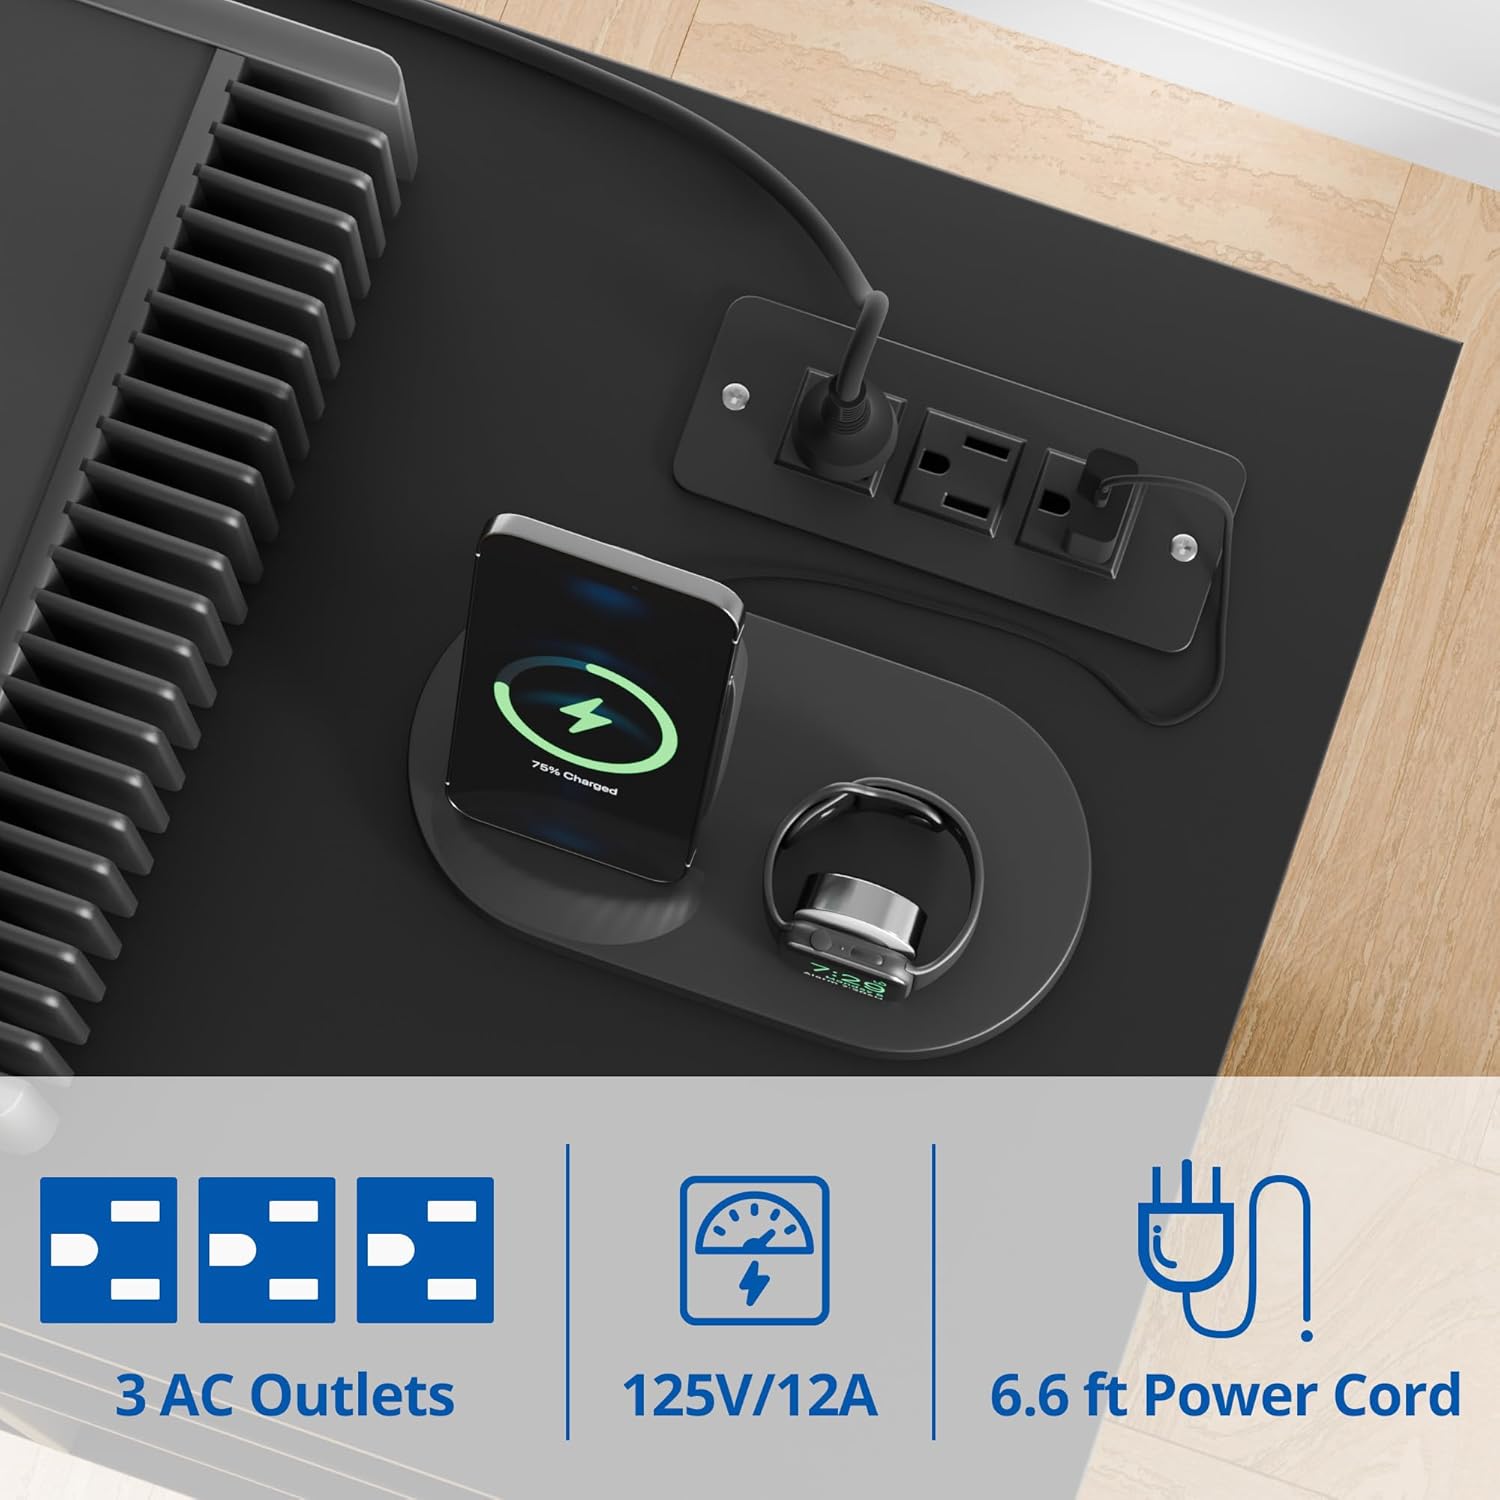
Figure 6.1: Detail of the integrated power strip with three AC outlets, providing convenient power access for your devices.
7. Maintenance and Care
To keep your Cozy Castle Record Player Stand in excellent condition:
- Cleaning: Wipe clean with a damp towel. Avoid harsh chemicals or abrasive cleaners, which can damage the finish.
- Dusting: Regularly dust the surfaces to prevent buildup, especially around electronic components.
- Spills: Immediately wipe up any spills to prevent water damage or staining.
- Check Connections: Periodically check all screws and connections to ensure they remain tight and secure.
8. Troubleshooting
If you encounter any issues with your record player stand, refer to the following common solutions:
| Problem | Possible Cause | Solution |
|---|---|---|
| Stand is wobbly/unstable. | Loose connections; uneven floor; anti-tip kit not installed. | Ensure all screws and cam locks are tightened. Move to a level surface or use shims. Install the anti-tip kit securely to a wall stud. |
| Power outlets not working. | Power cord not fully plugged in; wall outlet issue; overloaded circuit. | Check that the stand's power cord is fully inserted into a working wall outlet. Test the wall outlet with another device. Reduce the number of devices plugged into the power strip if overloaded. |
| Difficulty assembling. | Incorrect part orientation; missing hardware. | Refer to the numbered diagrams in the separate assembly guide. Ensure parts are oriented correctly. Verify all hardware is present. Contact customer support if parts are missing. |
9. Specifications
Key specifications for the Cozy Castle Large Record Player Stand:
| Feature | Detail |
|---|---|
| Brand | Cozy Castle |
| Model | Large Record Player Stand |
| Color | Black |
| Overall Dimensions (D x W x H) | 15.7"D x 44.9"W x 38"H (39.8cm D x 114cm W x 88.9cm H) |
| Product Weight | 69.7 lbs |
| Console Top Weight Limit | 100 lbs |
| Each Cube Weight Limit | 25 lbs |
| LP Storage Capacity (Front Flip Bin & Lower Cubbies) | Approx. 300 LPs (vertically) |
| CD/DVD/7" EP Storage Capacity (Upper Cubbies) | Approx. 200 units |
| Power Strip | 3 AC Outlets, 125V/12A, 6.6 ft Power Cord |
| Special Feature | Anti-Tipping Parts Included |

Figure 9.1: Detailed dimensions of the record player stand, including height, width, depth, and internal compartment measurements.
10. Warranty and Support
Cozy Castle is committed to providing high-quality products and excellent customer service. While specific warranty details are not provided in this manual, please retain your proof of purchase for any warranty claims.
For any questions, missing parts, assembly assistance, or troubleshooting not covered in this manual, please contact Cozy Castle Customer Support. You can typically find contact information on the product packaging or the retailer's website where you purchased the item.
Customer Support: Refer to your purchase documentation or the Cozy Castle brand store on Amazon for contact details. Visit the Cozy Castle Store on Amazon.
11. Product Videos
No official product videos from the seller were found that meet the embedding criteria for this manual. Please refer to the product page for any available media.