1. Important Safety Information
Please read and understand all instructions before assembly and use. Retain this manual for future reference.
- Always follow the assembly instructions carefully.
- Use appropriate safety gear when handling heavy parts or using tools.
- Ensure the cabinet is securely mounted to the wall using the provided wall anchor kit to prevent tipping. This is crucial for safety, especially in households with children or pets.
- Do not overload shelves or drawers. Refer to the specifications for weight limits.
- Keep small parts away from children during assembly.
2. Included Components
Verify that all components are present before beginning assembly. If any parts are missing or damaged, please contact customer support.
- 1 x JXQTLINGMU 72" Tall Storage Cabinet
- 1 x Instruction Manual (this document)
- 1 x Hardware Pack (screws, dowels, cam locks, etc.)
- 1 x Wall Anchor Kit (straps, screws, wall plugs)
3. Product Specifications
| Brand | JXQTLINGMU |
| Model Name | LM033-304DLB |
| Product Dimensions | 30"W x 15.55"D x 72"H (76.2cm W x 39.5cm D x 182.9cm H) |
| Drawer Size | 27"W x 12"D x 3.5"H (68.6cm W x 30.5cm D x 8.9cm H) |
| Color | Rustic Brown |
| Material | Engineered Wood (P2 MDF) |
| Number of Shelves | 6 (4 adjustable) |
| Door Shelves | 8 (2 adjustable) |
| Special Features | Adjustable Shelves, Door Shelves, Mid Sliding Drawer, Magnetic Catches, Wall Anchor Kit |
| Assembly Required | Yes |

Figure 3.1: Detailed product dimensions and individual shelf weight capacities. Note the 100 lbs capacity for bottom shelves and 50 lbs for middle shelves, with door shelves supporting up to 35 lbs.
4. Assembly Instructions
Assembly typically requires two people and can take several hours. Follow the step-by-step diagrams provided in the separate assembly booklet included in the hardware pack. Ensure all parts are correctly oriented before tightening fasteners.
4.1. Preparation
- Clear a spacious, clean, and soft area (e.g., carpet) to prevent scratching the cabinet parts.
- Unpack all components and hardware. Organize them by their labels.
- Gather necessary tools (e.g., screwdriver, hammer).
4.2. Step-by-Step Assembly
- Begin by assembling the main frame of the cabinet, connecting the side panels to the base and top panels using the provided hardware.
- Install the fixed shelves as indicated in the diagrams.
- Assemble the drawer components and install the drawer slides into the cabinet frame. Insert the completed drawer.
- Attach the door hinges to the cabinet frame and then to the doors. Ensure doors are aligned correctly.
- Install the door handles and magnetic catches.
- Insert the adjustable shelves into the desired positions using the shelf pins.
- Attach the door shelves to the inside of the cabinet doors.
- Secure the cabinet to the wall using the provided wall anchor kit. This step is mandatory for stability and safety.
Video 4.1: Official product video demonstrating the features and assembly process of the JXQTLINGMU Kitchen Pantry Storage Cabinet. This video provides a visual guide to the cabinet's functionality and construction.
5. Operating Instructions
This cabinet is designed for versatile storage in various rooms.
5.1. Adjustable Shelves
- The cabinet features 4 adjustable main shelves and 2 adjustable door shelves.
- To adjust a shelf, remove all items from the shelf. Carefully lift the shelf and remove the four shelf pins supporting it. Reinsert the pins into the desired holes at the new height, ensuring they are level, then place the shelf back onto the pins.
- This allows for customized storage to accommodate items of different sizes, from small spices to larger appliances.

Figure 5.1: The mid-storage drawer and adjustable shelves allow for customized organization of various items, from cutlery to small appliances.
5.2. Door Shelves
- The cabinet includes 8 door shelves, ideal for neatly storing smaller items such as spices, cans, or condiments.
- Two of these door shelves are adjustable, providing flexibility for taller items.
- Ensure sufficient clearance when closing the doors, especially if items on the main shelves are deep.

Figure 5.2: The door shelves feature a magnetic lock for secure closure and can hold up to 35 lbs, perfect for organizing small items.
5.3. Mid Storage Drawer
- A smooth-gliding drawer is located in the middle section of the cabinet, providing convenient storage for cutlery, utensils, or other small accessories.
- Pull the handle gently to open and push to close. Avoid forcing the drawer.
5.4. Magnetic Catches
- The cabinet doors are equipped with magnetic catches to ensure they remain securely closed when not in use.
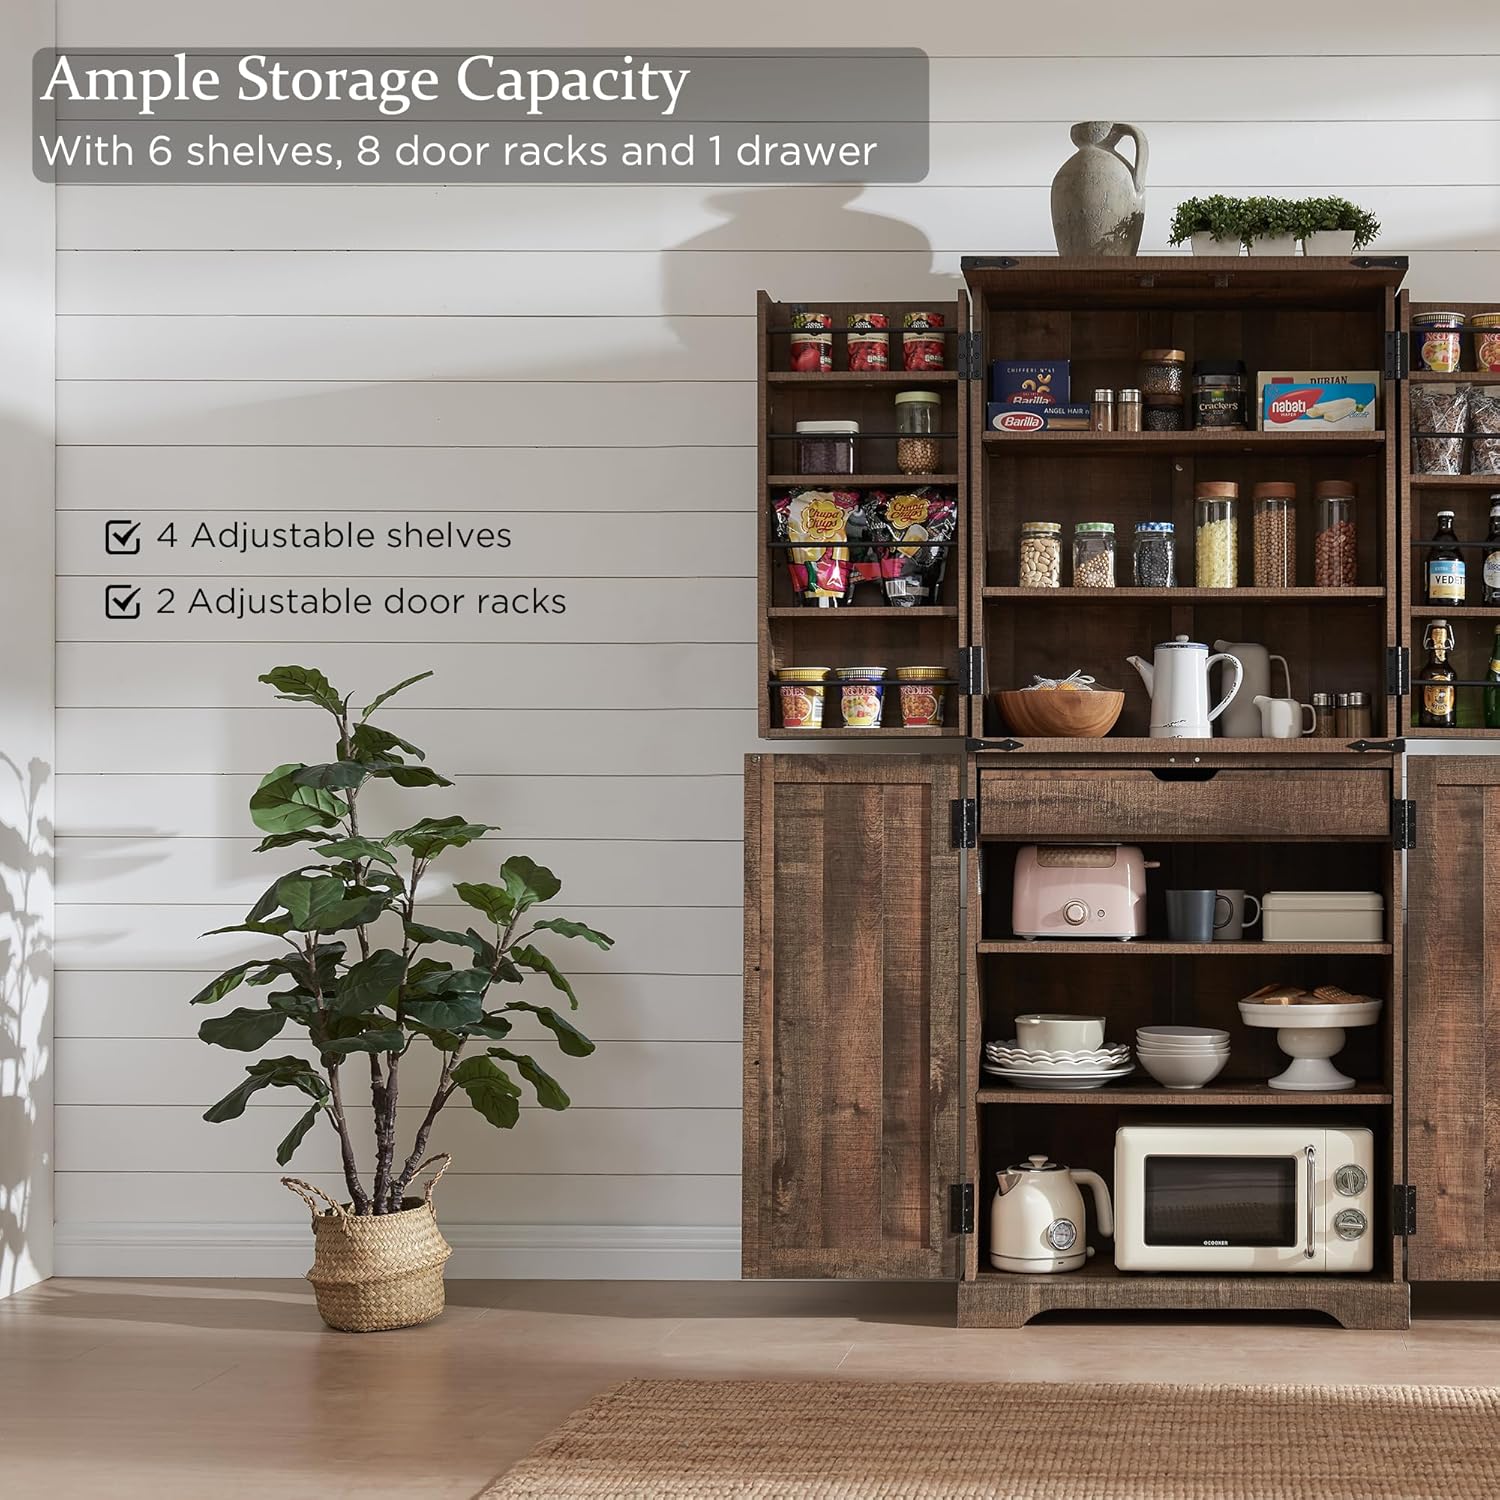
Figure 5.3: The cabinet offers ample storage capacity with 6 main shelves (4 adjustable) and 8 door racks (2 adjustable), providing versatile organization.
6. Maintenance
Proper care will extend the life and appearance of your cabinet.
- Cleaning: Wipe surfaces with a soft, damp cloth. Avoid using harsh chemicals, abrasive cleaners, or polishes that may damage the finish.
- Spills: Promptly wipe up any spills to prevent moisture damage, especially since the painted MDF surface is designed to be waterproof and humidity resistant.
- Hardware: Periodically check all screws and fasteners to ensure they are tight. Re-tighten if necessary to maintain structural integrity.
- Wall Anchor: Regularly inspect the wall anchor kit to ensure it remains securely attached to both the cabinet and the wall.
- Placement: Avoid placing the cabinet in direct sunlight or near heat sources to prevent warping or fading.
7. Troubleshooting
If you encounter any issues with your cabinet, refer to the following common solutions:
| Problem | Possible Cause | Solution |
|---|---|---|
| Cabinet feels wobbly or unstable. | Loose fasteners; uneven floor; wall anchor not properly installed. | Ensure all assembly screws are tightened. Check if the floor is level; use shims if necessary. Verify the wall anchor kit is correctly installed and secured to a wall stud or appropriate anchor. |
| Drawer does not slide smoothly. | Drawer slides misaligned; obstruction in the track; incorrect assembly. | Check that the drawer slides are installed correctly and are free of debris. Ensure the drawer itself is assembled squarely. Re-lubricate slides if needed. |
| Doors do not close properly or are misaligned. | Hinges are loose or misaligned; cabinet frame is not square. | Adjust the door hinges according to the instructions in the assembly manual. Ensure the cabinet is assembled squarely and all frame connections are tight. |
| Visible scratches or blemishes. | Damage during assembly or transit. | Contact customer support for assistance if the damage is significant upon arrival. For minor scratches, touch-up pens or furniture markers matching the rustic brown finish may be used. |
8. Warranty and Support
JXQTLINGMU Furniture is committed to providing quality products and customer satisfaction.
- This product is covered by a manufacturer's warranty against defects in materials and workmanship. Please refer to the purchase documentation for specific warranty terms and duration.
- For any questions, missing parts, assembly assistance, or warranty claims, please contact JXQTLINGMU customer support. Have your model number (LM033-304DLB) and purchase information ready.
- Our dedicated support team ensures a satisfactory solution to any issues you may encounter.