1. Safety Information
Always use both hands when operating the Murphy bed mechanism to prevent injury. Do not exceed the maximum weight capacity of 600 lbs to ensure the bed's stability and safety.
Ensure all fasteners are securely tightened before use. Periodically check and re-tighten fasteners as needed.
Keep children and pets away from the bed during conversion between chest and bed configurations.
2. Product Overview
The Hlivelood Full Size Murphy Chest Bed is a versatile furniture piece designed to optimize space. It functions as a decorative chest or storage unit when folded, and converts into a full-size bed when unfolded. This unit includes integrated storage and a charging station for convenience.
Key Features:
- Multi-Functional Design: Converts from a compact chest to a full-size bed, suitable for living rooms, home offices, or guest rooms.
- Extra Storage Space: Features a large bottom drawer with metal handles for storing pillows, bedding, books, or apparel. The cabinet's internal space accommodates a foldable mattress.
- Convenient Charging Station: Includes 2 USB ports and 2 power outlets for charging electronic devices.
- Sturdy Frame: Constructed with a reinforced framing structure for stability. Smooth rails facilitate easy bed extension and retraction, with a device to secure the frame.
3. Specifications
| Specification | Detail |
|---|---|
| Size | Full |
| Product Dimensions (L x W x H) | 76.3" x 55.3" x 41" |
| Special Feature | No Box Spring Needed |
| Color | Black |
| Finish Type | Polished |
| Included Components | Drawer |
| Compatible Mattress Size | Full |
| Item Weight | 206 pounds |
| Assembly Required | Yes |
Note: Mattress not included.
4. Setup and Assembly
Assembly of the Murphy Chest Bed requires careful attention to the provided instructions. It is recommended to have two people for assembly. All necessary tools and hardware are included and labeled.
Assembly Video Guide:
Official assembly video for the Hlivelood Full Size Murphy Bed. This video provides a detailed, step-by-step visual guide for the entire assembly process.
General Assembly Steps:
- Unpack and Identify Parts: Carefully unpack all components and hardware. Verify that all parts listed in the manual are present and undamaged.
- Assemble Base Frame: Begin by attaching the drawer slides to the designated side panels. Secure these panels to the base using the provided dowels and screws.
- Construct Side Panels: Attach the remaining side panels and support beams, ensuring all connections are firm.
- Install Charging Station: Integrate the charging station into its designated cutout on the side panel, securing it with screws.
- Attach Bed Slats/Panels: Secure the folding bed panels to the main frame using hinges and screws. Ensure smooth operation of the folding mechanism.
- Install Drawer Components: Assemble the drawer box and attach the drawer handles. Insert the completed drawer into the base frame.
- Final Checks: Confirm all screws and fasteners are tight. Test the bed conversion mechanism to ensure it operates smoothly and locks securely in both positions.
Refer to the detailed instruction booklet included in your packaging for specific diagrams and step-by-step guidance.
5. Operating Instructions
Converting from Chest to Bed:
- Open Bottom Drawer: Pull out the large bottom drawer to its full extension.
- Unlock Top Cover: Release the latches on the top cover of the chest.
- Unfold Bed Frame: Gently pull the front panel of the chest outwards. The bed frame will unfold and extend.
- Position Mattress: Place your full-size foldable mattress onto the unfolded bed frame.

Image illustrating the five steps to convert the Murphy chest bed from its cabinet form to a full-size bed.
Converting from Bed to Chest:
- Remove Mattress: Take the mattress off the bed frame.
- Fold Bed Frame: Lift the bed frame from the foot end and gently push it inwards until it folds back into the chest.
- Secure Top Cover: Close the top cover and ensure the latches are engaged.
- Close Bottom Drawer: Push the bottom drawer back into the chest.
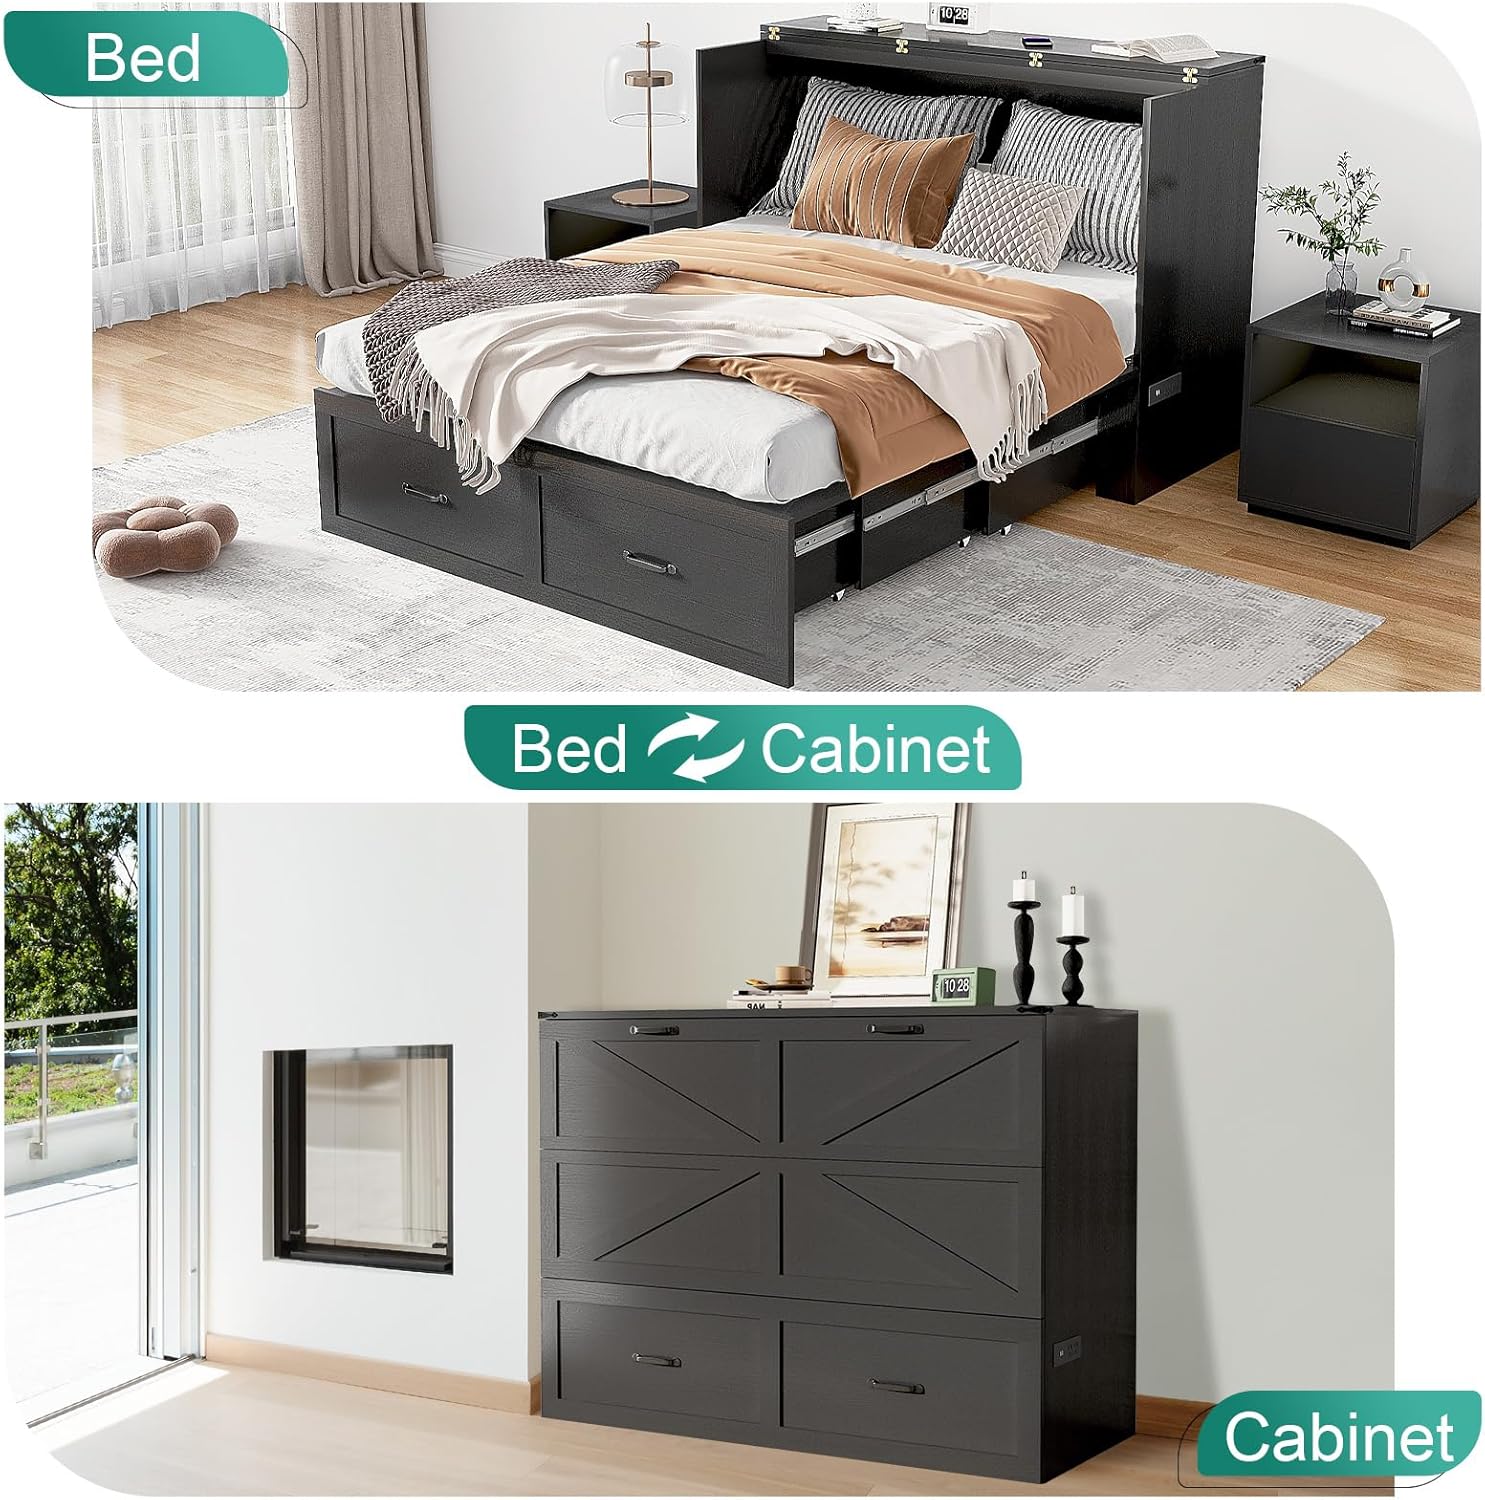
Image showing the Murphy bed in both its bed and cabinet forms, highlighting its space-saving design.
Using the Charging Station:
The integrated charging station is located on the side of the chest. Plug the bed's power cord into a wall outlet. You can then use the 2 USB ports and 2 AC power outlets to charge your devices.

Image detailing the charging station with 2 USB ports and 2 AC outlets, along with its 6.5-foot power cord.
6. Maintenance
- Cleaning: Wipe surfaces with a soft, damp cloth. Avoid harsh chemicals or abrasive cleaners that may damage the finish.
- Hardware Check: Periodically inspect all screws, bolts, and hinges for tightness. Re-tighten any loose hardware to maintain stability and safety.
- Mechanism Lubrication: If the folding mechanism becomes stiff, apply a small amount of silicone-based lubricant to the moving parts.
- Drawer Maintenance: Keep the drawer tracks clean and free of debris to ensure smooth operation.
7. Troubleshooting
Common Issues and Solutions:
- Bed does not fold/unfold smoothly:
Solution: Check for any obstructions in the mechanism. Ensure all hinges and slides are properly aligned and lubricated. Verify that all assembly screws are tight. - Drawer sticks or is difficult to open/close:
Solution: Inspect the drawer slides for debris or damage. Clean the tracks and apply a silicone lubricant if necessary. Ensure the drawer is correctly aligned on its tracks. - Charging station not working:
Solution: Confirm the bed's main power cord is securely plugged into a functional wall outlet. Check the power strip for any tripped breakers or loose connections. Test with a different device to rule out device-specific issues. - Unit feels unstable or wobbly:
Solution: Re-check all assembly points and tighten any loose screws or bolts. Ensure the unit is placed on a flat, level surface.
8. Warranty and Support
This Hlivelood product is covered by a manufacturer's warranty against defects in materials and workmanship. For specific warranty details, including duration and coverage, please refer to the warranty card included with your purchase or contact Hlivelood customer support.
For technical assistance, replacement parts, or any other inquiries, please contact Hlivelood customer support through the retailer's platform or the official Hlivelood website.